一. 介绍
平时工作中可能会碰到排查多线程的bug,而在排查的时候,如果线程(单个线程或者是线程池的线程)没有一个比较明确的名称,那么在排查的时候就比较头疼,因为排查问题首先需要找出“问题线程”,如果连“问题线程”都找不到,就很难找出问题原因,本文就针对多线程中涉及到的线程池、线程组、线程名称,介绍如果对其进行设置名称,方便排查问题时快速定位。
二. 设置线程名称
2.1 使用Thread+Runnable接口形式
如果是使用实现Runnable接口,然后使用Thread构造器来直接创建线程时,有两种方式设置线程名称:
1.在调用Thread的构造器时,传入第二个参数即可,构造器定义如下
Thread Thread(Runnable target, String threadName)
2.调用Thread对象的setName方法,设置线程名称即可;
上面两种方法的示例代码如下:
package cn.ganlixin;

import lombok.extern.slf4j.Slf4j;
import org.junit.Test;

@Slf4j
public class DefineThreadName {

    /**
     * 不设置线程名称,使用默认的线程名称
     */
    @Test
    public void defaultThreadName() {
        new Thread(() -> {
            String threadName = Thread.currentThread().getName();
            String threadGroupName = Thread.currentThread().getThreadGroup().getName();
            long threadId = Thread.currentThread().getId();
            log.info("threadName:{}, threadGroupName:{}, threadId:{}", threadName, threadGroupName, threadId);
        }).start();
        // 输出 threadName:Thread-1, threadGroupName:main, threadId:13
    }

    /**
     * 自定义线程的名称
     */
    @Test
    public void customThreadName() {
        // 方式一:指定Thread构造方法的第二个参数,也就是线程的名称
        new Thread(() -> {
            String threadName = Thread.currentThread().getName();
            String threadGroupName = Thread.currentThread().getThreadGroup().getName();
            long threadId = Thread.currentThread().getId();
            log.info("threadName:{}, threadGroupName:{}, threadId:{}", threadName, threadGroupName, threadId);
        }, "my-custom-thread-name-1").start();

        // 输出 threadName:my-custom-thread-name-1, threadGroupName:main, threadId:13

        // 方式二:使用Thread对象的setName方法,设置线程名称
        Thread thread = new Thread(() -> {
            String threadName = Thread.currentThread().getName();
            String threadGroupName = Thread.currentThread().getThreadGroup().getName();
            long threadId = Thread.currentThread().getId();
            log.info("threadName:{}, threadGroupName:{}, threadId:{}", threadName, threadGroupName, threadId);
        });
        thread.setName("my-custom-thread-name-2");
        thread.start();
        // 输出 threadName:my-custom-thread-name-2, threadGroupName:main, threadId:14
    }
}
2.2 继承Thread类的形式
如果是继承Thread类,那么可以在子类中调用Thread仅接受一个字符串作为线程名称的构造器,像下面这么做:
package cn.ganlixin;

import lombok.extern.slf4j.Slf4j;
import org.junit.Test;

@Slf4j
public class DefineThreadName {

    /**
     * 自定义的继承自Thread的线程类
     */
    private static class MyThread extends Thread {
        private MyThread(String threadName) {
            super(threadName); // Thread有一个构造器接收一个字符串类型的参数,作为线程名称
        }

        @Override
        public void run() {
            // 因为继承自Thread,所以下面可以直接调用这些方法,而不需要通过Thread.currentThread()获取当前线程
            String threadName = getName();
            String threadGroupName = getThreadGroup().getName();
            long threadId = getId();
            log.info("threadName:{}, threadGroupName:{}, threadId:{}", threadName, threadGroupName, threadId);
        }
    }

    /**
     * 测试设置、更改线程名称
     */
    @Test
    public void testInheritThread() {
        MyThread t1 = new MyThread("my-extends-thread-name-1");
        t1.start();
        // 输出 threadName:my-extends-thread-name-1, threadGroupName:main, threadId:13

        MyThread t2 = new MyThread("my-extends-thread-name-2");
        t2.setName("changed-thread-name"); // 手动修改线程名称
        t2.start();
        // 输出 threadName:changed-thread-name, threadGroupName:main, threadId:14
    }
}
三. 设置线程组的名称
线程组名称需要在创建线程组的时候进行指定,然后使用线程组的时候将线程组作为Thread类的构造器参数传入即可,示例代码如下:
package cn.ganlixin.name;

import lombok.extern.slf4j.Slf4j;
import org.junit.Test;

@Slf4j
public class ThreadGroupName {

    @Test
    public void defineThreadGroupName() {
        // 定义一个线程组,传入线程组的名称(自定义)
        ThreadGroup threadGroup = new ThreadGroup("my-thread-group-name");

        Runnable runnable = () -> {
            String threadGroupName = Thread.currentThread().getThreadGroup().getName();
            String threadName = Thread.currentThread().getName();
            long threadId = Thread.currentThread().getId();

            log.info("threadGroupName:{}, threadName:{}, threadId:{}", threadGroupName, threadName, threadId);
        };

        Thread t1 = new Thread(threadGroup, runnable);
        t1.start();
        // 输出 threadGroupName:my-thread-group-name, threadName:Thread-1, threadId:13

        // 第三个参数是线程名称
        Thread t2 = new Thread(threadGroup, runnable, "my-thread-name");
        t2.start();
        // threadGroupName:my-thread-group-name, threadName:my-thread-name, threadId:14
    }
}
四. 设置线程池名称
4.1 创建线程池的两种途径
创建线程池,有两种方式:
1.实例化ThreadPoolExecutor来创建线程池,可以指定相关的参数,方法定义如下:

2.使用Executors的静态方法创建线程池,实际是对ThreadPoolExecutor对象的创建过程进行了封装,可用的方法定义如下:
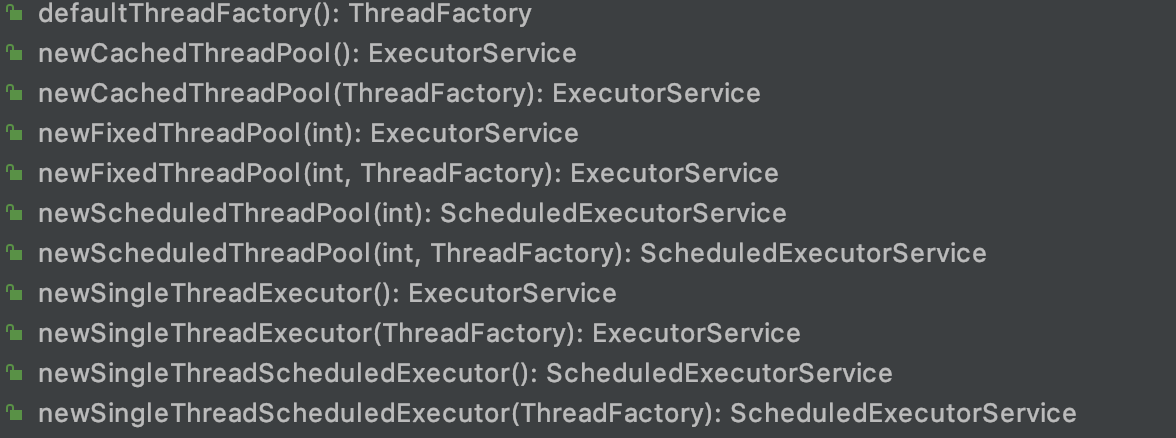
上面的诸多定义中,提到了一个ThreadFactory,“线程工厂”,这是一个接口,定义了创建线程的统一规范,实现类需要重写newThread方法,定义如下:
package java.util.concurrent;

public interface ThreadFactory {
    Thread newThread(Runnable r);
}
当我们调用Executors或者使用ThreadPoolExecutor来创建线程池,如果没有指定ThreadFactory,那么就会使用默认的Executors.DefaultThreadFactory:
static class DefaultThreadFactory implements ThreadFactory {
    private static final AtomicInteger poolNumber = new AtomicInteger(1);
    private final ThreadGroup group;
    private final AtomicInteger threadNumber = new AtomicInteger(1);
    private final String namePrefix;

    DefaultThreadFactory() {
        SecurityManager s = System.getSecurityManager();
        group = (s != null) ? s.getThreadGroup() :
                              Thread.currentThread().getThreadGroup();
        namePrefix = "pool-" +
                      poolNumber.getAndIncrement() +
                     "-thread-";
    }

    public Thread newThread(Runnable r) {
        Thread t = new Thread(group, r,
                              namePrefix + threadNumber.getAndIncrement(),
                              0);
        if (t.isDaemon())
            t.setDaemon(false);
        if (t.getPriority() != Thread.NORM_PRIORITY)
            t.setPriority(Thread.NORM_PRIORITY);
        return t;
    }
}
如果我们要对线程池中的线程创建进行扩展,那么实现ThreadFactory接口,加入自己的扩展即可,此处对于线程池中线程的名称进行设置,也是可以在这里实现。
4.2 自定义线程工厂(ThreadFactory)
自己实现ThreadFactory接口,可以参考Executors.DefaultThreadFactory,做一下细微的修改就行了,下面是我创建的NameableThreadFactory,意为“可命名的线程工厂”:
package cn.ganlixin.name;

import org.apache.commons.lang3.StringUtils;

import java.util.Objects;
import java.util.concurrent.ThreadFactory;
import java.util.concurrent.atomic.AtomicInteger;

/**
 * 描述:
 * 参照Executors.DefaultThreadFactory,自定义ThreadFactory实现类
 *
 * @author ganlixin
 * @create 2020-05-23
 */
public class NameableThreadFactory implements ThreadFactory {
    /**
     * 对线程池的数量进行计数,注意是类属性
     */
    private static final AtomicInteger poolNumber = new AtomicInteger(1);

    /**
     * 线程组名称
     */
    private ThreadGroup group;

    /**
     * 对线程池中的线程数据进行计数,注意是实例属性
     */
    private final AtomicInteger threadNumber = new AtomicInteger(1);

    /**
     * 线程名称的前缀
     */
    private String namePrefix;

    /**
     * Executors.DefaultThreadFactory中默认的方式(设置线程组、线程名称前缀)
     */
    public NameableThreadFactory() {
        SecurityManager s = System.getSecurityManager();
        group = (s != null) ? s.getThreadGroup() : Thread.currentThread().getThreadGroup();
        namePrefix = "pool-" + poolNumber.getAndIncrement() + "-thread-";
    }

    /**
     * 创建线程工厂,指定线程名称前缀
     *
     * @param threadNamePrefix 线程名称前缀
     */
    public NameableThreadFactory(String threadNamePrefix) {
        if (StringUtils.isBlank(threadNamePrefix)) {
            throw new IllegalArgumentException("线程名称的前缀不能为空");
        }

        // 线程组,仍旧使用旧规则
        SecurityManager s = System.getSecurityManager();
        group = (s != null) ? s.getThreadGroup() : Thread.currentThread().getThreadGroup();

        // 指定线程的名称前缀,设置为传入的名称前缀
        this.namePrefix = threadNamePrefix + "-";
    }

    /**
     * 创建线程工厂,指定线程组、以及线程名称前缀
     *
     * @param threadGroup      线程组实例
     * @param threadNamePrefix 线程名称前缀
     */
    public NameableThreadFactory(ThreadGroup threadGroup, String threadNamePrefix) {
        if (Objects.isNull(threadGroup)) {
            throw new IllegalArgumentException("线程组不能为空");
        }

        if (StringUtils.isBlank(threadNamePrefix)) {
            throw new IllegalArgumentException("线程名称的前缀不能为空");
        }

        this.group = threadGroup;
        this.namePrefix = threadNamePrefix + "-";
    }

    public Thread newThread(Runnable r) {
        Thread t = new Thread(group, r, namePrefix + threadNumber.getAndIncrement(), 0);
        if (t.isDaemon()) {
            t.setDaemon(false);
        }
        if (t.getPriority() != Thread.NORM_PRIORITY) {
            t.setPriority(Thread.NORM_PRIORITY);
        }
        return t;
    }
}
进行测试,因为Executors和ThreadPoolExecutor的本质是一样的,所以这里使用Executors进行测试,只需要在用到ThreadFactory的时候,引入自己的创建NameableThreadFactory即可:
package cn.ganlixin.name;

import lombok.extern.slf4j.Slf4j;
import org.junit.Test;

import java.util.concurrent.ExecutorService;
import java.util.concurrent.Executors;

@Slf4j
public class TestNameableThreadFactory {

    @Test
    public void test() throws InterruptedException {
        ExecutorService executorService1 = Executors.newFixedThreadPool(3, new NameableThreadFactory("自定义线程池one"));

        Runnable runnable = () -> {
            String threadGroupName = Thread.currentThread().getThreadGroup().getName();
            String threadName = Thread.currentThread().getName();
            long threadId = Thread.currentThread().getId();
            log.info("threadGroupName:{}, threadName:{}, threadId:{}", threadGroupName, threadName, threadId);
        };

        for (int i = 0; i < 3; i++) {
            executorService1.submit(runnable);
        }
        // 输出
        // threadGroupName:main, threadName:自定义线程池one-1, threadId:14
        // threadGroupName:main, threadName:自定义线程池one-2, threadId:15
        // threadGroupName:main, threadName:自定义线程池one-3, threadId:16
        Thread.sleep(100);

        // 创建线程组
        ThreadGroup threadGroup = new ThreadGroup("自定义线程组one");
        ExecutorService executorService2 = Executors.newFixedThreadPool(3, new NameableThreadFactory(threadGroup, "自定义线程池two"));
        for (int i = 0; i < 3; i++) {
            executorService2.submit(runnable);
        }
        // 输出:
        // threadGroupName:自定义线程组one, threadName:自定义线程池two-1, threadId:16
        // threadGroupName:自定义线程组one, threadName:自定义线程池two-2, threadId:17
        // threadGroupName:自定义线程组one, threadName:自定义线程池two-3, threadId:18

        Thread.sleep(1000);
    }
}