JUnit - 使用断言
断言
所有的断言都包含在 Assert 类中
public class Assert extends java.lang.Object这个类提供了很多有用的断言方法来编写测试用例。只有失败的断言才会被记录。Assert 类中的一些常用的方法列式如下:
| 序号 | 方法和描述 |
| 1 | void assertEquals(boolean expected, boolean actual) 检查两个变量或者等式是否平衡 |
|
2 |
void assertTrue(boolean expected, boolean actual) 检查条件为真 |
|
3 |
void assertFalse(boolean condition) 检查条件为假 |
|
4 |
void assertNotNull(Object object) 检查对象不为空 |
|
5 |
void assertNull(Object object) 检查对象为空 |
|
6 |
void assertSame(boolean condition) assertSame() 方法检查两个相关对象是否指向同一个对象 |
|
7 |
void assertNotSame(boolean condition) assertNotSame() 方法检查两个相关对象是否不指向同一个对象 |
|
8 |
void assertArrayEquals(expectedArray, resultArray) assertArrayEquals() 方法检查两个数组是否相等 |
待测试类
 1 /**
 2  *
 3  * @author Administrator
 4  * junit测试用例类
 5  */
 6 public class Demo {
 7
 8     /**
 9      * 获取两数之和
10      * @param numOne int.
11      * @param numTwo int.
12      * @return int numOne+numTwo.
13      */
14     public int getAdd(int numOne,int numTwo) {
15         return numOne+numTwo;
16     }
17
18     /**
19      * 获取两数比较的真假
20      * @param numOne int.
21      * @param numTwo int.
22      * @return boolean numOne>numTwo.
23      */
24     public boolean getDifference(int numOne,int numTwo) {
25         return numOne>numTwo;
26     }
27
28     /**
29      * 获取一个字符串
30      * @return String.
31      */
32     public String getString() {
33         return "不提也罢";
34     }
35 }
junit测试类
 1 import static org.hamcrest.CoreMatchers.*;
 2 import static org.junit.Assert.*;//静态导入类的所有静态方法
 3 import org.junit.Test;
 4 /*junit测试类*/
 5 public class DemoTest {
 6     Demo demo = new Demo();
 7
 8     @Test
 9     public void testGetAdd() {
10         int add = demo.getAdd(2, 3);
11         assertThat(add,is(5));//变量是否等于指定值
12         assertThat(add, not(4));//变量是否不等于指定值
13     }
14
15     @Test
16     public void testGetDifference() {
17         boolean difference = demo.getDifference(3, 2);
18         assertTrue(difference);//判断真假
19     }
20
21     @Test
22     public void testGetString() {
23         String string = demo.getString();
24         //测试变量是否包含指定字符
25         assertThat(string, containsString("也"));
26         //测试变量是否已指定字符串开头
27         assertThat(string, startsWith("不"));
28         //测试变量是否以指定字符串结尾
29         assertThat(string, endsWith("罢"));
30         //测试变量是否等于指定字符串
31         assertThat(string, equalTo("不提也罢"));
32     }
33 }
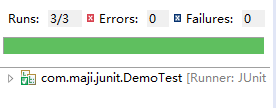
结果通过,无错误。如图:
注释
注释就好像你可以在你的代码中添加并且在方法或者类中应用的元标签。JUnit 中的这些注释为我们提供了测试方法的相关信息,哪些方法将会在测试方法前后应用,哪些方法将会在所有方法前后应用,哪些方法将会在执行中被忽略。
JUnit 中的注释的列表以及他们的含义:
| 序号 | 注释和描述 |
| 1 | @Test 这个注释说明依附在 JUnit 的 public void 方法可以作为一个测试案例。 |
| 2 | @Before 有些测试在运行前需要创造几个相似的对象。在 public void 方法加该注释是因为该方法需要在 test 方法前运行。 |
| 3 | @After 如果你将外部资源在 Before 方法中分配,那么你需要在测试运行后释放他们。在 public void 方法加该注释是因为该方法需要在 test 方法后运行。 |
| 4 | @BeforeClass 在 public void 方法加该注释是因为该方法需要在类中所有方法前运行。 |
| 5 | @AfterClass 它将会使方法在所有测试结束后执行。这个可以用来进行清理活动。 |
| 6 | @Ignore 这个注释是用来忽略有关不需要执行的测试的。 |
 1 import static org.junit.Assert.*;
 2 import org.junit.After;
 3 import org.junit.AfterClass;
 4 import org.junit.Before;
 5 import org.junit.BeforeClass;
 6 import org.junit.Ignore;
 7 import org.junit.Test;
 8
 9 public class ClassDemoTest {
10
11     //在类加载前,只执行一次
12        @BeforeClass
13        public static void beforeClass() {
14           System.out.println("类加载前");
15        }
16
17        //在类加载后,只执行一次
18        @AfterClass
19        public static void  afterClass() {
20           System.out.println("类加载后");
21        }
22
23        //在每一个测试方法执行前执行一次
24        @Before
25        public void before() {
26           System.out.println("测试方法执行前");
27        }
28
29        //在每一个测试方法执行前执行一次
30        @After
31        public void after() {
32           System.out.println("测试方法执行后");
33        }
34
35        //测试单元1
36        @Test
37        public void testCase1() {
38           System.out.println("测试单元1");
39        }
40
41        //测试单元2
42        @Test
43        public void testCase2() {
44           System.out.println("测试单元2");
45        }
46        @Ignore
47        public void testIgnore() {
48            System.out.println("Ignore");
49        }
50
51 }
执行结果如下:
