前言
Sping的生态圈已经非常大了,很多时候对Spring的理解都是在会用的阶段,想要理解其设计思想却无从下手。前些天看了某某学院的关于Spring学习的相关视频,有几篇讲到手写Spring源码,感觉有些地方还是说的挺好的,让博主对Spring的理解又多了一些,于是在业余时间也按照视频讲解实现一遍SpringIOC、DI、MVC的设计思想,加深巩固记忆,也便于初学者理解,我们不用重复造轮子,但得知道轮子怎么造。
源码放在文章末尾哦~
开发工具
环境:jdk8 + IDEA + maven
jar包:javax.servlet-2.5
实现步骤
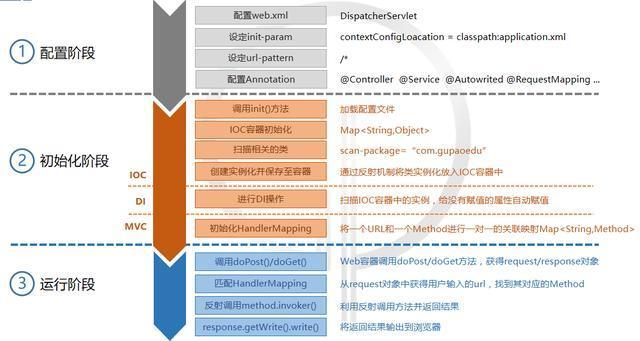
视频中这张图画得很好,我们按照这张图来概括一下实现步骤
1.配置阶段:即配置web.xml和application.properties,以及相关自定义注解;
2.初始化阶段:初始化Ioc容器,将扫描到的类实例化交给IoC容器管理,然后注入实例的各属性,接着将请求路径与执行方法的映射加载到HandlerMapping中;
3.运行阶段:由HandlerMapping根据请求路径将请求分发到指定方法,返回执行结果。
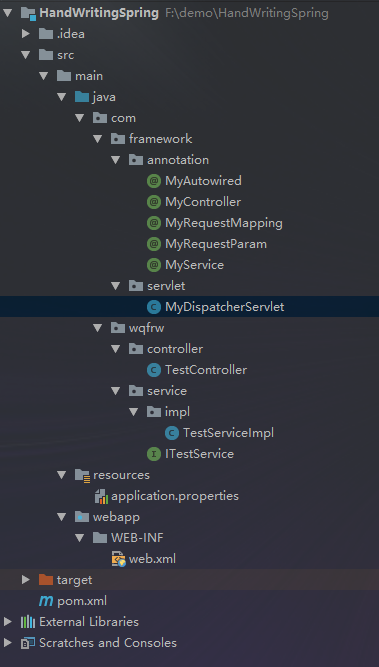
附上自己的项目结构供参考
具体实现
配置阶段
application.properties 配置扫描路径,这里为了方便,所以没有使用xml文件去解析
scanPackage=com.wqfrw
web.xml 配置Servlet和application文件的路径
<servlet>
    <servlet-name>mymvc</servlet-name>
    <servlet-class>com.framework.servlet.MyDispatcherServlet</servlet-class>
    <init-param>
        <param-name>contextConfigLocation</param-name>
        <param-value>application.properties</param-value>
    </init-param>
    <load-on-startup>1</load-on-startup>
</servlet>

<servlet-mapping>
    <servlet-name>mymvc</servlet-name>
    <url-pattern>/*</url-pattern>
</servlet-mapping>
pom.xml 引入servlet.jar
<dependency>
  <groupId>javax.servlet</groupId>
  <artifactId>servlet-api</artifactId>
  <version>2.5</version>
</dependency>
相关自定义注解
@Target(ElementType.FIELD)
@Retention(RetentionPolicy.RUNTIME)
@Documented
public @interface MyAutowired {
    String value() default "";
}

@Target(ElementType.TYPE)
@Retention(RetentionPolicy.RUNTIME)
@Documented
public @interface MyController {
    String value() default "";
}

@Target({ElementType.TYPE, ElementType.METHOD})
@Retention(RetentionPolicy.RUNTIME)
@Documented
public @interface MyRequestMapping {
    String value() default "";
}

@Target(ElementType.PARAMETER)
@Retention(RetentionPolicy.RUNTIME)
@Documented
public @interface MyRequestParam {
    String value() default "";
}

@Target({ElementType.TYPE})
@Retention(RetentionPolicy.RUNTIME)
@Documented
public @interface MyService {
    String value() default "";
}
初始化阶段
这部分的操作才是最重要的,注释我都详细的写在代码中
MyDispatcherServlet
public class MyDispatcherServlet extends HttpServlet {

    //IoC容器
    private Map<String, Object> ioc = new HashMap<>();

    //加载配置文件对象
    private Properties contextConfig = new Properties();

    //扫描到的类名带包路径
    private List<String> classNameList = new ArrayList<>();

    //url与方法的映射 也就是请求分发器
    private Map<String, Method> handlerMapping = new HashMap<>();

    @Override
    protected void doGet(HttpServletRequest req, HttpServletResponse resp) throws ServletException, IOException {
        doPost(req, resp);
    }

    @Override
    protected void doPost(HttpServletRequest req, HttpServletResponse resp) throws ServletException, IOException {
        try {
            doDispatch(req, resp);
        } catch (Exception e) {
            e.printStackTrace();
            resp.getWriter().write("500 Exception Detail:" + Arrays.toString(e.getStackTrace()));
        }
    }

    @Override
    public void init(ServletConfig config) throws ServletException {
        //加载配置文件 拿到需要扫描的包路径
        doLoadConfig(config.getInitParameter("contextConfigLocation"));

        //扫描相关的类
        doScanner(contextConfig.getProperty("scanPackage"));

        //实例化Bean到IoC容器
        doInstance();

        //依赖注入(DI)
        doAutowired();

        //初始化HandlerMapping url和对应方法的键值对
        doInitHandlerMapping();

        //初始化完成
        System.out.println("MySpring framework is init!");
    }

    /**
     * 功能描述: 接收到浏览器的请求,执行方法
     *
     * @创建人: 我恰芙蓉王
     * @创建时间: 2020年07月28日 20:54:04
     * @param req
     * @param resp
     * @return: void
     **/
    private void doDispatch(HttpServletRequest req, HttpServletResponse resp) throws Exception {
        String url = req.getRequestURI();
        String contextPath = req.getContextPath();
        url = url.replaceAll(contextPath,"");

        //根据请求路径如果没有找到对应的方法则抛出404错误
        if (!handlerMapping.containsKey(url)) {
            resp.getWriter().write("404 Not Found!");
            return;
        }

        Map<String,String[]> params = req.getParameterMap();
        Method method = handlerMapping.get(url);
        String beanName = toLowerFirstCase(method.getDeclaringClass().getSimpleName());
        //方法调用
        method.invoke(ioc.get(beanName),new Object[]{req,resp,params.get("name")[0]});
    }

    /**
     * 功能描述: 初始化HandlerMapping
     *
     * @创建人: 我恰芙蓉王
     * @创建时间: 2020年07月28日 20:56:09
     * @param
     * @return: void
     **/
    private void doInitHandlerMapping() {
        ioc.forEach((k, v) -> {
            Class<?> clazz = v.getClass();

            //加了MyController注解的类才操作
            if (clazz.isAnnotationPresent(MyController.class)) {

                String baseUrl = "";
                //如果类上面加了MyRequestMapping注解,则需要拿到url进行拼接
                if (clazz.isAnnotationPresent(MyRequestMapping.class)) {
                    MyRequestMapping annotation = clazz.getAnnotation(MyRequestMapping.class);
                    baseUrl = annotation.value();
                }

                //获取所有public修饰的方法
                Method[] methods = clazz.getMethods();
                //过滤拿到所有MyRequestMapping注解的方法,put到handlerMapping中
                String finalBaseUrl = baseUrl;
                Stream.of(methods)
                        .filter(m -> m.isAnnotationPresent(MyRequestMapping.class))
                        .forEach(m -> {
                            MyRequestMapping annotation = m.getAnnotation(MyRequestMapping.class);
                            String url = (finalBaseUrl + annotation.value()).replaceAll("/+", "/");
                            handlerMapping.put(url, m);
                        });
            }

        });
    }

    /**
     * 功能描述: 依赖注入(DI)
     *
     * @创建人: 我恰芙蓉王
     * @创建时间: 2020年07月28日 20:55:57
     * @param
     * @return: void
     **/
    private void doAutowired() {
        //循环IoC容器中所管理的对象 注入属性
        ioc.forEach((k, v) -> {
            //拿到bean所有的字段 包括private、public、protected、default
            Field[] Fields = v.getClass().getDeclaredFields();
            //过滤拿到所有加了MyAutowired注解的字段并循环注入
            Stream.of(Fields)
                    .filter(f -> f.isAnnotationPresent(MyAutowired.class))
                    .forEach(f -> {

                        MyAutowired annotation = f.getAnnotation(MyAutowired.class);
                        String beanName = annotation.value().trim();
                        if ("".equals(beanName)) {
                            beanName = f.getType().getName();
                        }

                        //强制访问
                        f.setAccessible(true);

                        try {
                            //赋值
                            f.set(v, ioc.get(beanName));
                        } catch (IllegalAccessException e) {
                            e.printStackTrace();
                        }
                    });
        });
    }

    /**
     * 功能描述: 实例化bean至IoC容器
     *
     * @创建人: 我恰芙蓉王
     * @创建时间: 2020年07月28日 20:55:39
     * @param
     * @return: void
     **/
    private void doInstance() {
        classNameList.forEach(v -> {
            try {
                Class<?> clazz = Class.forName(v);

                //只初始化加了MyController注解和MyService注解的类
                if (clazz.isAnnotationPresent(MyController.class)) {
                    String beanName = toLowerFirstCase(clazz.getSimpleName());
                    ioc.put(beanName, clazz.newInstance());
                } else if (clazz.isAnnotationPresent(MyService.class)) {
                    // 1.默认首字母小写
                    String beanName = toLowerFirstCase(clazz.getSimpleName());

                    // 2.自定义beanName
                    MyService myService = clazz.getAnnotation(MyService.class);
                    if (!"".equals(myService.value())) {
                        beanName = myService.value();
                    }

                    // 3.如果是接口 必须创建实现类的实例
                    for (Class<?> i : clazz.getInterfaces()) {
                        if (ioc.containsKey(i)) {
                            throw new Exception("This beanName is exists!");
                        }
                        beanName = i.getName();
                    }
                    //将实例化的对象放入IoC容器中
                    ioc.put(beanName, clazz.newInstance());
                }

            } catch (Exception e) {
                e.printStackTrace();
            }
        });
    }

    /**
     * 功能描述: 扫描相关的类 加入到classNameList
     *
     * @创建人: 我恰芙蓉王
     * @创建时间: 2020年07月28日 20:55:10
     * @param scanPackage
     * @return: void
     **/
    private void doScanner(String scanPackage) {
        //获取根目录  拿到com.wqfry替换成/com/wqfrw
        URL url = this.getClass().getClassLoader().getResource("/" + scanPackage.replaceAll("\.", "/"));
        File classFile = new File(url.getFile());
        for (File file : classFile.listFiles()) {
            //如果file是文件夹  则递归调用
            if (file.isDirectory()) {
                doScanner(scanPackage + "." + file.getName());
            } else {
                //如果非class文件 则跳过
                if (!file.getName().endsWith(".class")) {
                    continue;
                }
                String className = (scanPackage + "." + file.getName()).replace(".class", "");
                //类名+包路径放入到类名集合中  方便后续实例化
                classNameList.add(className);
            }
        }
    }

    /**
     * 功能描述: 加载配置文件
     *
     * @创建人: 我恰芙蓉王
     * @创建时间: 2020年07月28日 20:54:57
     * @param contextConfigLocation
     * @return: void
     **/
    private void doLoadConfig(String contextConfigLocation) {
        InputStream resource = this.getClass().getClassLoader().getResourceAsStream(contextConfigLocation);
        try {
            //加载配置文件
            contextConfig.load(resource);
        } catch (IOException e) {
            e.printStackTrace();
        } finally {
            //关闭文件流
            if (resource != null) {
                try {
                    resource.close();
                } catch (IOException e) {
                    e.printStackTrace();
                }
            }
        }
    }

    /**
     * 首字母转小写
     *
     * @param className
     * @return
     */
    private String toLowerFirstCase(String className) {
        char[] chars = className.toCharArray();
        chars[0] += 32;
        return String.valueOf(chars);
    }
}
运行阶段
部分代码在上面,这里我贴出Controller与Server的代码
TestController
@MyController
@MyRequestMapping("/test")
public class TestController {

    @MyAutowired
    private ITestService testService;

    @MyRequestMapping("/query")
    public  void query(HttpServletRequest req, HttpServletResponse resp, @MyRequestParam("name") String name){
        String result = testService.query(name);
        try {
            resp.getWriter().write(result);
        } catch (IOException e) {
            e.printStackTrace();
        }
    }

    @MyRequestMapping("/add")
    public  void add(HttpServletRequest req, HttpServletResponse resp, @MyRequestParam("name") String name){
        System.out.println("add");
    }

    @MyRequestMapping("/remove")
    public  void remove(HttpServletRequest req, HttpServletResponse resp, @MyRequestParam("name") String name){
        System.out.println("remove");
    }

}
ITestService
public interface ITestService {

    String query(String name);

}
TestServiceImpl
@MyService
public class TestServiceImpl implements ITestService {

    @Override
    public String query(String name) {
        return "hello  " + name + "!";
    }

}
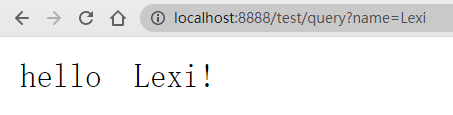
实际调用
总结
以上只是简略实现了Spring的核心思想,真正的Spring当然要比此复杂许多,但是学习都是由浅至深的,希望大家不仅会用工具,并且都能知道为什么要这样用。
附上原视频链接:https://live.gupaoedu.com/watch/1284875
代码已经提交至Git : https://github.com/wqfrw/HandWritingSpringV1.0