ERC-20 USDT 代币增发分析
近日,听说以太坊上的泰达币(USDT)频繁被增发。本着学习的目的在 etherscan 上审计了泰达币的智能合约(TetherToken)源码以及 USDT 增发相关的调用事件,本文记录一下分析过程。
以下是 TetherToken 智能合约的 USDT 增发函数:
// Issue a new amount of tokens
// these tokens are deposited into the owner address
//
// @param _amount Number of tokens to be issued
function issue(uint amount) public onlyOwner {
    // 确保增发后不会溢出
    require(_totalSupply + amount > _totalSupply);
    require(balances[owner] + amount > balances[owner]);
    // 增发到 owner 账户
    balances[owner] += amount;
    _totalSupply += amount;
    // 发送增发事件
    Issue(amount);
}
可以看到增发 USDT 需要 TetherToken 合约的 owner 账户调用 issue(uint) 增发函数进行,增发成功后还会抛出 Issue(amount) 增发事件。
再看下最近的增发记录截图:
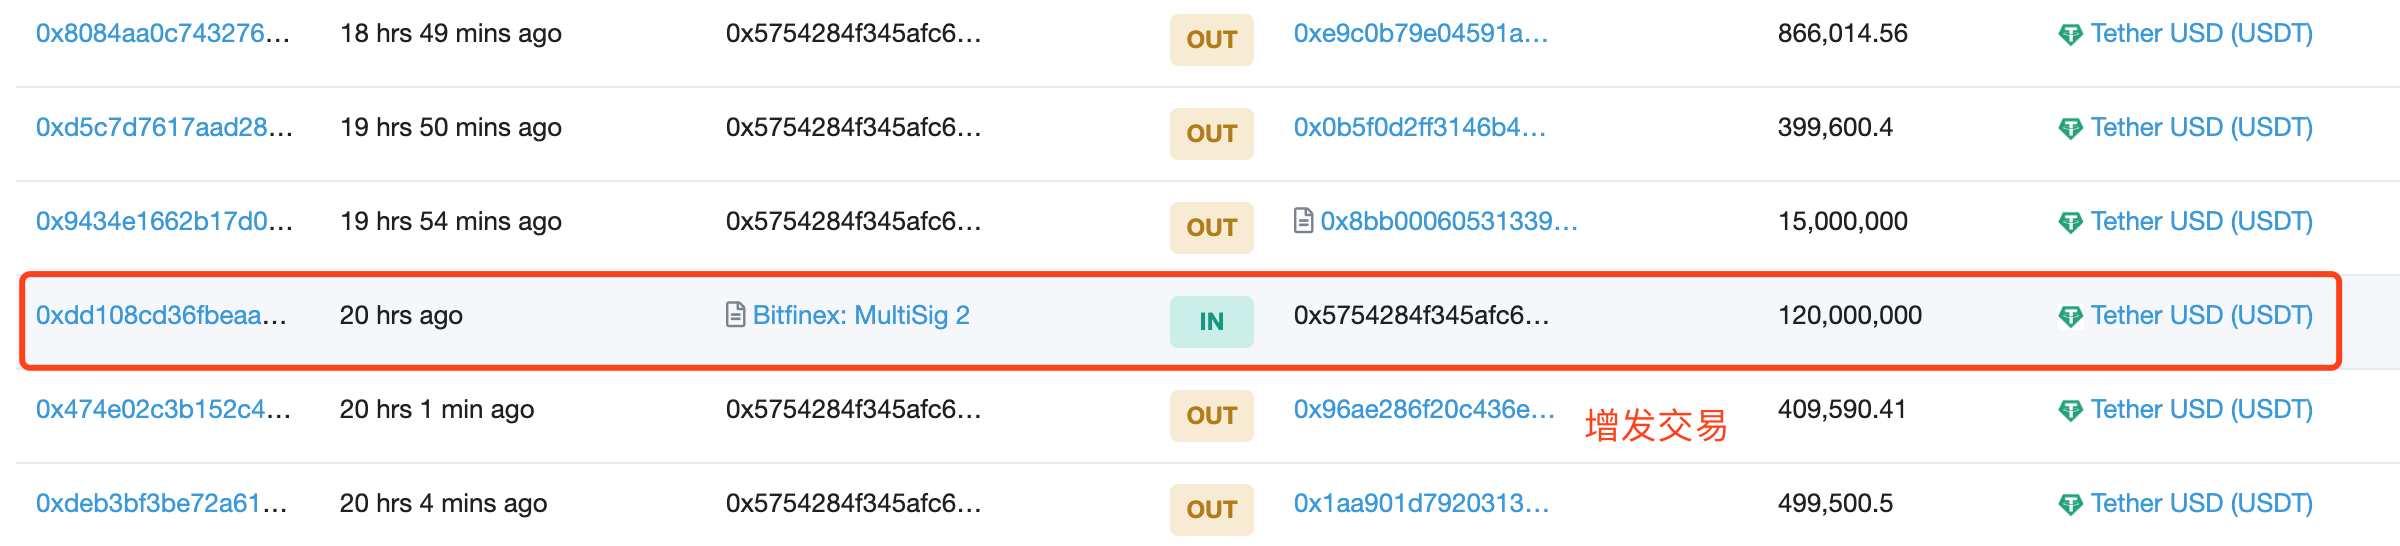
Transaction Hash:0xdd108cd36fbeaab03b29ac46d465ad9824618d683268681d3206bd78302e0d71
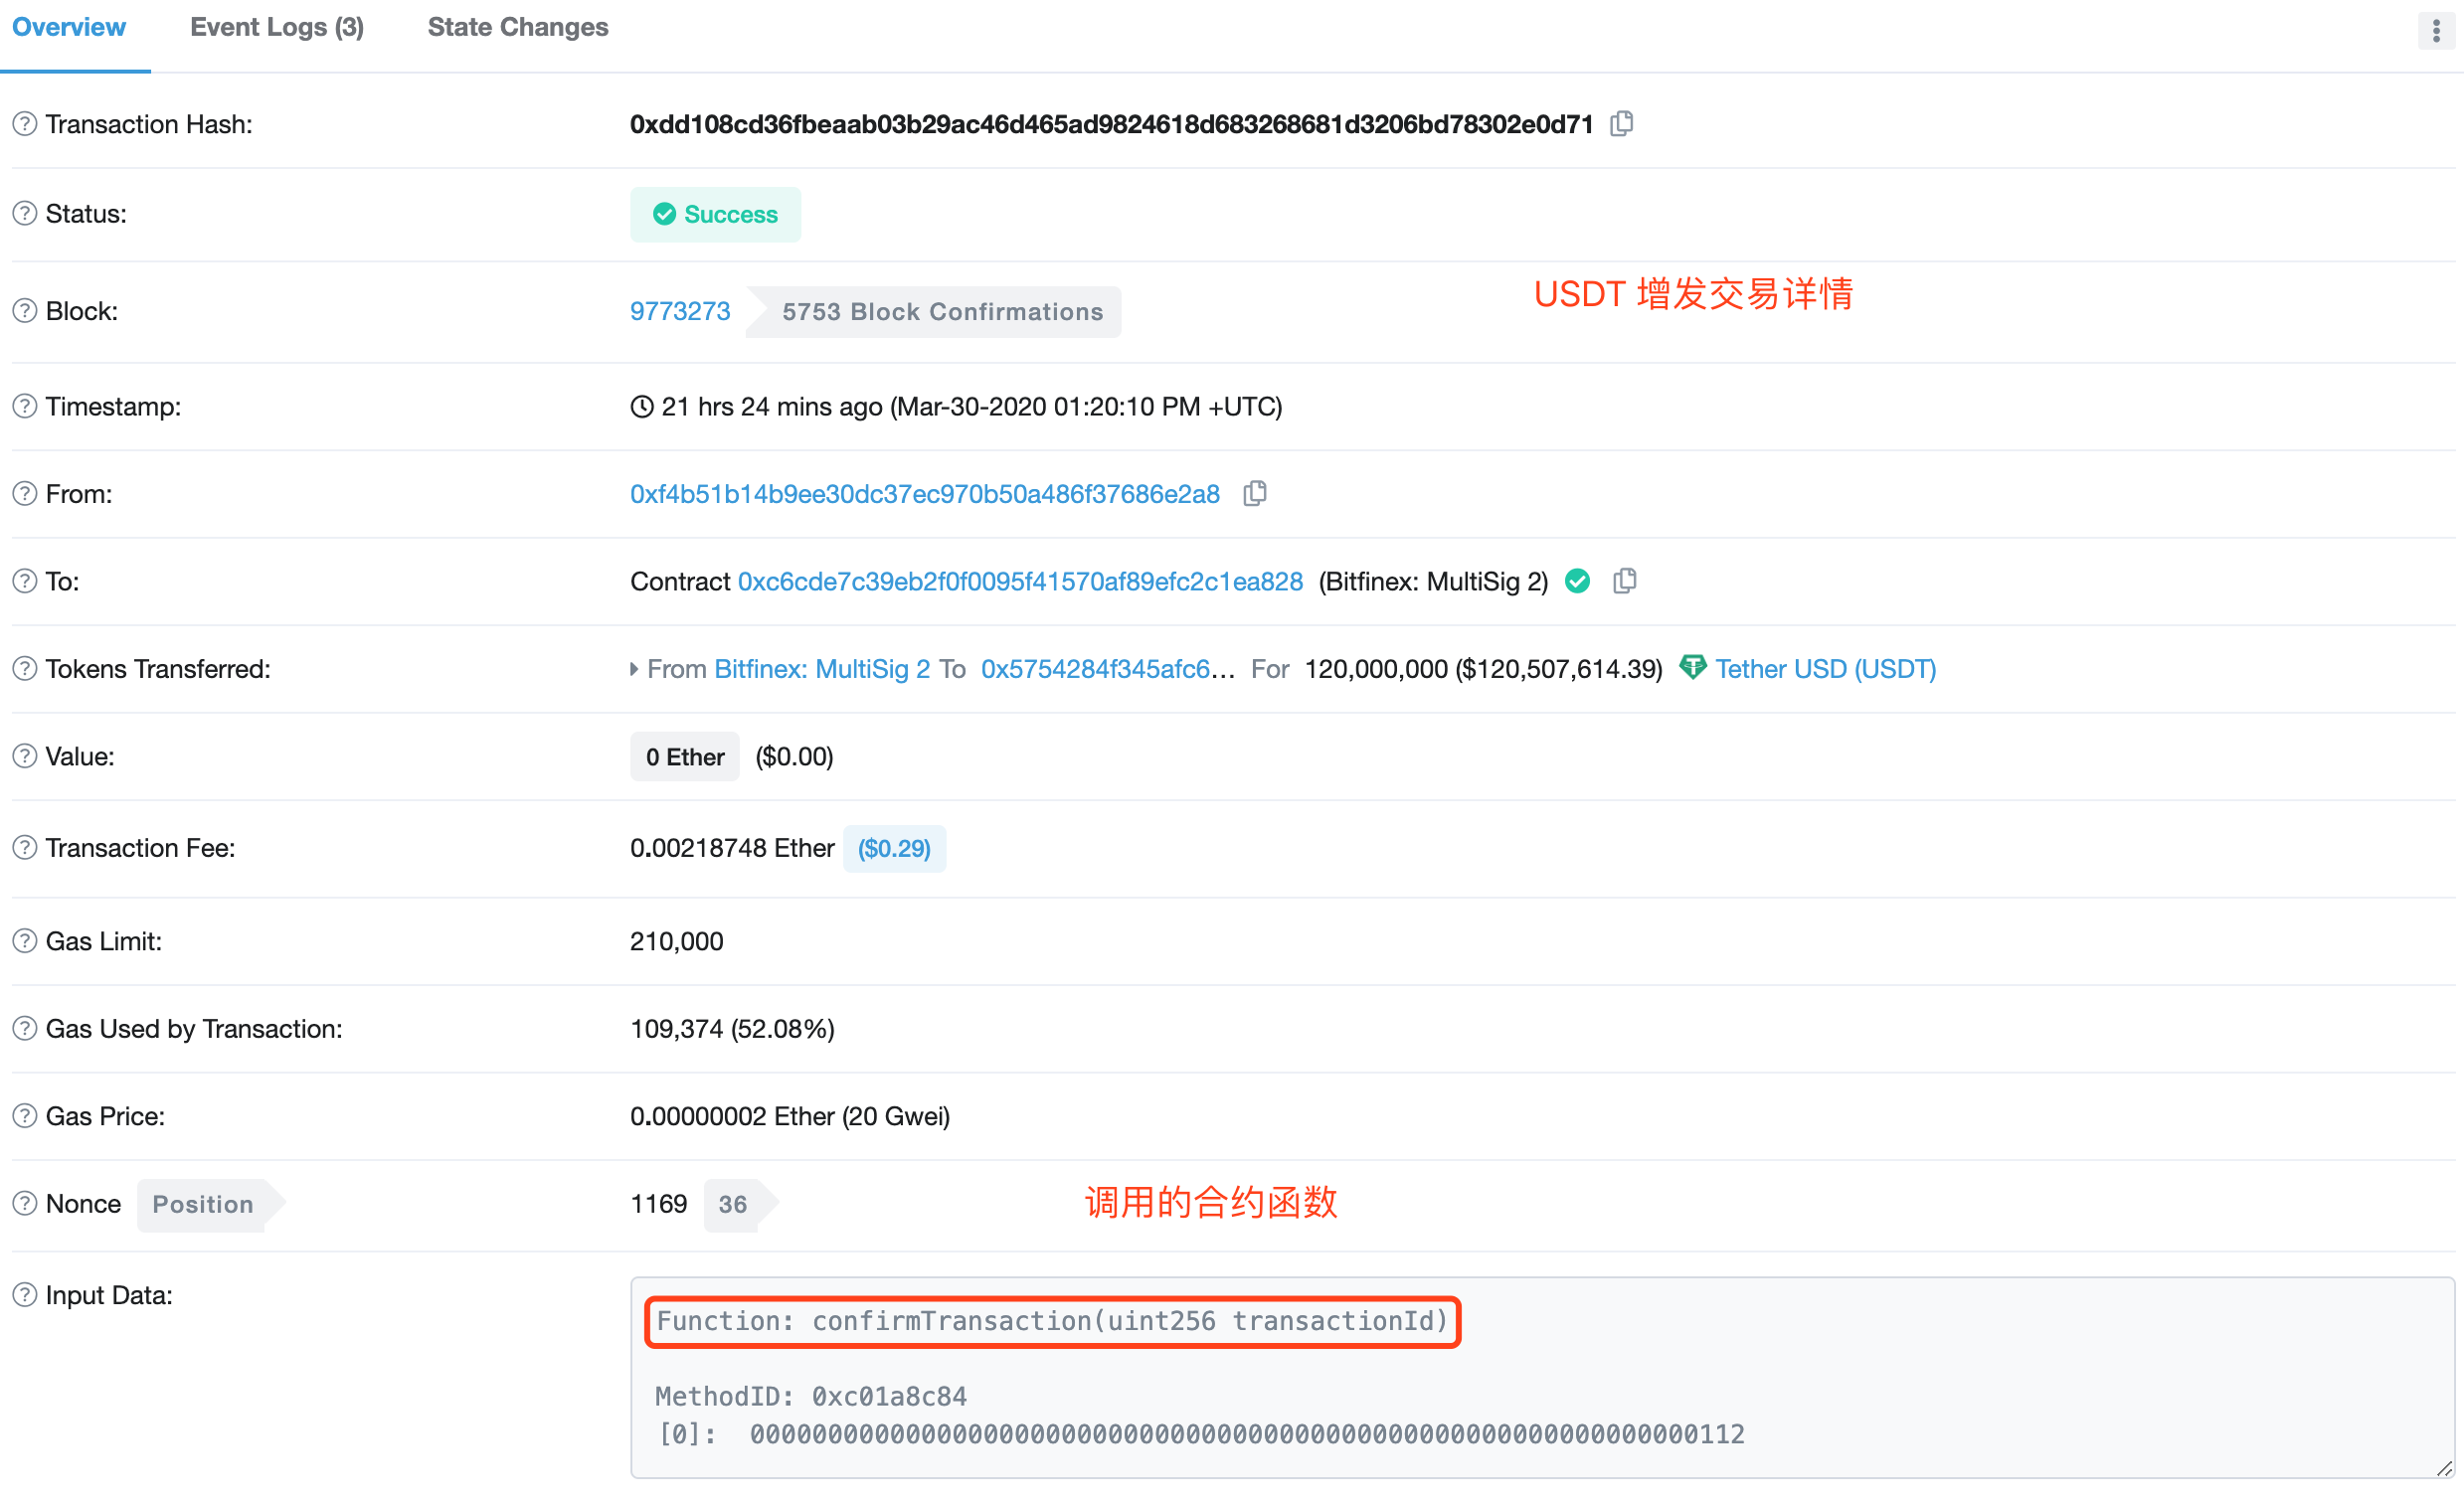
可以看到在上图交易详情中并没有调用 TetherToken 合约的 issue(uint) 增发函数,而是调用了 MultiSigWallet 合约的 confirmTransaction(uint) 函数完成的增发操作。
需要注意以下两点:
1、Bitfinex: MultiSig 2 是 MultiSigWallet 合约的别称
2、Bitfinex: MultiSig 2 是 TetherToken 合约的 owner 地址
TetherToken 合约调用分析
我们先看看 MultiSigWallet 合约的 confirmTransaction(uint) 函数的实现
/// @dev Allows an owner to confirm a transaction.
/// @param transactionId Transaction ID.
function confirmTransaction(uint transactionId)
    public
    ownerExists(msg.sender)// 确保当前调用者具备 owner 权限
    transactionExists(transactionId)// 确保 submitTransaction(address,uint,bytes) 函数被调用
    notConfirmed(transactionId, msg.sender)// 确保当前调用者没有确认过该交易
{
    confirmations[transactionId][msg.sender] = true;// 当前调用者确认该交易
    Confirmation(msg.sender, transactionId);// 发送确认事件
    executeTransaction(transactionId);
}
/// @dev Allows anyone to execute a confirmed transaction.
/// @param transactionId Transaction ID.
function executeTransaction(uint transactionId)
    public
    notExecuted(transactionId)// 确保该交易没有被执行
{
    if (isConfirmed(transactionId)) {// 检查该交易是否满足指定个 owner 的确认(目前是 3 个)
        Transaction tx = transactions[transactionId];// 根据 ID 取出相应的交易事务
        tx.executed = true;// 修改该交易执行状态
        if (tx.destination.call.value(tx.value)(tx.data))// 跨合约调用
            Execution(transactionId);// 发送执行成功事件
        else {
            ExecutionFailure(transactionId);
            tx.executed = false;
        }
    }
}
调用 confirmTransaction(uint) 函数确认并执行交易需要满足以下条件
1、当前调用者具备 owner 权限。
2、当前交易已被提交,既调用了 submitTransaction(address,uint,bytes) 函数。
3、当前交易已被 3 个 owner 确认。
submitTransaction(address,uint,bytes) 会调用到合约内部的 addTransaction(address,uint,bytes) 函数,其实现如下:
/*
 * Internal functions
 */
/// @dev Adds a new transaction to the transaction mapping, if transaction does not exist yet.
/// @param destination Transaction target address.
/// @param value Transaction ether value.
/// @param data Transaction data payload.
/// @return Returns transaction ID.
function addTransaction(address destination, uint value, bytes data)
    internal
    notNull(destination)// 确保非 0x0 地址
    returns (uint transactionId)
{
    transactionId = transactionCount;
    transactions[transactionId] = Transaction({// 添加交易事务
        destination: destination,
        value: value,
        data: data,
        executed: false
    });
    transactionCount += 1;
    Submission(transactionId);// 发送提交事件
}
最终一次完整的提交 -> 确认操作流程如下:
1、调用 submitTransaction(address,uint,bytes) 函数提交事务并传入参数:contract-address、eth-value、payload。注意:提交事务包含一次事务确认。
依次发送 Submission 事件 -> Confirmation 事件。
2、调用 confirmTransaction(uint) 确认并执行事务,需要 3 个不同的 owner 账户完成最终的确认。
依次发送 Confirmation 事件 -> 执行 payload 所产生的事件(满足确认数量)-> Execution 事件。
TetherToken 跨合约调用如下图所示:

USDT 增发分析
继续看这笔增发交易的调用事件,正好满足调用 confirmTransaction(uint) 函数所产生的事件。

通过查询 transactionId 即可看到调用参数
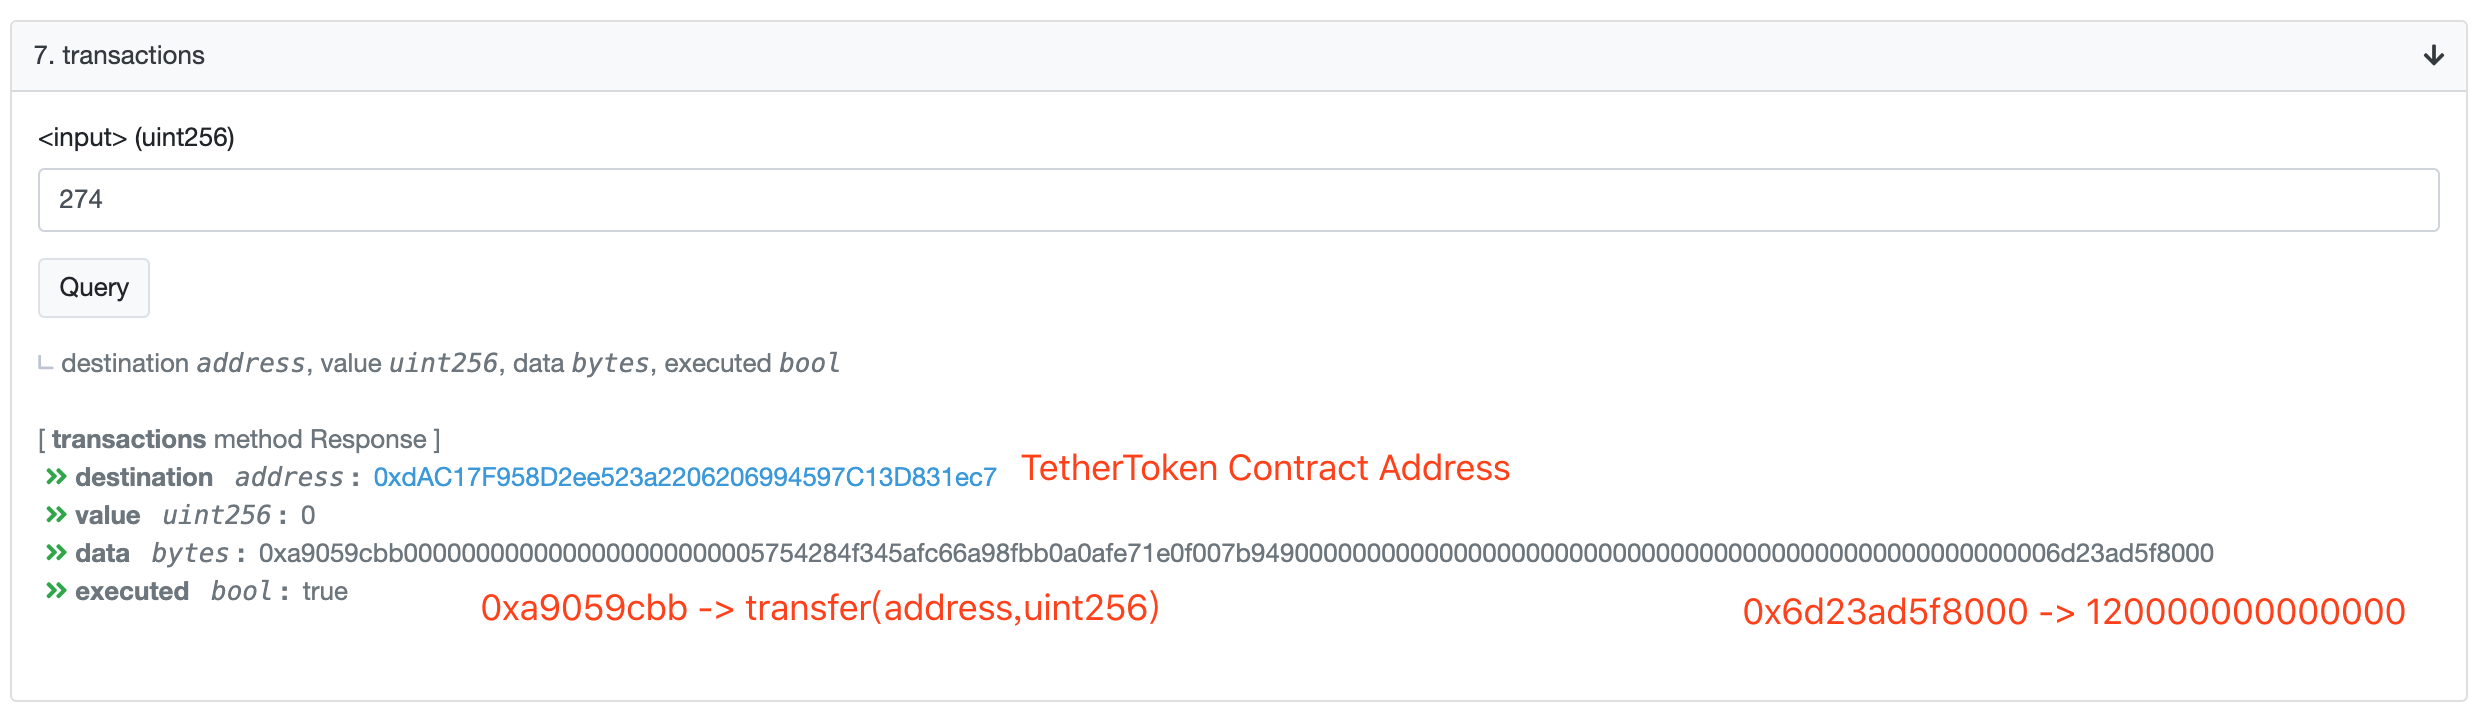
转换成以下伪代码:
0xdAC17F958D2ee523a2206206994597C13D831ec7.call.value(0)(
    bytes4(keccak256("transfer(
    0x5754284f345afc66a98fbb0a0afe71e0f007b949,120000000000000)"))
)
那么 Bitfinex: MultiSig 2 地址的 USDT 是哪来的呢?根据 transactionId 继续向前追踪一个事务即可找到真正为 Bitfinex: MultiSig 2 地址增发 USDT 的交易:
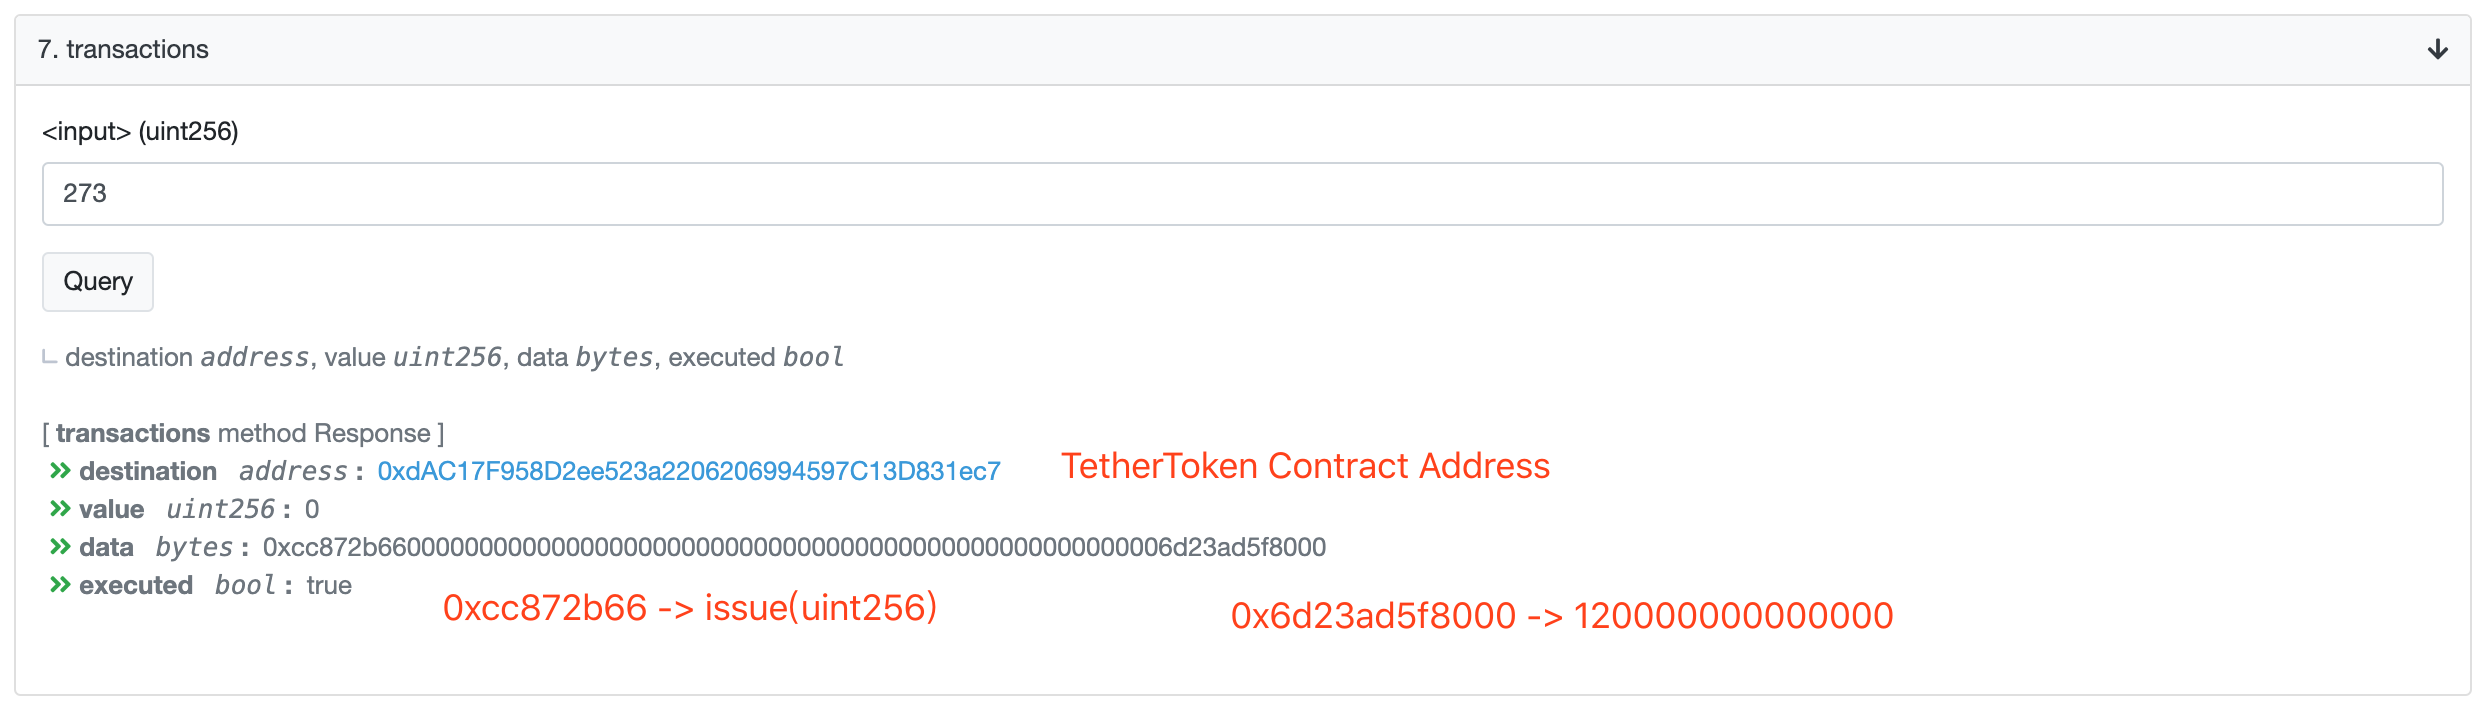
转换成以下伪代码:
0xdAC17F958D2ee523a2206206994597C13D831ec7.call.value(0)(
    bytes4(keccak256("issue(120000000000000)"))
)
Transaction Hash:0xb467ea92b5c0095b1a96f35eb466b239c13e5b0b3f493e3e452f832d99830d6b
这才是真正为 Bitfinex: MultiSig 2 地址增发 USDT 的操作。
USDT 增发如下图所示:
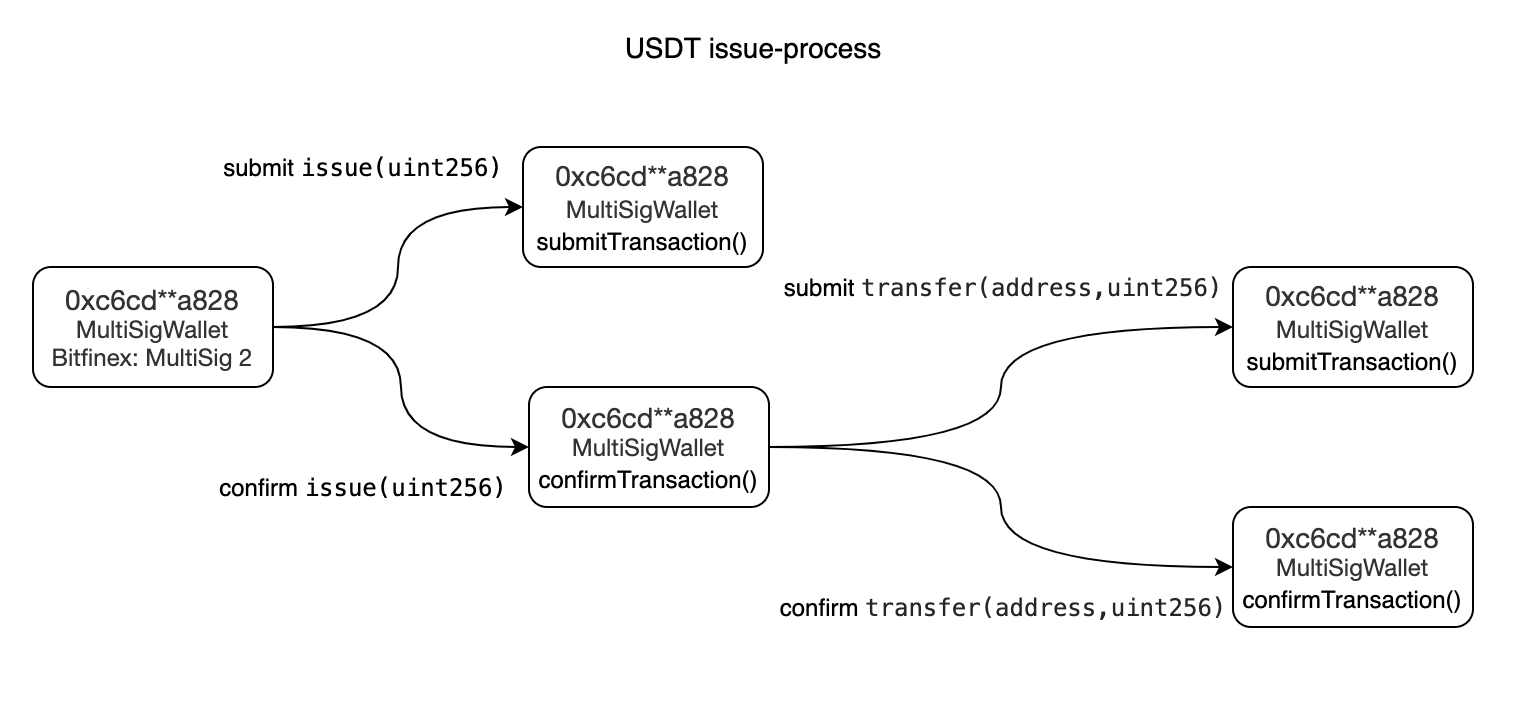
总结
可以看到,USDT 的增发需要通过 MultiSigWallet 跨合约调用才能完成。而 MultiSigWallet 智能合约存在多个 owner 用户,完成一次跨合约调用需要至少 3 个 owner 的确认。这种增发机制在一定程度上杜绝了当某一 owner 账户丢失或被盗时 USDT 被恶意增发的安全隐患。