晚上心血来潮,为了复习之前学过的内容,温故而至知新,所以决定写一个简易的网络商城购物车,该小项目采用的技术非常简单,基本上都是原生的,算是对基础知识的复习。
一、项目实现
项目实现是基于Servlet的,数据库采用MySql5.6,项目中用到了很多技术,下面通过代码来说明。项目结构如图所示:

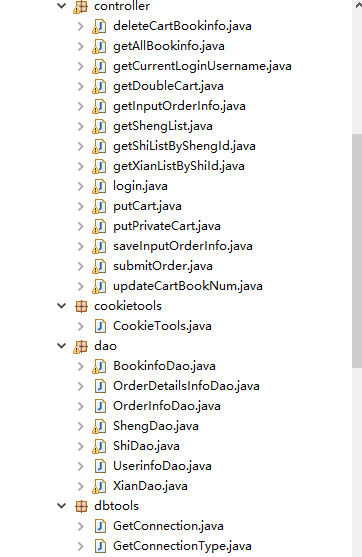
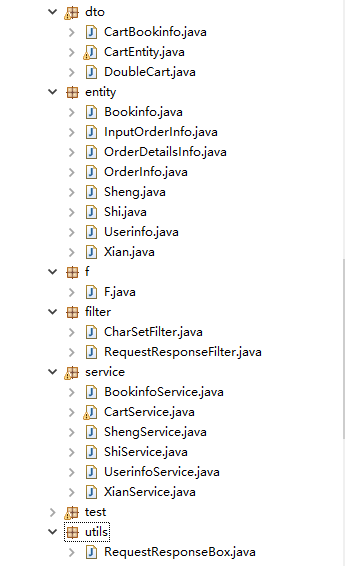
该项目采用MVC模式,Controller负责接收请求并处理结果,服务层实现业务逻辑,dao层负责和数据库进行交互,视图层测采用了普通的html页面显示结果,为了提高安全性与效率为HttpRequest和HttpResponse添加了ThreadLocal变量,提高线程的安全性。关于Cookie,单独写了一个类CookieTools,该类提供了对cookie的增、删、改操作的方法。单独编写了一个过滤器,目的是对中文编码utf-8进行过滤,防止出现乱码。另外,购物车的表格稍微加了一点样式,这样看起来不是那么的单调。
项目实现思想:该项目实现了两个购物车,分别是公共购物车和私有购物车,公共购物车是在没有登陆状态下的所看到,任何人都可以操作,私有购物车是登陆以后才能看到的,公共购物车和私有购物车的商品可以合并,合并以后可以进行下单,下单后跳转到支付页面填写支付收货人信息等,收货人信息实现了3级联动。
下面详细介绍项目的实现过程:
首先创建基于javaEE的项目shopping_cart,导入相关的jar包,这里主要用到的就是mysql-connector-java-5.1.7-bin.jar这个包,然后按照MVC模型的思想分别编写各层的代码。
1) 数据库的设计
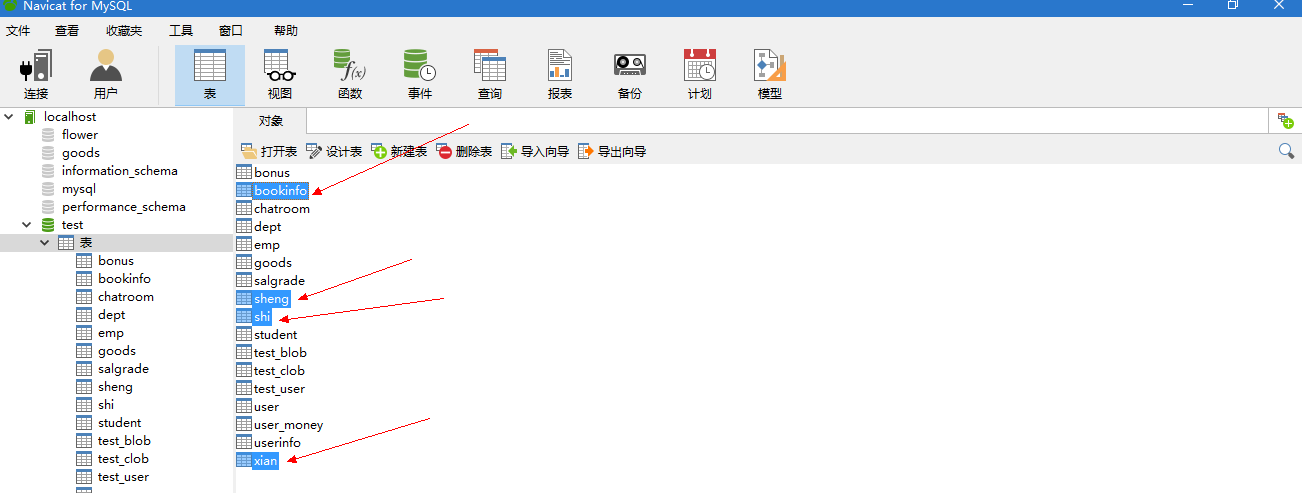
该项目涉及到的数据表格有:userinfo表,主要存放的是用户的信息,只有数据库中的用户才能够登陆。还有另外3张,分别为省表、市表和县表,供填写收货人信息和实现三级联动使用。表结构如图所示:
2)封装HttpRequest和HttpResponse
该类位于utils包下:将HttpRequest和HttpResponse放在ThreadLocal变量中,采用set方法放入,get方法获取,代码如下:
 1 package utils;
 2 import javax.servlet.http.HttpServletRequest;
 3 import javax.servlet.http.HttpServletResponse;
 4
 5 public class RequestResponseBox {
 6
 7     private static ThreadLocal<HttpServletRequest> requestBox = new ThreadLocal<>();
 8     private static ThreadLocal<HttpServletResponse> responseBox = new ThreadLocal<>();
 9
10     public static void setRequest(HttpServletRequest request) {
11         requestBox.set(request);
12     }
13
14     public static void setResponse(HttpServletResponse response) {
15         responseBox.set(response);
16     }
17
18     public static HttpServletRequest getRequest() {
19         return requestBox.get();
20     }
21
22     public static HttpServletResponse getResponse() {
23         return responseBox.get();
24     }
25
26 }
3)封装cookie
该类提供对cookie的增删改的操作,具体代码如下:
 1 public class CookieTools {
 2
 3     /**
 4      * 保存cookie
 5      * @param cookieName
 6      * @param cookieValue
 7      * @param maxAge
 8      * @return void
 9      * @author wangsj
10      */
11     public void save(String cookieName, String cookieValue, int maxAge) {
12         try {
13             cookieValue = java.net.URLEncoder.encode(cookieValue, "utf-8");
14             Cookie cookie = new Cookie(cookieName, cookieValue);
15             cookie.setMaxAge(maxAge);
16             RequestResponseBox.getResponse().addCookie(cookie);
17         } catch (UnsupportedEncodingException e) {
18             e.printStackTrace();
19         }
20     }
21
22     /**
23      * 获取cookie值
24      * @param cookieName
25      * @return
26      * @return String
27      * @author wangsj
28      */
29     public String getValue(String cookieName) {
30         String cookieValue = null;
31         try {
32             Cookie[] cookieArray = RequestResponseBox.getRequest().getCookies();
33             if (cookieArray != null) {
34                 for (int i = 0; i < cookieArray.length; i++) {
35                     if (cookieArray[i].getName().equals(cookieName)) {
36                         cookieValue = cookieArray[i].getValue();
37                         cookieValue = java.net.URLDecoder.decode(cookieValue, "utf-8");
38                         break;
39                     }
40                 }
41             }
42         } catch (UnsupportedEncodingException e) {
43             e.printStackTrace();
44         }
45         return cookieValue;
46     }
47
48     /**
49      * 根据cookie名删除cookie
50      * @param cookieName
51      * @return void
52      * @author wangsj
53      */
54     public void delete(String cookieName) {
55         Cookie cookie = new Cookie(cookieName, "");
56         cookie.setMaxAge(0);
57         RequestResponseBox.getResponse().addCookie(cookie);
58     }
59
60 }
3)封装Filter
过滤器的主要作用是对传入的request,response提前过滤掉一些信息,或者提前设置一些参数(本项目主要进行中文编码),然后再传入servlet是,防止中文出现乱码。比较简单,代码如下:
RequestResponseFilter:
 1 package filter;
 2
 3 import java.io.IOException;
 4
 5 import javax.servlet.Filter;
 6 import javax.servlet.FilterChain;
 7 import javax.servlet.FilterConfig;
 8 import javax.servlet.ServletException;
 9 import javax.servlet.ServletRequest;
10 import javax.servlet.ServletResponse;
11 import javax.servlet.http.HttpServletRequest;
12 import javax.servlet.http.HttpServletResponse;
13
14 import utils.RequestResponseBox;
15
16 public class RequestResponseFilter implements Filter {
17
18     @Override
19     public void init(FilterConfig filterConfig) throws ServletException {
20     }
21
22     @Override
23     public void doFilter(ServletRequest request, ServletResponse response, FilterChain chain)
24             throws IOException, ServletException {
25         RequestResponseBox.setRequest((HttpServletRequest) request);
26         RequestResponseBox.setResponse((HttpServletResponse) response);
27         chain.doFilter(request, response);
28     }
29
30     @Override
31     public void destroy() {
32     }
33
34 }
CharSetFilter:
 1 package filter;
 2
 3 import java.io.IOException;
 4
 5 import javax.servlet.Filter;
 6 import javax.servlet.FilterChain;
 7 import javax.servlet.FilterConfig;
 8 import javax.servlet.ServletException;
 9 import javax.servlet.ServletRequest;
10 import javax.servlet.ServletResponse;
11
12 public class CharSetFilter implements Filter {
13
14     @Override
15     public void init(FilterConfig filterConfig) throws ServletException {
16     }
17
18     @Override
19     public void doFilter(ServletRequest request, ServletResponse response, FilterChain chain)
20             throws IOException, ServletException {
21         request.setCharacterEncoding("utf-8");
22         response.setCharacterEncoding("utf-8");
23         chain.doFilter(request, response);
24     }
25
26     @Override
27     public void destroy() {
28     }
29
30 }
4)封装数据库连接工具
该类主要是对数据库进行连接,对该类进行封装,方便dao层调用。代码如下:
GetConnectionType类
 1 package dbtools;
 2
 3 import java.sql.Connection;
 4 import java.sql.DriverManager;
 5 import java.sql.SQLException;
 6
 7 public class GetConnectionType {
 8     public static Connection getConnection() throws SQLException, ClassNotFoundException {
 9         String url = "jdbc:mysql://localhost:3306/test";
10         String driver = "com.mysql.jdbc.Driver";
11         String username = "root";
12         String password = "123456";
13         Class.forName(driver);
14         Connection connection = DriverManager.getConnection(url, username, password);
15         return connection;
16     }
17 }
GetConnection类,该类依然使用了ThreadLocal变量,代码如下:
 1 package dbtools;
 2
 3 import java.sql.Connection;
 4 import java.sql.SQLException;
 5
 6 public class GetConnection {
 7
 8     private static ThreadLocal<Connection> local = new ThreadLocal<>();
 9     //获取链接
10     public static Connection getConnection() throws ClassNotFoundException, SQLException {
11         Connection conn = local.get();
12         if (conn == null) {
13             conn = GetConnectionType.getConnection();
14             conn.setAutoCommit(false);
15             local.set(conn);
16         }
17         return conn;
18     }
19     //提交事务
20     public static void commit() {
21         try {
22             if (local.get() != null) {
23                 local.get().commit();
24                 local.get().close();
25                 local.set(null);
26             }
27         } catch (SQLException e) {
28             e.printStackTrace();
29         }
30     }
31     //回滚
32     public static void rollback() {
33         try {
34             if (local.get() != null) {
35                 local.get().rollback();
36                 local.get().close();
37                 local.set(null);
38             }
39         } catch (SQLException e) {
40             e.printStackTrace();
41         }
42     }
43 }
5)实现第一个功能:登陆
登陆的基本思想:对输入的用户名和密码进行校验,然后到数据库去匹配,如果匹配成功则允许等录,否则,提示用户有误。该功能涉及到UserinfoDao,UserinfoService,Login这些类以及index.js里面编写的login方法以及html页面。代码如下:
UserinfoDao:
 1 package dao;
 2
 3 import java.sql.Connection;
 4 import java.sql.PreparedStatement;
 5 import java.sql.ResultSet;
 6 import java.sql.SQLException;
 7
 8 import dbtools.GetConnection;
 9 import entity.Userinfo;
10
11 public class UserinfoDao {
12
13     public Userinfo getUserinfo(String username, String password) throws SQLException, ClassNotFoundException {
14         Userinfo userinfo = null;
15         String sql = "select * from userinfo where username=? and password=?";
16         Connection conn = GetConnection.getConnection();
17         PreparedStatement ps = conn.prepareStatement(sql);
18         ps.setString(1, username);
19         ps.setString(2, password);
20         ResultSet rs = ps.executeQuery();
21         while (rs.next()) {
22             int idDB = rs.getInt("id");
23             String usernameDB = rs.getString("username");
24             String passwordDB = rs.getString("password");
25             userinfo = new Userinfo();
26             userinfo.setId(idDB);
27             userinfo.setUsername(usernameDB);
28             userinfo.setPassword(passwordDB);
29         }
30         rs.close();
31         ps.close();
32         return userinfo;
33     }
34
35     public Userinfo getUserinfo(String username) throws SQLException, ClassNotFoundException {
36         Userinfo userinfo = null;
37         String sql = "select * from userinfo where username=?";
38         Connection conn = GetConnection.getConnection();
39         PreparedStatement ps = conn.prepareStatement(sql);
40         ps.setString(1, username);
41         ResultSet rs = ps.executeQuery();
42         while (rs.next()) {
43             int idDB = rs.getInt("id");
44             String usernameDB = rs.getString("username");
45             String passwordDB = rs.getString("password");
46             userinfo = new Userinfo();
47             userinfo.setId(idDB);
48             userinfo.setUsername(usernameDB);
49             userinfo.setPassword(passwordDB);
50         }
51         rs.close();
52         ps.close();
53         return userinfo;
54     }
55 }
UserinfoService
 1 package service;
 2
 3 import java.sql.SQLException;
 4
 5 import cookietools.CookieTools;
 6 import dao.UserinfoDao;
 7 import entity.Userinfo;
 8 import f.F;
 9
10 public class UserinfoService {
11
12     private UserinfoDao userinfoDao = new UserinfoDao();
13     private CookieTools cookieTools = new CookieTools();
14
15     public boolean login(String username, String password) throws SQLException, ClassNotFoundException {
16         Userinfo userinfo = userinfoDao.getUserinfo(username, password);
17         if (userinfo != null) {
18             cookieTools.save(F.CURRENT_LOGIN_USERNAME, username, 36000);
19             return true;
20         } else {
21             return false;
22         }
23     }
24
25     public Userinfo getUserinfoByUsername(String username) throws SQLException, ClassNotFoundException {
26         Userinfo userinfo = userinfoDao.getUserinfo(username);
27         return userinfo;
28     }
29
30     public String getCurrentLoginUsername() {
31         return cookieTools.getValue(F.CURRENT_LOGIN_USERNAME);
32     }
33
34 }
index.js
 1 function login(){
 2     var usernameValue = $("#username").val();
 3     var passwordValue = $("#password").val();
 4     $.post("login?t=" + new Date().getTime(), {
 5         "username": usernameValue,
 6         "password": passwordValue
 7     }, function(data){
 8         if (data == 'true') {
 9             $("#loginForm").hide();
10             initWelcomeUI(usernameValue);
11         }
12         else {
13             alert("登陆失败请重新输入!");
14         }
15     });
16 }
index.html
 1 <div id="loginDIV">
 2             <div id="loginForm" style="display:none">
 3                 username:<input type="text" id="username">
 4                 <br/>
 5                 password:<input type="text" id="password">
 6                 <br/>
 7                 <input type="button" value="登陆" onclick="javascript:login()">
 8             </div>
 9             <div id="welcomeDIV" style="display:none">
10             </div>
11         </div>
运行结果如下:比较单调,没有加任何样式

6)购物车的实现
购物车实现比较麻烦,本项目采用的是字符串拼接的方式实现的,比较原始,稍微复杂一点,加入购物车代码在CartService类中,
商品信息采用的是:A商品id_数量-B商品id_数量的形式实现,部分代码如下:
 1 public void putCart(String bookIdParam) throws SQLException, ClassNotFoundException {
 2         String cartName = "";
 3         String cartValue = "";
 4         String newCartValue = "";
 5
 6         String currentLoginUsername = userinfoService.getCurrentLoginUsername();
 7         if (currentLoginUsername == null) {
 8             cartName = F.PUBLIC_CART_NAME;
 9         } else {// privataCart_userId
10             int userId = userinfoService.getUserinfoByUsername(currentLoginUsername).getId();
11             cartName = F.PRIVATE_CART_NAME_PREFIX + userId;
12         }
13         cartValue = cookieTools.getValue(cartName);
14         if (cartValue == null) {
15             cartValue = bookIdParam + "_1";
16         } else {
17             String[] bookinfoArray = cartValue.split("\-");
18             boolean isFindBookId = false;
19             for (int i = 0; i < bookinfoArray.length; i++) {
20                 String bookId = bookinfoArray[i].split("\_")[0];
21                 String bookNum = bookinfoArray[i].split("\_")[1];
22                 if (bookId.equals(bookIdParam)) {
23                     isFindBookId = true;
24                     break;
25                 }
26             }
27             if (isFindBookId == false) {
28                 cartValue = cartValue + "-" + bookIdParam + "_1";
29             } else {
30                 for (int i = 0; i < bookinfoArray.length; i++) {
31                     String bookId = bookinfoArray[i].split("\_")[0];
32                     String bookNum = bookinfoArray[i].split("\_")[1];
33                     if (bookId.equals(bookIdParam)) {
34                         newCartValue = newCartValue + "-" + bookId + "_" + ((Integer.parseInt(bookNum)) + 1);
35                     } else {
36                         newCartValue = newCartValue + "-" + bookId + "_" + bookNum;
37                     }
38                 }
39                 newCartValue = newCartValue.substring(1);
40                 cartValue = newCartValue;
41             }
42         }
43         System.out.println(cartValue + "     " + cartName);
44         cookieTools.save(cartName, cartValue, 36000);
45     }
商品信息的传输时采用以下的信息:
<list>
  <bookinfo>
    <id>1</id>
    <bookname>Java</bookname>
    <bookprice>33.56</bookprice>
  </bookinfo>
  <bookinfo>
    <id>2</id>
    <bookname>c++</bookname>
    <bookprice>56.45</bookprice>
  </bookinfo>
  <bookinfo>
    <id>3</id>
    <bookname>Hibernat</bookname>
    <bookprice>80.55</bookprice>
  </bookinfo>
  <bookinfo>
    <id>4</id>
    <bookname>Struts</bookname>
    <bookprice>53.45</bookprice>
  </bookinfo>
  <bookinfo>
    <id>5</id>
    <bookname>Java</bookname>
    <bookprice>34.22</bookprice>
  </bookinfo>
  <bookinfo>
    <id>6</id>
    <bookname>we</bookname>
    <bookprice>12.22</bookprice>
  </bookinfo>
</list>
此外,书籍数量的更新采用ajax实现,实现页面局部更新,从而避免页面更新时的闪动,下面是部分的数量更新代码:
 1 function updateCartBookNum(operateType, cartType, bookId){
 2     $.post("updateCartBookNum?t=" + new Date().getTime(), {
 3         "operateType": operateType,
 4         "cartType": cartType,
 5         "bookId": bookId
 6     }, function(data){
 7         if (data == '1') {
 8             updateCartBookNumTRInfo(cartType, bookId);
 9             setCartBottomInfoTR(cartType);
10         }
11         else {
12             alert("更新书籍数量失败!");
13         }
14     });
15 }
7) 购物车实现效果
输入用户名登陆后的页面如下所示:
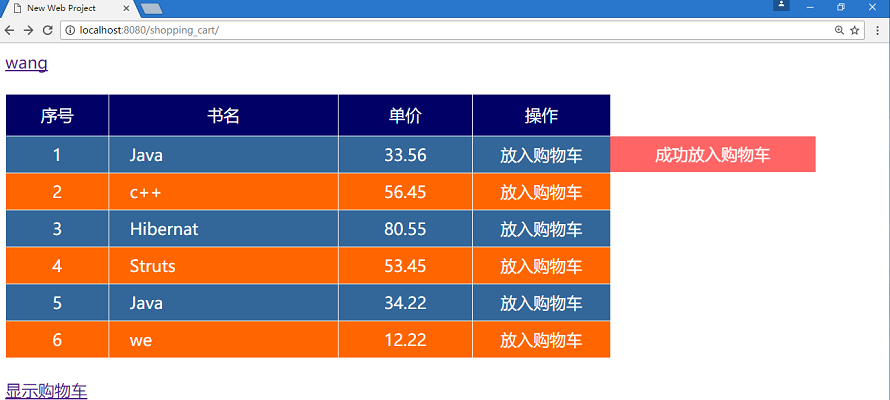
当点击放入购物车按钮是会有一个动画效果,显示2秒然后消失,当点击显示购物车按钮时,会显示私有购物车的一些信息,如下所示:

这里显示的是双购物车,即私有购物车和公共购物车,双购物车中的商品可以进行合并,合并实现的思想是首先判断商品id,如果id相同则进行数量的相加,否则进行字符串的拼接。代码如下:
 1 public void putPrivateCart(String publicCart_id_num_String) throws ClassNotFoundException, SQLException {
 2         String cartName = "";
 3         String cartValue = "";
 4         String newCartValue = "";
 5
 6         String currentLoginUsername = userinfoService.getCurrentLoginUsername();
 7         int userId = userinfoService.getUserinfoByUsername(currentLoginUsername).getId();
 8         cartName = F.PRIVATE_CART_NAME_PREFIX + userId;
 9         cartValue = cookieTools.getValue(cartName);
10
11         if (cartValue != null) {
12
13             String[] publicBookinfoArray = publicCart_id_num_String.split("-");
14             String[] privateBookinfoArray = cartValue.split("-");
15
16             String differenceString = "";
17
18             for (int i = 0; i < publicBookinfoArray.length; i++) {
19                 String bookIdPublic = publicBookinfoArray[i].split("\_")[0];
20                 String bookNumPublic = publicBookinfoArray[i].split("\_")[1];
21                 boolean isFindBookId = false;
22                 for (int j = 0; j < privateBookinfoArray.length; j++) {
23                     String bookIdPrivate = privateBookinfoArray[j].split("\_")[0];
24                     String bookNumPrivate = privateBookinfoArray[j].split("\_")[1];
25                     if (bookIdPublic.equals(bookIdPrivate)) {
26                         privateBookinfoArray[j] = bookIdPrivate + "_"
27                                 + ((Integer.parseInt(bookNumPublic)) + (Integer.parseInt(bookNumPrivate)));
28                         isFindBookId = true;
29                     }
30                 }
31                 if (isFindBookId == false) {
32                     differenceString = differenceString + "-" + bookIdPublic + "_" + bookNumPublic;
33                 }
34             }
35             for (int i = 0; i < privateBookinfoArray.length; i++) {
36                 newCartValue = newCartValue + "-" + privateBookinfoArray[i];
37             }
38             newCartValue = newCartValue + differenceString;
39             newCartValue = newCartValue.substring(1);
40             cartValue = newCartValue;
41         } else {
42             cartValue = publicCart_id_num_String;
43         }
44         System.out.println(cartValue);
45         cookieTools.save(cartName, cartValue, 36000);
46     }
点击putPrivateCart按钮,如果左侧没有商品被选中的时候,会弹出提示框,如图所示:
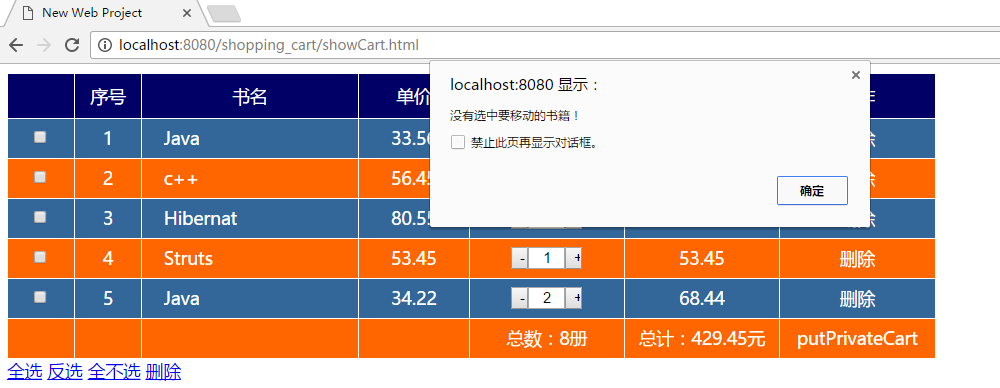
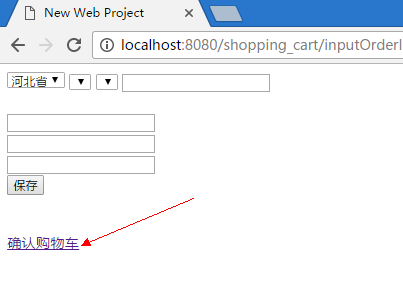
选中,左侧按钮所对应的商品,便可以成功放入私有购物车,放入购物车就可以进行下单操作了,如图点击左下角的输入订单信息,便可以进入,订单页面,填好订单,可以进行购物车的确认以及订单的提交。


二、总结
到这里,一个简易的购物车就基本实现了,但这仅仅只是宇哥雏形,改进的地方还有很多,鉴于篇幅和时间的关系,只贴出了部分代码,其他源码,感兴趣的朋友可以下载附件研究改进,待改进的地方:
1、数据库的设计有待完善,数据库中的字段可以添加数量的实时更新,显示库存等。
2、商品添加购物车采用的字符串拼接比较麻烦,可以采用json格式的字符串和前台进行交互。
3、异常的捕捉不是很好,可以考虑多加入异常的处理。
4、没有日志的记录,可以采用log4j对日志进行处理,方便调试,明确问题出在哪里。
5、可以考虑引入Spring框架,进行充分解耦。
6、登录功能的设计有待完善,后期可以加入注册功能,登录功能可以用SpringMVC或者Struts2框架进行改进,另外登陆验证可以采用前后台双向校验的方式进行验证。
以上这些均是该项目有待改进的地方,还有很多需要完善的地方,希望对大家的学习有所帮助。
源码下载地址:http://files.cnblogs.com/files/10158wsj/shopping_cart.rar