前言:从今天开始写这系列linux博客了(是学习刘遄老师的<linux就该这么学>),视频学习的资源可以在b站上找到:https://www.bilibili.com/video/av45771723?from=search&seid=16246736897428574633,同时这本书的电子稿的话,可以在刘遄老师的网站找到:https://www.linuxprobe.com/chapter-06.html,而且里面有系统安装资源和教程,非常详细。
一、认识RPM和yum :
在早期linux系统里面要安装一个软件的话,只能采用源码包的方式来安装,而且要考虑软件的依赖关系,所以在linux系统中装软件非常的麻烦,于是乎RPM(red package mangement:红帽软件包管理器),就出现了,这才解决了这个装软件的麻烦性。
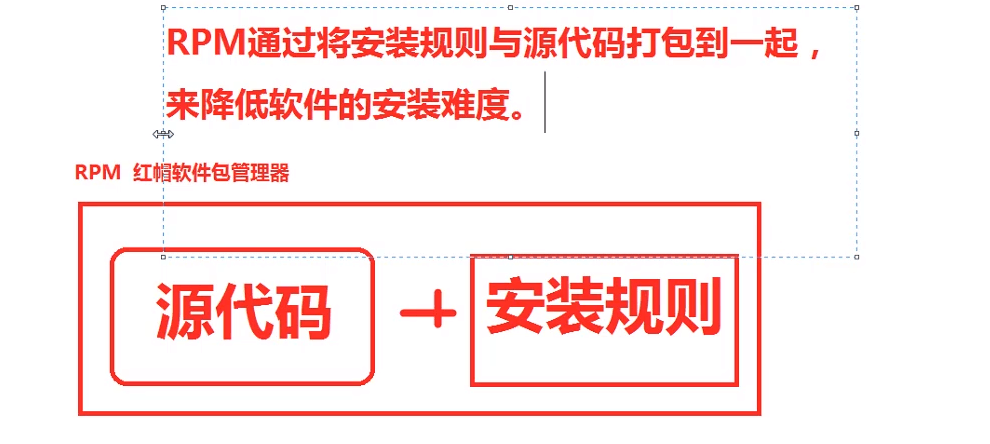
但是随着技术的发展,现在的软件是越来越复杂话了,所以RPM在linux里面装系统还是非常的麻烦,所以这个时候yum创库出现了(它是通过大量的常用RPM软件放在一起,解决软件包的依赖关系,进一步来降低软件的安装难度)
二、RHEL7中服务进程中常用的命令:
1、基本形式:
systemctl + 配置命令
systemd +服务名
2、常用服务进程命令:
a、systemctl restart +服务名 --------表示重启服务
b、systemctl start +服务名 --------表示启动服务
c、systemctl stop +服务名 --------表示关闭服务
d、systemctl enable +服务名 ---------表示加入启动项
e、systemctl status +服务名 --------表示查看服务
注意:这个服务进程命令非常重要,后面的许多服务配置经常要用到这些命令
三、linux命令的常见格式为:
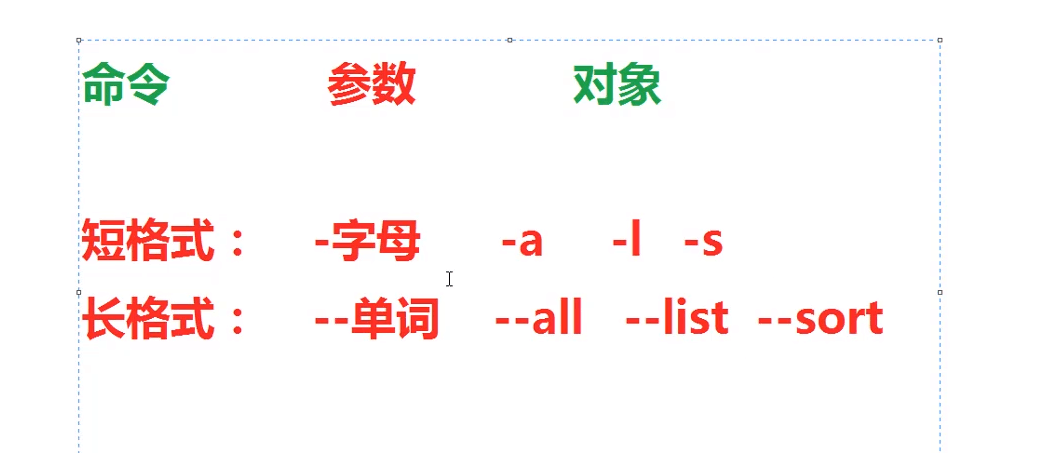
注意:短格式和短格式可以合并,例如上面的 -a 和-l 就可以合并成-al ,但是短格式和长格式不可以合并以及长格式与长格式也不可以合并
四、常用系统命令的用法:
1、man命令,它是用man + 任何命令,就会显示这个命令的具体用法了,非常方便。
2、echo命令:它是在终端上输出字符串或者提取变量的值,格式为:“echo [字符串] | $变量
[root@linuxprobe Desktop]# echo i like the linux
i like the linux
取变量的值(这里是取变量的SHELL的值,不要忘加"$"):
[root@linuxprobe Desktop]# echo $SHELL
/bin/bash
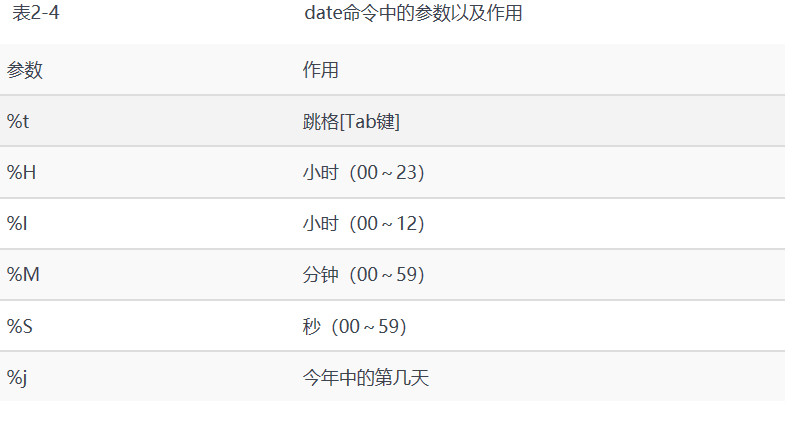
3、date命令,它是显示及设置系统的时间或者日期,格式" date [选项] [+指定的格式],同时我们在使用的时候在它的后面加一个"+"开头的参数,可以按照指定的格式来输出系统的时间和日期,它常用参数用法如下:
a、按照默认格式查看当前系统的时间:
[root@linuxprobe Desktop]# date
Wed May 22 01:19:14 CST 2019
b、按照"年-月-日 小时:分钟:秒"的格式来查看当前系统的时间:
[root@linuxprobe Desktop]# date "+%Y-%m-%d %H:%M:%S"
2019-05-22 01:22:47
c、将系统的时间可以设置成一个指定的时间,比如:2019年5月22日5点25分:
[root@linuxprobe Desktop]# date -s "20190522 5:25:00"
Wed May 22 05:25:00 CST 2019
d、使用"%j"可以查看今天是今年中的第几天:
[root@linuxprobe Desktop]# date "+%j"
142
4、reboot命令,它用于重启系统,只要直接输入这个命令就可以重启系统了。
5、poweroff命令,它是用于关闭系统,只要直接输入这个命令就可以实现关闭系统了。
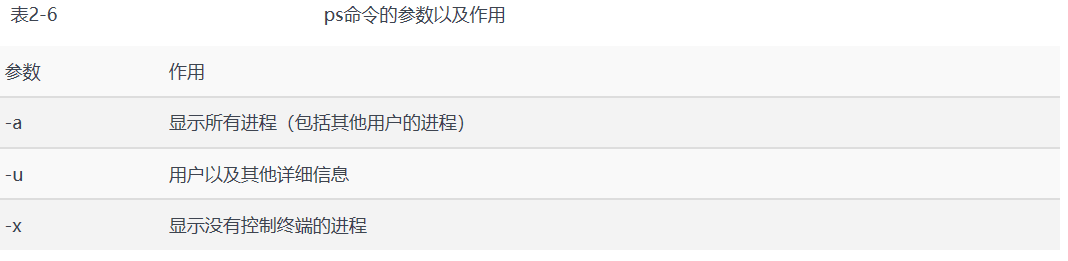
6、ps命令,它是用来查看系统中的进程状态,格式为"ps [参数]",它的常用参数如下:
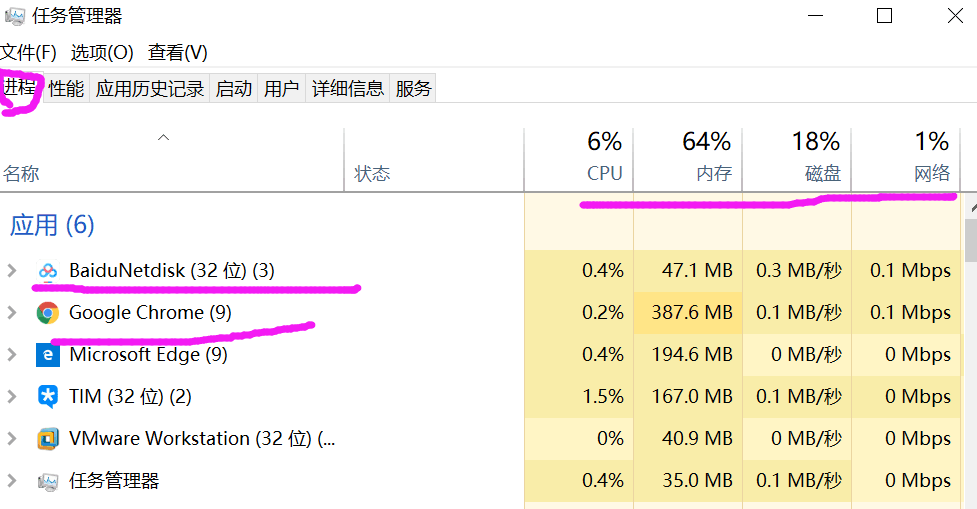
注意如果不好理解进程是什么,可以看下面这个(简单把它理解成一个写好的软件,正在运行,比如我们windows系统中的任务管理器中可以查看进程):
同时在linux 系统中有五种常见的进程状态:
-------R(运行):表示进程正在运行或者在运行队列中等待
-------S(中断):表示进程处于休眠中,当某个条件形成后或者接受到信号时,则脱离该状态
--------D(不可中断):表示进程不响应异步信号,即使使用kill 命令也不能将其中断。
--------Z(僵死):表示进程已经终止,但是进程描述符依然存在,直到父进程调用wait()系统函数后才将进程释放。
--------T(停止):表示收到停止信号后停止运行
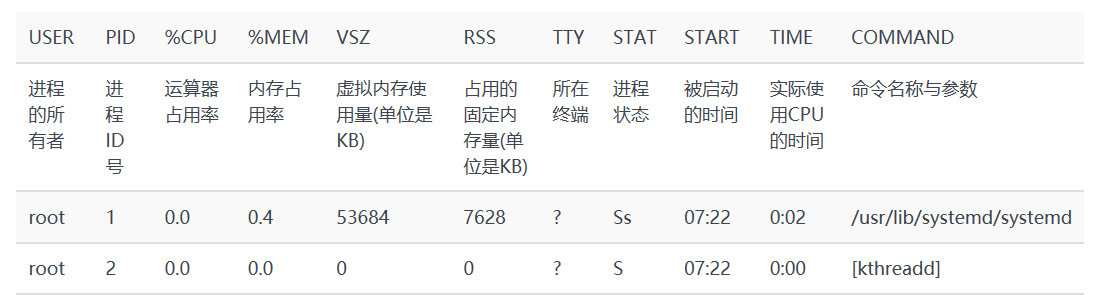
接下来我们看一下这个ps 命令的演示效果:

那么这里的USER PID 等后面的参数代表什么意思呢,看下面的说明:
7、top命令,它是动态的查看进程活动与系统负载等信息,格式为"top",也就是和我刚才说的那样,在windows任务管理器中,可以查看进程状态,这个命令的演示效果如下:
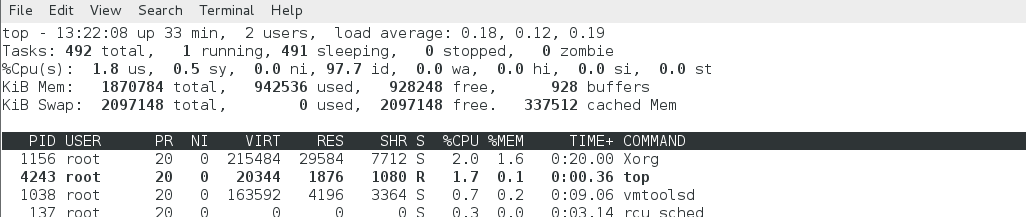
说明:这里从top第一行从左往右的意思依次是表示 : 当前系统时间是---13:22:08,运行了33分钟,登入终端数为2个,系统负载分别为18秒,12秒,19秒(数值越小意味着负载承受压力越低)。
第二行从左往右表示为,进程总数(也就是程序总个数)为492个,一个正在运行的进程数,491个进程没有运行,0个进程被停止,僵死的进程为0个。
第三行从左往右依次表示:cpu暂用的资源百分比总共为2.3%,97.7%的cpu资源处于空闲的状态。
第四行从左往右依次表示:物理内存总共为1870784kiB,已经使用了942536kiB,空闲内存为92848kiB,作为内核缓存的内存量为928kiB。
第五行从左往右依次表示:虚拟内存总量为2097148kiB,虚拟内存使用量为0,虚拟内存空闲量为2097148kiB,已经被提前加载的内存量我337512kiB
8、pidof命令,它是用来查询某个指定服务进程的PID值(就是进程的标识符,有点像网络里面的端口号),格式为:"pidof [参数] [服务名称]"。比如我们来查看一下sshd服务:
[root@linuxprobe Desktop]# pidof sshd
2381    //sshd的PID值为2381
9、kill命令,它是用于终止某个指定PID的服务进程,格式为"kill[参数] [进程PID],例如我们关闭sshd服务,然后再用pidof查看,你会发现查看不到sshd服务的PID值
[root@linuxprobe ~]# pidof sshd
2381
[root@linuxprobe ~]# kill 2381
[root@linuxprobe ~]# pidof sshd
[root@linuxprobe ~]#
10、killall命令,它用于终止某个指定名称的服务所对应的全部进程,格式为:"killall [参数] [服务名称]"(这里暂时没有学到一个服务有很多个PID值的服务,所以暂时举不出一个例子来但是后面会学到,到时候会完善这里)。
五、系统状态监测命令:
1、ifconfig命令,它是用来获取网卡配置与网络状态等信息,格式为"ifconfig [网络设备] [参数]",(这个命令类似我们在Windows里面的ipconfig命令查看网卡的信息):
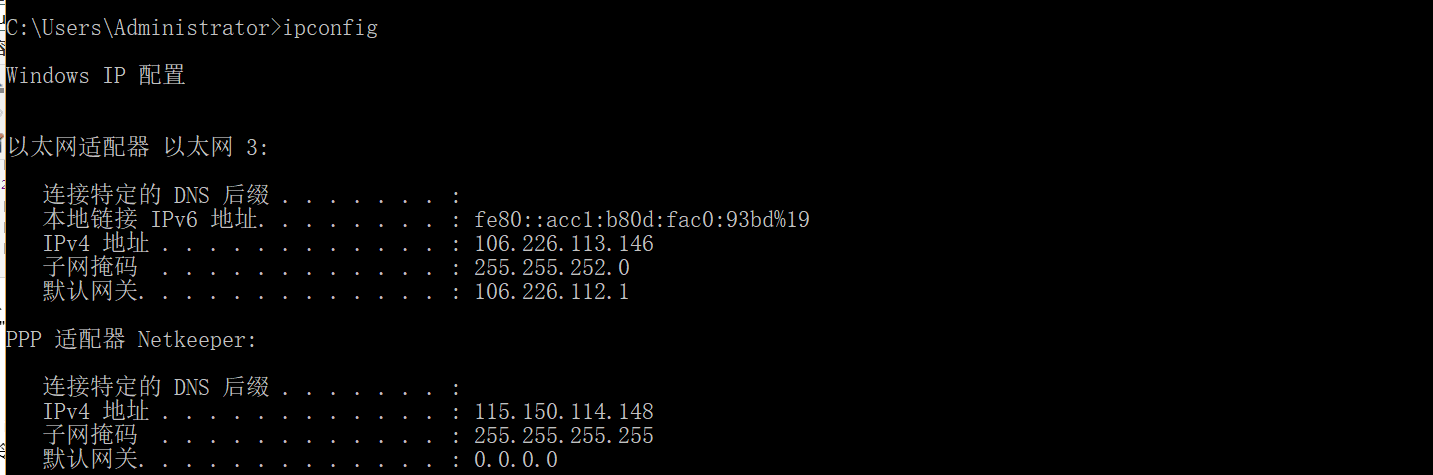
注:这个是windows 中查看网卡的信息。
接下来我们来看一下linxu系统下的网卡查看命令:
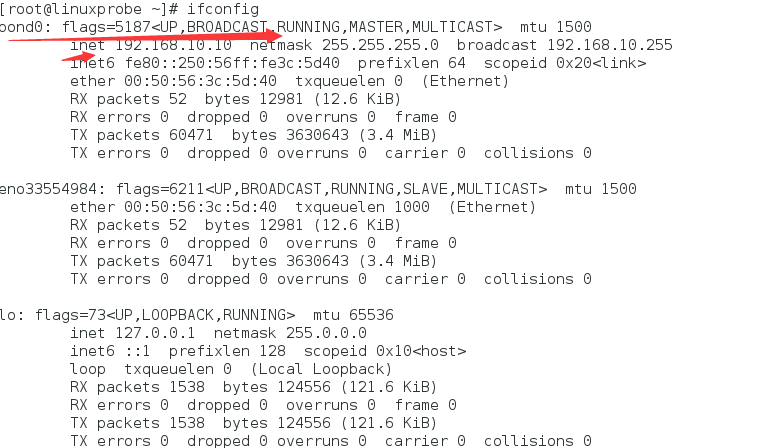
注:这里网卡名称是bond0,inet后面192.168.10.10是ip地址,ether参数后面的00:50:56:3c:5d:40是网卡的物理地址(也叫MAC地址),RX,TX是表示接受数据包和发送数据包。
2、uname命令,它是用于查看系统内核与系统版本等信息,格式为"uname [-a]",演示效果如下:
[root@linuxprobe ~]# uname -a
Linux linuxprobe.com 3.10.0-123.el7.x86_64 #1 SMP Mon May 5 11:16:57 EDT 2014 x86_64 x86_64 x86_64 GNU/Linux
说明:内核名称为:linux,主机名为:linuxprobe.con,内核发行版本:3.10.0-123.e17.x86_64,节点名:smp,系统时间:Mon May 5 11:16:57 ,操作系统名称:x86_64_x86_64 x86_64 GNU/Linux。
3、uptime命令,它是来查看系统的负载信息(比如说,可以显示当前系统时间,系统当前已经运行的时间,启用终端数量以及平均负载值等等)这个命令有点像top命令。
[root@linuxprobe ~]# uptime
 18:42:48 up  5:54,  2 users,  load average: 0.04, 0.07, 0.06
4、free命令,它是用来查看当前系统中内存的使用信息,格式为"free [-h]",这个命令的最大作用就是可以时刻查看内存的使用量,防止系统宕机
[root@linuxprobe ~]# free -h
             total       used       free     shared    buffers     cached
Mem:          1.8G       1.0G       815M       9.8M       928K       330M
-/+ buffers/cache:       680M       1.1G
Swap:         2.0G         0B       2.0G

5、who命令,它是查看当前登入主机的用户终端信息,格式为"who [参数]"
[root@linuxprobe ~]# who
root     :0           May 22 12:50 (:0)   //登入用户名为root
root     pts/0        May 22 13:12 (:0)
6、last命令,它是来查看所有系统的登入记录(比如说我们这个操作系统有哪些用户登入过,都可以用这个命令查看到的)。
[root@linuxprobe ~]# last
root     pts/0        :0               Wed May 22 13:12   still logged in
root     :0           :0               Wed May 22 12:50   still logged in
(unknown :0           :0               Wed May 22 12:48 - 12:50  (00:01)
reboot   system boot  3.10.0-123.el7.x Wed May 22 20:48 - 18:54  (-1:-53)
7、history命令,它是用来查看我们之前执行过的命令,利用这个命令统统可以查看到,
[root@linuxprobe ~]# history
    1  cd ~
    2  fdisk /dev/sdb
    3  vim /etc/sysconfig/network-scripts/ifcfg-eno16777736
    4  systemctl restart network
    5  vim /etc/sysconfig/network-scripts/ifcfg-eno16777736
    6   systemctl restart network
    7  ifconfig
    8  exit
    9  vim /etc/sysconfig/network-scripts/ifcfg-eno16777736
   10  vim /etc/sysconfig/network-scripts/ifcfg-eno16777736
   11  systemctl restart network
   12  exit
   13  vim /etc/ssh/sshd_config
   14  systemctl restart sshd
   15  systemctl enable sshd
   16  vim /etc/ssh/sshd_config
   17  systemctl enable sshd
   18  systemctl enable sshd
   19  systemctl enable sshd
   20  vim /etc/ssh/sshd_config
   21  systemctl enable sshd
   22  vim /etc/ssh/sshd_config
   23  systemctl enable sshd
   24  sentenforce 0
注:上面是一部分执行过的命令,这个命令可以显示所有之前用过的命令记录。历史命令会被保存到用户的家目录中的./bash_history 文件中(linux系统中以(.)开头的文件均表示隐藏文件,而且这些文件大多数为系统服务文件);history -c 命令是表示清空之前用过的所有命令记录。
8、sosreport命令,它是用来收集系统配置及架构信息并输出诊断文档,格式为"sosreport"(这个命令可以很好的查看一些错误,当系统发生故障的时候,而且也可以让技术人员远程通过这个错误信息来解决问题,也就不用亲自来现场解决,因为Linux技术服务到现场的话,维修费用非常贵)
六、工作目录切换命令:
1、pwd命令,它是来显示用户当前所处的工作目录:
[root@linuxprobe Desktop]# pwd
/root/Desktop    //当前在rooty用户下的桌面目录
2、cd命令,它是用来切换工作路径,格式为:"cd [目录名称]";“cd -”命令表示返回上一次所处的目录,使用"cd.."命令表示进入上级目录,以及使用"cd ~"命令表示为切换到当前用户的家目录。演示效果如下:
[root@linuxprobe Desktop]# cd /bin     //切换到bin目录下
[root@linuxprobe bin]# cd -            //返回桌面目录下
/root/Desktop
[root@linuxprobe Desktop]# cd ~        //切换到用户的家目录
[root@linuxprobe ~]#
3、ls命令,它是来显示目录中的文件信息。格式为:"ls [选项] [文件]";可以使用"ls -a" 命令查看全部文件(包括隐藏文件),使用“ls -l ”命令可以查看文件的属性、大小等详细信息;使用"ls -al"命令可以查看全部文件的属性。显示效果如下:
[root@linuxprobe ~]# ls -al
total 92
dr-xr-x---. 17 root root 4096 May 23 00:32 .
drwxr-xr-x. 17 root root 4096 May 23  2019 ..
-rw-------.  1 root root 3720 May 23 00:32 .ICEauthority
-rw-------.  1 root root 2438 May 21 19:40 .bash_history
-rw-r--r--.  1 root root   18 Dec 29  2013 .bash_logout
-rw-r--r--.  1 root root  176 Dec 29  2013 .bash_profile
-rw-r--r--.  1 root root  176 Dec 29  2013 .bashrc
drwx------. 10 root root 4096 Feb 21 21:58 .cache
drwx------. 15 root root 4096 Feb 17 21:20 .config
-rw-r--r--.  1 root root  100 Dec 29  2013 .cshrc
drwx------.  3 root root   24 Feb  6 17:52 .dbus
-rw-------.  1 root root   16 Feb  6 18:02 .esd_auth
drwx------.  3 root root   18 Feb  6 18:02 .local
drwx------.  2 root root   46 Feb 22 22:44 .ssh
-rw-r--r--.  1 root root  129 Dec 29  2013 .tcshrc
-rw-------.  1 root root 6077 May 21 19:22 .viminfo
-rw-------.  1 root root 6944 Feb 23 23:08 .viminfo.tmp
-rw-------.  1 root root   59 May  4 20:21 .xauthpl8Xz5
drwxr-xr-x.  2 root root    6 May 21 18:47 Desktop
drwxr-xr-x.  2 root root    6 Feb  6 18:02 Documents
drwxr-xr-x.  2 root root    6 Feb  6 18:02 Downloads
drwxr-xr-x.  2 root root    6 Feb  6 18:02 Music
drwxr-xr-x.  2 root root    6 Feb  6 18:02 Pictures
drwxr-xr-x.  2 root root    6 Feb  6 18:02 Public
drwxr-xr-x.  2 root root    6 Feb  6 18:02 Templates
drwxr-xr-x.  2 root root    6 Feb  6 18:02 Videos
drwxr-xr-x.  3 root root   14 May 21 19:26 a
-rw-------.  1 root root 1032 Feb  7 01:50 anaconda-ks.cfg
-rw-r--r--.  1 root root   63 May 21 19:14 hh
drwxr-xr-x.  2 root root    6 May 21 19:24 hhh
-rw-r--r--.  1 root root 1083 Feb  6 17:52 initial-setup-ks.cfg
-rw-r--r--.  1 root root    3 Feb 22 22:41 readme.txt
-rw-r--r--.  1 root root   96 May 21 19:27 tt
-rw-r--r--.  1 root root   70 Feb 22 22:44 tu.txt
如果想查看目录属性信息,可以用"ls -ld +[目录名称]",演示如下:
[root@linuxprobe ~]# ls -ld /etc
drwxr-xr-x. 132 root root 8192 May 23  2019 /etc  //drwxr-xr-x这个就是表示目录的属性,关于文件的属性,后面我们会学到
七、文件文本编辑命令:
1、cat 命令,它是来查看纯文本文件(内容比较少的),格式为:"cat [选项] [文件]"。"cat -n [文件] "命令可以在查看文件的内容的时候,可以显示行号出来。
[root@linuxprobe ~]# cat -n anaconda-ks.cfg
     1    #version=RHEL7
     2    # System authorization information
     3    auth --enableshadow --passalgo=sha512
     4
     5    # Use CDROM installation media
     6    cdrom
     7    # Run the Setup Agent on first boot
     8    firstboot --enable
     9    ignoredisk --only-use=sda
    10    # Keyboard layouts
    11    keyboard --vckeymap=us --xlayouts='us'
    12    # System language
    13    lang en_US.UTF-8
    14
    15    # Network information
    16    network  --bootproto=dhcp --device=eno16777736 --onboot=off --ipv6=auto
    17    network  --hostname=linuxprobe.com
    18    # Root password
    19    rootpw --iscrypted $6$CwjdunbhIs0f/XbH$0LRlGWkfG.rDumUCwVtFU6TuNAlVyh3Yd2/ef4CbwLowJ7y5WHmOA10PuJuERGlPaZf70LldkqR5RgnM/cmCm0
    20    # System timezone
    21    timezone America/New_York --isUtc
    22    # X Window System configuration information
    23    xconfig  --startxonboot
    24    # System bootloader configuration
    25    bootloader --location=mbr --boot-drive=sda
    26    autopart --type=lvm
    27    # Partition clearing information
    28    clearpart --none --initlabel
    29
    30    %packages
    31    @base
    32    @core
    33    @desktop-debugging
    34    @dial-up
    35    @fonts
    36    @gnome-desktop
    37    @guest-agents
    38    @guest-desktop-agents
    39    @input-methods
    40    @internet-browser
    41    @multimedia
    42    @print-client
    43    @x11
    44
    45    %end
    46
cat命令详解:https://www.linuxcool.com/cat
2、more命令,它是来查看纯文本文件(内容比较多的),格式为"more [选项] [文件]";相对于刚才那个cat 命令来讲的话,在查看一个未知文件大小的时候,最好用这个命令:演示如下:
[root@linuxprobe ~]# more anacoda-ks.cfg
anacoda-ks.cfg: No such file or directory
[root@linuxprobe ~]# more anaconda-ks.cfg
#version=RHEL7
# System authorization information
auth --enableshadow --passalgo=sha512

# Use CDROM installation media
cdrom
# Run the Setup Agent on first boot
firstboot --enable
ignoredisk --only-use=sda
# Keyboard layouts
keyboard --vckeymap=us --xlayouts='us'
# System language
lang en_US.UTF-8

# Network information
network  --bootproto=dhcp --device=eno16777736 --onboot=off --ipv6=auto
network  --hostname=linuxprobe.com
# Root password
rootpw --iscrypted $6$CwjdunbhIs0f/XbH$0LRlGWkfG.rDumUCwVtFU6TuNAlVyh3Yd2/ef4Cbw
LowJ7y5WHmOA10PuJuERGlPaZf70LldkqR5RgnM/cmCm0
# System timezone
timezone America/New_York --isUtc
# X Window System configuration information
--More--(64%)
注:它还会显示当前查看了多少内容百分比,例如上面显示查找了%64的内容。
3、head命令,它是用来查看纯文本文档的前N行,格式为"head [选项] [文件]"。可以使用"head -n +显示行数 +文件名 "来查看文本的前N行:
[root@linuxprobe ~]# head -n 20 anaconda-ks.cfg
#version=RHEL7
# System authorization information
auth --enableshadow --passalgo=sha512

# Use CDROM installation media
cdrom
# Run the Setup Agent on first boot
firstboot --enable
ignoredisk --only-use=sda
# Keyboard layouts
keyboard --vckeymap=us --xlayouts='us'
# System language
lang en_US.UTF-8

# Network information
network  --bootproto=dhcp --device=eno16777736 --onboot=off --ipv6=auto
network  --hostname=linuxprobe.com
# Root password
rootpw --iscrypted $6$CwjdunbhIs0f/XbH$0LRlGWkfG.rDumUCwVtFU6TuNAlVyh3Yd2/ef4CbwLowJ7y5WHmOA10PuJuERGlPaZf70LldkqR5RgnM/cmCm0
# System timezone
4、tail命令,用于查看纯文本文档的后N行或者持续刷新内容,格式为"tail [选项]] [文件]"使用命令"tail -n + 显示行数 +文件名 " ,而且使用命令"tail -f [文件名]"可以实时查看文件的内容:
[root@linuxprobe ~]# tail -n 20 anaconda-ks.cfg
# Partition clearing information
clearpart --none --initlabel

%packages
@base
@core
@desktop-debugging
@dial-up
@fonts
@gnome-desktop
@guest-agents
@guest-desktop-agents
@input-methods
@internet-browser
@multimedia
@print-client
@x11

%end
[root@linuxprobe ~]# tail -f anaconda-ks.cfg
@guest-agents
@guest-desktop-agents
@input-methods
@internet-browser
@multimedia
@print-client
@x11

%end
5、tr命令,它是用来替换文本文件中的字符,格式为"tr [原始字符] [目标字符]",例如我们下面来把anaconda-ks.cfg文件里面的内容全部替换成大写,这里有一个管道符(打个比喻,我们日常生活中,你下班回家进家门的时候,你第一时间要做的是就是开开家门进去,而这个管道符就像这扇门一样,打开了你就进去了里面,所以下面我举得这个例子是先通过cat 命令查文件anaconda-ks.cfg里面的内容,然后通过管道符传递给后面,再通过tr命令命令把刚才传递过来的文件内容里面的字符全部进行大写):
[root@linuxprobe ~]#  cat anaconda-ks.cfg | tr [a-z] [A-Z]
#version=RHEL7
# System [uthoriz[tion inform[tion
[uth --en[blesh[dow --p[ss[lgo=sh[512

# Use CDROM inst[ll[tion medi[
cdrom
# Run the Setup Agent on first boot
firstboot --en[ble
ignoredisk --only-use=sd[
# Keybo[rd l[youts
keybo[rd --vckeym[p=us --xl[youts='us'
# System l[ngu[ge
l[ng en_US.UTF-8

# Network inform[tion
network  --bootproto=dhcp --device=eno16777736 --onboot=off --ipv6=[uto
network  --hostn[me=linuxprobe.com
# Root p[ssword
rootpw --iscrypted $6$CwjdunbhIs0f/XbH$0LRlGWkfG.rDumUCwVtFU6TuNAlVyh3Yd2/ef4CbwLowJ7y5WHmOA10PuJuERGlP[Zf70LldkqR5RgnM/cmCm0
# System timezone
timezone Americ[/New_York --isUtc
# X Window System configur[tion inform[tion
xconfig  --st[rtxonboot
# System bootlo[der configur[tion
bootlo[der --loc[tion=mbr --boot-drive=sd[
[utop[rt --type=lvm
# P[rtition cle[ring inform[tion
cle[rp[rt --none --initl[bel

%p[ck[ges
@b[se
@core
@desktop-debugging
@di[l-up
@fonts
@gnome-desktop
@guest-[gents
@guest-desktop-[gents
@input-methods
@internet-browser
@multimedi[
@print-client
@x11

%end
注:这里好像使用这个命令没起作用,但是刘遄老师书上成功了,以及看老师讲课也是可以放大的,但是不知道我在试验的时候不知道为啥出错了。
6、wc命令,它是统计指定文本的行数、字数、字节数,格式为:"wc [参数] 文本",它的具体用法如下:

演示如下:
[root@linuxprobe ~]# wc -l anaconda-ks.cfg
46 anaconda-ks.cfg
[root@linuxprobe ~]# wc -w anaconda-ks.cfg
98 anaconda-ks.cfg
[root@linuxprobe ~]# wc -c anaconda-ks.cfg
1032 anaconda-ks.cfg
7、stat命令,它是来查看文件的具体存储信息和时间信息,格式为:"stat 文件名称":
[root@linuxprobe ~]# stat anaconda-ks.cfg
  File: 'anaconda-ks.cfg'
  Size: 1032          Blocks: 8          IO Block: 4096   regular file
Device: fd01h/64769d    Inode: 68975158    Links: 1
Access: (0600/-rw-------)  Uid: (    0/    root)   Gid: (    0/    root)
Context: system_u:object_r:admin_home_t:s0
Access: 2019-09-01 08:43:40.624951086 +0800
Modify: 2019-02-07 01:50:58.773909354 +0800
Change: 2019-02-07 01:50:58.774909354 +0800
 Birth: -
8、cut命令,它是按列提取文本字符,格式为" cut [参数] 文本";可以使用参数-f 来设置下需要看的列数,同时在设置的时候还要使用参数 -d 来设置间隔符。演示如下:
[root@linuxprobe Desktop]# head -n 2 /etc/passwd
root:x:0:0:root:/root:/bin/bash
bin:x:1:1:bin:/bin:/sbin/nologin
[root@linuxprobe Desktop]# cd ~
[root@linuxprobe ~]# cut -d: -f1 /etc/passwd     //以间隔符冒号":"来提取etc目录下的文件内容的第一列
root
bin
daemon
adm
lp
sync
shutdown
halt
mail
operator
games
ftp
nobody
dbus
polkitd
unbound
colord
usbmuxd
avahi
avahi-autoipd
libstoragemgmt
saslauth
qemu
rpc
rpcuser
nfsnobody
rtkit
radvd
ntp
chrony
abrt
pulse
gdm
gnome-initial-setup
9、diff命令,它是用来比较多个文本文件的差异,格式为:" diff [参数] 文件",在使用这个命令的时候 可以使用参数"--brief " 来确认两个文件是否不同,还可以使用参数" -c " 来详细比较出多个文件的差异之处,在显示这个命令之前,我先vim编辑器创建了两个文件:hh和tt,然后往里面随便写内容:

八、文件目录管理命令:
1、touch命令,它是用于创建空白文件或者设置文件的时间,格式为: "touch [文件] ‘’,它的参数使用如下:
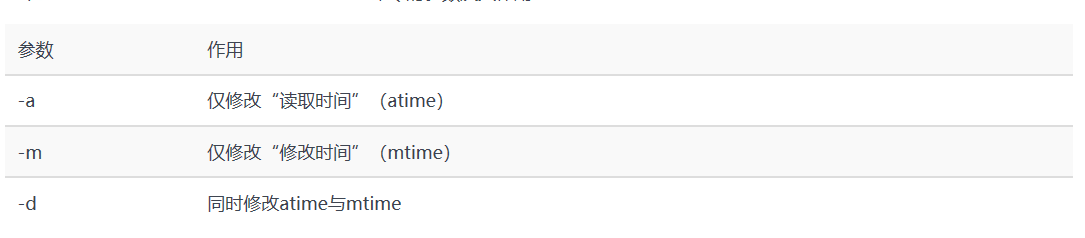
自己的理解:atime 是表示最后访问时间;mtime是表示修改的内容;ctime是表示修改属性;下面的演示是修改了文件的时间:
[root@linuxprobe Desktop]# cd ~
[root@linuxprobe ~]# ls -l anaconda-ks.cfg
-rw-------. 1 root root 1032 Feb  7 01:50 anaconda-ks.cfg

[root@linuxprobe ~]# echo "i like the linux " >> anaconda-ks.cfg
[root@linuxprobe ~]# ls -l anaconda-ks.cfg
-rw-------. 1 root root 1050 May 23 18:31 anaconda-ks.cfg
[root@linuxprobe ~]# touch -d "2019-05-24 18:33 " anaconda-ks.cfg
[root@linuxprobe ~]# ls -l anaconda-ks.cfg
-rw-------. 1 root root 1050 May 24  2019 anaconda-ks.cfg
[root@linuxprobe ~]#
2、mkdir命令,它是来创建空白的目录,格式为: "mkdir [选项] 目录 ",这个命令用的比较多,在后面 的磁盘分区经常要用到这个命令,所以这个命令一定要掌握,这里我创建了一个haha 目录,并且同时在这个目录下面还可以使用参数" -p “来递归创建具有嵌套层关系的文件目录,演示如下:
[root@linuxprobe ~]# mkdir haha
[root@linuxprobe ~]# cd haha
[root@linuxprobe haha]# mkdir -p a/b/c/d/e
[root@linuxprobe haha]# cd a
[root@linuxprobe a]# cd b
[root@linuxprobe b]# cd c
[root@linuxprobe c]#
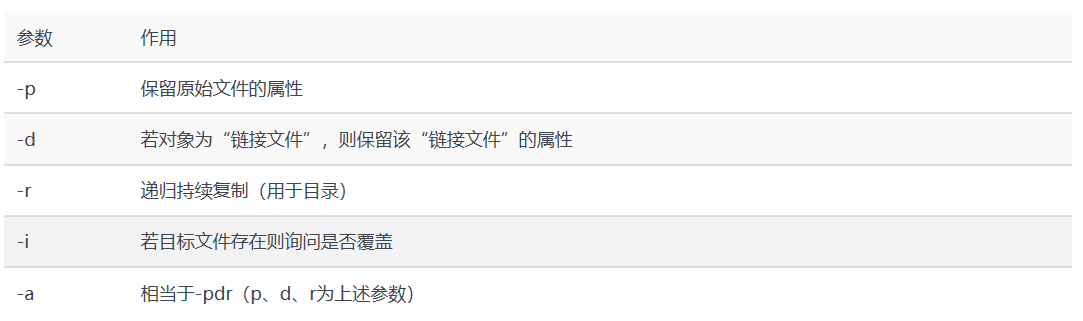
3、cp命令,它是用来复制文件或者目录,格式为i:“ cp [选项 ] 源文件 目标文件 ”,在linux系统中复制操作分为三种情况:
a、如果目标文件是目录,则会把源文件复制到该目录中去
b、如果目标文件也是普通文件,则会询问是否要覆盖它
c、如果目标文件不存在,则执行正常的复制操作
同时cp命令参数的使用如下:
[root@linuxprobe ~]# touch install.log
[root@linuxprobe ~]# cp install.logx.log
cp: missing destination file operand after 'install.logx.log'
Try 'cp --help' for more information.
[root@linuxprobe ~]#   //这里演示的时候出了点问题,不知道为啥,今天做上面的那个管道符的试验也失败了,后面会查找到原因来
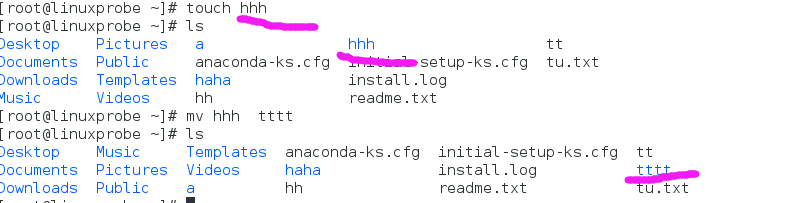
4、mv命令,它是来剪切文件或者将文件重新命名,格式为 :" mv [选项] 源文件 [目标路径] [目标文件名] ",这里要注意,剪切操作不是复制操作,因为他会默认把源文件删除掉,只保留剪切后的文件,下面我建立了一个hhh文件,然后利用mv命令把改名成了tttt:
5、rm命令,它是来删除文件或者目录,格式为" rm [选项] 文件";" rm -rf +文件或目录"这个命令可以强制删除文件或者目录,比如现在来删除我刚刚建立的文件tttt:
[root@linuxprobe ~]# rm -rf tttt
[root@linuxprobe ~]# ls
Desktop    Downloads  Pictures  Templates  a                haha  initial-setup-ks.cfg  readme.txt  tu.txt
Documents  Music      Public    Videos     anaconda-ks.cfg  hh    install.log           tt
6、dd命令,它是按照指定大小和个数的数据块来复制文件或者转换文件,格式为: " dd [参数]",常用格式为: " dd if=文件名 of=文件名(是一个新的文件名) bs(块的大小) count(块的个数) ",它的参数如下:

[root@linuxprobe Desktop]# cd ~
[root@linuxprobe ~]# dd if=/dev/zero of=hhhhh count=1 bs=560
1+0 records in
1+0 records out
560 bytes (560 B) copied, 8.9491e-05 s, 6.3 MB/s
说明:这里从/dev/zero设备文件中取出了一个大小为560M的数据块,然后保存名为hhhhh的文件
7、file命令,它是来查看文件的类型,因为在linux系统中一切都是文件,就连硬盘都是文件:
[root@linuxprobe ~]# file tt
tt: ASCII text
[root@linuxprobe ~]#
九、打包压缩与搜索命令:
1、tar命令,它是用于对文件进行打包或者压缩,具体用法如下:
a、 tar czvf/-cvzf 压缩包名称.tar.gz 打包的目录名称 (这里的c表示打包,z表示压缩格式,v表示显示压缩或解压的过程 ,f 表示目标文件名
b、 tar -xzvf 压缩包名称.tar.gz (x 表示解压)
c、tar命令的具体参数如下:

接下来先是压缩然后是解压:
[root@linuxprobe ~]# tar czvf etc.tar.gz /etc
tar: Removing leading `/' from member names
/etc/
/etc/fstab
/etc/crypttab
/etc/mtab
/etc/fonts/
/etc/fonts/conf.d/
/etc/fonts/conf.d/65-0-lohit-bengali.conf
/etc/fonts/conf.d/59-liberation-sans.conf
/etc/fonts/conf.d/65-0-khmeros-base.conf
[root@linuxprobe ~]# mkdir /root/etc
mkdir: cannot create directory '/root/etc': File exists
[root@linuxprobe ~]# tar -xzvf etc.tar.gz -C /root/etc
etc/
etc/fstab
etc/crypttab
etc/mtab
etc/fonts/
etc/fonts/conf.d/
etc/fonts/conf.d/65-0-lohit-bengali.conf
etc/fonts/conf.d/59-liberation-sans.conf
2、grep 命令,它是来对文本中执行关键字搜索,并显示匹配的结果,格式为: "grep [选项] [文件] ",它的具体参数使用如下:
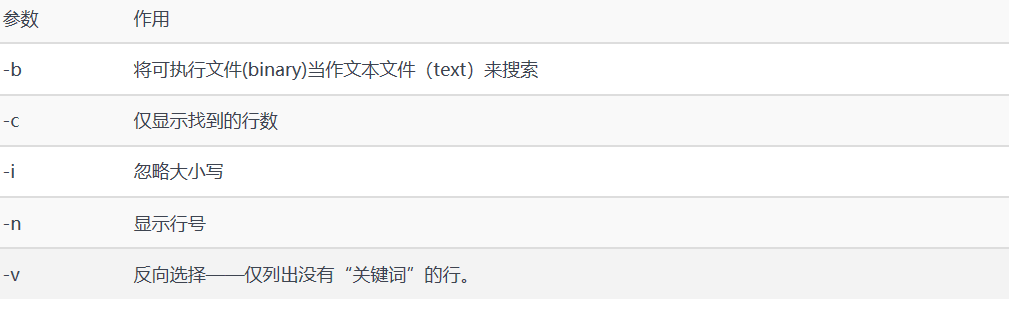
下面演示了查找anaconda-ks.cfg文件中的RHEL7:
[root@linuxprobe ~]# grep RHEL7
^C
[root@linuxprobe ~]# grep RHEL7 anaconda-ks.cfg
#version=RHEL7
[root@linuxprobe ~]#
3、find命令,它是按照指定条件来查找文件,它的具体参数用法如下:


进阶实验:在整个文件系统中找出所有归属于linuxprobe用户的文件并复制到/root/findresults目录。
该实验的重点是“-exec {} ;”参数,其中的{}表示find命令搜索出的每一个文件,并且命令的结尾必须是“;”。完成该实验的具体命令如下:
[root@linuxprobe ~]# find / -user linuxprobe -exec cp -a {} /root/findresults/ ;
十、总结:
通过这章的学习,自己熟悉了一些基本命令的用法,但是我知道这只是冰山一角,还得往下面学习下去,走进linux的世界,继续加油。