任务一:Android Studio的安装测试
- 任务要求:参考《Java和Android开发学习指南(第二版)(EPUBIT,Java for Android 2nd)》第二十四章:
- 参考http://www.cnblogs.com/rocedu/p/6371315.html#SECANDROID,安装 Android Stuidio
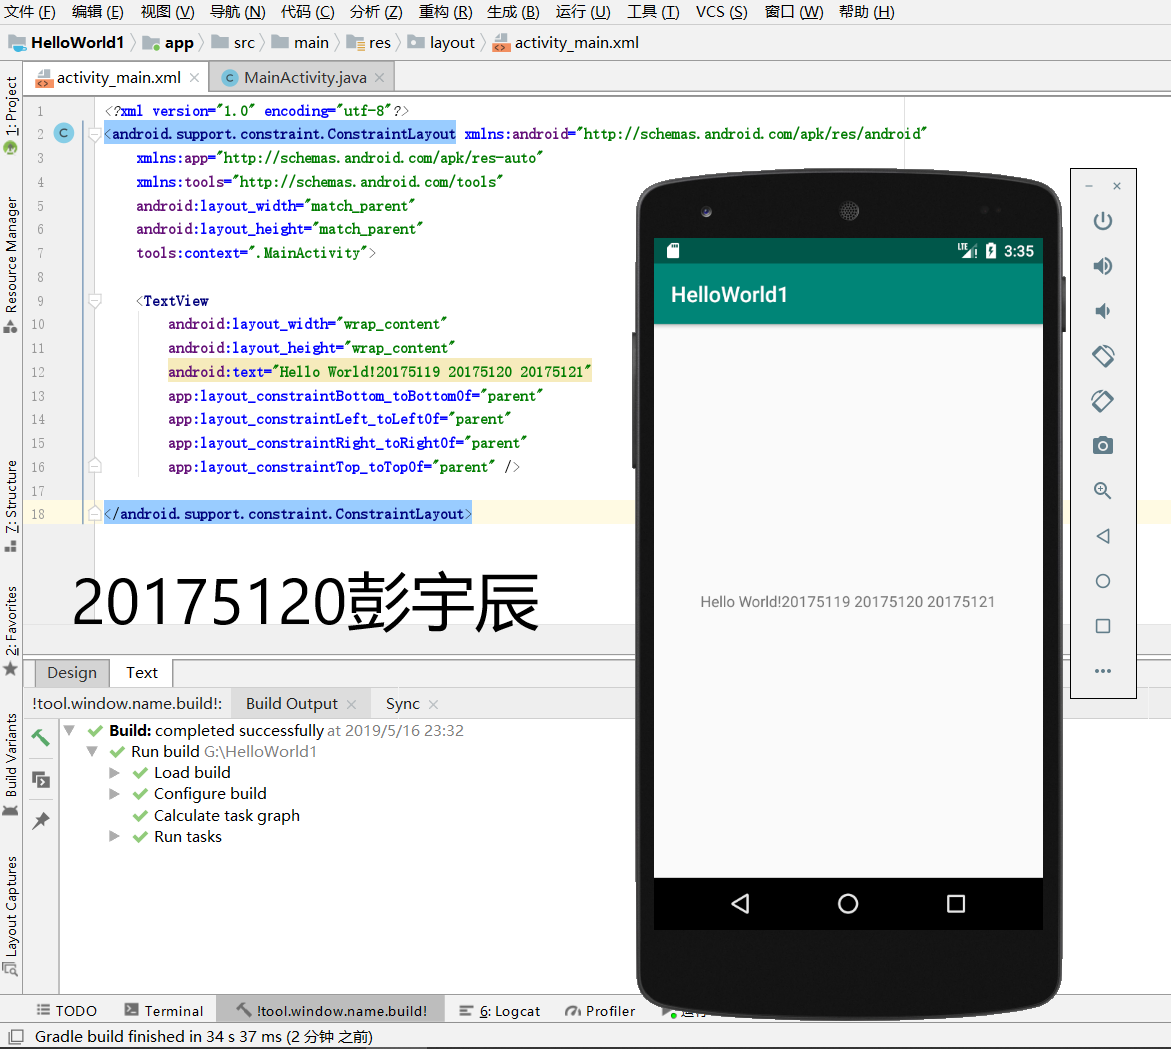
- 完成Hello World, 要求修改res目录中的内容,Hello World后要显示自己的学号,自己学号前后一名同学的学号,提交代码运行截图和码云Git链接,截图没有学号要扣分
- 学习Android Stuidio调试应用程序
实验步骤
1.下载好Android Studio之后,安装到D盘,在bin目录下打开studio64
2.打开左侧的project,进入res目录下的layout,可以看到activity_main.xml
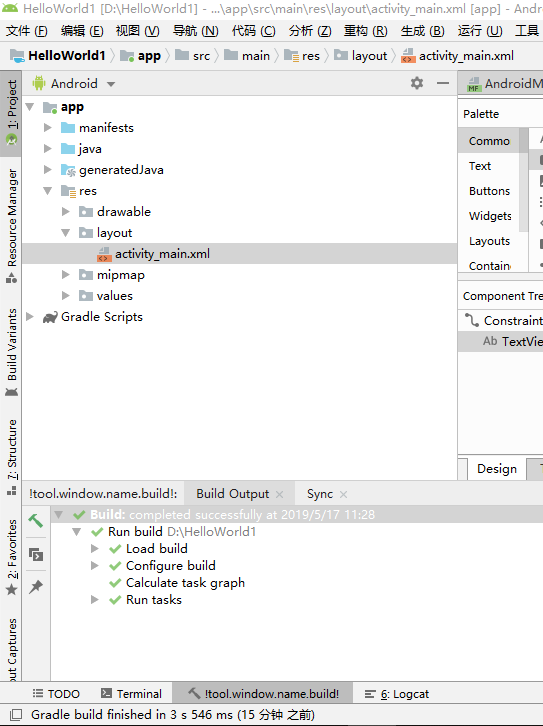
3.修改activity_main.xml第12行代码,在HelloWorld后面加入学号
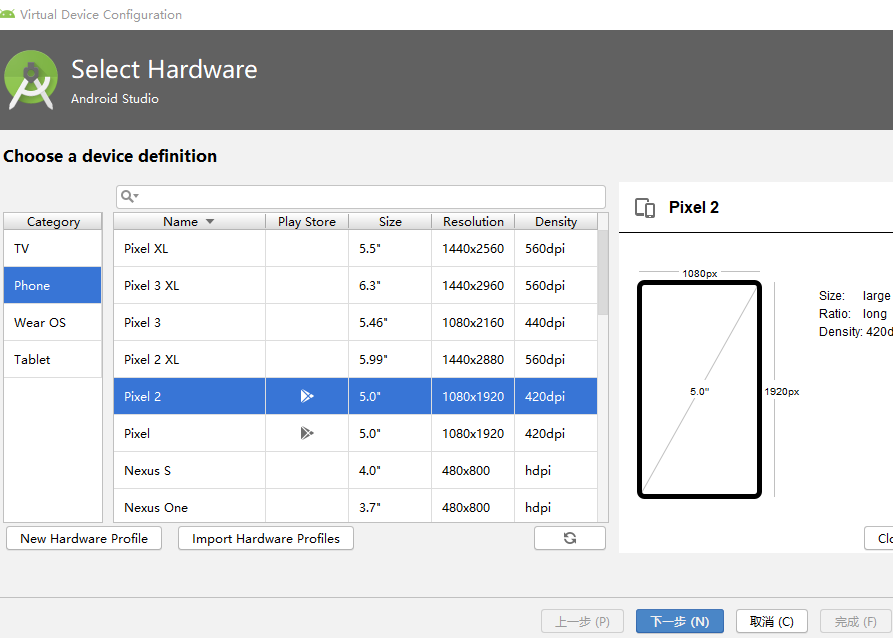
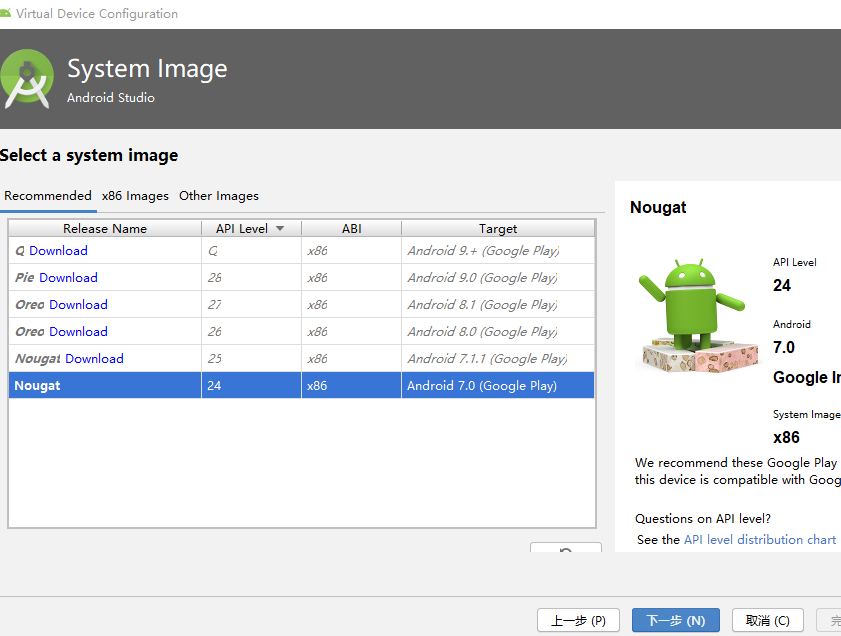
4.打开右上角AVD manager
-Create Virtual Device创建一个安卓虚拟机,选择一个虚拟机下载
下面是我的运行截图
任务二:Activity测试。
- 任务要求:参考《Java和Android开发学习指南(第二版)(EPUBIT,Java for Android 2nd)》第二十五章:
- 构建项目,运行教材相关代码
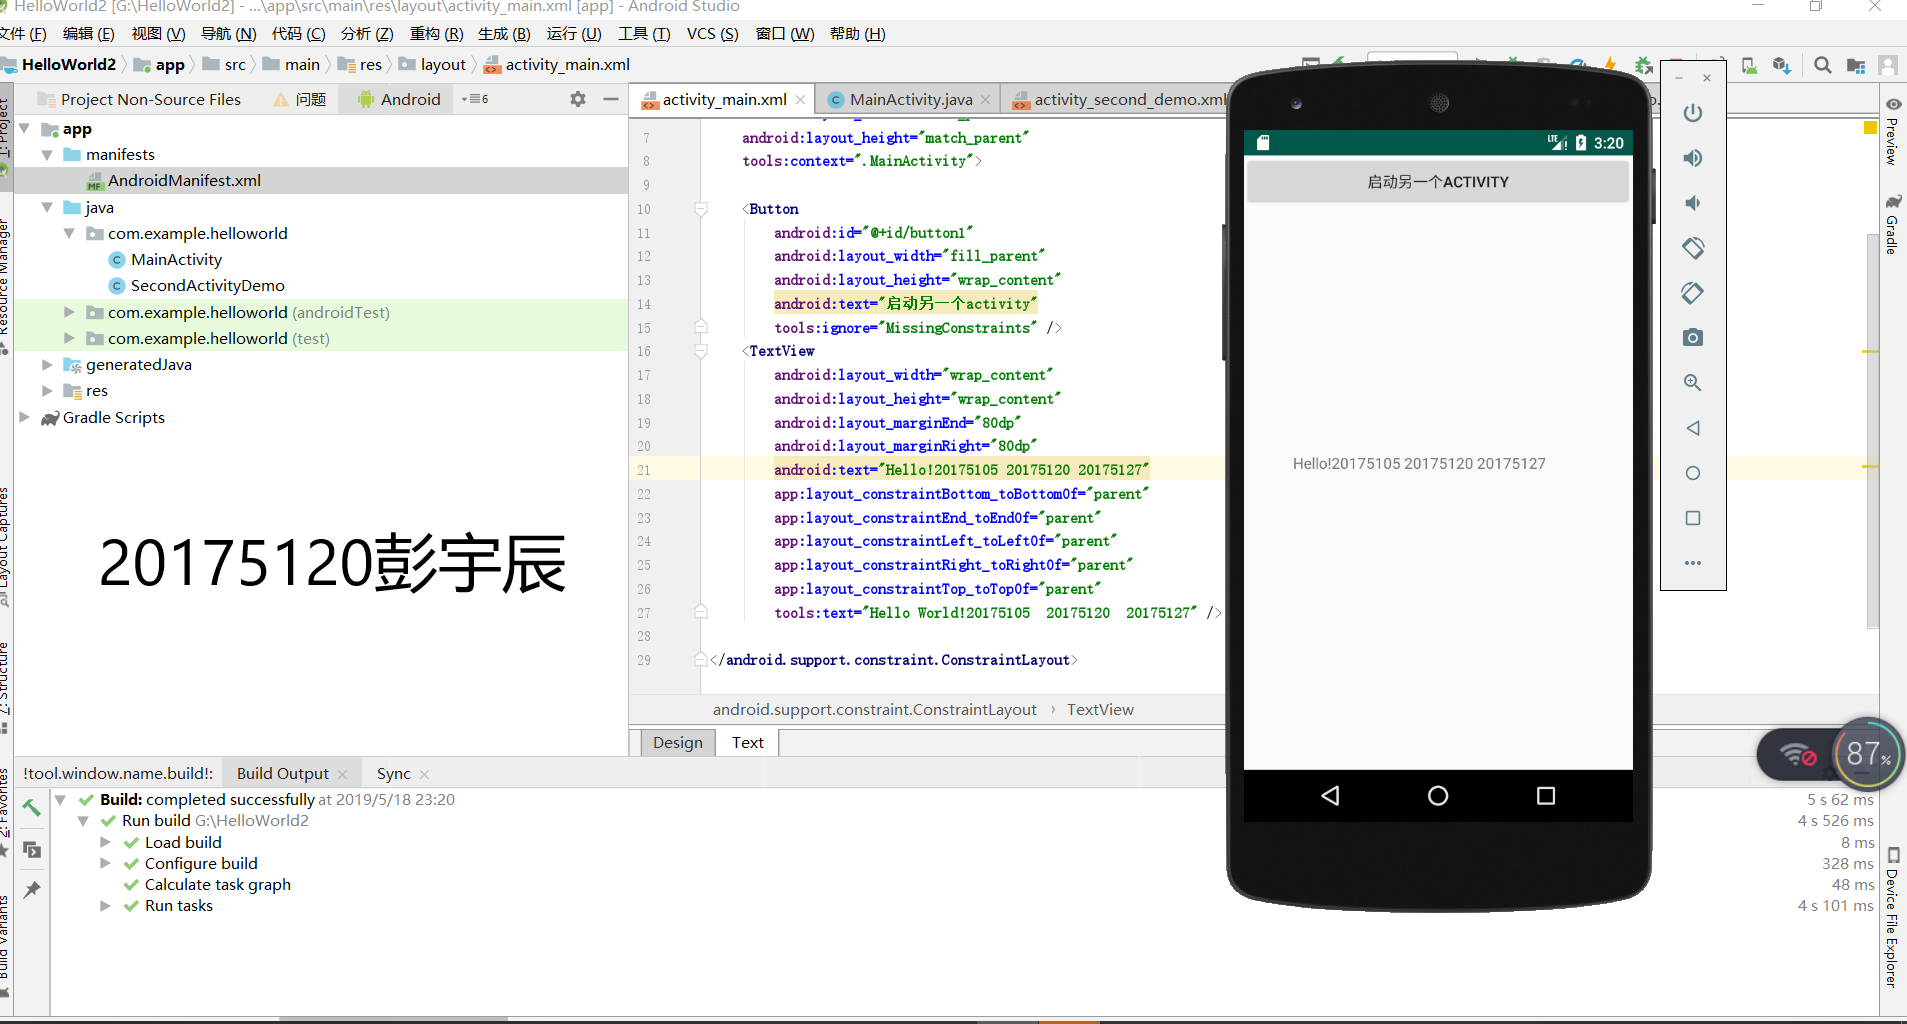
- 创建 ThirdActivity, 在ThirdActivity中显示自己的学号,修改代码让MainActivity启动ThirdActivity
- 提交代码运行截图和码云Git链接,截图要有学号水印,否则会扣分
实验步骤
1.在MainActivity相同的目录下创建SecondActivityDemo项目
2.按照教材修改MainActivity中相关代码
3.修改在layout中activity_third.xml文件
4.AndroidMainfest.xml注册
代码修改
//在MainActivity.java中创建intent对象
button1 = (Button) findViewById(R.id.button1);
button1.setOnClickListener(new OnClickListener() {
    @Override
    public void onClick(View v) {
        Intent intent = new Intent(
             MainActivity.this, SecondActivityDemo.class);
             startActivity(intent);

//在activity_third.xml中添加一个button
<Button
    android:id="@+id/button1"
    android:layout_width="fill_parent"
    android:layout_height="wrap_content"
    android:text="启动另一个activity"
    tools:ignore="MissingConstraints" />

//SecondActivityDemo
package com.example.helloworld;
import android.support.v7.app.AppCompatActivity;
import android.os.Bundle;
public class SecondActivityDemo extends AppCompatActivity {
   @Override
   protected void onCreate(Bundle savedInstanceState) {
   super.onCreate(savedInstanceState);
   setContentView(R.layout.activity_second_demo);
   }
}

//AndroidMainfest.xml
<?xml version="1.0" encoding="utf-8"?>
<manifest xmlns:android="http://schemas.android.com/apk/res/android"
    xmlns:tools="http://schemas.android.com/tools"
    package="com.example.helloworld" >
    <application
        android:allowBackup="true"
        android:icon="@mipmap/ic_launcher"
        android:label="@string/app_name"
        android:theme="@style/AppTheme"
        tools:ignore="GoogleAppIndexingWarning">
    <activity
        android:name=".MainActivity"
        android:label="@string/app_name" >
        <intent-filter>
    <action
        android:name="android.intent.action.MAIN" />
    <category
        android:name="android.intent.category.LAUNCHER" />
        </intent-filter>
    </activity>
    <activity
        android:name=".SecondActivityDemo"
        android:label="Activity">
    </activity><!--在这里注册-->
    </application>
</manifest>
运行截图
任务三:UI测试。
- 任务要求:参考《Java和Android开发学习指南(第二版)(EPUBIT,Java for Android 2nd)》第二十六章:
- 构建项目,运行教材相关代码
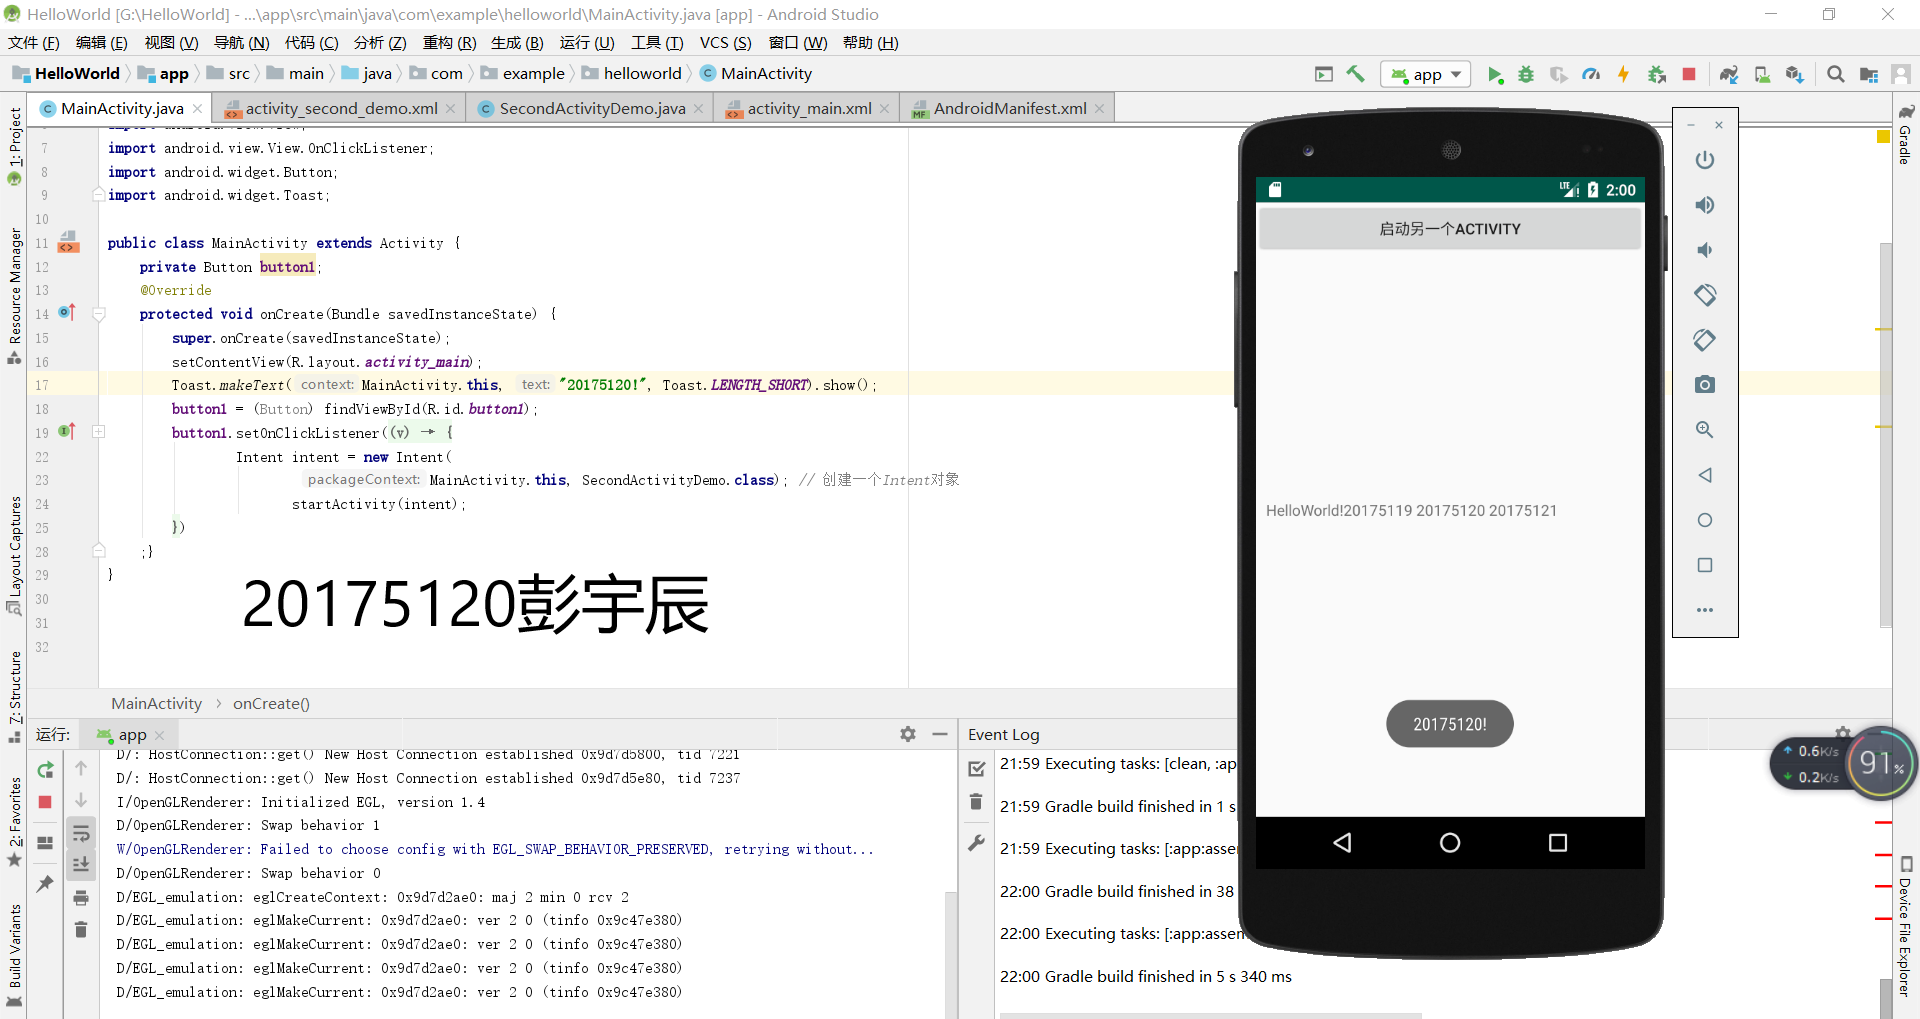
- 修改代码让Toast消息中显示自己的学号信息
- 提交代码运行截图和码云Git链接,截图要有学号水印,否则会扣分
实验步骤
1.引入方法
import android.widget.Toast;
2.快速调用
Toast.makeText(MainActivity.this, "20175120!", Toast.LENGTH_SHORT).show();
代码
package com.example.helloworld;

import android.app.Activity;
import android.content.Intent;
import android.os.Bundle;
import android.view.View;
import android.view.View.OnClickListener;
import android.widget.Button;
import android.widget.Toast;

public class MainActivity extends Activity {
    private Button button1;
    @Override
    protected void onCreate(Bundle savedInstanceState) {
        super.onCreate(savedInstanceState);
        setContentView(R.layout.activity_main);
        Toast.makeText(MainActivity.this, "20175120!", Toast.LENGTH_SHORT).show();
        button1 = (Button) findViewById(R.id.button1);
        button1.setOnClickListener(new OnClickListener() {
            @Override
            public void onClick(View v) {
                Intent intent = new Intent(
                        MainActivity.this, SecondActivityDemo.class); // 创建一个Intent对象
                       startActivity(intent);
            }
        }
    }
}
运行截图
任务四:布局测试。
- 任务要求:参考《Java和Android开发学习指南(第二版)(EPUBIT,Java for Android 2nd)》第二十七章:
- 构建项目,运行教材相关代码
- 修改布局让P290页的界面与教材不同
- 提交代码运行截图和码云Git链接,截图要有学号水印,否则会扣分
实验过程:图形界面操作

5.任务五:事件处理测试。
- 任务要求:参考《Java和Android开发学习指南(第二版)(EPUBIT,Java for Android 2nd)》第二十八章:
- 构建项目,运行教材相关代码
- 提交代码运行截图和码云Git链接,截图要有学号水印,否则会扣分
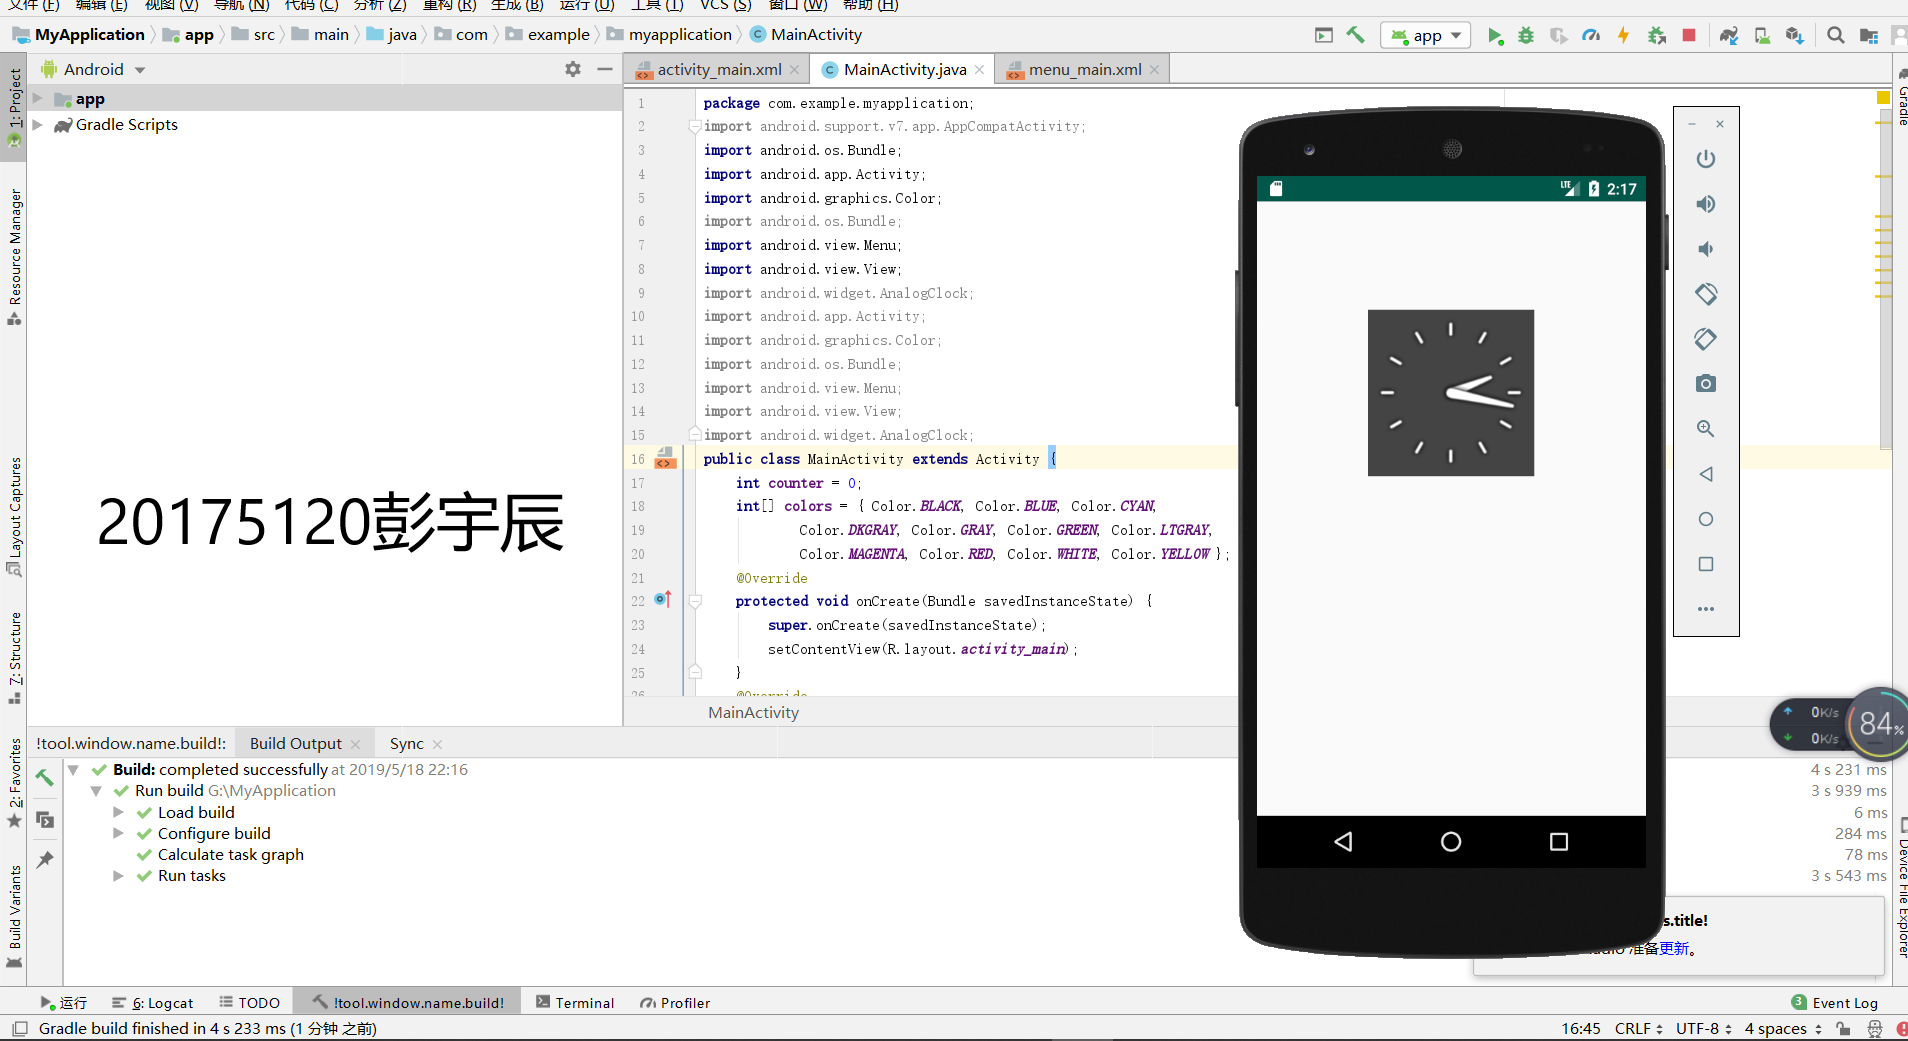
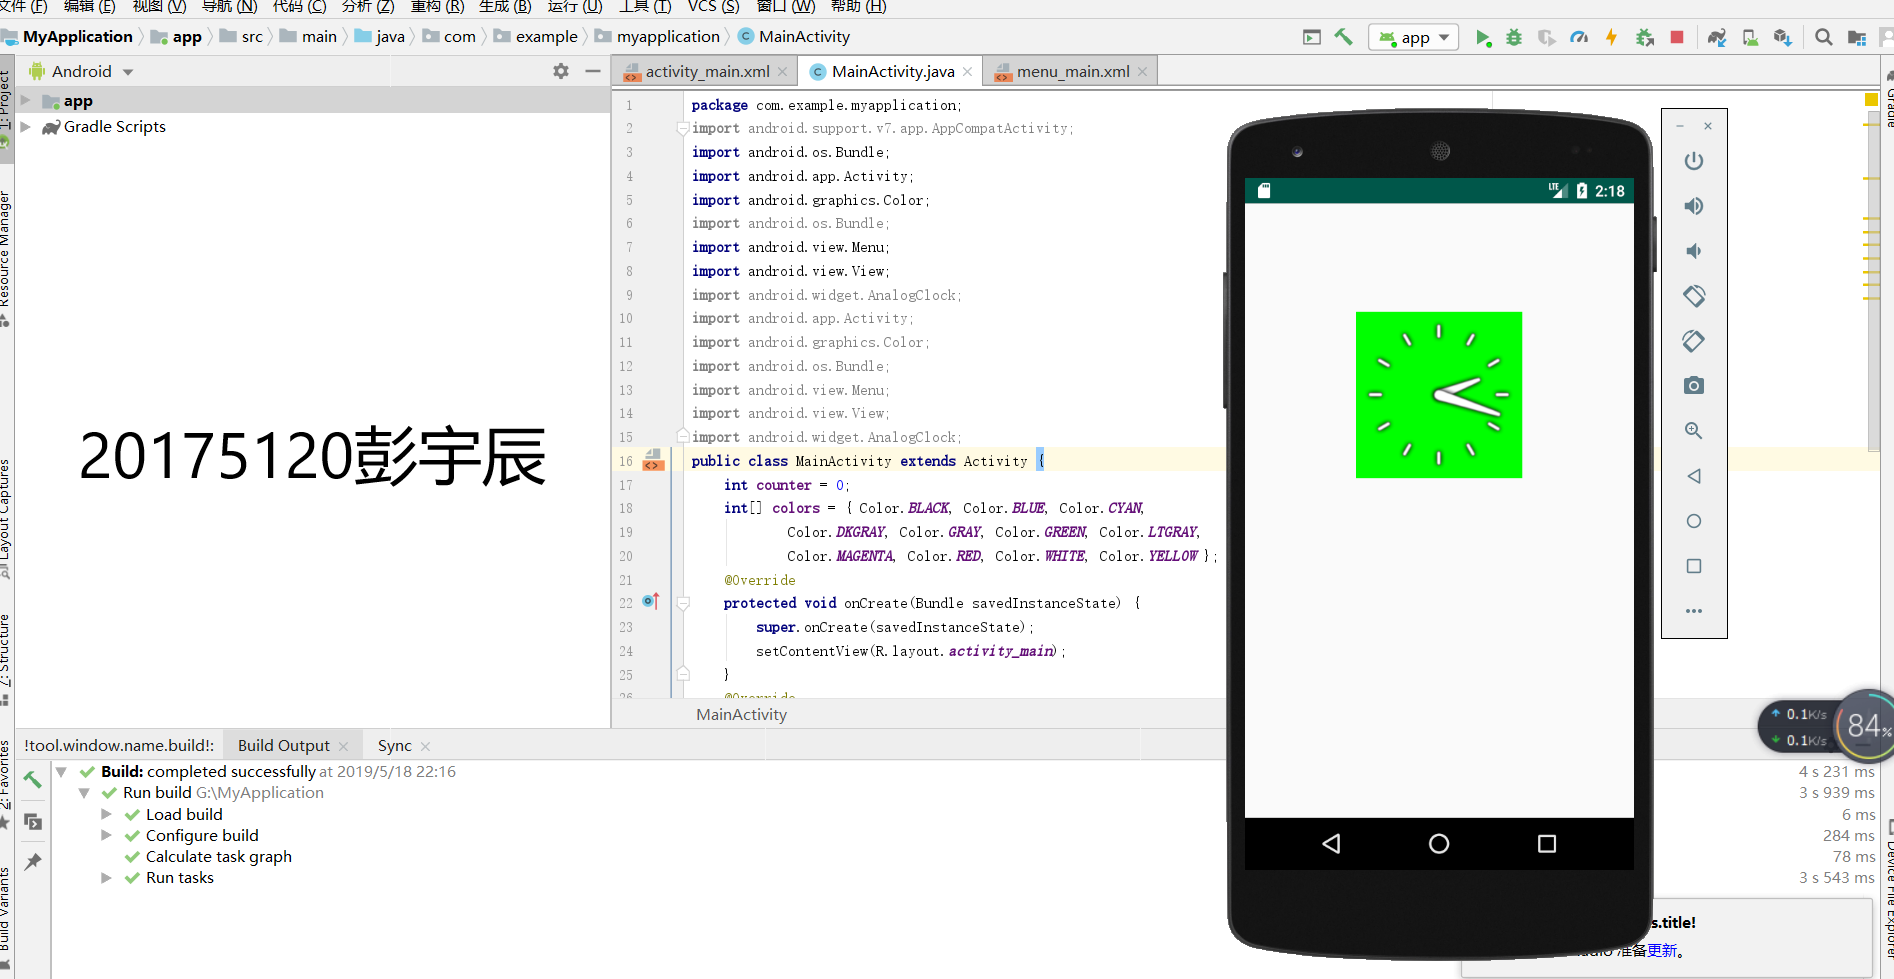
需求:改变时钟背景色
代码
//MainActivity.java
package cn.edu.besti.is.wxh.multicolorclock;
import android.support.v7.app.AppCompatActivity;
import android.os.Bundle;
import android.app.Activity;
import android.graphics.Color;
import android.os.Bundle;
import android.view.Menu;
import android.view.View;
import android.widget.AnalogClock;
import android.app.Activity;
import android.graphics.Color;
import android.os.Bundle;
import android.view.Menu;
import android.view.View;
import android.widget.AnalogClock;
public class MainActivity extends Activity {
    int counter = 0;
    int[] colors = { Color.BLACK, Color.BLUE, Color.CYAN,
            Color.DKGRAY, Color.GRAY, Color.GREEN, Color.LTGRAY,
            Color.MAGENTA, Color.RED, Color.WHITE, Color.YELLOW };
    @Override
    protected void onCreate(Bundle savedInstanceState) {
        super.onCreate(savedInstanceState);
        setContentView(R.layout.activity_main);
    }
    @Override
    public boolean onCreateOptionsMenu(Menu menu) {
// Inflate the menu; this adds items to the action bar if it
// is present.
        getMenuInflater().inflate(R.menu.menu_main, menu);
        return true;
    }
    public void changeColor(View view) {
        if (counter == colors.length) {
            counter = 0;
        }
        view.setBackgroundColor(colors[counter++]);
    }
}

//activity_main.xml
<RelativeLayout
    xmlns:android="http://schemas.android.com/apk/res/android"
    xmlns:tools="http://schemas.android.com/tools"
    android:layout_width="match_parent"
    android:layout_height="match_parent"
    android:paddingBottom="10dp"
    android:paddingLeft="10dp"
    android:paddingRight="10dp"
    android:paddingTop="10dp"
    tools:context=".MainActivity">
    <AnalogClock
        android:id="@+id/analogClock1"
        android:layout_width="wrap_content"
        android:layout_height="wrap_content"
        android:layout_alignParentTop="true"
        android:layout_centerHorizontal="true"
        android:layout_marginTop="90dp"
        android:onClick="changeColor"
        />
</RelativeLayout>
实验截图