ssm项目集成
说明:ssm指的是 spring + springMvc+ mybatis,是目前开发比较流行的集成方式,可以较好的实现前后端分离
spring与mybatis的集成,是通过配置文件applicaContext.xml实现的,其中将mybatis的核心对象SqlSessionFactory通过工厂创建bean对象的方法注入到spring容器中
这样就不需要使用new的方式创建对象,步骤简单,底层帮忙实现其中的mapper对象的封装,mapper对象使我们操作数据库的最终对象。
springmvc+spring 的集成:配置web.xml,在启动服务器的时候会读取web.xml文件,在读取的时候监听spring容器,加载spring核心配置文件和启动springMvc容器,加载springMvc核心配置文件,最后配置过滤器,解决编码问题。
步骤:
1.创建一个maven或者普通的web项目
使用ider'或者eclipse创建一个web项目(该结构就不再赘述)
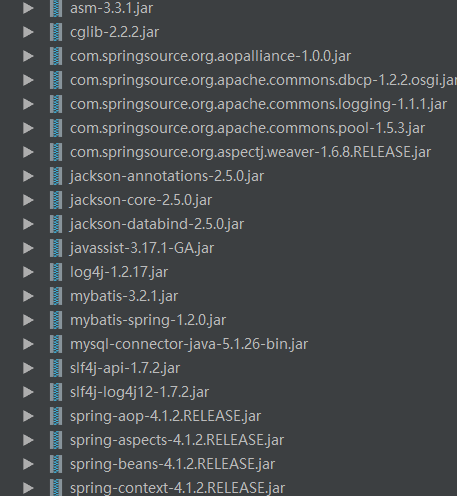
2.导包


导包完成后,build path 或者 addlibary 解析,如果是maven项目,则在pop.xml 写依赖即可
3.写配置文件
1.写spring的核心配置文件:applicationContext.xml
<!--加载配置文件-->
    <context:property-placeholder location="classpath:jdbc.properties"/>
    <!--扫描service层-->
    <context:component-scan base-package="cn.itsource.ssm.service"/>
    <!--配置数据库连接池-->
    <bean id="dataSource" class="org.apache.commons.dbcp.BasicDataSource" destroy-method="close">
        <!--配置四大金刚-->
        <property name="driverClassName" value="${jdbc.driverClassName}"/>
        <property name="username" value="${jdbc.username}"/>
        <property name="url" value="${jdbc.url}"/>
        <property name="password" value="${jdbc.password}"/>
    </bean>
    <!--配置mybatis核心对象-->
    <bean id="sqlSessionFactory" class="org.mybatis.spring.SqlSessionFactoryBean">
        <!--引用数据库连接池-->
        <property name="dataSource" ref="dataSource"/>
        <!--配置映射文件mapper.xml文件的位置-->
        <property name="mapperLocations" value="classpath:cn/itsource/ssm/mapper/*Mapper.xml"/>
        <!--配置别名-->
        <property name="typeAliasesPackage">
            <value>
                cn.itsource.ssm.domain
                cn.itsource.ssm.query
            </value>
        </property>
    </bean>
    <!--配置扫描接口包,扫描mapper接口-->
    <bean  class="org.mybatis.spring.mapper.MapperScannerConfigurer">
        <property name="basePackage" value="cn.itsource.ssm.mapper"/>
    </bean>
    <!--配置事务-->
    <bean id="transactionManager" class="org.springframework.jdbc.datasource.DataSourceTransactionManager">
        <!--引入连接池-->
        <property name="dataSource" ref="dataSource"/>
    </bean>
    <!--开启事务注解支持-->
    <tx:annotation-driven transaction-manager="transactionManager"/>
</beans>
写springMv核心配置文件:
<?xml version="1.0" encoding="UTF-8"?>
<beans xmlns="http://www.springframework.org/schema/beans" xmlns:xsi="http://www.w3.org/2001/XMLSchema-instance"
       xmlns:context="http://www.springframework.org/schema/context"
       xmlns:mvc="http://www.springframework.org/schema/mvc"
       xsi:schemaLocation="http://www.springframework.org/schema/beans
       http://www.springframework.org/schema/beans/spring-beans.xsd
       http://www.springframework.org/schema/context
       http://www.springframework.org/schema/context/spring-context.xsd
       http://www.springframework.org/schema/mvc
       http://www.springframework.org/schema/mvc/spring-mvc.xsd">
    <!--扫描controller-->
    <context:component-scan base-package="cn.itsource.ssm.controller" />
    <!--静态资源处理-->
    <mvc:default-servlet-handler />
    <!--识别@requestMappering等注解支持-->
    <mvc:annotation-driven />
    <!--配置视图解析器-->
    <bean class="org.springframework.web.servlet.view.InternalResourceViewResolver">
        <property name="prefix" value="/WEB-INF/views/" />
        <property name="suffix" value=".jsp" />
    </bean>
</beans>
写web.xml配置文件:
 <context-param>
        <param-name>contextConfigLocation</param-name>
        <param-value>classpath:applicationContext.xml</param-value>
    </context-param>
    <!--监听spring的启动-->
    <listener>
        <listener-class>org.springframework.web.context.ContextLoaderListener</listener-class>
    </listener>
    <!--配置启动springmvc-->
    <servlet>
        <servlet-name>dispatcherServlet</servlet-name>
        <servlet-class>org.springframework.web.servlet.DispatcherServlet</servlet-class>
        <init-param>
            <param-name>contextConfigLocation</param-name>
            <param-value>classpath:applicationContext-mvc.xml</param-value>
        </init-param>
        <!--加载的时候就启动springmvc-->
        <load-on-startup>1</load-on-startup>
    </servlet>
    <servlet-mapping>
        <servlet-name>dispatcherServlet</servlet-name>
        <url-pattern>/*</url-pattern>
    </servlet-mapping>
    <!-- 编码过滤器-->
    <filter>
        <filter-name>EncodingFilter</filter-name>
        <filter-class>org.springframework.web.filter.CharacterEncodingFilter</filter-class>
        <init-param>
            <param-name>encoding</param-name>
            <param-value>utf-8</param-value>
        </init-param>
    </filter>
    <filter-mapping>
        <filter-name>EncodingFilter</filter-name>
        <url-pattern>/*</url-pattern>
    </filter-mapping>
</web-app>
4.测试:
创建一个包:domain mapper service(包括实现类) controller test(用来写测试类)
domain:写数据库关联对象,提供get,set 和toSting方法
mapper:接口,相当于dao层,提供接口方法
service:业务层--提供与mapper层一样的接口方法,实现类:注入mapper接口,调用mapper中的方法
controller:控制页面跳转,(也可以返回json格式数据)
配置tomcat,配置完成后,启动服务器tomcat,访问资源