solution one:
JavaScript,单个模态框展示:
modal_tools.js
window.onload = function () {  //js默认加载页面方法
    // get modal show or close element value
    let toggleModal = document.getElementsByClassName("toggleModal");
    let container = document.getElementsByClassName("container")[0];
    let mask = document.getElementsByClassName("mask")[0];
    let modal = document.getElementsByClassName("modal")[0];
    let closes = document.getElementsByClassName("close")[0];
    for (let modal_index = 0; modal_index < toggleModal.length; modal_index++) {
        toggleModal[modal_index].onclick = show;
    }
    closes.onclick = close;

    function show() {
        let index = this.id;
        //show edit modal value
        update_modal_value(index);  //这里展示的编辑功能的模态框,所以模态框展示的时候,会携带被编辑的数据,
// 这个功能是在展示模态框的地方添加的
        mask.style.display = "block";
        modal.style.display = "block";
    }

    function close() {
        mask.style.display = "none";
        modal.style.display = "none";
    }
};

//edit modal table value
function update_modal_value(index){
    let modal_id = document.getElementById("record_id");
    let org_id = document.getElementsByClassName("record_id")[index];
    modal_id.innerText = org_id.innerText;
    let org_name = document.getElementsByClassName("person_name")[index];
    let modal_name = document.getElementById("person_name");
    for (let name_id=0;name_id<modal_name.length;name_id++){
        if(modal_name[name_id].innerText===org_name.innerText){
            modal_name[name_id].selected = true;
        }
    }
    get_selected_attend("morning", "morning", index);
    get_selected_attend("afternoon", "afternoon", index);
    let org_date = document.getElementsByClassName("attend_date")[index];
    let modal_date = document.getElementById("attend_date");
    modal_date.value = org_date.innerText;
    console.log("modal value>>", modal_date.value, "org date>>", org_date.innerText);
}

//set selected option value
function get_selected_attend(class_name, id_name, index){
    let org_morning = document.getElementsByClassName(class_name)[index];
    let modal_morning = document.getElementById(id_name);
    for (let name_id=0;name_id<modal_morning.length;name_id++){
        if(modal_morning[name_id].innerText===org_morning.innerText){
            modal_morning[name_id].selected = true;
        }
    }
}
css,单个模态框展示,跟上面衔接:
org_modal_frame_back.css
* {
    padding: 0;
    margin: 0;
}

body {
     100%;
    height: 100%;
    background: #fff;
}

.mask {
        position: fixed;
/*所有position的value都是fixed,这样页面上下滑动的时候,模态框能一直覆盖掉整个页面*/
        top: 0;
        bottom: 0;
        left: 0;
         100%;
        height: 100%;
        background: rgba(0, 0, 0, 0.4);
        z-index: 100;
        display: none;
    }

.modal {
    position: fixed;
    top: 50%;
    left: 50%;
     600px;
    transform: translate(-50%, -50%);
    border-radius: 5px;
    background: #fff;
    box-shadow: 2px 3px 20px rgba(0, 0, 0, 0.2);
    z-index: 120;
    display: none;
}

.modal .modal-header {
    height: 50px;
    border-bottom: 1px solid #f5f5f5;
    padding: 0 15px;
}

.modal .modal-header p {
    line-height: 50px;
    display: inline-block;
}

.modal .modal-header .title {
    font-size: 18px;
    color: #333;
}

.modal .modal-header .close {
    float: right;
    font-size: 26px;
    margin-top: -2px;
    color: black;
    cursor: default;
}

.modal .modal-content {
    min-height: 150px;
}

.modal .modal-footer .btn {
    padding: 0 20px;
    height: 36px;
    line-height: 36px;
    color: #409EFF;
    /*#d9edf7 */
    background: gray;
    border: none;
}

.modal .modal-footer {
    border-top: 1px solid #f5f5f5;
    padding: 15px;
    text-align: right;

}

.container::after {
    content: "";
    display: block;
    clear: both;
}
html样式效果,跟上面JavaScript以及css匹配的页面:
这里是html引用head部分:
<link rel="stylesheet"
      href="{% static bootstrap %}bootstrap-3.3.7-dist/css/bootstrap.css">
<link rel="stylesheet" href="{% static css %}css/org_modal_frame_back.css">

<title>Title</title>
<script src="{% static js %}js/modal_tools.js"></script>
{#除了上面自己写的js方法和css样式以外,加上bootstrap的css引用即可#}
------------------------------------------------------------------------------------
{# modal frame begin #}
<div class="modal">
    <div class="modal-header">
        <p class="title">模态框编辑页</p>
        <p class="close">×</p>
    </div>
    <div class="modal-content">
        <table class="table table-bordered" border="1">
            <tr class="info">
                <th>ID</th>
                <th>NAME</th>
                <th>DATE</th>
                <th>MORNING</th>
                <th>AFTERNOON</th>
            </tr>
            <tr>
                <td><p id="record_id">1</p></td>

                <td>
                    <select id="person_name">
                        {% for person_name in names %}
                            <option value="">{{ person_name }}</option>
                        {% endfor %}
                    </select>
                </td>
                <td><input id="attend_date" type="date"
                           value=""></td>
                <td><select id="morning">
                    {% with morning_opt="01" %}
                        {% for each_opt in morning_opt %}
                            <option value="">{{ each_opt }}</option>
                        {% endfor %}
                    {% endwith %}

                </select></td>
                <td><select id="afternoon">
                    {% with after_opt="01" %}
                        {% for each_opt in after_opt %}
                            <option value="">{{ each_opt }}</option>
                        {% endfor %}
                    {% endwith %}
                </select></td>
            </tr>
        </table>
    </div>
    <div class="modal-footer">
        <button class="close btn" onclick="choose_ele()">提交</button>
    </div>
</div>
<div class="mask"></div>
{# modal frame end #}
效果图展示:
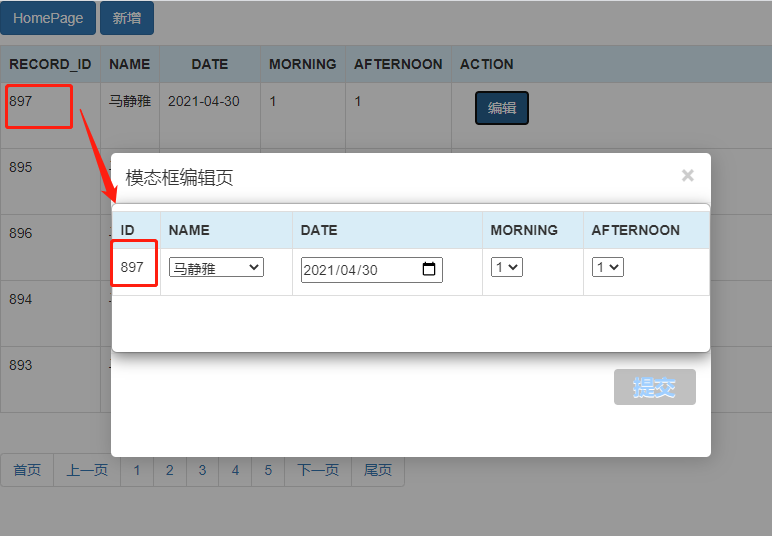
以上,能解决部分问题。如果一个页面用单个模态框,上面就够用了,虽然js写得比较麻烦,但是能解决问题。下面给出另一个解决方案。js代码更简洁。
solution two:一个页面有两个模态框,都能正常显示
接下来的方法,不需要手些原生css,利用bootstrap框架里面的模态框组件,js的启动也更简介,唯一增加的就是js引用部分,需要先引用jQuery然后再引用bootstrap里面的js。
当然了,bootstrap里面的css是必须要引用的。
html页面:
<link rel="stylesheet"
          href="{% static bootstrap %}bootstrap-3.3.7-dist/css/bootstrap.css">
    <script src="https://code.jquery.com/jquery-3.6.0.min.js"></script>
{#jQuery的引用必须要加在bootstrap的js前面,否则,bootstrap源码会报错找不到jQuery#}
    <script src="{% static bootstrap %}bootstrap-3.3.7-dist/js/bootstrap.js">
<style>
        .modal-title {
            font-weight: bolder
        }  {#这里是给模态框上面的提示title字体加粗设置#}
    </style>

<script>
    function editModalOpen(index) {
            let id_ = Number(index);
            update_attend_value(id_); //这里是编辑数据,需要把被编辑的数据默认显示在模态框里面,
    //这里的update_attend_value方法就是用来处理这个问题。
            //展示模态框
            let modal = document.getElementById("exampleModal");
            //设置为可见
            modal.style.visibility = "visible";
        }
        function editModalClose() {
            //关闭模态框
            let modal = document.getElementById("exampleModal");
            //设置为不可见
            modal.style.visibility = "hidden";

        }

//第二个模态框启动、关闭方法:
    function addModalOpen(){
      let modal = document.getElementById("addModal");
      modal.style.visibility = "visible";
    }
    function addModalClose(){
      let modal = document.getElementById("addModal");
      modal.style.visibility = "hidden";
    }
</script>
------------------------------------------------------------------------------------
{#如下都是body部分,下面这个按钮是触发模态框的按钮#}
<button class="toggleModal btn btn-primary"
        id="{{ forloop.counter0 }}"
     data-toggle="modal"  {#这个属性是模态框组件的必备启动模态框属性,这里是固定的key=value值,不可改变#}
        data-target="#exampleModal"  {#这个属性也是模态框组件的必备属性值,key是固定的,value部分是模态框的id值#}
        onclick="editModalOpen(id)"
        type="button">edit attend
</button>
{#如下都是从bootstrap上直接copy过来的组件代码,我就在模态框的modal-body里面加上了我想加的数据#}
<div>
<!-- Modal -->
<div class="modal fade" id="exampleModal" tabindex="-1" role="dialog"
aria-labelledby="exampleModalLabel" aria-hidden="true">
<div class="modal-dialog" role="document">
<div class="modal-content">
<div class="modal-header">
<span class="modal-title" id="exampleModalLabel">
edit attendance</span>
<button type="button" class="close"
data-dismiss="modal" {#关闭模态框属性,固定的key=value属性值,不可改变#}
aria-label="Close">
<span aria-hidden="true">×</span>
</button>
</div>
<div class="modal-body">
<table class="table table-bordered" border="1">
<tr class="info">
<th>ID</th>
<th>NAME</th>
<th>DATE</th>
<th>MORNING</th>
<th>AFTERNOON</th>
</tr>
<tr>
<td><label for="record_id"></label>
<p id="record_id">1</p></td>
<td><label for="person_name"></label>
<select id="person_name" class="form-control">
{% for person_name in names %}
<option value="">{{ person_name }}</option>
{% endfor %}
</select>
</td>
<td><label for="attend_date"></label>
<input id="attend_date" type="date"
class="form-control"
value=""></td>
<td><label for="morning"></label>
<select id="morning" class="form-control">
{% with morning_opt="01" %}
{% for each_opt in morning_opt %}
<option value="">{{ each_opt }}</option>
{% endfor %}
{% endwith %}
</select>
</td>
<td><label for="afternoon"></label>
<select id="afternoon" class="form-control">
{% with after_opt="01" %}
{% for each_opt in after_opt %}
<option value="">{{ each_opt }}</option>
{% endfor %}
{% endwith %}
</select></td>
</tr>
</table>
</div>
<div class="modal-footer">
<button type="button" class="btn btn-secondary"
data-dismiss="modal" {#关闭模态框属性,不可改变#}
onclick="editModalClose()">
Close
</button>
<button type="button" class="btn btn-primary"
onclick="choose_ele()">Save changes
</button>
</div>
</div>
</div>
</div>
</div>
{#为了展示多个模态框效果,这里简写一个demo,需要增加内容,自行在框架里面加入即可。模态框的modal-body下面就是添加数据的地方#}
<button data-toggle="modal" data-target="#add-modal" {#这里绑定的是如下的模态框id值#}
  onclick="addModalOpen()" type="button">
<div>
  <!--the second modal-->
  <div class="modal fade" id="addModal" tabindex="-1" role="dialog"
aria-labelledby="addModalLabel" aria-hidden="true">
<button type="button" class="close" data-dismiss="modal"
aria-label="Close">
<span aria-hidden="true">×</span>
</button>
  <button type="button" class="btn btn-secondary"
        data-dismiss="modal" onclick="addModalClose()">
      Close
  </button>
  </div>
</div>
展示效果:

上面的solution one里面,用的window.onload方法,这个方法,没有办法创建两个模态框,我自己试过,怎么都不行,一个能用,第二个就不能用了。所以,才找到了solution two
这里面的方法,需要两个模态框,甚至更多模态框,只需要按照我的有色字体标记出来的关键点,叠加上去就行。需要注意的是,如果你一个页面有超过1个模态框,每个模态框外面,需要再加一层div包裹。