week 6 实验:分析Linux内核创建一个新进程的过程
1.使用gdb跟踪创建新进程的过程
准备工作:
rm menu -rf
git clone https://github.com/mengning/menu.git   # 更新Menu
cd menu
mv test_fork.c test.c   # 把test.c覆盖掉
make rootfs

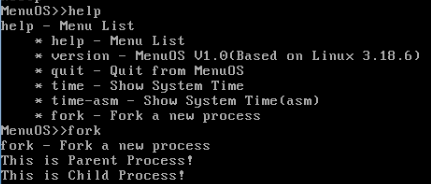
执行fork,可以看到父进程子进程都输出了信息。

下面进行gdb调试:
qemu -kernel linux-3.18.6/arch/x86/boot/bzImage -initrd rootfs.img -s -S

gdb

file linux-3.18.6/vmlinux
target remote:1234

// 设置断点
b sys_clone # 因为fork实际上是执行的clone
b do_fork
b dup_task_struct
b copy_process
b copy_thread
b ret_from_fork

c
n
……

可以看到一系列相关函数:


tsk->stack = ti;    //把内核堆栈的地址赋给它

//把内核堆栈压栈的空间地址找到,初始化
sturct pt_regs *childregs = task_pg_regs(p);

//把当前进程的内核堆栈的压的寄存器赋值到子进程中来。
*childregs = *current_pt_regs();
childregs->ax = 0;

//设置子进程被调度的ip,即子进程的起点
p->thread.ip = (unsigned long) ret_from_fork;

jmp syscall_exit;   //这之后就跟踪不到了。


2.进程创建的分析
Linux通过复制父进程来创建一个新进程,在这里使用的就是fork函数,具体的过程有如下两步:
-
复制一个PCB——task_struct
-
要给新进程分配一个新的内核堆栈
ti = alloc_thread_info_node(tsk, node); tsk->stack = ti; setup_thread_stack(tsk, orig); //这里只是复制thread_info,而非复制内核堆栈 -
要修改复制过来的进程数据,比如pid、进程链表等,见copy_process内部。
 *childregs = *current_pt_regs(); //复制内核堆栈
 childregs->ax = 0; //为什么子进程的fork返回0,这里就是原因!

 p->thread.sp = (unsigned long) childregs; //调度到子进程时的内核栈顶
 p->thread.ip = (unsigned long) ret_from_fork; //调度到子进程时的第一条指令地址
系统调用内核处理函数sys_fork,sys_vfrok,sys_clone,其实最终执行的都是do_fork。
do_fork里有:
copy_process
里面有:
dup_task_struct // 复制pcb
alloc_thread_info_node  // 创建了一个页面,其实就是实际分配内核堆栈空间的效果。
setup_thread_stack  // 把thread_info的东西复制过来

然后是大量的修改内容,将子进程初始化。

※copy_thread
copy_thread时都做了什么?
堆栈相关的一些内容
当前进程(父进程)的内核堆栈的栈底拷贝过来
赋值ip,sp……
创建的新进程是从哪里开始执行的?
——ret_from_fork
*childregs = *current_pt_regs(); //复制内核堆栈
childregs->ax = 0; //为什么子进程的fork返回0,这里就是原因!

p->thread.sp = (unsigned long) childregs; //调度到子进程时的内核栈顶
p->thread.ip = (unsigned long) ret_from_fork; //调度到子进程时的第一条指令地址
ip指向的是ret_from_fork,所以是从这里开始执行的。
复制内核堆栈的时候是复制的pt_regs,即只复制了SAVE_ALL相关的那一部分,即系统调用压栈的那一部分。
pt_regs里面内容有:
Entry(ret_from_fork):
最终会跳转到syscall_exit,这之前的内核堆栈状态和syscall_call的一致,然后返回用户态,变成子进程的用户态。
3.学习总结
请走博客闫佳歆的学习笔记