今天主要学习了图片多选以及回显(上限9张)
参考博客:https://www.cnblogs.com/1925yiyi/p/7419021.html;应文中博主要求,附上转载自:https://i.cnblogs.com/EditPosts.aspx?postid=7419021
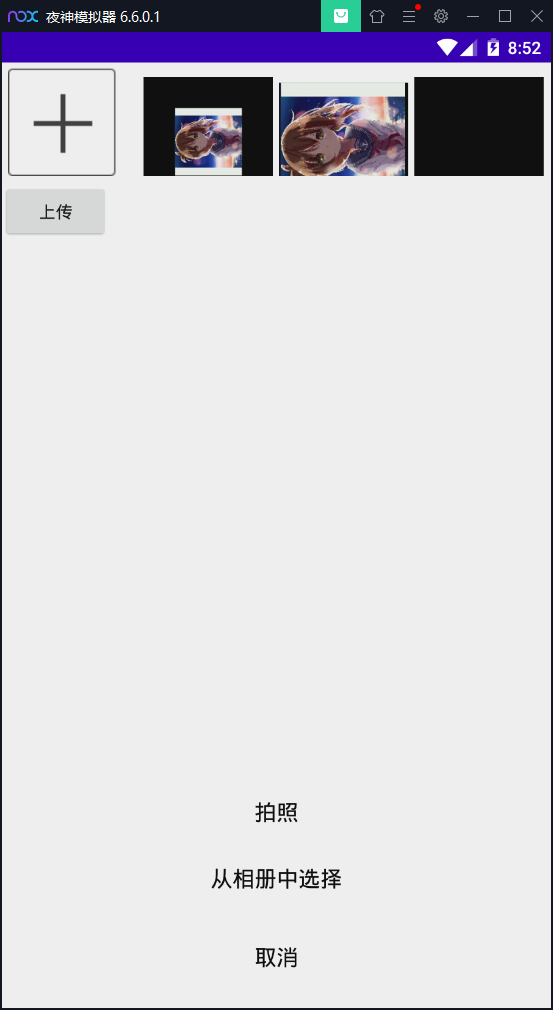
先看看效果图:
由于没有完全掌握这份代码里的知识,因此我会粘贴部分已掌握的代码,总结一下其中的用法,作为今天的进度总结:
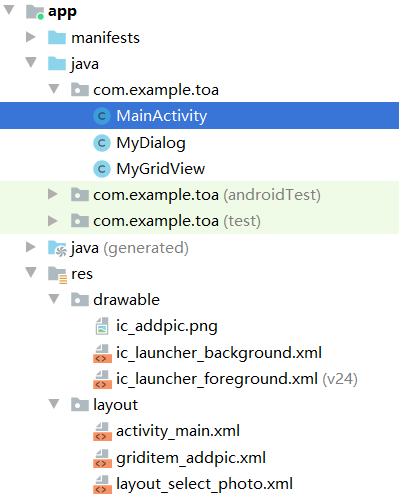
这是文件目录,drawable下的ic_addpic.png就是上面的那个“+”号,其中包含点击事件。griditem_main.xml配合activity_main.xml中声明的GridView控件使用,layout_select_photo.xml则是实现dialog。
activity_main.xml:
 1 <?xml version="1.0" encoding="utf-8"?>
 2 <LinearLayout xmlns:android="http://schemas.android.com/apk/res/android"
 3     xmlns:app="http://schemas.android.com/apk/res-auto"
 4     xmlns:tools="http://schemas.android.com/tools"
 5     android:layout_width="match_parent"
 6     android:layout_height="match_parent"
 7     android:orientation="vertical"
 8     tools:context=".MainActivity">
 9
10     <com.example.toa.MyGridView
11         android:id="@+id/gridView"
12         android:layout_width="match_parent"
13         android:layout_height="wrap_content"
14         android:layout_margin="5dp"
15         android:layout_weight="111"
16         android:columnWidth="90dp"
17         android:gravity="center"
18         android:horizontalSpacing="5dp"
19         android:numColumns="4"
20         android:stretchMode="columnWidth"
21         android:verticalSpacing="5dp"
22         ></com.example.toa.MyGridView>
23
24     <Button
25         android:id="@+id/bt_submit"
26         android:layout_width="wrap_content"
27         android:layout_height="wrap_content"
28         android:text="上传"
29         ></Button>
30 </LinearLayout>
原文中的排版远不止这些,但我只取了GridView部分,因为这个部分是实现多照片回显的关键,下面给出与其相关的griditem_main.xml:
 1 <?xml version="1.0" encoding="utf-8"?>
 2 <LinearLayout xmlns:android="http://schemas.android.com/apk/res/android"
 3     android:layout_width="match_parent"
 4     android:layout_height="match_parent">
 5
 6     <ImageView
 7         android:id="@+id/imageView1"
 8         android:layout_width="wrap_content"
 9         android:layout_height="wrap_content"
10         ></ImageView>
11 </LinearLayout>
这里的声明的ImageView控件:imageView1是配合MainActivity.java(主方法)和MyGridView.java(自定义GridView)来实现的:
首先是自定义GridView,这里都是公式化的模板:
 1 package com.example.toa;
 2
 3 import android.content.Context;
 4 import android.util.AttributeSet;
 5 import android.widget.GridView;
 6
 7 public class MyGridView extends GridView{
 8
 9     public MyGridView(Context context, AttributeSet attrs) {
10         super(context, attrs);
11     }
12
13     public MyGridView(Context context){
14         super(context);
15     }
16
17     public MyGridView(Context context, AttributeSet attrs, int defStyle){
18         super(context);
19     }
20
21     @Override
22     protected void onMeasure(int widthMeasureSpec, int heightMeasureSpec){
23         int expandSpec = MeasureSpec.makeMeasureSpec(Integer.MAX_VALUE>>2,MeasureSpec.AT_MOST);
24         super.onMeasure(widthMeasureSpec,expandSpec);
25     }
26 }
重点是MainActivity.java里的方法。图片回显的方法还是使用了bitmap,虽然在写法上有些差异,但思路相似:
 1  @Override
 2     protected void onResume() {
 3         // TODO Auto-generated method stub
 4         super.onResume();
 5         //判定有图片添加
 6         if (!TextUtils.isEmpty(pathImage)) {
 7             //bitmap回显
 8             Bitmap addbmp = BitmapFactory.decodeFile(pathImage);
 9             //将信息存入Map中
10             HashMap<String, Object> map = new HashMap<String, Object>();
11             map.put("itemImage", addbmp);
12             imageItem.add(map);
13             //在griditem_addpic.xml中向imageView1添加图片
14             simpleAdapter = new SimpleAdapter(this, imageItem,
15                     R.layout.griditem_addpic, new String[] { "itemImage" },
16                     new int[] { R.id.imageView1 });
17             simpleAdapter.setViewBinder(new ViewBinder() {
18                 @Override
19                 public boolean setViewValue(View view, Object data,
20                                             String textRepresentation) {
21                     // TODO Auto-generated method stub
22                     if (view instanceof ImageView && data instanceof Bitmap) {
23                         ImageView i = (ImageView) view;
24                         i.setImageBitmap((Bitmap) data);
25                         return true;
26                     }
27                     return false;
28                 }
29             });
30             gridView.setAdapter(simpleAdapter);
31             simpleAdapter.notifyDataSetChanged();
32             // 刷新后释放防止手机休眠后自动添加
33             pathImage = null;
34             dialog.dismiss();
35         }
36
37     }
关于gridview相关操作大概就这些了,接下来的问题是dialog。我这里还没有捋顺dialog的制作思路,下面附上我个人感觉不错的讲解博客地址:https://www.cnblogs.com/holyday/p/7284394.html
明日最低完成限度目标:理解这份图片添加的代码。