Unity3D ShaderLab 创建自定义高光类型
在上一篇,我们认识了Unity基础的高光实现,本次主要是研究如何对Phong高光类型进行顶点操作,以及在表面着色器中使用Input结构体的新参数进行像素操作。
所以还是新建Shader,再建材质球然后打开编辑器进行shader的编辑。
1.修改Properties
Properties {

_MainTex ("Base (RGB)", 2D) = "white" {}

_MainTint("Diffuse Tint",Color)=(1,1,1,1)

_SpecularColor("Specular Color",Color)=(1,1,1,1)

_SpecularPower("Specular Power",Range(0,30))=1

}
3.修改CGPROGRAM
CGPROGRAM

#pragma surface surf Phong


sampler2D _MainTex;

float4 _SpecularColor;

float4 _MainTint;

float _SpecularPower;
4.编写自定义光照模型LightingPhong
inline fixed4 LightingPhong(SurfaceOutput s,fixed3 lightDir,half3 viewDir,fixed atten){

float diff=dot(s.Normal,lightDir);

float3 reflection=normalize(2.0*s.Normal*diff-lightDir);

float spec = pow(max(0,dot(reflection,viewDir)),_SpecularPower);

float3 finalSpec = _SpecularColor.rgb*spec;

fixed4 c;

c.rgb=(s.Albedo*_LightColor0.rgb*diff)+(_LightColor0.rgb*finalSpec)*(atten*2);

c.a=1.0;

return c;

}
5.修改surf函数
half4 c = tex2D (_MainTex, IN.uv_MainTex)*_MainTint;
通过以上步骤,我们完成的自定义的高光渲染光照模型。其中的操作步骤与以前并无差别。但是我们这次用到的LightingPhong函数是4个参数的,这其中的奥妙要介绍一下:
之前说过:光照模型是几个名称由光照 (Lighting) 开头的正规函数。它们可声明于您的着色器文件或某个被包含的文件的任何位置。函数为:
half4 Lighting+Name (SurfaceOutput s, half3 lightDir, half atten); 其在正向渲染路径中用于非与视线方向相关的光照模型(例如,漫反射)。
half4 Lighting+Name (SurfaceOutput s, half3 lightDir, half3 viewDir, half atten); 其在正向渲染路径中用于与视线方向相关的光照模型。
half4 Lighting+Name_PrePass (SurfaceOutput s, half4 light); 其用于延时光照路径中。
请注意,您不必声明所有函数。一种光照模型要么使用视线方向,要么不使用。类似地,如果光照模型在延时光照中无效,您就不必声明 _PrePass 函数,然后所有使用它的着色器都将仅编译成正向渲染。
Api参见:
http://www.unitymanual.com/m/Components/SL-SurfaceShaderLighting.html
在上面我们创建的是一个高光着色器,所以我们需要选的是视点/视角相关型的光照函数结构。因此我们的函数就是:
inline fixed4 LightingPhong(SurfaceOutput s,fixed3 lightDir,half3 viewDir,fixed atten){}
这样就告诉着色器我们建立的是一个视点相关的光照模型。
接下来,光照函数会首先计算顶点法线和光的入射方向,我们得到一个额返回值,该值为1物体正对光源方向,-1表面物体背对光源方向。
然后我们计算反射向量,先对顶点法线的向量进行缩放,该值乘以2.0后再乘以diff,得到的值减去光照的方向向量值,这样做实现了法线朝向光源弯曲的效果。
所以作为一个远离光源的法线向量,它将被强制朝向光源方向.
再往下
我们创建spec值和颜色值,为了得到这2个值,我们对反射向量和视角方向进行点乘运算,然后对结果求specpower次方,最后将SpecularColor.rgb乘以spec得到我们的高光值。
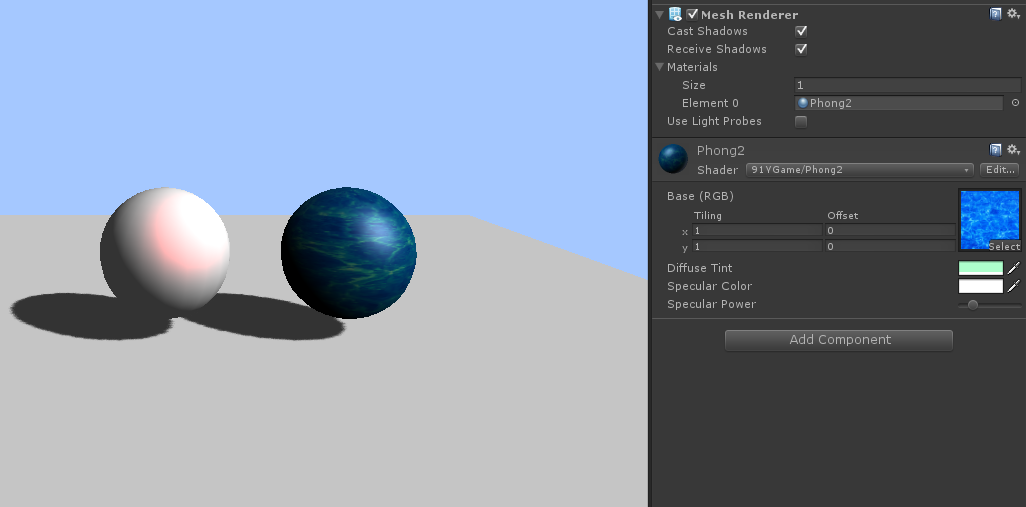
最终效果如下,右侧是我们自定义的高光模型:

code start---------------------------------------------------------------------------------------------
Shader "91YGame/Phong2" {
    Properties {
        _MainTex ("Base (RGB)", 2D) = "white" {}
        _MainTint("Diffuse Tint",Color)=(1,1,1,1)
        _SpecularColor("Specular Color",Color)=(1,1,1,1)
        _SpecularPower("Specular Power",Range(0,30))=1
    }
    SubShader {
        Tags { "RenderType"="Opaque" }
        LOD 200

        CGPROGRAM
        #pragma surface surf Phong

        sampler2D _MainTex;
        float4 _SpecularColor;
        float4 _MainTint;
        float _SpecularPower;

        struct Input {
            float2 uv_MainTex;
        };

        inline fixed4 LightingPhong(SurfaceOutput s,fixed3 lightDir,half3 viewDir,fixed atten){
            float diff=dot(s.Normal,lightDir);
            float3 reflection=normalize(2.0*s.Normal*diff-lightDir);
            float spec = pow(max(0,dot(reflection,viewDir)),_SpecularPower);
            float3 finalSpec = _SpecularColor.rgb*spec;
            fixed4 c;
            c.rgb=(s.Albedo*_LightColor0.rgb*diff)+(_LightColor0.rgb*finalSpec)*(atten*2);
            c.a=1.0;
            return c;
        }

        void surf (Input IN, inout SurfaceOutput o) {
            half4 c = tex2D (_MainTex, IN.uv_MainTex)*_MainTint;
            o.Albedo = c.rgb;
            o.Alpha = c.a;
        }

        ENDCG
    }
    FallBack "Diffuse"
}
code end ----------------------------------------------------------------------------------------------