https://www.cnblogs.com/31415926535x/p/11001669.html
基于卷积神经网络的人脸识别项目_使用Tensorflow-gpu+dilib+sklearn
概述
学期末了啊,,,最后这个人脸识别的项目弄完了,,有很多的不足,,很多东西都是只知道怎么用,但是不知道其背后的逻辑,,感觉自己学习东西对于那些潜意识优先级不高的就放弃了,,,emmm
这篇文章主要是大致介绍一下我们最后弄出来的人脸识别项目的成果吧,,整个项目放到了我的github,,可以直接下载运行的,,不过这也只是一个我们的思路,,这块东西还是多阅读别人的项目代码,,然后自己写一下好些,,根据自己的需求尝试自己写代码,实在不行再看别人的思路,,才能提升自己的思维吧,,,
项目思路
抛开那些花里胡哨的东西,人脸识别的大致流程只有三个: 人脸数据的录入、构建卷积神经网络并训练模型、识别
不过这前要配置好环境,,我用的Anaconda来配置的整体环境,,,可以看我的这篇博客 ,,(到能成功验证环境即可
具体的运行流程:
- 激活创建的anaconda环境
- 运行初始化模块(可有可无)
python init.py - 运行录入人脸模块,此时会提示输入姓名,然后录制视频,按q结束(20几喵即可)
python getFaceByCamera.py - 运行训练模块,
python tensorflow_face.py - 等待,,结束后会打印准确度,,
- 运行识别模块,
python tensorflow_face.py,,,没错还是这个,,第二次运行会调用识别模块的,,,
人脸数据的录入
这部分我们的大致思路是:
- 录入待录入者的姓名
- 录制一段视频
- 利用dlib人脸检测器以及opencv对图片的操作来裁剪200张相片,,当然也可以使用opencv的人脸检测器,,,不足应该就是准确率不怎么高吧,,但是快些,,,
- 循环录入所有人的信息
这一部分的代码:
getFaceByCamera.py
import cv2
import os
import dlib
import sys
import random
import shutil


def make_video(name):
    # 录制视频
    #shutil.rmtree(name)
    """使用opencv录像"""
    cap = cv2.VideoCapture(0)  # 默认的摄像头
    # 指定视频代码
    fourcc = cv2.VideoWriter_fourcc(*"DIVX")
    out = cv2.VideoWriter('233.avi', fourcc, 20.0, (640,480))   # 设置录制的视频的格式
    while(cap.isOpened()):
        ret, frame = cap.read()
        if ret:
            out.write(frame)
            #
            cv2.imshow('frame',frame)
            # 等待按键q操作关闭摄像头
            if cv2.waitKey(1) & 0xFF == ord('q'):
                break
        else:
            break
    cap.release()                   # 释放摄像头资源
    out.release()                   # 释放文件资源
    cv2.destroyAllWindows()         # 关闭拍摄窗口


# 改变图片的亮度与对比度
def relight(img, light=1, bias=0):
    w = img.shape[1]
    h = img.shape[0]
    #image = []
    for i in range(0,w):
        for j in range(0,h):
            for c in range(3):
                tmp = int(img[j,i,c]*light + bias)
                if tmp > 255:
                    tmp = 255
                elif tmp < 0:
                    tmp = 0
                img[j,i,c] = tmp
    return img

def getDataByDlib(name):
    # 利用dlib来实现
    output_dir = name       # 使用录入的名字作为文件夹的名字
    size = 64               # 相片的大小为64*64

    if not os.path.exists(output_dir):      # 没有文件夹是主动创建一个
        os.makedirs(output_dir)
    #使用dlib自带的frontal_face_detector作为我们的特征提取器
    detector = dlib.get_frontal_face_detector()
    # 打开摄像头 参数为输入流,可以为摄像头或视频文件
    #camera = cv2.VideoCapture(0)
    camera = cv2.VideoCapture("233.avi")    # 相片来自上一步拍摄的视频

    index = 1
    while True:
        if (index <= 200):                  # 每一段视频只取200张
            print('Being processed picture %s' % index) # 显示处理的过程
            # 从摄像头读取照片
            success, img = camera.read()    # 从视频流中读取照片
            # 转为灰度图片
            gray_img = cv2.cvtColor(img, cv2.COLOR_BGR2GRAY)
            # 使用detector进行人脸检测
            dets = detector(gray_img, 1)

            if success == False:
                break

            for i, d in enumerate(dets):
                x1 = d.top() if d.top() > 0 else 0
                y1 = d.bottom() if d.bottom() > 0 else 0
                x2 = d.left() if d.left() > 0 else 0
                y2 = d.right() if d.right() > 0 else 0

                face = img[x1:y1,x2:y2]
                # 调整图片的对比度与亮度, 对比度与亮度值都取随机数,这样能增加样本的多样性
                face = relight(face, random.uniform(0.5, 1.5), random.randint(-50, 50))
                # 裁剪出人脸相片,大小为64*64
                face = cv2.resize(face, (size,size))
                # 显示最后裁剪出的人脸相片
                cv2.imshow('image', face)
                # 保存到文件下,文件名为1 - 200.jpg
                cv2.imwrite(output_dir+'/'+str(index)+'.jpg', face)

                index += 1
            key = cv2.waitKey(30) & 0xff
            if key == 27:
                break
        else:
            print('Finished!')
            break
    # 删除视频
    shutil.rmtree('./233.avi')


def getDataByOpencv2():
    # 利用opencv来实现
    output_dir = './my_faces'
    size = 64
    if not os.path.exists(output_dir):
        os.makedirs(output_dir)
    # 获取分类器
    haar = cv2.CascadeClassifier(r'G:DIPAnaconda3envs	est1Libraryetchaarcascadeshaarcascade_frontalface_default.xml')

    # 打开摄像头 参数为输入流,可以为摄像头或视频文件
    camera = cv2.VideoCapture("233.avi")

    n = 1
    while 1:
        if (n <= 10000):
            print('It`s processing %s image.' % n)
            # 读帧
            success, img = camera.read()

            gray_img = cv2.cvtColor(img, cv2.COLOR_BGR2GRAY)
            faces = haar.detectMultiScale(gray_img, 1.3, 5)
            for f_x, f_y, f_w, f_h in faces:
                face = img[f_y:f_y+f_h, f_x:f_x+f_w]
                face = cv2.resize(face, (64,64))
                '''
                if n % 3 == 1:
                    face = relight(face, 1, 50)
                elif n % 3 == 2:
                    face = relight(face, 0.5, 0)
                '''
                face = relight(face, random.uniform(0.5, 1.5), random.randint(-50, 50))
                cv2.imshow('img', face)
                cv2.imwrite(output_dir+'/'+str(n)+'.jpg', face)
                n+=1
            key = cv2.waitKey(30) & 0xff
            if key == 27:
                break
        else:
            break

if __name__ == '__main__':
    name = input('please input yourename: ')        # 获取录入者的名字
    name = os.path.join('./image/trainfaces', name) # 生成保存的文件路径名
    make_video(name)                                # 拍摄视频
    getDataByDlib(name)                             # 利用dlib处理裁剪人脸原始相片
构建卷积神经网络,然后训练模型
这一部分大概就是做人脸识别的主要目的了吧,,,
构建卷积神经网络
这一部分几乎网上写的代码的框架都是差不多的,,,所以只要理解每一层是什么意思,,怎么用就行了,,当然可以继续深究下去,,理解每一层为什么这么做,,这么做的方法是什么等等,,
我们之前在这一部分投入的精力也最多,,出现的问题也是很多的,,其中我感觉最印象深刻的就是层数的叠加和那个神奇的 loss=0.69.....
层数的叠加就是说大部分的代码都是做的3层的神经网络,,但是很少有做多层的,,当时找了很多的资料才一点一点的大致会算怎么计算下一层
关于那一个神奇的 loss=0.69 ,,貌似不同的网络、需求下可能不会出现这种情况,,,但是如果出现不管比怎么调参出来的loss都保持在0.69附近的话,,可以试着查一下这一个问题,,我们最后的解决方法是再添加一层 batch nomalization层 ,,具体干什么的网上有很多讲解的,,,加了它就可以使loss快速收敛,,,
训练模型
这一部分的框架都是差不多的,,变化可能有参数的变化,,优化器的不同等等
代码:
#!/usr/bin/python
#coding=utf-8
''' face detect convolution'''
# pylint: disable=invalid-name
import os
import sys
import logging as log
import matplotlib.pyplot as plt
import common
import numpy as np
from tensorflow.examples.tutorials.mnist import input_data
import tensorflow as tf
import cv2
from sklearn.model_selection import train_test_split
import random

SIZE = 64

x = tf.placeholder(tf.float32, [None, SIZE, SIZE, 3])
y_ = tf.placeholder(tf.float32, [None, None])
keep_prob_5 = tf.placeholder(tf.float32)
keep_prob_75 = tf.placeholder(tf.float32)


def weightVariable(shape):
    ''' build weight variable'''
    init = tf.random_normal(shape, stddev=0.01)
    #init = tf.truncated_normal(shape, stddev=0.01)
    return tf.Variable(init)

def biasVariable(shape):
    ''' build bias variable'''
    init = tf.random_normal(shape)
    #init = tf.truncated_normal(shape, stddev=0.01)
    return tf.Variable(init)

def conv2d(x, W):
    ''' conv2d by 1, 1, 1, 1'''
    return tf.nn.conv2d(x, W, strides=[1, 1, 1, 1], padding='SAME')

def maxPool(x):
    ''' max pooling'''
    return tf.nn.max_pool(x, ksize=[1, 2, 2, 1], strides=[1, 2, 2, 1], padding='SAME')

def dropout(x, keep):
    ''' drop out'''
    return tf.nn.dropout(x, keep)

def batch_norm_layer(value,is_training=False,name='batch_norm'):
    '''
    批量归一化  返回批量归一化的结果

    args:
        value:代表输入,第一个维度为batch_size
        is_training:当它为True,代表是训练过程,这时会不断更新样本集的均值与方差。当测试时,要设置成False,这样就会使用训练样本集的均值和方差。
              默认测试模式
        name:名称。
    '''
    if is_training is True:
        #训练模式 使用指数加权函数不断更新均值和方差
        return tf.contrib.layers.batch_norm(inputs=value,decay=0.9,updates_collections=None,is_training = True)
    else:
        #测试模式 不更新均值和方差,直接使用
        return tf.contrib.layers.batch_norm(inputs=value,decay=0.9,updates_collections=None,is_training = False)


def cnnLayer(classnum, isTrue):
    ''' create cnn layer'''
    # 第一层
    W1 = weightVariable([3, 3, 3, 32]) # 卷积核大小(3,3), 输入通道(3), 输出通道(32)
    b1 = biasVariable([32])
    conv1 = tf.nn.relu(batch_norm_layer(conv2d(x, W1) + b1, isTrue))
    pool1 = maxPool(conv1)
    # 减少过拟合,随机让某些权重不更新
    drop1 = dropout(pool1, keep_prob_5) # 32 * 32 * 32 多个输入channel 被filter内积掉了

    # 第二层
    W2 = weightVariable([3, 3, 32, 64])
    b2 = biasVariable([64])
    conv2 = tf.nn.relu(batch_norm_layer(conv2d(drop1, W2) + b2, isTrue))
    pool2 = maxPool(conv2)
    drop2 = dropout(pool2, keep_prob_5) # 64 * 16 * 16

    # 第三层
    W3 = weightVariable([3, 3, 64, 64])
    b3 = biasVariable([64])
    conv3 = tf.nn.relu(conv2d(drop2, W3) + b3)
    pool3 = maxPool(conv3)
    drop3 = dropout(pool3, keep_prob_5) # 64 * 8 * 8

    # 全连接层
    Wf = weightVariable([8*8*64,512])
    bf = biasVariable([512])
    drop3_flat = tf.reshape(drop3, [-1, 8*8*64])
    dense = tf.nn.relu(tf.matmul(drop3_flat, Wf) + bf)
    dropf = dropout(dense, keep_prob_75)

    # 输出层
    Wout = weightVariable([512, classnum])
    bout = weightVariable([classnum])
    #out = tf.matmul(dropf, Wout) + bout
    out = tf.add(tf.matmul(dropf, Wout), bout)
    return out

    # # 第三层
    # W3 = weightVariable([3, 3, 64, 128])
    # b3 = biasVariable([128])
    # conv3 = tf.nn.relu(batch_norm_layer(conv2d(drop2, W3) + b3, True))
    # pool3 = maxPool(conv3)
    # drop3 = dropout(pool3, keep_prob_5) # 128 * 8 * 8

    # # 第四层
    # W4 = weightVariable([3, 3, 128, 512])
    # b4 = biasVariable([512])
    # conv4 = tf.nn.relu(batch_norm_layer(conv2d(drop3, W4) + b4, True))
    # pool4 = maxPool(conv4)
    # drop4 = dropout(pool4, keep_prob_5) # 512 * 4 * 4

    # # 第五层
    # W5 = weightVariable([3, 3, 512, 1024])
    # b5 = biasVariable([1024])
    # conv5 = tf.nn.relu(batch_norm_layer(conv2d(drop4, W5) + b5, True))
    # pool5 = maxPool(conv5)
    # drop5 = dropout(pool5, keep_prob_5) # 1024 * 2 * 2

    # # 第六层
    # W6 = weightVariable([3, 3, 1024, 1024])
    # b6 = biasVariable([1024])
    # conv6 = tf.nn.relu(conv2d(drop5, W6) + b6)
    # pool6 = maxPool(conv6)
    # drop6 = dropout(pool6, keep_prob_5) # 2048 * 1 * 1


    # # 全连接层
    # Wf = weightVariable([1*1*1024, 2048])
    # bf = biasVariable([2048])
    # drop3_flat = tf.reshape(drop6, [-1, 1*1*1024])
    # dense = tf.nn.relu(tf.matmul(drop3_flat, Wf) + bf)
    # # dense = tf.nn.relu(tf.matmul(max_pool22_flat, Wf) + bf)
    # dropf = dropout(dense, keep_prob_75)


    # # 输出层
    # Wout = weightVariable([2048, classnum])
    # bout = weightVariable([classnum])
    # #out = tf.matmul(dropf, Wout) + bout
    # out = tf.add(tf.matmul(dropf, Wout), bout)
    # #return out


def train(train_x, train_y, tfsavepath):
    ''' train'''
    ##### log.debug('train')

    # 随机划分测试集与训练集
    train_x,test_x,train_y,test_y = train_test_split(train_x, train_y, test_size=0.05, random_state=random.randint(0,100))

    # 得到卷积结果
    out = cnnLayer(train_y.shape[1],True)

    # 参数:图片数据的总数,图片的高、宽、通道
    train_x = train_x.reshape(train_x.shape[0], SIZE, SIZE, 3)
    test_x = test_x.reshape(test_x.shape[0], SIZE, SIZE, 3)

    print('train size:%s, test size:%s' % (len(train_x), len(test_x)))
    sys.stdout.flush()

    # 图片块,每次取32张图片
    batch_size = 32
    num_batch = len(train_x) // batch_size

    # 交叉熵
    cross_entropy = tf.reduce_mean(tf.nn.softmax_cross_entropy_with_logits(logits=out, labels=y_))

    # Adam优化器,学习速率:0.001
    train_step = tf.train.AdamOptimizer(0.001).minimize(cross_entropy)
    # train_step = tf.train.AdadeltaOptimizer(0.001).minimize(cross_entropy)

    # 比较标签是否相等,再求的所有数的平均值,tf.cast(强制转换类型)
    # 准确率计算公式
    accuracy = tf.reduce_mean(tf.cast(tf.equal(tf.argmax(out, 1), tf.argmax(y_, 1)), tf.float32))


    # 将loss与accuracy保存以供tensorboard使用
    tf.summary.scalar('loss', cross_entropy)
    tf.summary.scalar('accuracy', accuracy)
    merged_summary_op = tf.summary.merge_all()

    # 数据保存器的初始化
    saver = tf.train.Saver()

    with tf.Session() as sess:

        # tensorflow初始化
        sess.run(tf.global_variables_initializer())
        # tensorboard数据保存
        summary_writer = tf.summary.FileWriter('./tmp', graph=tf.get_default_graph())

        # 迭代80次
        for n in range(80):
            # 每次取32(batch_size)张图片
            for i in range(num_batch):

                # 训练集、测试集分块
                batch_x = train_x[i*batch_size : (i+1)*batch_size]
                batch_y = train_y[i*batch_size : (i+1)*batch_size]
                # 开始训练数据,同时训练三个变量,返回三个数据
                _,loss,summary = sess.run([train_step, cross_entropy, merged_summary_op],
                                                feed_dict={x:batch_x,y_:batch_y, keep_prob_5:0.5,keep_prob_75:0.75})

                # tensorboard记录数据
                summary_writer.add_summary(summary, n*num_batch+i)


                # 打印损失
                print(n*num_batch+i, loss)
                sys.stdout.flush()

        #         if (n*num_batch+i) % batch_size == 0:
        #             # 获取测试数据的准确率
        #             acc = accuracy.eval({x:test_x, y_:test_y, keep_prob_5:1.0, keep_prob_75:1.0})
        #             print(n*num_batch+i, acc, '--', n)

        #             accc = acc

        #             # 准确率大于0.98时保存并退出
        #             if acc > 0.95 and n > 2:
        #                 # saver.save(sess, './train_faces.model', global_step=n*num_batch+i)
        #                 saver.save(sess, tfsavepath)
        #                 # saver.save(sess, tfsavepath)
        #                 sys.exit(0)
        # # saver.save(sess, './train_faces.model', global_step=n*num_batch+i)
        # # saver.save(sess, tfsavepath)
        # print('accuracy less 0.98, exited!')

        # 准确率计算表达式
        acc = accuracy.eval({x:test_x, y_:test_y, keep_prob_5:1.0, keep_prob_75:1.0})
        print('after 80 times run: accuracy is ', acc)
        sys.stdout.flush()

        # 模型保存
        saver.save(sess, tfsavepath)

if __name__ == '__main__':
    pass
识别
这部分就是将训练好的模型加载,,然后实时的获取每一张相片处理等等,,,
tensorflow_face.py 这部分代码第一次运行会给每一个人创建一个标签,,获得标签集,,然后和训练集一同训练,,,而第二次运行就是识别,,,
import os
import logging as log
import matplotlib.pyplot as plt
import common
import numpy as np
from tensorflow.examples.tutorials.mnist import input_data
import tensorflow as tf
import cv2
# import convert as myconv
import tensorflow_face_conv as myconv
import dlib
import random
from sklearn.model_selection import train_test_split
import time

import sys


# rm
import shutil

def createdir(*args):       # 创建一个文件夹
    ''' create dir'''
    for item in args:
        if not os.path.exists(item):
            os.makedirs(item)

IMGSIZE = 64
SIZE = 64

rootpath = 'G:\DIP\mine'

def getpaddingSize(shape):  # 将相片两侧填充为正方形
    ''' get size to make image to be a square rect '''
    h, w = shape
    longest = max(h, w)
    result = (np.array([longest]*4, int) - np.array([h, h, w, w], int)) // 2
    return result.tolist()

def dealwithimage(img, h=64, w=64): # 裁剪出人脸的图片
    ''' dealwithimage '''
    #img = cv2.imread(imgpath)
    top, bottom, left, right = getpaddingSize(img.shape[0:2])
    img = cv2.copyMakeBorder(img, top, bottom, left, right, cv2.BORDER_CONSTANT, value=[0, 0, 0])
    img = cv2.resize(img, (h, w))
    return img

def relight(imgsrc, alpha=1, bias=0):   # 更改图片为二值图
    '''relight'''
    imgsrc = imgsrc.astype(float)
    imgsrc = imgsrc * alpha + bias
    imgsrc[imgsrc < 0] = 0
    imgsrc[imgsrc > 255] = 255
    imgsrc = imgsrc.astype(np.uint8)
    return imgsrc

def getfilesinpath(filedir):            # 得到一个文件夹下的所有文件
    ''' get all file from file directory'''
    for (path, dirnames, filenames) in os.walk(filedir):
        for filename in filenames:
            if filename.endswith('.jpg'):
                yield os.path.join(path, filename)
        for diritem in dirnames:
            getfilesinpath(os.path.join(path, diritem)) # 递归调用得到改文件夹下的文件


def readimage(pairpathlabel):           # 得到一个文件夹下的照片文件名和标记labels, 返回一个列表
    '''read image to list'''
    imgs = []
    labels = []
    for filepath, label in pairpathlabel:
        for fileitem in getfilesinpath(filepath):
            img = cv2.imread(fileitem)
            imgs.append(img)
            labels.append(label)
    return np.array(imgs), np.array(labels)

def onehot(numlist):                    # 用于得到一个人的标签
    ''' get one hot return host matrix is len * max+1 demensions'''
    b = np.zeros([len(numlist), max(numlist)+1])
    b[np.arange(len(numlist)), numlist] = 1
    return b.tolist()

def getfileandlabel(filedir):           # 用字典保存一个人名的照片和对应的labels
    ''' get path and host paire and class index to name'''
    dictdir = dict([[name, os.path.join(filedir, name)]
                    for name in os.listdir(filedir) if os.path.isdir(os.path.join(filedir, name))])
                    #for (path, dirnames, _) in os.walk(filedir) for dirname in dirnames])

    dirnamelist, dirpathlist = dictdir.keys(), dictdir.values()

    indexlist = list(range(len(dirnamelist)))

    return list(zip(dirpathlist, onehot(indexlist))), dict(zip(indexlist, dirnamelist))

def main(_):
    ''' main '''
    '''

    人脸识别项目主main函数

    + 在第一次运行该文件时,会将上一次拍照保存的多个人的照片数据进行处理,卷积、训练等得到一个适合的模型
    + 在第二次运行该文件时,会打开摄像头获取一个照片,然后根据上一步得到的模型处理后分类(识别)出照片上出现的人脸是之前录入的所有人中哪一个
    + 目前无法判断其他未录入人的人脸,即others

    '''
    #shutil.rmtree('./checkpoint')
    savepath = './checkpoint/face.ckpt'     # 记录下模型的索引路径
    isneedtrain = False                     # 不存在时认为时第一次运行,即进行卷积训练
    if os.path.exists(savepath+'.meta') is False:
        isneedtrain = True


    # 根据录入保存的照片得到一个label和字典的路径的列表
    pathlabelpair, indextoname = getfileandlabel(rootpath + '\image\trainfaces')

    print(indextoname)
    sys.stdout.flush()
    print(pathlabelpair)
    sys.stdout.flush()

    # 得到训练集、测试集的照片和labels的列表
    train_x, train_y = readimage(pathlabelpair)
    # 将数据集归一化 ???
    train_x = train_x.astype(np.float32) / 255.0


    #### log.debug('len of train_x : %s', train_x.shape)


    if isneedtrain:
        # first generate all face

        # 调用另一文件进行卷积训练模型
        myconv.train(train_x, train_y, savepath)

       #### # log.debug('training is over, please run again')
    else:
        # second recognize faces
        # 调用下面的函数进行实时识别

        testfromcamera(train_x, train_y, savepath)
        #print(np.column_stack((out, argmax)))


def testfromcamera(train_x, train_y, chkpoint):

    # 打开默认摄像头
    camera = cv2.VideoCapture(0)
    #haar = cv2.CascadeClassifier('haarcascade_frontalface_default.xml')
    pathlabelpair, indextoname = getfileandlabel(rootpath + '\image\trainfaces')

    # 得到预测值
    output = myconv.cnnLayer(len(pathlabelpair),False)

    predict = output

    # 得到dlib的人脸检测器
    detector = dlib.get_frontal_face_detector()

    # 加载模型
    saver = tf.train.Saver()

    with tf.Session() as sess:
        #sess.run(tf.global_variables_initializer())
        saver.restore(sess, chkpoint)

        n = 1
        while 1:
            if (n <= 20000):
                print('It`s processing %s image.' % n)
                sys.stdout.flush()

                # 间隔0.2s
                time.sleep(0.2)

                # 读帧
                success, img = camera.read()
                # 得到灰度图
                gray_img = cv2.cvtColor(img, cv2.COLOR_BGR2GRAY)

                # 使用detector进行人脸检测
                faces = detector(gray_img, 1)
                #faces = haar.detectMultiScale(gray_img, 1.3, 5)
                for i, d in enumerate(faces):
                    x1 = d.top() if d.top() > 0 else 0
                    y1 = d.bottom() if d.bottom() > 0 else 0
                    x2 = d.left() if d.left() > 0 else 0
                    y2 = d.right() if d.right() > 0 else 0

                    face = img[x1:y1,x2:y2]

                    face = cv2.resize(face, (IMGSIZE, IMGSIZE))
                    #could deal with face to train
                    test_x = np.array([face])
                    test_x = test_x.astype(np.float32) / 255.0

                    res = sess.run([predict, tf.argmax(output, 1)],
                                   feed_dict={myconv.x: test_x,
                                   myconv.keep_prob_5:1.0, myconv.keep_prob_75: 1.0})
                    print(res, indextoname[res[1][0]], res[0][0][res[1][0]])
                    sys.stdout.flush()

                    # 得到一组随机的颜色值
                    r = random.randint(0, 255)
                    g = random.randint(0, 255)
                    b = random.randint(0, 255)

                    # 绘制检测到的人脸的方框
                    cv2.rectangle(img, (x2,x1),(y2,y1), (r, g, b),3)

                    # if res[0][0][res[1][0]] >= 500:
                    #     cv2.putText(img, 'others', (x1, y1 + 50), cv2.FONT_HERSHEY_SIMPLEX, 1, (col, col, col), 2)  #显示名字
                    # else:
                    #     cv2.putText(img, indextoname[res[1][0]], (x1, y1 - 40), cv2.FONT_HERSHEY_SIMPLEX, 1, (col, col, col), 2)  #显示名字
                    cv2.putText(img, indextoname[res[1][0]], (x2 + 25, y1 + 40), cv2.FONT_HERSHEY_SIMPLEX, 1, (r, g, b), 2)  #显示名字

                    n+=1
                    cv2.imshow('img', img)
                key = cv2.waitKey(30) & 0xff
                if key == 27:
                    break
            else:
                break
    camera.release()
    cv2.destroyAllWindows()

if __name__ == '__main__':
    # first generate all face
    main(0)
    #onehot([1, 3, 9])
    #print(getfileandlabel('./image/trainimages'))
    #generateface([['./image/trainimages', './image/trainfaces']])
总结
最后的模型的准确度还行,,但是不能识别未录入者,,它会认为是与已录入者最接近的人,,,
acc:
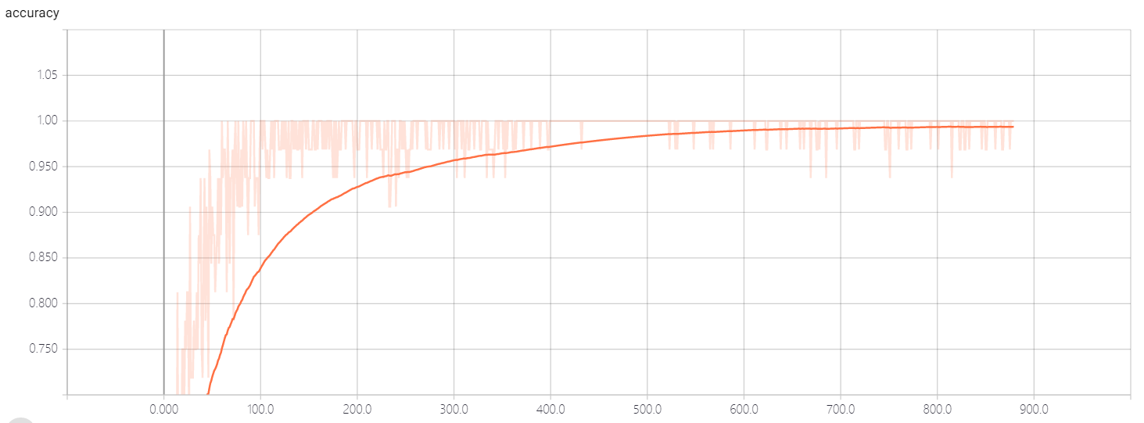
loss:
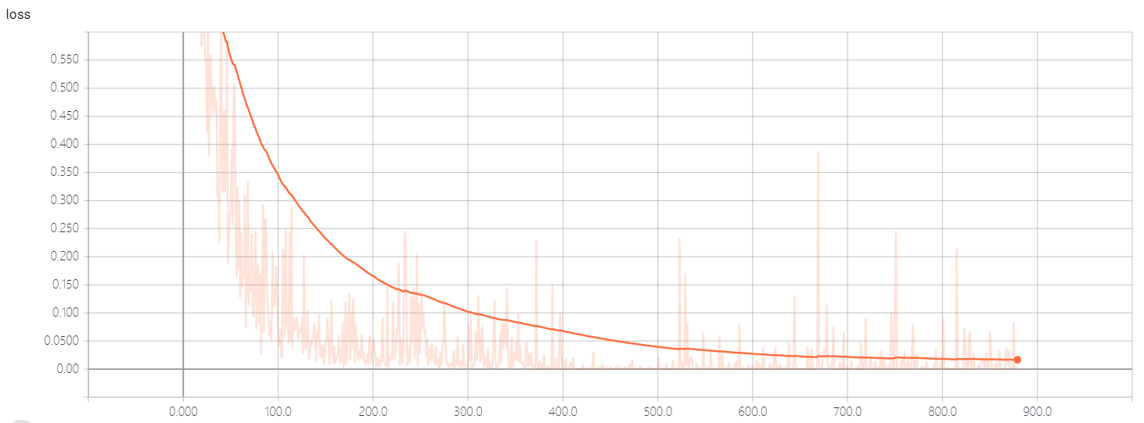
这个数据是通过tensorboard生成的,,
项目里还有一个简单的gui的实现,,因为没有时间了,,所有没有好好的优化一下,,,
(end 困。。。。)