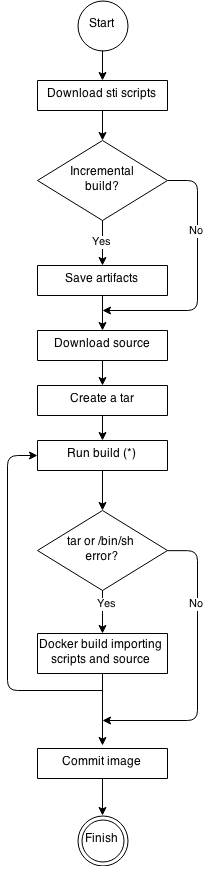
上次说到了怎么在oc上面部署应用而且说道了怎么定义模板部署应用,也许你会奇怪那个我代码打包编译在哪一步,那就要说道oc的s2i流程了
下面是基本s2i流程
1、制作base-image镜像
要使用s2i流程首先需要打好包含s2i程序的镜像
准备s2i脚本
1、下载s2i程序
https://github.com/openshift/source-to-image/releases/
2、生成s2i脚本
# s2i create openresty s2i-openresty
# cd s2i-openresty
# ls
# cd s2i/bin
# ls


assemble 复杂编译打包应用是在Build的时候执行的
run 负责启动应用是在deployment之后容器的来的时候执行的
下面是一个nginx镜像的例子:
PS:这里我应的ubuntu镜像强烈建议使用oc提供的openshift/base-centos7 不然你会遇到很多SCC的问题
# cat Dockerfile
FROM ubuntu:16.04
MAINTAINER sen.zhang@downtown8.com

LABEL
      io.openshift.s2i.scripts-url=image:///usr/libexec/s2i

ENV
    STI_SCRIPTS_PATH=/usr/libexec/s2i

COPY ./sources.list /etc/apt/

RUN  set -x
     && apt-get -y update
     && apt-get -y install libpcre3-dev libssl-dev perl make build-essential curl
        sudo vim telnet net-tools iputils-ping psmisc git wget

COPY ./src/ /usr/local/src/

RUN  set -x
     && cd /usr/local/src/sregex
     && make -j4
     && make install
     && cd /usr/local/src/openresty
     && ./configure
        --prefix=/data/app/openresty
        --error-log-path=/data/logs/nginx/error.log
        --http-log-path=/data/logs/nginx/access.log
        --with-http_sub_module
        --with-http_stub_status_module
        --with-http_realip_module
        --with-stream=dynamic
        --with-openssl=/usr/local/src/openssl
        --add-dynamic-module=/usr/local/src/nchan
        --add-module=/usr/local/src/replace-filter-nginx-module
     && make -j4
     && make install
     && rm -rf usr/local/src/*

RUN  set -x
     && mkdir -p /data/disk-mem /data/disk-cache /data/logs/nginx
     && ln -s /data/app/openresty/nginx/sbin/* /sbin/
     && ln -sf /bin/bash /bin/sh
     && ln -sf /usr/local/lib/libsregex.so.0 /lib/libsregex.so.0
     && /data/app/openresty/nginx/sbin/nginx -V
     && useradd www -u 1001
     && echo "www ALL=(ALL) NOPASSWD:ALL" >> /etc/sudoers
     && chown -R www.www /data


COPY ./s2i/bin/ /usr/libexec/s2i

USER 1001
EXPOSE 80 8080
CMD ["/usr/libexec/s2i/usage"]
强烈建议assemble具体逻辑放到网络脚本当中不然会经常要改base镜像
# cat assemble
#!/bin/bash -e

#执行自定义动作
curl http://build.xxx.cn/build/nginx/nginx_s2i_build.sh |sh
run脚本就可以写死了
#!/bin/bash -e
echo "开始运行...."

#处理dns
nginx_conf="/data/app/openresty/nginx/conf/nginx.conf"
nameserver=`cat /etc/resolv.conf |grep nameserver |head -n 1 |awk '{print $2}'`
echo "resolver=$nameserver"
sed -i s/223.5.5.5/$nameserver/g $nginx_conf

#启动nginx
echo 'sudo nginx -g "daemon off;"'
sudo nginx -g "daemon off;"
2、上传镜像到docker-registry
oc安装的时候默认在default项目会默认安装一个docker-registry,作用是保存base-image、build-image
刚才制作的base-image就可以上传到docker 仓库当中了
# docker build -t="registry.oc.example.com/openshift/nginx:latest
# docker login -u"default/api-admin" -p"$token" registry.oc.example.com
# docker push registry.oc.example.com/openshift/nginx:latest
还记得上节那个自定义模板中的${APP_BUILDER_IMAGE}变量应该填写nginx:latest