SpringMVC概述
什么是Spring MVC
SpringMVC是Spring框架内置的MVC的实现.SpringMVC就是一个Spring内置的MVC框架.
MVC框架,它解决WEB开发中常见的问题(参数接收、文件上传、表单验证、国际化、等等),而且使用简单,与Spring无缝集成。 支持 RESTful风格的 URL 请求 。
采用了松散耦合可插拔组件结构,比其他 MVC 框架更具扩展性和灵活性。
SpringMVC的作用
MVC模式:(Model-View-Controller):为了解决页面代码和后台代码的分离.
SpringMVC底层实现
在没有使用SpringMVC之前我们都是使用的Servlet在做Web开发。但是使用Servlet开发在接受请求数据参数,数据共享,页面跳转等操作相对比较复杂。
SpringMVC底层就是的Servlet,SpringMVC就是对Servlet进行更深层次的封装
MVC模式
什么是mvc模式
模型model(javabean), 视图view(jsp/img) 控制器Controller(Action/servlet) C存在的目的.就是为了保证M和V的一致性
当M发生改变时,C可以把M中的新内容更新到V中.
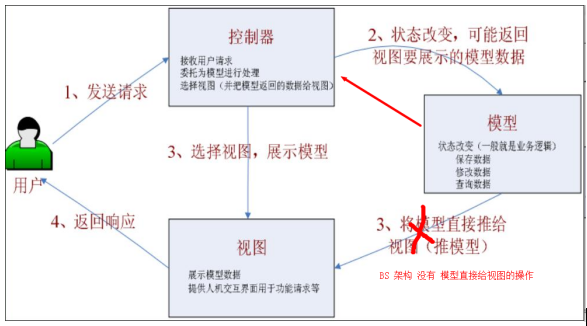
原始MVC 模式
MVC模式最早开始是在CS 架构上面 20世纪70+年代
下面为原始的mvc模式.
目前web应用中,99%的项目都会使用mvc模式开发.

WEB开发的MVC
WEB开发从20世纪90+年代开始,也是使用MVC模式。在最原始的MVC上有一些改进
优秀的框架改变了这种模式,将model更广泛的使用,这样会比原始的mvc好多了.
像现在一些优秀的mvc的框架,如Struts2,springMVC
在客户端提交也使用了模型来请求参数
spring MVC 也实现的相关的功能
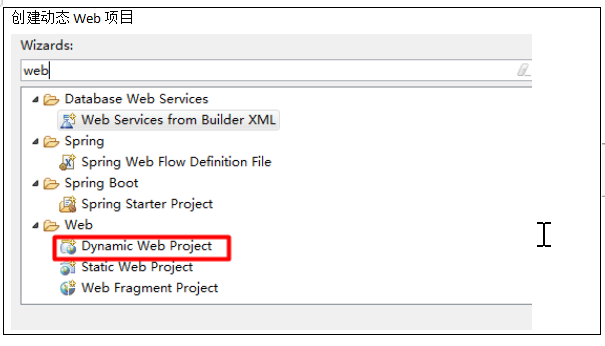
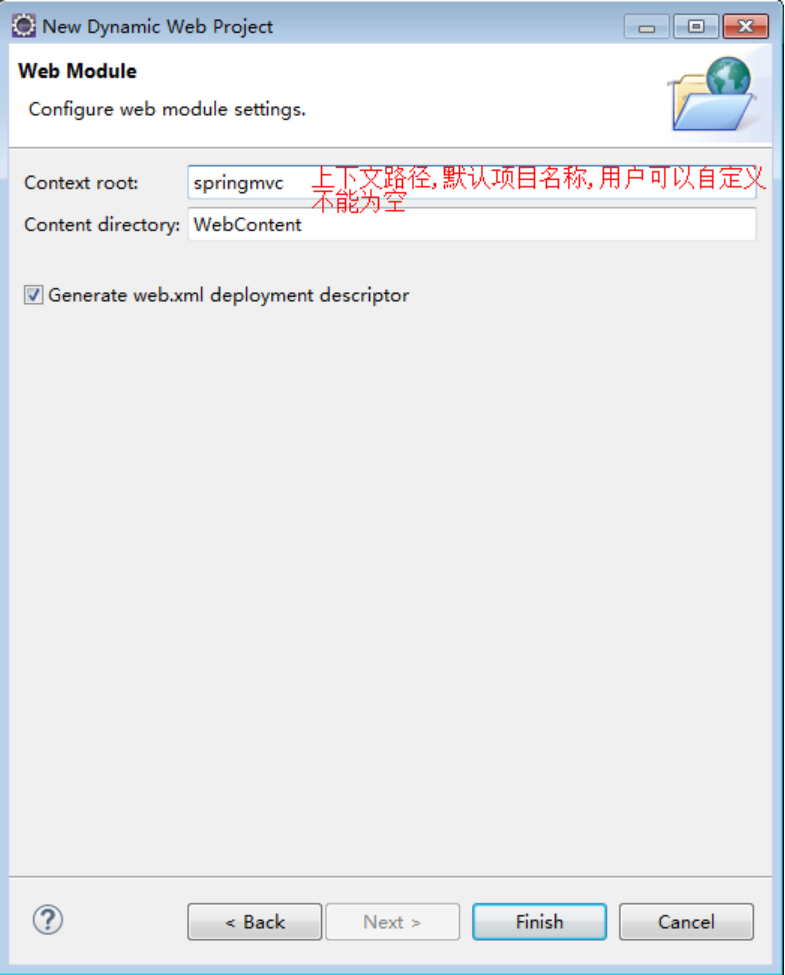
入门案例 -xml 配置
准备工作

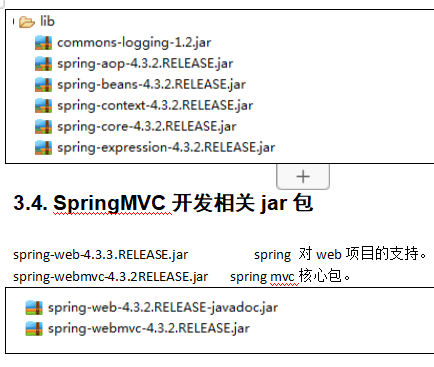
准备jar包
package cn.sxt.controller;
import javax.servlet.http.HttpServletRequest;
import javax.servlet.http.HttpServletResponse;

import org.springframework.web.servlet.ModelAndView;
import org.springframework.web.servlet.mvc.Controller;
//实现Controller接口
public class HelloCon implements Controller{

    @Override
    public ModelAndView handleRequest(HttpServletRequest request, HttpServletResponse response) throws Exception {

        ModelAndView mo = new ModelAndView();
        //共享数据
        mo.addObject("Username","据甘肃噶庿");
        //跳转页面
        mo.setViewName("/WEB-INF/view/hello.jsp");
        return mo;
    }


}
<?xml version="1.0" encoding="UTF-8"?>
<beans xmlns="http://www.springframework.org/schema/beans"
    xmlns:p="http://www.springframework.org/schema/p"
    xmlns:context="http://www.springframework.org/schema/context"
    xmlns:aop="http://www.springframework.org/schema/aop"
    xmlns:tx="http://www.springframework.org/schema/tx"
    xmlns:xsi="http://www.w3.org/2001/XMLSchema-instance"
    xsi:schemaLocation="
        http://www.springframework.org/schema/beans
        http://www.springframework.org/schema/beans/spring-beans.xsd
        http://www.springframework.org/schema/context
        http://www.springframework.org/schema/context/spring-context.xsd
        http://www.springframework.org/schema/aop
        http://www.springframework.org/schema/aop/spring-aop.xsd
        http://www.springframework.org/schema/tx
        http://www.springframework.org/schema/tx/spring-tx.xsd
        ">
<!-- 配置HelloController
        如果使SpringMVC的Bean
        必须使用name属性并且 值必须有 斜杠 开头

        http://localhost:8080/springmvc/hello
     -->
     <bean name="/hello" class="cn.sxt.controller.HelloCon"></bean>
     </beans>
<?xml version="1.0" encoding="UTF-8"?>
<web-app xmlns:xsi="http://www.w3.org/2001/XMLSchema-instance" xmlns="http://java.sun.com/xml/ns/javaee" xsi:schemaLocation="http://java.sun.com/xml/ns/javaee http://java.sun.com/xml/ns/javaee/web-app_3_0.xsd" version="3.0">
   <!-- web.xml 是web项目的入口文件,浏览器的所有请求都会先进入此文件 -->


  <!-- 配置springMVC的前端控制器(总控)
      之前:用户浏览器的请求都是请求的servlet
      现在:配置SpringMVC的前端控制器以后,用户浏览器的请求都走 SpringMVC框架(如果不配,就走servlet)
   -->
   <servlet>
   <servlet-name>MVC</servlet-name>
   <servlet-class>org.springframework.web.servlet.DispatcherServlet</servlet-class>
   <!-- 使用初始化参数读取springmvc.xml配置文件 -->
   <init-param>
   <param-name>contextConfigLocation</param-name>
          <param-value>classpath:springmvc.xml</param-value>
   </init-param>
       <!-- 让被spring管理的bean在服务器启动就创建 -->
       <load-on-startup>1</load-on-startup>
   </servlet>

       <!-- 访问在什么之下 -->
   <servlet-mapping>
   <servlet-name>MVC</servlet-name>
   <url-pattern>/</url-pattern>
   </servlet-mapping>

</web-app>
<%@ page language="java" contentType="text/html; charset=UTF-8"
    pageEncoding="UTF-8"%>
<!DOCTYPE html>
<html>
<head>
<meta charset="UTF-8">
<title>Insert title here</title>
</head>
<body>
${username}
</body>
</html>
SpringMVC的全注解开发
<?xml version="1.0" encoding="UTF-8"?>
<beans xmlns="http://www.springframework.org/schema/beans"
    xmlns:p="http://www.springframework.org/schema/p"
    xmlns:context="http://www.springframework.org/schema/context"
    xmlns:aop="http://www.springframework.org/schema/aop"
    xmlns:tx="http://www.springframework.org/schema/tx"
    xmlns:mvc="http://www.springframework.org/schema/mvc"
    xmlns:xsi="http://www.w3.org/2001/XMLSchema-instance"
    xsi:schemaLocation="
        http://www.springframework.org/schema/beans
        http://www.springframework.org/schema/beans/spring-beans.xsd
        http://www.springframework.org/schema/context
        http://www.springframework.org/schema/context/spring-context.xsd
        http://www.springframework.org/schema/aop
        http://www.springframework.org/schema/aop/spring-aop.xsd
        http://www.springframework.org/schema/tx
        http://www.springframework.org/schema/tx/spring-tx.xsd
           http://www.springframework.org/schema/mvc
        http://www.springframework.org/schema/mvc/spring-mvc.xsd
        ">
    <context:component-scan
        base-package="cn.sxt.controller"></context:component-scan>

    <!-- 开启SpringMVC的注解驱动 -->
    <mvc:annotation-driven />


</beans>
package cn.sxt.controller;

import javax.servlet.http.HttpServletRequest;
import javax.servlet.http.HttpServletResponse;

import org.springframework.stereotype.Controller;
import org.springframework.web.bind.annotation.RequestMapping;
import org.springframework.web.servlet.ModelAndView;

@Controller
public class HelloCon {
    /*
     * @RequestMapping(value="/hello") 请求映射注解,映射用户在浏览器的请求
     *
     *
     * 用户浏览器输入 http://localhost:8080/springmvc/hello /hello 就是当前地址访问资源对应的名称
     * 就会执行 @RequestMapping 注解所贴的对应的方法
     */
    @RequestMapping(value = "/hello")
    public ModelAndView hello() {

        ModelAndView mo = new ModelAndView();
        // 共享数据
        mo.addObject("username", "据甘肃噶庿");
        // 跳转页面
        mo.setViewName("/WEB-INF/view/hello.jsp");
        return mo;
    }
    @RequestMapping("/hello1")
    public ModelAndView hello2() {
        ModelAndView mo = new ModelAndView();
        // 共享数据
        mo.addObject("username", "hello");
        // 跳转页面
        mo.setViewName("/WEB-INF/view/hello.jsp");
        return mo;
    }

}
SpringMVC执行流程和原理
|
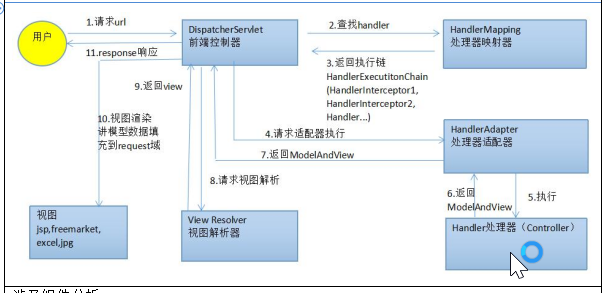
SpringMVC流程: 01、用户发送出请求到前端控制器DispatcherServlet。 02、DispatcherServlet收到请求调用HandlerMapping(处理器映射器)。 03、HandlerMapping找到具体的处理器(可查找xml配置或注解配置),生成处理器对象及处理器拦截器(如果有),再一起返回给DispatcherServlet。 04、DispatcherServlet调用HandlerAdapter(处理器适配器)。 05、HandlerAdapter经过适配调用具体的处理器(Handler/Controller)。 06、Controller执行完成返回ModelAndView对象。 07、HandlerAdapter将Controller执行结果ModelAndView返回给DispatcherServlet。 08、DispatcherServlet将ModelAndView传给ViewReslover(视图解析器)。 09、ViewReslover解析后返回具体View(视图)。 10、DispatcherServlet根据View进行渲染视图(即将模型数据填充至视图中)。 11、DispatcherServlet响应用户。 |
|
涉及组件分析: 1、前端控制器DispatcherServlet(不需要程序员开发),由框架提供,在web.xml中配置。 作用:接收请求,响应结果,相当于转发器,中央处理器。 2、处理器映射器HandlerMapping(不需要程序员开发),由框架提供。 作用:根据请求的url查找Handler(处理器/Controller),可以通过XML和注解方式来映射。 3、处理器适配器HandlerAdapter(不需要程序员开发),由框架提供。 作用:按照特定规则(HandlerAdapter要求的规则)去执行Handler。 4、处理器Handler(也称之为Controller,需要工程师开发) 注意:编写Handler时按照HandlerAdapter的要求去做,这样适配器才可以去正确执行Handler。 作用:接受用户请求信息,调用业务方法处理请求,也称之为后端控制器。 5、视图解析器ViewResolver(不需要程序员开发),由框架提供 作用:进行视图解析,把逻辑视图名解析成真正的物理视图。 SpringMVC框架支持多种View视图技术,包括:jstlView、freemarkerView、pdfView等。 6、视图View(需要工程师开发) 作用:把数据展现给用户的页面 View是一个接口,实现类支持不同的View技术(jsp、freemarker、pdf等) |
|
具体组件的配置相关,请查阅 spring-webmvc-4.3.2.RELEASE.jar 包 下面 /org/springframework/web/servlet/DispatcherServlet.properties 的相关配置 |
|
HanderMapping 请求映射处理器 |
|
作用:根据不同的请求选择最合适的处理器(自己编写的控制器),请求映射处理器可以配置多个,谁最先匹配就执行谁。 Spring MVC默认:/org/springframework/web/servlet/DispatcherServlet.properties org.springframework.web.servlet.HandlerMapping=org.springframework.web.servlet.handler.BeanNameUrlHandlerMapping, org.springframework.web.servlet.do.annotation.DefaultAnnotationHandlerMapping BeanNameUrlHandlerMapping:处理通过<bean name="/xxx">注册的控制器。控制器需要实现Controller接口。 DefaultAnnotationHandlerMapping:处理通过注解@Controller(类标签) 及@RequestMapping(方法标签) 注册的控制器。 该请求映射处理器已经在Spring 3.2 版本过时,替换为RequestMappingHandlerMapping。
spring 中提供的映射处理器: org.springframework.web.servlet.handler.SimpleUrlHandlerMapping 简单url请求映射处理器。 <bean class="org.springframework.web.servlet.handler.SimpleUrlHandlerMapping"> <property name="mappings"> <value> /helloworld=helloworldController /helloworld002=helloworldController </value> </property> </bean> org.springframework.web.servlet.do.method.annotation.RequestMappingHandlerMapping 采用注解方式请求映射处理器。 |
|
HandlerAdapter 处理器适配 |
|
HandlerAdapter 处理器适配: 作用: 支持多种类型的处理器,如何来执行"处理器(控制器)“; Spring MVC默认: org.springframework.web.servlet.HandlerAdapter= org.springframework.web.servlet.do.HttpRequestHandlerAdapter, org.springframework.web.servlet.do.SimpleControllerHandlerAdapter, org.springframework.web.servlet.do.annotation.AnnotationMethodHandlerAdapter org.springframework.web.servlet.do.HttpRequestHandlerAdapter 处理实现了HttpRequestHandler对应的控制器。 核心代码: public ModelAndView handle(HttpServletRequest request, HttpServletResponse response, Object handler) throws Exception { ((HttpRequestHandler) handler).handleRequest(request, response); return null; } org.springframework.web.servlet.do.SimpleControllerHandlerAdapter 处理实现了Controller对应的控制器。 public ModelAndView handle(HttpServletRequest request, HttpServletResponse response, Object handler) throws Exception { return ((Controller) handler).handleRequest(request, response); }
org.springframework.web.servlet.do.annotation.AnnotationMethodHandlerAdapter 处理通过注解方式的控制器。 3.2中已过时,替换为org.springframework.web.servlet.do.method.annotation.RequestMappingHandlerAdapter |
|
ViewResolver 视图解析器 |
|
作用:根据不同的视图,响应不同的结果,比如普通的jsp或json. Spring mvc默认: org.springframework.web.servlet.ViewResolver= org.springframework.web.servlet.view.InternalResourceViewResolver
InternalResourceViewResolver : 支持默认视图,采用forward,redirect。 视图名: 不写前缀默认为"转发" 视图名字符串前缀: forward:/xxx.jsp 采用转发。 redirect:/xxx.jsp 采用重定向。 new ModelAndView("forward:/userList"); new ModelAndView("redirect:/userList");
注册视图解析器: <bean class="org.springframework.web.servlet.view.InternalResourceViewResolver"> <property name="prefix" value="/WEB-INF/" /> <property name="suffix" value=".jsp" /> </bean> |
对静态资源访问
|
我们这样的配置有这样一个问题 在Web根路径添加index.html,然后不能访问,原因是什么呢?为什么此时在配置前端控制器的URL模式(<url-pattern>)写成 / 就不行呢? |
|
原因: Tomcat中处理静态资源访问的servlet(default)的映射路径为/. 在启动项目的时候,在Tomcat中的web.xml是先加载的,项目的web.xml是后加载的,如果配置了相同的映射路径,后面的会覆盖前者. 也就是说,SpringMVC中的DispatcherServlet的映射路径覆盖了Tomcat默认对静态资源的处理的路径。 如果SpringMVC要配置为/,那么就得设置Dispatcherservlet对静态资源进行支持。 |
|
Tomcat 根/confg/web.xml 103行 <servlet> <servlet-name>default</servlet-name> <servlet-class>org.apache.catalina.servlets.DefaultServlet</servlet-class> <init-param> <param-name>debug</param-name> <param-value>0</param-value> </init-param> <init-param> <param-name>listings</param-name> <param-value>false</param-value> </init-param> <load-on-startup>1</load-on-startup> </servlet> <servlet-mapping> <servlet-name>default</servlet-name> <url-pattern>/</url-pattern> </servlet-mapping> |
|
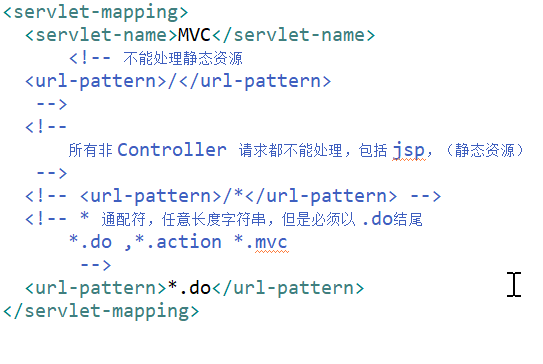
解决方案:需要在SpringMVC的配置文件中添加对静态资源的访问 <mvc:default-servlet-handler/> ----------------------------------------------------------------------------------------- <mvc:default-servlet-handler/> 将在 SpringMVC 上下文中定义一个 DefaultServletHttpRequestHandler,它会对进入 DispatcherServlet 的请求进行筛查,如果发现是没有经过映射的请求,就将该请求交由 Tomcat默认的 Servlet 处理,如果不是静态资源的请求,才由 DispatcherServlet 继续处理 ----------------------------------------------------------------------------------------- /和/*的区别: / 会匹配url请求/index等 ,也会匹配静态资源*.js,*.html等, 不会匹配*.jsp文件。 /* 会匹配url请求/index等 ,也会匹配静态资源*.js,*.html等, 会匹配*.jsp文件。 实际开发中一般推荐使用 *.后缀 如 *.do *.action *.do |
|
<servlet-mapping> <servlet-name>springMVC</servlet-name> <url-pattern>*.do</url-pattern> </servlet-mapping> |
解决方法1.

解决方法2.
在web.xml这样做
Spring请求响应
@RequestMapping
@RequestMapping注解主要是设置SpringMVC请求的映射路径
所谓的映射路径,就是匹配请求路径和执行方法关系的路径.
请求路径:http://localhost:8080/springmvc/method1.do
映射路径:@RequestMapping(value="/method1")
@RequestMapping 用于贴在控制器的类上或者方法上面
如果是贴在控制器的类上面,那么在访问这个类的方法之前必须先加上类上的对应的名称
类似于 项目下面的 模块名称
如果贴在方法上面,就是访问此方法的资源名称
|
@Controller @RequestMapping("/request") //访问时候必须加上,类似模块名称 public class RequestController { @RequestMapping(value="/method1") //资源名称 public void method1() { } } |
访问地址 : http://localhost:8080/springmvc/request/method1.do
两种限制
SpringMVC支持对请求的限制.如果不满足限制的条件,就不让访问执行方法.
这样做,大大提高了执行方法的安全性.
主要的限制有两种:(method)方法限制,参数限制
方法限制
就是设置请求的method类型.如果发送过来的请求与方法设置的method不一样,就不能访问执行方法.
请求method : GET , POST
参数限制
1.就是请求里面必须包括哪些参数,或不包括哪些哪些.
2.参数包括哪些值,不包括哪些值
限制参数格式:
1.参数必须包括:params={"username","password"}
2.参数不能包括:params={"!userid"}
3参数值必须是指定的值:params={"username=zhangsan"})
4.参数值必须不是指定的值:params={"userid!=123"})

后端接收
package cn.sxt.controller;

import javax.servlet.ServletContext;
import javax.servlet.http.HttpServletRequest;
import javax.servlet.http.HttpServletResponse;
import javax.servlet.http.HttpSession;

import org.springframework.stereotype.Controller;
import org.springframework.web.bind.annotation.RequestMapping;
import org.springframework.web.bind.annotation.RequestMethod;
import org.springframework.web.servlet.ModelAndView;
@Controller
public class HelloCon {
    /*
     * @RequestMapping(value="/hello")
     * 请求映射注解,映射用户在浏览器的请求
     * 用户浏览器输入
     * http://localhost:8080/springmvc/hello
     * value: /hello 就是当前地址访问资源对应的名称
     *   就会执行 @RequestMapping 注解所贴的对应的方法
     * method : 请求的方式显示
     *         GET :当前方法只接受GET请求
     *         POST :当前方法只接受POST
     *     默认如果不写,GET和POST都支持
     *    大大增加程序的安全性
     */
    //方法限制可以配多个参数
    @RequestMapping(value="/login",
            method=RequestMethod.POST,
            params= {"username","password"})
    public ModelAndView hello(String username,String password) {
        System.out.println(username);
        System.out.println(password);
        return null;
    }


    /*
     * Spring的方法默认可以注入 JavaWeb开发常用的数据共享对象
        HttpServletRequest
        HttpServletResponse
     *  HttpSession 以后开发 按需注入
     *  ServletContext cotnext
     */
    @RequestMapping(value = "/method0")
    public ModelAndView method0(HttpServletRequest req,
                        HttpServletResponse resp,
                        HttpSession session,
                        ServletContext cotnext) {
        //TODO
        return null;
    }
}
数据绑定是什么
SpringMVC里面,所谓的数据绑定就是将请求带过来的表单数据绑定到执行方法的参数变量.
实际开发中,SpringMVC作为表现层框架,肯定会接受前台页面传递过来的参数,SpringMVC提供了丰富的接受参数的方法
前端:
<%@ page language="java" contentType="text/html; charset=UTF-8"
    pageEncoding="UTF-8"%>
<!DOCTYPE html>
<html>
<head>
<meta charset="UTF-8">
<title>Insert title here</title>
</head>
<body>
    <form action="${pageContext.request.contextPath}/hello1.do"
        method="post">
        账号:<input type="text" name="username"><br> 密码:<input
            type="password" name="password"><br> <input
            type="submit" value="登录">
    </form>
    <form action="${pageContext.request.contextPath}/hello.do"
        method="post">
        账号:<input type="text" name="username"><br> 密码:<input
            type="password" name="password"><br> <input
            type="submit" value="登录">
    </form>
    <form action="${pageContext.request.contextPath}/hello2.do"
        method="post">
        账号:<input type="text" name="username"><br> 密码:<input
            type="password" name="password"><br> <input
            type="submit" value="登录">
    </form>
    <form action="${pageContext.request.contextPath}/hello3.do"
        method="get">
        账号: <input name="name"><br> 年龄: <input name="age"><br>
        爱好: <input type="checkbox" name="hobbys" value="java">java <input
            type="checkbox" name="hobbys" value="html">html<br>
        <button type="submit">提交</button>
    </form>
    <form action="${pageContext.request.contextPath}/hello4.do"
        method="get">
        账号: <input name="name"><br> 密码: <input type="password"
            name="password"><br> 邮箱: <input name="email"><br>
        电话: <input name="phone"><br> 爱好:<input type="checkbox"
            name="hobby" value="java">java <input type="checkbox"
            name="hobby" value="C">C <input type="checkbox" name="hobby"
            value="C++">C++<br />
        <button type="submit">提交</button>
    </form>
    <fieldset>
    <form action="${pageContext.request.contextPath}/hello5.do" method="post">
        账号: <input name="userName"><br>
        密码: <input name="password"><br>
        邮箱: <input name="email"><br>
        电话: <input name="phone"><br>
        <button type="submit">提交</button>
    </form>
</fieldset>
</body>
</html>
后台
package cn.sxt.controller;

import java.util.Arrays;
import java.util.Map;

import javax.servlet.http.HttpServletRequest;
import org.springframework.stereotype.Controller;
import org.springframework.web.bind.annotation.RequestMapping;
import org.springframework.web.bind.annotation.RequestMethod;
import org.springframework.web.bind.annotation.RequestParam;
import org.springframework.web.servlet.ModelAndView;
import cn.sxt.pojo.User;
@Controller
public class HelloCon {
/*原始方式request.getParameter() 了解
   SpringMVC可以注入HttpServletRequest对象,直接使用getParameter参数接受
 */
    @RequestMapping(value="hello1",method=RequestMethod.POST,params= {"username","password"})
    public ModelAndView hello1(HttpServletRequest ht) {
        String name=ht.getParameter("username");
        String password=ht.getParameter("password");
        System.out.println(name+password);
        return null;
    }


    //方法形参与前台参数同名
    //在请求方法形参上,声明和表单字段名相同的参数名(可以自动同名匹配,然后进行封装)

    @RequestMapping(value="/hello",
            method=RequestMethod.POST)
    public ModelAndView hello(String username,String password) {
        System.out.println(username);
        System.out.println(password);
        return null;
    }

    //方法形参与前台参数不同名
    @RequestMapping(value="/hello2",method=RequestMethod.POST)
    public ModelAndView hello2(@RequestParam("username")String name,String password) {
        System.out.println(name);
        System.out.println(password);
        return null;
    }
    //接受数组
    @RequestMapping(value="/hello3",method=RequestMethod.GET)
    public ModelAndView hello3(String username,String password,String[] hobbys) {
        System.out.println(username);
        System.out.println(password);
        System.out.println(Arrays.toString(hobbys));
        return null;
    }
    // 参数封装成pojo对象,后台并不能直接接受集合参数,需要将集合设置到对应的JavaBean中,通过JavaBean接受集合参数
    // 注意: 参数的名称必须和pojo的属性名相同
    @RequestMapping(value="/hello4",method=RequestMethod.GET)
    public ModelAndView hello4(User user) {
        System.out.println(user);
        return null;
    }
    // 使用map集合接受参数
    //只能接收单个值
    @RequestMapping(value="/hello5")
    public ModelAndView hello5(@RequestParam Map<String, Object> map) {
        System.out.println("map:" + map);
        return null;

    }

}
RESTful风格支持
RESTFUL 风格介绍
REST(英文:Representational State Transfer,简称REST)描述了一个架构样式的网络系统,比如 web 应用程序。它首次出现在 2000 年 Roy Fielding 的博士论文中,他是 HTTP 规范的主要编写者之一。在目前主流的三种Web服务交互方案中,REST相比于SOAP(Simple Object Access protocol,简单对象访问协议)以及XML-RPC更加简单明了,REST都倾向于用更加简单轻量的方法设计和实现。值得注意的是REST并没有一个明确的标准,而更像是一种设计的风格。
RESTful一种软件架构风格、设计风格,而不是标准,只是提供了一组设计原则和约束条件。它主要用于客户端和服务器交互类的软件。基于这个风格设计的软件可以更简洁,更有层次,更易于实现缓存等机制。
参数传递方法 GET
例如:根据商品id查询对应的商品信息(京东网站)
如果按照我们web开发应该是将商品id通过get方法跟在地址后面
普通方式 https://item.jd.com?product_id=100000287117 京东不支持
但是京东不是使用的此种方式,使用的 RESTFUL风格
RESTful风格 : https://item.jd.com/100000287117.html
案例代码
package cn.sxt.controller;
import org.springframework.stereotype.Controller;
import org.springframework.web.bind.annotation.PathVariable;
import org.springframework.web.bind.annotation.RequestMapping;
import org.springframework.web.servlet.ModelAndView;
/**
 * 用户浏览器访问地址 协议+主机+端口+上下文路径+模块+资源
 *
 * http://localhost:8080/springmv/request/hello1.do
 *
 */
@Controller
@RequestMapping(value="/request")// 理解为模块名称
public class HelloCon {

    @RequestMapping(value="/hello1")
    public ModelAndView hello(long pId) {
        System.out.println(pId);
        return null;

    }
    @RequestMapping("/hello2/{pId}.html")
    public ModelAndView hello2(@PathVariable("pId")long pId) {
        System.out.println(pId);
        return null;

    }
}
<%@ page language="java" contentType="text/html; charset=UTF-8"
    pageEncoding="UTF-8"%>
<!DOCTYPE html>
<html>
<head>
<meta charset="UTF-8">
<title>Insert title here</title>
</head>
<body>
     传统方式传递参数
     <a href="${pageContext.request.contextPath}/request/hello1?pId=100005182158">1111</a>
     RESTFUL 风格
     <a href="${pageContext.request.contextPath}/request/hello2/100005182158.html">2222222222</a>
</body>
</html>
请求中文乱码问题
SpringMVC默认接受的参数是ISO-8859-1编码参数,单字节,不支持中文,Spring提供了一个过滤器可以让开发者自定义请求参数的字符编码
注意:此种方式只对post提交方式有效
如果提交中文参数的提交是get方式
配置 tomcat/conf/server.xml 添加 URIEncoding="UTF-8"
|
<Connector URIEncoding="UTF-8" connectionTimeout="20000" port="8080" protocol="HTTP/1.1" redirectPort="8443"/> |
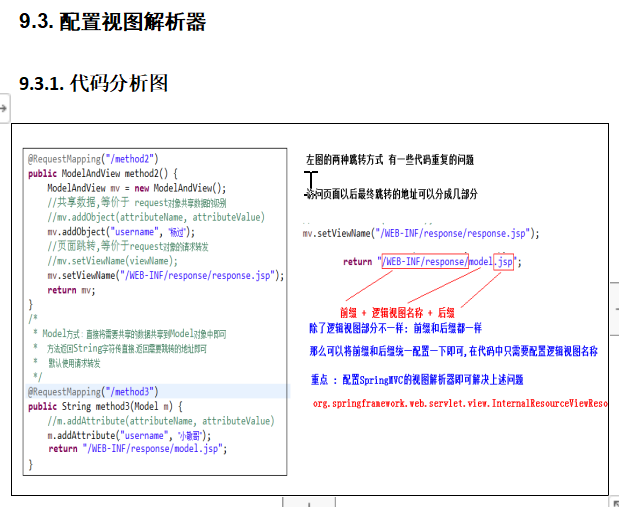
响应传值方式
package cn.sxt.controller;

import java.io.IOException;

import javax.servlet.ServletException;
import javax.servlet.http.HttpServletRequest;
import javax.servlet.http.HttpServletResponse;

import org.springframework.stereotype.Controller;
import org.springframework.ui.Model;
import org.springframework.web.bind.annotation.ModelAttribute;
import org.springframework.web.bind.annotation.RequestMapping;
/*
 * Web开发重点就是请求响应
 * 请求 :请求地址,请求参数的接受
 *
 * 响应:页面跳转,数据共享
 *  页面跳转 :用户 方法A ---》程序内部跳转到B页面
 *  页面跳转有两种方式
 *   方式一: 请求转发
 *       1、浏览器依然显示的A页面地址,地址不会发生改变(发送了一次请求)
 *        2、可以B页面共享数据
 *      3、不能跨域访问(不能跳转第三方网站)
 *      4、可以访问WEB-INF下面内容
 *
 *   方式二: 重定向
 *       1、浏览器显示的B页面地址,地址会发生改变(发送两次请求)
 *        2、可以B页面共享数据
 *      3、能跨域访问(可以跳转第三方网站)
 *      4、不可以访问WEB-INF下面内容
 *
 *
 */
import org.springframework.web.servlet.ModelAndView;

import cn.sxt.pojo.User;

@RequestMapping("/world")
@Controller
public class HelloCon {

    /*
     * 最原始方法(了解) 方法返回void类型,直接在方法参数上注入请求或者响应对象,使用这两个对象进行页面跳转
     */
    @RequestMapping(value = "/hello1")
    public void hello1(HttpServletRequest request, HttpServletResponse response) throws Exception, IOException {
        // 1.共享数据
        request.setAttribute("username", "eFEGEW");
        // 2.使用请求转发跳转到 hello.jsp
        // request.getRequestDispatcher("/abc.jsp").forward(request, response);
        // 重定向跳转
        response.sendRedirect("http://www.jd.com");
    }

    // ----------------- SpringMVC响应方式------------------
    /*
     *
     * 方式一: 方法返回一个 ModelAndView 对象 Model:数据模型(需要共享的数据) View :页面显示视图(jsp)
     * 注意:此方法默认只能使用请求转发跳转,不能使用重定向
     */
    @RequestMapping("/hello2")
    public ModelAndView hello2() {
        // 创建模型视图对象
        ModelAndView mo = new ModelAndView();
        // 共享数据
        mo.addObject("username", "eFEGEW");
        // 设置视图地址
        // 没有配置视图解析器之前
        // mo.setViewName("/WEB-INF/view/hello.jsp");
        // 配置视图解析器之后
        mo.setViewName("hello");
        return mo;

    }

    /*
     *
     * 方式二: 方法直接返回一个字符串 字符串就是要跳转的 视图地址 在方法中注入一个Model 模型对象,用于共享数据
     * 注意:此方法默认只能使用请求转发跳转,不能使用重定向
     */
    @RequestMapping("/hello3")
    public String hello3(Model m) {
        // 共享数据
        m.addAttribute("username", "aegeageg");
        // 没有配置视图解析器之前
        // return "/WEB-INF/view/hello.jsp";
        // 配置视图解析器之后
        return "hello";
    }
    /*
     * 上述两种SpringMVC的响应方式存在一些小问题
     * 1.默认只能使用请求转发跳转
     * 2.所有请求转发跳转的地址必须遵循视图解析器配置规则
     *
     * 如何解决上述两个存在小问题
     * 打破默认视图解析规则和默认请求转发跳转规则
     *
     * 使用自定义跳转
     *     自定跳转和自定义跳转页面
     * org.springframework.web.servlet.view.InternalResourceViewResolver
     * 视图解析器默认已经提供了自定义跳转的方案
     *  redirect:跳转地址   --------》自定义重定向跳转
     *  forward:跳转的地址 --------》自定义请求转发跳转
     */
    @RequestMapping("/hello4")
    public String hello4(Model m) {

        //TODO 处理业务
        m.addAttribute("username","wahh45144");
        //重定向跳转
        //return "redirect:http://www.jd.com";
        //请求转发
        return "forward:/WEB-INF/view/hello.jsp";

    }

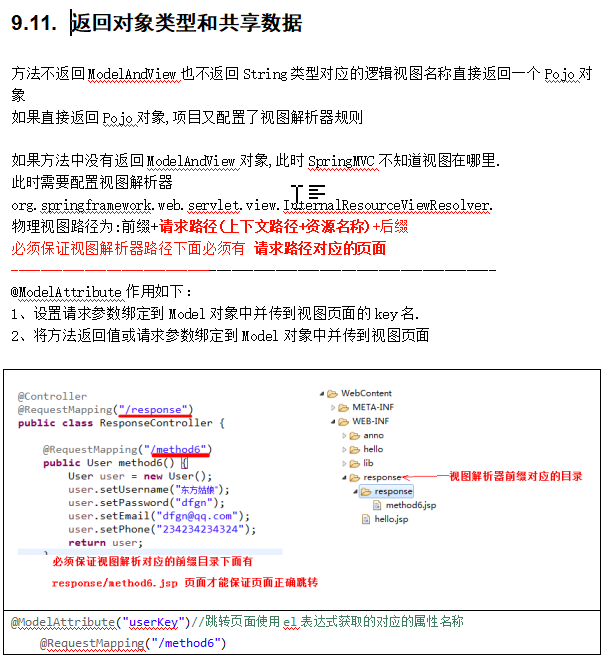
/*
     *
     * SpringMVC直接返回一个对象
     *
     * 方法最终还是会去找一个视图地址
     * 视图地址规则
     *
     * 视图前缀 + 模块(类上面的@RequestMapping) +请求资源(@RequestMapping)+后缀
     *    /WEB-INF/view/world/hello5.jsp
     *  如果没有此视图,就是报错
     *  默认也会共享当前返回对象到视图页面
     *
     *  共享的key 默认就是 当前 对象类型的  类名首字母小写
     *  可以使用@ModelAttrbute 手动指定共享数据key的名称
     */
    @ModelAttribute("userKey")
    @RequestMapping("/hello5")
    public User getUser() {
        User user = new User();
        user.setName("张三");
        user.setEmail("zhangsan@qq.com");
        return user;
    }

}
<?xml version="1.0" encoding="UTF-8"?>
<beans xmlns="http://www.springframework.org/schema/beans"
    xmlns:p="http://www.springframework.org/schema/p"
    xmlns:context="http://www.springframework.org/schema/context"
    xmlns:aop="http://www.springframework.org/schema/aop"
    xmlns:tx="http://www.springframework.org/schema/tx"
    xmlns:mvc="http://www.springframework.org/schema/mvc"
    xmlns:xsi="http://www.w3.org/2001/XMLSchema-instance"
    xsi:schemaLocation="
        http://www.springframework.org/schema/beans
        http://www.springframework.org/schema/beans/spring-beans.xsd
        http://www.springframework.org/schema/context
        http://www.springframework.org/schema/context/spring-context.xsd
        http://www.springframework.org/schema/aop
        http://www.springframework.org/schema/aop/spring-aop.xsd
        http://www.springframework.org/schema/tx
        http://www.springframework.org/schema/tx/spring-tx.xsd
           http://www.springframework.org/schema/mvc
        http://www.springframework.org/schema/mvc/spring-mvc.xsd
        ">
    <context:component-scan
        base-package="cn.sxt.controller"></context:component-scan>

    <!-- 开启SpringMVC的注解驱动 -->
    <mvc:annotation-driven />
    <!-- 对静态资源处理,把静态资源处理依然交给 tomcat 的 default 对应的servlet处理 -->
    <mvc:default-servlet-handler/>

        <!-- 配置视图解析器 -->
    <bean class="org.springframework.web.servlet.view.InternalResourceViewResolver">
        <!-- 配置视图前缀 -->
        <property name="prefix" value="/WEB-INF/view/"/>

        <!-- 配置视图后缀 -->
        <property name="suffix" value=".jsp"/>
    </bean>
</beans>
转换JSON数据
在web开发中,前台页面经常会发送ajax请求从后台请求数据,ajax请求给前台的数据一般都是json 数据。
SpringMVC支持自动将对象转换JSON格式的数据响应给客户端
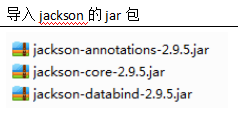
SpringMVC默认使用的是 jackson 作为对象转json的工具
Fast-json Alibaba
Gson google
Json-lib Apache
package cn.sxt.controller;

import java.util.ArrayList;
import java.util.List;

import org.springframework.stereotype.Controller;
import org.springframework.web.bind.annotation.ModelAttribute;
import org.springframework.web.bind.annotation.RequestMapping;
import org.springframework.web.bind.annotation.ResponseBody;

import cn.sxt.pojo.User;

@RequestMapping("/world")
@Controller
public class HelloCon {

    /**
     * @ResponseBody
     * 会让方法以字符串的形式返回
     * 底层使用jackson将对象转换成json字符串
     */
    @ResponseBody
    @ModelAttribute("userKey")
    @RequestMapping("/hello5")
    public User getUser() {
        User user = new User("feaeef","eafeaf","aefefa","efaefeg");

        return user;
    }
    @ResponseBody
    @RequestMapping("/hello1")
    public List<User> getUserList(){
        ArrayList<User> users = new ArrayList<>();
        for (int i = 0; i < 10; i++) {
            User user = new User("feaeef","eafeaf","aefefa","efaefeg");
            users.add(user);
        }
        return users;
    }

}
小结
1,SpringMVC介绍
(1) SpringMVC是一个Spring框架下面一个基于MVC模式的 表现层/Web 框架
(2) SpringMVC 底层就是Servlet,就是对Servlet的封装
(3) SpringMVC 接受参数灵活,页面跳转,共享数据方便
2,开发步骤
(1) 引入相关依赖jar包
(2) 在web.xml中配置SpringMVC的前端控制器
① DispatcherServlet
(3) 在springmvc.xml配置文件配置包扫描,开启Springmvc的注解驱动
① <context:component-sacn basePackage=’cn.zj.springmvc’>
② <mvc:annotation-driven>
(4) 新建一个普通类型
① 在类上面贴上 @Controller注解,就是SpringMVC的控制器了
(5) 在类中新建一个方法,并且在方法上面贴上一个注解
① @RequestMapping(“url地址访问路径”)
(6) 在浏览器输入地址即可访问
3,SpringMVC的请求
(1) 请求方法的限定 GET/POST
(2) 请求参数的限定 ,必须有什么参数,必须没有什么参数,参数值必须是什么,参数值必须不是什么
(3) 数据绑定(接受请求参数)
① 表单提交参数名和方法参数名相同 -最常见
② 表单提交参数名和方法参数名不相同
1) 在方法参数前面写上@RequestParam("和表单参数名相同")
③ 数组类型(多值)
④ 接受多个参数封装成 pojo对象
1) 必须保证表单参数名称和pojo对象属性名称相同
⑤ 将接受参数封装成map集合
(4) 支持 RestFul风格
① @PathVariables()
(5) SpringMVC中文参数乱码的问题
① Post方式 设置过滤器
② Get方式 修改tomcat 配置
4,SpringMVC的相应
(1) ModelAndView 共享模型数据并且设置视图地址
(2) 方法直接返回 String 使用 Model 模型对象共享
(3) 自定义页面跳转
① redirect: 重定向
② forward:请求转发
(4) 配置视图解析器(配置视图的前缀和后缀)
(5) 返回对象类型
(6) 返回json数据
① Jackson+@ResponseBody