在iOS中Qutarz2D 详解及使用
(一)初识
介绍
Quartz 2D是二维绘图引擎。
能完成的工作有:
    绘制图形 : 线条三角形矩形圆弧等

    绘制文字

    绘制生成图片(图像)

    读取生成PDF

    截图裁剪图片

    自定义UI控件

    … …
在iOS中最主要的作用是:自定义View
废话不多说了,直接开始学习它吧。
从概念开始
首先,必须清楚 图形上下文 的概念
-
图形上下文(Graphics Context)是一个CGContentRef类型的数据;可以帮你把你要显示
的图形显示到你指定的目标文件上。 -
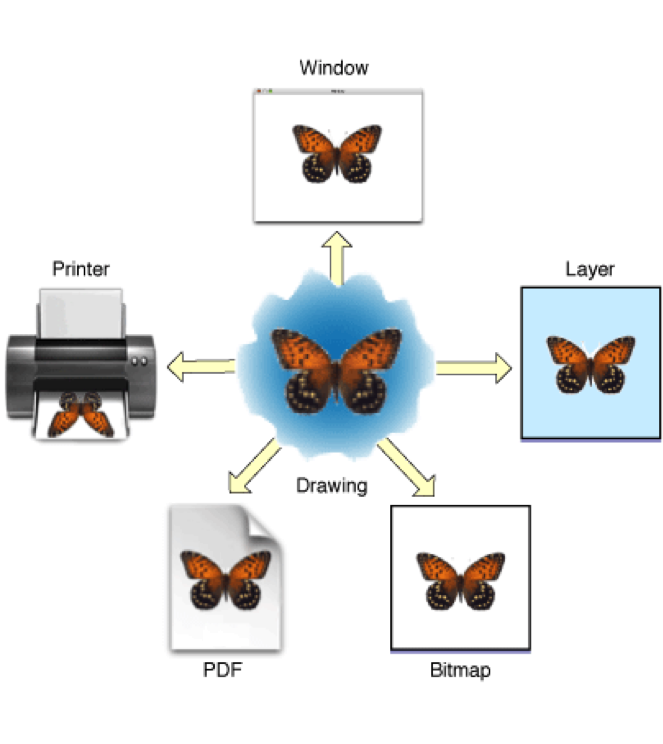
图形上下文的分类
Quartz2D提供了以下几种类型的Graphics Contenxt类型:
1.Bitmap Graphics Context
2.PDF Graphics Context
3.Windwo Graphics Context
4.Layer Graphics Contenx
5.Printer Graphics Context
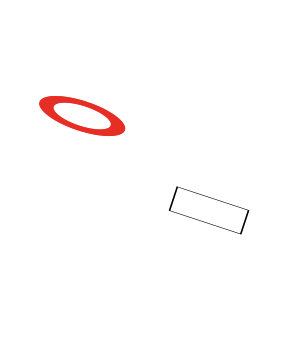
这几种样式的显示样式实例如下图所示:
现在我们直接来使用它吧
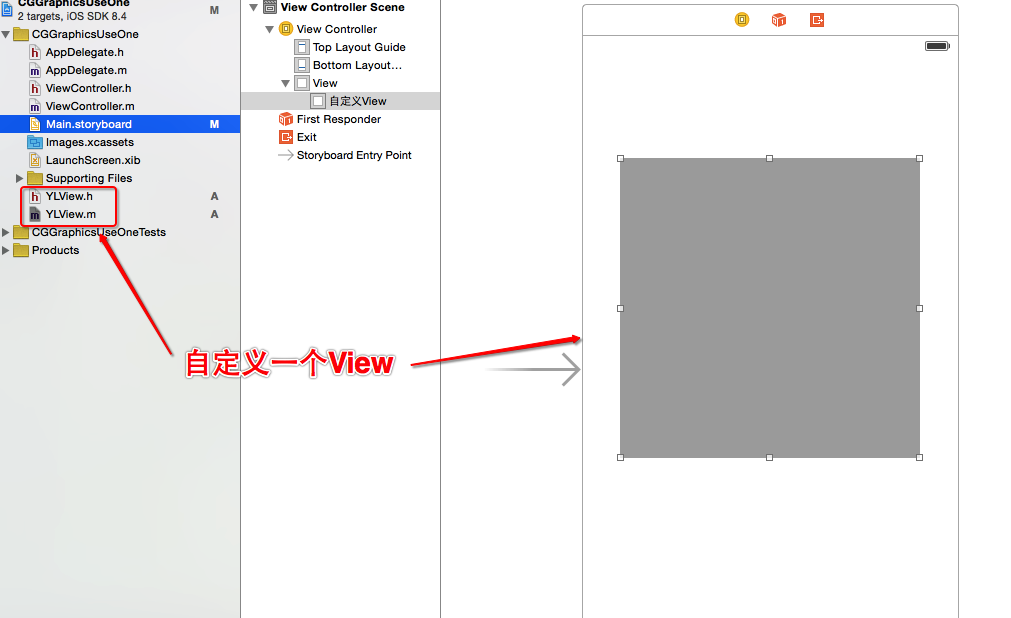
为了方便大家看懂我的代码,首先我们学习一下使用的具体步骤:
1.自定义一个View(自定义一个UI控件),用来在上面画图
2.在这个View类的DrawRect方法中画图:
-
获取与该View相关的上下文
-
设置图形的路径
-
将路径添加到上下文(也就是显示出来)
实例展示一:

步骤:
1.自定义一个View
2.在自定义的View的DrawRect方法中画图
//画一个三角形
- (void)drawRect:(CGRect)rect {

    //获取当前上下文
    CGContextRef currentContext =  UIGraphicsGetCurrentContext();

    /************************************************/
    //设置路径,开始点
    CGContextMoveToPoint(currentContext, 10, 10);

    //添加第二个点
    CGContextAddLineToPoint(currentContext, 100, 100);

    //添加第三个点
    CGContextAddLineToPoint(currentContext, 150, 40);

    //封闭区域
    CGContextClosePath(currentContext);

    /***********************************************/

    //将路径渲染到上下文并画出来
    CGContextStrokePath(currentContext);
}
其他图形
把上面的/*****/注释的那一段换成其他的图形,就可以展示出其他的图形了。例如:
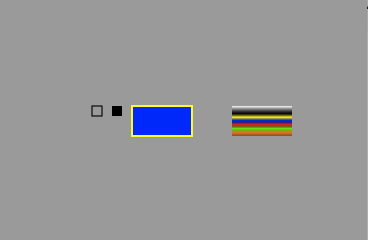
矩形
/*画矩形*/
   CGContextStrokeRect(context,CGRectMake(100, 120, 10, 10));//画方框
   CGContextFillRect(context,CGRectMake(120, 120, 10, 10));//填充框
   //矩形,并填弃颜色
   CGContextSetLineWidth(context, 2.0);//线的宽度
   UIColor *aColor = [UIColor blueColor];//blue蓝色
   CGContextSetFillColorWithColor(context, aColor.CGColor);//填充颜色
   aColor = [UIColor yellowColor];
   CGContextSetStrokeColorWithColor(context, aColor.CGColor);//线框颜色
   CGContextAddRect(context,CGRectMake(140, 120, 60, 30));//画方框
   CGContextDrawPath(context, kCGPathFillStroke);//绘画路径

   //矩形,并填弃渐变颜色

   CAGradientLayer *gradient1 = [CAGradientLayer layer];
   gradient1.frame = CGRectMake(240, 120, 60, 30);
   gradient1.colors = [NSArray arrayWithObjects:
                       (id)[UIColor whiteColor].CGColor,
                       (id)[UIColor grayColor].CGColor,
                       (id)[UIColor blackColor].CGColor,
                       (id)[UIColor yellowColor].CGColor,
                       (id)[UIColor blueColor].CGColor,
                       (id)[UIColor redColor].CGColor,
                       (id)[UIColor greenColor].CGColor,
                       (id)[UIColor orangeColor].CGColor,
                       (id)[UIColor brownColor].CGColor,
                       nil];
   [self.layer insertSublayer:gradient1 atIndex:0];
文字
//文字
CGContextSetRGBFillColor(currentContext, 1, 0, 0, 1.0);
UIFont *font = [UIFont boldSystemFontOfSize:15.0];
[@"画汉字" drawInRect:CGRectMake(10, 10, 50, 100) withFont:font];

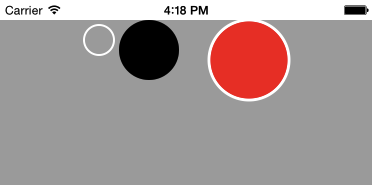
画圆
//画圆

    //填充模式:
    //kCGPathFill填充非零绕数规则,
    //kCGPathEOFill表示用奇偶规则,
    //kCGPathStroke路径,
    //kCGPathFillStroke路径填充,
    //kCGPathEOFillStroke表示描线,不是填充

    //画圆函数
    //void CGContextAddArc(CGContextRef c,CGFloat x, CGFloat y,CGFloat radius,CGFloat startAngle,CGFloat endAngle, int clockwise)
    // x,y为圆点坐标,radius半径,startAngle为开始的弧度,endAngle为 结束的弧度,clockwise 0为顺时针,1为逆时针。

    //设置
    CGContextSetRGBStrokeColor(context,1,1,1,1.0);//画笔线的颜色
    CGContextSetLineWidth(context, 2.0);//线的宽度

    //边框圆
    CGContextAddArc(context, 100, 20, 15, 0, 2*M_PI, 0); //添加一个圆
    CGContextDrawPath(context, kCGPathStroke); //绘制路径

    //填充圆,无边框
    CGContextAddArc(context, 150, 30, 30, 0, 2*M_PI, 0); //添加一个圆
    CGContextDrawPath(context, kCGPathFill);//绘制填充

    //画大圆并填充颜色
    UIColor*aColor = [UIColor colorWithRed:1 green:0.0 blue:0 alpha:1];
    CGContextSetFillColorWithColor(context, aColor.CGColor);//填充颜色
    CGContextSetLineWidth(context, 3.0);//线的宽度
    CGContextAddArc(context, 250, 40, 40, 0, 2*M_PI, 0); //添加一个圆
    CGContextDrawPath(context, kCGPathFillStroke); //绘制路径加填充
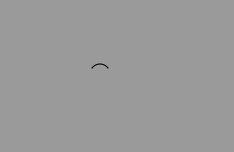
圆弧
//圆弧
CGContextSetRGBStrokeColor(context, 0, 0, 1, 1);//改变画笔颜色
CGContextMoveToPoint(context, 140, 80);//开始坐标p1
//CGContextAddArcToPoint(CGContextRef c, CGFloat x1, CGFloat y1,CGFloat x2, CGFloat y2, CGFloat radius)
//x1,y1跟p1形成一条线,x2,y2跟x1,y1坐标形成一条线,然后将这两条线作为切线,画出圆心求出半径,radius半径,注意, 需要算好半径的长度,
CGContextAddArcToPoint(context, 148, 68, 156, 80, 10);
CGContextStrokePath(context);//绘画路径
椭圆、圆角按钮、图片、贝塞尔曲线
//画椭圆
    CGContextAddEllipseInRect(context, CGRectMake(160, 180, 20, 8)); //椭圆
    CGContextDrawPath(context, kCGPathFillStroke);

    /*画圆角矩形*/
    float fw = 180;
    float fh = 280;

    CGContextMoveToPoint(context, fw, fh-20);  // 开始坐标右边开始
    CGContextAddArcToPoint(context, fw, fh, fw-20, fh, 10);  // 右下角角度
    CGContextAddArcToPoint(context, 120, fh, 120, fh-20, 10); // 左下角角度
    CGContextAddArcToPoint(context, 120, 250, fw-20, 250, 10); // 左上角
    CGContextAddArcToPoint(context, fw, 250, fw, fh-20, 10); // 右上角
    CGContextClosePath(context);
    CGContextDrawPath(context, kCGPathFillStroke); //根据坐标绘制路径

    /*画贝塞尔曲线*/
    //二次曲线
    CGContextMoveToPoint(context, 120, 300);//设置Path的起点
    CGContextAddQuadCurveToPoint(context,190, 310, 120, 390);//设置贝塞尔曲线的控制点坐标和终点坐标
    CGContextStrokePath(context);
    //三次曲线函数
    CGContextMoveToPoint(context, 200, 300);//设置Path的起点
    CGContextAddCurveToPoint(context,250, 280, 250, 400, 280, 300);//设置贝塞尔曲线的控制点坐标和控制点坐标终点坐标
    CGContextStrokePath(context);


    /*图片*/
    UIImage *image = [UIImage imageNamed:@"Snip20150715_1"];
    [image drawInRect:CGRectMake(60, 340, 60, 60)];//在坐标中画出图片
//  [image drawAtPoint:CGPointMake(100, 340)];//保持图片大小在point点开始画图片
    CGContextDrawImage(context, CGRectMake(100, 340, 60, 60), image.CGImage);//使图片上下颠倒
这里就不贴图了。
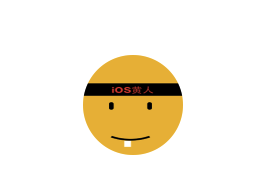
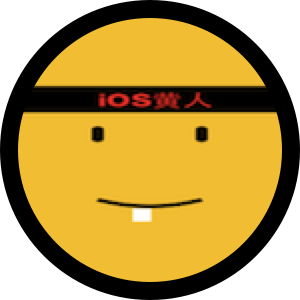
下面综合案例,画出自己的表情小黄人
实现效果:
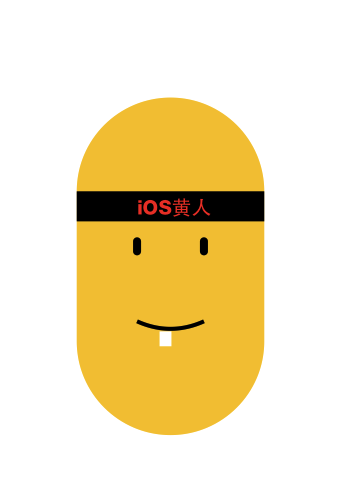
代码如下:
//
//  YLView.m
//  我的QQ表情
//  联系方式: 492199045@qq.com
//  Created by 薛银亮 on 15/7/15.
//  Copyright (c) 2015年 薛银亮. All rights reserved.
//

#import "YLView.h"
#define YLColor(r, g, b) [UIColor colorWithRed:r / 255.0 green:g / 255.0 blue:b  / 255.0 alpha:1.1]

@implementation YLView

- (void)drawRect:(CGRect)rect {

    //获取当前上下文
    CGContextRef context = UIGraphicsGetCurrentContext();

    //画身体
    //头圆
    CGFloat x = self.bounds.size.width * 0.5;
    CGFloat y = self.bounds.size.height /3;
    CGFloat radius = self.bounds.size.width / 4;
    CGContextAddArc(context, x, y, radius, 0, M_PI, 1);
    //身线
    CGFloat h = y + 150;
    CGContextAddLineToPoint(context, x-radius, h);
    //下巴
    CGContextAddArc(context, x, h, radius, M_PI, 2*M_PI, 1);
    CGContextClosePath(context);
    //颜色
    [YLColor(249, 201, 40) setFill];
    CGContextFillPath(context);

    //画嘴
    CGFloat zuiqX = x-radius/4 -10;
    CGFloat zuiqY = h-20;
    CGFloat kongX = x;
    CGFloat kongY = zuiqY + 15;
    CGFloat zhongX = x + radius / 4 +10;
    CGFloat zhongY = zuiqY;
    CGContextMoveToPoint(context, zuiqX, zuiqY);
    CGContextAddQuadCurveToPoint(context, kongX, kongY, zhongX, zhongY);
    [YLColor(0 , 0, 0) setStroke];
    CGContextSetLineWidth(context, 4);
    CGContextStrokePath(context);

    //画牙
    CGContextMoveToPoint(context, x-5, kongY-5);
    CGFloat yazhongX = x -5;
    CGFloat yazhongY = kongY +10;
    [YLColor(255, 255, 255) set];
    CGContextAddLineToPoint(context, yazhongX, yazhongY);
    CGContextSetLineWidth(context, 12);
//    CGContextSetLineCap(context, kCGLineCapRound);
    CGContextStrokePath(context);

    //画头符
    CGRect toufuRect = CGRectMake(x - radius, y, 2*radius, 30);
    CGContextAddRect(context, toufuRect);
    [YLColor(0, 0, 0) setFill];
    CGContextFillPath(context);

    //画头符汉字
    NSString *toufuString = @"iOS黄人";
    CGRect toufuStrRect = CGRectMake(zuiqX, y+4, radius, 30);
    NSMutableDictionary *toufuStrDict = [NSMutableDictionary dictionary];
    toufuStrDict[NSFontAttributeName] = [UIFont systemFontOfSize:20 weight:6];
    toufuStrDict[NSForegroundColorAttributeName] = [UIColor redColor];
    [toufuString drawInRect:toufuStrRect withAttributes:toufuStrDict];
    CGContextStrokePath(context);

    //画眼睛
    //左眼
    CGContextMoveToPoint(context, zuiqX, y+50);
    CGFloat zyanzhongX = zuiqX;
    CGFloat zyanzhongY = y + 60;
    [YLColor(0, 0, 0) set];
    CGContextAddLineToPoint(context, zyanzhongX, zyanzhongY);
    CGContextSetLineWidth(context, 8);
    CGContextSetLineCap(context, kCGLineCapRound);

    //右眼
    CGContextMoveToPoint(context, zhongX, y+50);
    CGFloat yyanzhongX = zhongX;
    CGFloat yyanzhongY = y + 60;
    CGContextAddLineToPoint(context, yyanzhongX, yyanzhongY);
    CGContextStrokePath(context);

}


@end
(二)进阶
上下文栈
上面的案例可以看出来存在很多不恰当的地方,我们每次画出来一部分都要重新设置当前上下文的状态,以便下一次的使用。
这在使用的过程中很不方便,所以就有了图形上下文栈的操作。
假如我们知道当前上下文的状态在以后会使用,但是紧接着我们要使用其他的上下文状态,这时候,我们就可以把当前的上下文保存起来,相当于拷贝的操作,并存储在栈顶中:
保存:
void CGContextSaveGState(CGContextRef c)
当我们需要重新使用这个状态的上下文的时候,就可以将上下文出栈,替换掉当前正在使用的上下文。
void CGContextRestoreGState(CGContextRef c)
举例:
我们先画出来一个圆形和一个正方形,然后再来看看问题所在
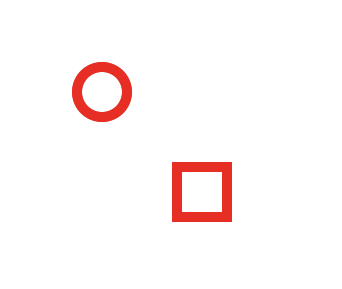
- (void)drawRect:(CGRect)rect {
    //获得当前上下文
    CGContextRef context = UIGraphicsGetCurrentContext();
    //设置所画的图形的颜色和线宽
    CGContextSetLineWidth(context, 10);
    [[UIColor redColor]setStroke];
    //画一个圆形
    CGContextAddEllipseInRect(context, CGRectMake(100, 100, 50, 50));
    //显示出来所画的图形
    CGContextStrokePath(context);
    //画一个正方形
    CGContextAddRect(context, CGRectMake(200, 200, 50, 50));
    //显示出来所画的图形
    CGContextStrokePath(context);
}
如果我们想给正方形设置成黑色的细线形状,那么,我们就要重新设置LineWight和Color。这看起来是没有问题的。但是如果我们画的不只是两个不一样的图形,而是多个,那么这样就显得非常的麻烦。下面我们看看怎么使用上下文栈解决这个问题:
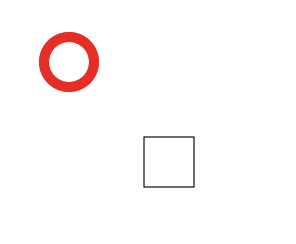
- (void)drawRect:(CGRect)rect {
    //获得当前上下文
    CGContextRef context = UIGraphicsGetCurrentContext();

    //保存上下文的初始状态,以便后面使用
    CGContextSaveGState(context);
    //设置所画的图形的颜色和线宽
    CGContextSetLineWidth(context, 10);
    [[UIColor redColor]setStroke];
    //画一个圆形
    CGContextAddEllipseInRect(context, CGRectMake(100, 100, 50, 50));
    CGContextStrokePath(context);
    //拿出上次保存的上下文的状态,用来设置正方形那个的样子
    CGContextRestoreGState(context);
    //画一个正方形
    CGContextAddRect(context, CGRectMake(200, 200, 50, 50));
    //显示出来所画的图形
    CGContextStrokePath(context);
}
矩阵操作
所谓的矩阵操作就是将类似于我们之前的所有的画线操作一起进行一些操作,比如:旋转、平移、缩放等。
下面,我们将上面的知识点举个例子学习一下:
我们将上面的例子中的圆形和正方形同时进行旋转、平移等操作:
- (void)drawRect:(CGRect)rect {
    //获得当前上下文
    CGContextRef context = UIGraphicsGetCurrentContext();

    //矩阵操作
    //旋转
    CGContextRotateCTM(context, M_1_PI);
    //平移
    CGContextTranslateCTM(context, 0, 100);
    //缩放
    CGContextScaleCTM(context, 1.5, 0.5);

    //保存上下文的初始状态,以便后面使用
    CGContextSaveGState(context);
    //设置所画的图形的颜色和线宽
    CGContextSetLineWidth(context, 10);
    [[UIColor redColor]setStroke];
    //画一个圆形
    CGContextAddEllipseInRect(context, CGRectMake(100, 100, 50, 50));
    CGContextStrokePath(context);
    //拿出上次保存的上下文的状态,用来设置正方形那个的样子
    CGContextRestoreGState(context);
    //画一个正方形
    CGContextAddRect(context, CGRectMake(200, 200, 50, 50));
    //显示出来所画的图形
    CGContextStrokePath(context);
}
裁剪
剪裁一
显示在指定的UIView上
我们可以把一张图片裁剪成自己想要的图形
- 设置好要裁剪的图形
- 将准备好的图片放在裁剪区域
示例:
- (void)drawRect:(CGRect)rect {
    //获得当前上下文
    CGContextRef context = UIGraphicsGetCurrentContext();
    //截图操作
    //画出要截取的区域-圆
    CGContextAddEllipseInRect(context, CGRectMake(100, 100, 100, 100));
    //剪裁
    CGContextClip(context);
    CGContextFillPath(context);
    //添加一张图片
    UIImage *image = [UIImage imageNamed:@"Snip20150716_10"];
    [image drawInRect:CGRectMake(50, 50, 200, 200)];
}
剪裁二
显示成一张图片,方便使用。
显示结果:
我们可以把这个功能抽取成UIImage的分类,以便以后的使用:
+ (instancetype)circleImageWithName:(NSString *)name borderWidth:(CGFloat)borderWidth borderColor:(UIColor *)borderColor
{
    // 1.加载原图
    UIImage *oldImage = [UIImage imageNamed:name];

    // 2.开启上下文
    CGFloat imageW = oldImage.size.width + 2 * borderWidth;
    CGFloat imageH = oldImage.size.height + 2 * borderWidth;
    CGSize imageSize = CGSizeMake(imageW, imageH);
    UIGraphicsBeginImageContextWithOptions(imageSize, NO, 0.0);

    // 3.取得当前的上下文
    CGContextRef ctx = UIGraphicsGetCurrentContext();

    // 4.画边框(大圆)
    [borderColor set];
    CGFloat bigRadius = imageW * 0.5; // 大圆半径
    CGFloat centerX = bigRadius; // 圆心
    CGFloat centerY = bigRadius;
    CGContextAddArc(ctx, centerX, centerY, bigRadius, 0, M_PI * 2, 0);
    CGContextFillPath(ctx); // 画圆

    // 5.小圆
    CGFloat smallRadius = bigRadius - borderWidth;
    CGContextAddArc(ctx, centerX, centerY, smallRadius, 0, M_PI * 2, 0);
    // 裁剪(后面画的东西才会受裁剪的影响)
    CGContextClip(ctx);

    // 6.画图
    [oldImage drawInRect:CGRectMake(borderWidth, borderWidth, oldImage.size.width, oldImage.size.height)];

    // 7.取图
    UIImage *newImage = UIGraphicsGetImageFromCurrentImageContext();

    // 8.结束上下文
    UIGraphicsEndImageContext();

    return newImage;
}
补充:我们一般会将画好的图像保存起来。保存到沙河Documents的方法如下:
//先将图片压缩
NSData *data = UIImagePNGRepresentation(newImage);
NSString *path = [[NSSearchPathForDirectoriesInDomains(NSDocumentDirectory, NSUserDomainMask, YES) lastObject] stringByAppendingPathComponent:@"new.png"];
[data writeToFile:path atomically:YES];
重绘(刷帧)
在使用绘画的时候,我们经常要不断的更新画面,但是系统的
- (void)drawRect:(CGRect)rect;
这个函数只会默认调用一次,而且我们不能手动去调用(因为我们在其他地方无法获取到系统的上下文)。所以就要用到重绘了。
所谓重绘,关键要用到这个函数:
- (void)setNeedsDisplay;
在重绘的时候,我们有时候会用到定时器,这里补充一下定时器知识,我们可以使用这两种定时器,例子:
CADisplayLink *link = [CADisplayLink displayLinkWithTarget:self selector:@selector(setNeedsDisplay)];

[link addToRunLoop:[NSRunLoop mainRunLoop] forMode:NSDefaultRunLoopMode];
这种定时器会默认在1秒钟刷新60次,而且使用时候要加入到主运行循环中,这样有时候会看着更加的流畅。
第二种:
[NSTimer scheduledTimerWithTimeInterval:0.2 target:self selector:@selector(setNeedsDisplay) userInfo:nil repeats:YES];
这种用户可以自定义刷新的频率
例子:
贴出一个雪花下降的程序:
#import "YLView.h"

@interface YLView()
/**y值*/
@property(nonatomic,assign) CGFloat snowY;
@end
@implementation YLView

-(void)awakeFromNib
{
    CADisplayLink *link = [CADisplayLink displayLinkWithTarget:self selector:@selector(setNeedsDisplay)];
    [link addToRunLoop:[NSRunLoop mainRunLoop] forMode:NSDefaultRunLoopMode];
//    [NSTimer scheduledTimerWithTimeInterval:0.2 target:self selector:@selector(setNeedsDisplay) userInfo:nil repeats:YES];
}

- (void)drawRect:(CGRect)rect {
    self.snowY +=5;
    UIImage *image = [UIImage imageNamed:@"snow.jpg"];
    [image drawAtPoint:CGPointMake(0, self.snowY)];

}
制作水印图片
水印图片是指在一张图片上面添加上属于自己的标志,例如很多商标图片上面的右下角都会有一个小小的标志。下面我们画一个这样的例子。
效果如下
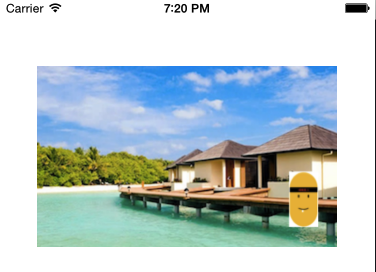
像这样的例子,可能会经常用到,所以我们最好将这个功能封装成一个分类。这里因为是UIImage的功能,所以我们将其封装成UIImage的分类。
代码示例:
//
//  UIImage+Water.m
//  打水印
//  联系方式: 492199045@qq.com
//  Created by 薛银亮 on 15/7/17.
//  Copyright (c) 2015年 薛银亮. All rights reserved.
//  水印图片

#import "UIImage+Water.h"

@implementation UIImage (Water)
+(UIImage *)imageWithWaterBackGroundImage:(NSString *)backgroundImageString IconImageString:(NSString *)iconImageString
{
    //背景图片
    UIImage *backImage = [UIImage imageNamed:backgroundImageString];
    //水印图标
    UIImage *iconImage = [UIImage imageNamed:iconImageString];
    //开启一个图片上下文
    UIGraphicsBeginImageContextWithOptions(backImage.size, NO, 0.0);
    //画背景
    CGFloat backW = backImage.size.width;
    CGFloat backH = backImage.size.height;
    [backImage drawInRect:CGRectMake(0, 0, backW, backH)];
    //画水印
    //计算水印所在的位置
    CGFloat margin = 10;
    CGFloat scale = 0.1;
    CGFloat iconW = iconImage.size.width * scale;
    CGFloat iconH = iconImage.size.height * scale;
    CGFloat X = backW - iconW - margin;
    CGFloat Y = backH - iconH - margin;
    [iconImage drawInRect:CGRectMake(X, Y, iconW, iconH)];
    //获取图形上下文的图片
    UIImage *newImage = UIGraphicsGetImageFromCurrentImageContext();
    //结束图形上下文
    UIGraphicsEndImageContext();
    return  newImage;
}

@end
屏幕截屏
这里也封装到UIImage的分类中了
+ (instancetype)captureWithView:(UIView *)view
{
    // 1.开启上下文
    UIGraphicsBeginImageContextWithOptions(view.frame.size, NO, 0.0);

    // 2.将控制器view的layer渲染到上下文
    [view.layer renderInContext:UIGraphicsGetCurrentContext()];

    // 3.取出图片
    UIImage *newImage = UIGraphicsGetImageFromCurrentImageContext();

    // 4.结束上下文
    UIGraphicsEndImageContext();

    return newImage;
}