1 概述
本文主要讲述了如何使用ShardingSphere(其中的Sharding-JDBC)和MyBatisPlus进行分库分表,具体步骤包括:
- 准备数据库环境
- 准备依赖
- 编写配置文件
- 测试
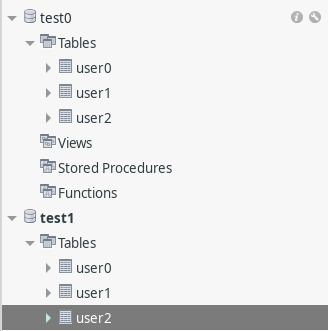
2 准备数据库环境
2.1 两库六表
准备好两个库:
test0test1
在两个库中分别建立三个字段一样的表:
user0user1user2
字段如下:

这样就准备了两个库以及其中的六个表了。
2.2 (可选)MyBatis Plus Generator代码生成表
因为MyBatis Plus Generator生成的Controller等代码默认是按照表名命名的,这样就会生成类似User0、User0Controller这样的命名,因此这里创建一个叫user的表,仅仅用于代码的生成,里面不会存放任何的数据:

3 新建项目
新建Spring Boot项目并引入如下依赖:
DruidMyBatis Plus starterMyBaits Plus GeneratorVelocity coreShardingSphereYitter(一个雪花id生成器)
Maven如下:
<dependency>
    <groupId>com.baomidou</groupId>
    <artifactId>mybatis-plus-boot-starter</artifactId>
    <version>3.4.3.1</version>
</dependency>
<dependency>
    <groupId>com.baomidou</groupId>
    <artifactId>mybatis-plus-generator</artifactId>
    <version>3.5.0</version>
</dependency>
<dependency>
    <groupId>org.apache.velocity</groupId>
    <artifactId>velocity-engine-core</artifactId>
    <version>2.3</version>
</dependency>
<dependency>
    <groupId>org.realityforge.org.jetbrains.annotations</groupId>
    <artifactId>org.jetbrains.annotations</artifactId>
    <version>1.7.0</version>
</dependency>
<dependency>
    <groupId>com.alibaba</groupId>
    <artifactId>druid</artifactId>
    <version>1.2.6</version>
</dependency>
<dependency>
    <groupId>org.apache.shardingsphere</groupId>
    <artifactId>sharding-jdbc-spring-boot-starter</artifactId>
    <version>4.1.1</version>
</dependency>
<dependency>
    <groupId>com.github.yitter</groupId>
    <artifactId>yitter-idgenerator</artifactId>
    <version>1.0.6</version>
</dependency>
Gradle如下:
implementation 'com.baomidou:mybatis-plus-boot-starter:3.4.3.1'
implementation 'org.apache.velocity:velocity-engine-core:2.3'
implementation 'org.realityforge.org.jetbrains.annotations:org.jetbrains.annotations:1.7.0'
implementation 'com.alibaba:druid:1.2.6'
implementation 'org.apache.shardingsphere:sharding-jdbc-spring-boot-starter:4.1.1'
implementation 'com.github.yitter:yitter-idgenerator:1.0.6'
4 配置文件
配置文件可以参考ShardingSphere文档,这里给出一个示例配置:
spring:
  shardingsphere:
    datasource:
      names: test0,test1                                        # 数据源,这里为了方便直接使用库名的名称
      test0:
        type: com.alibaba.druid.pool.DruidDataSource            # Druid连接池
        url: jdbc:mysql://127.0.0.1:3306/test0                  # 连接test0的url
        username: root
        password: 123456
      test1:
        type: com.alibaba.druid.pool.DruidDataSource            # Druid连接池
        url: jdbc:mysql://127.0.0.1:3306/test1                  # 连接test1的url
        username: root
        password: 123456
    sharding:
      default-database-strategy:                                # 默认分库策略
        inline:
          sharding-column: age                                  # 表示根据age列进行分库
          algorithm-expression: test$->{age % 2}                # 根据age对2的模进行分库,模为0表示test0库,模为1表示test1库
      tables:
        user:
          actual-data-nodes: test$->{0..1}.user$->{0..2}        # 表的名字,test$->{0..1}可以表示test0、test1两个库
                                                                # user$->{0..2}表示user0、user1、user2三个库
          table-strategy:                                       # 分表策略
            inline:
              sharding-column: id                               # 根据哪一列进行分表,id表示根据列名为"id"的列分表
              algorithm-expression: user$->{id%3}               # 分表规则为id对3取模,id%3为0表示分到user0表
                                                                # id%3为1表示分到user1表,id%3为2表示分到user2表
    props:
      sql:
        show:
          true                                                  # 打印sql
这里使用自动取模分片策略,ShardingShphere内置了如下分片算法:
- 自动分片算法:取模分片、哈希取模分片、基于分片容量的范围分片、基于分片边界的范围分片、自动时间段分片
- 标准分片算法:行表达式分片、时间范围分片
- 复合行表达式分片
Hint行表达式分片
如果不能满足需要还可以自定义分片算法,具体请看官方文档。
5 测试代码生成
使用MyBaits Plus Generator生成相应代码,具体使用可以参考笔者之前的文章,这里直接放上生成类的代码:
import com.baomidou.mybatisplus.generator.AutoGenerator;
import com.baomidou.mybatisplus.generator.config.*;

public class MyBatisPlusGenerator {
    public static void main(String[] args) {
        DataSourceConfig dataSourceConfig = new DataSourceConfig.Builder("jdbc:mysql://localhost:3306/test0", "root", "123456").build();
        String projectPath = System.getProperty("user.dir");
        StrategyConfig strategyConfig = new StrategyConfig.Builder().addInclude("user").build();
        GlobalConfig globalConfig = new GlobalConfig.Builder().outputDir(projectPath + "/src/main/java").openDir(false).build();
        PackageConfig packageConfig = new PackageConfig.Builder().moduleName("user").parent("com.example.demo").serviceImpl("service").build();
        new AutoGenerator(dataSourceConfig).global(globalConfig).packageInfo(packageConfig).strategy(strategyConfig).execute();
    }
}
把UserController类修改如下:
@RestController
@RequestMapping("/user")
@RequiredArgsConstructor(onConstructor = @__(@Autowired))
public class UserController {
    private final Random random = new Random();
    private final UserServiceImpl service;
    @GetMapping("/select")
    public List<User> select(){
        return service.list();
    }

    @GetMapping("/insert")
    public boolean insert(){
        return service.save(User.builder().age(random.nextInt(80)+20).name("test name").email("test@test.com").build());
    }
}
6 增加雪花id生成器
首先修改User类,增加一个@Builder注解,同时修改id的生成策略,使用IdType.ASSIGN_ID:
@Builder
public class User implements Serializable {
    @TableId(type = IdType.ASSIGN_ID)
    private Long id;
    //...
}
新建id生成器类:
import com.baomidou.mybatisplus.core.incrementer.IdentifierGenerator;
import com.github.yitter.contract.IdGeneratorOptions;
import com.github.yitter.idgen.YitIdHelper;
import org.springframework.stereotype.Component;

import javax.annotation.PostConstruct;

@Component
public class IdGenerator implements IdentifierGenerator {
    final IdGeneratorOptions options = new IdGeneratorOptions((short) 1);

    @PostConstruct
    public void init() {
        YitIdHelper.setIdGenerator(options);
    }

    @Override
    public Long nextId(Object entity) {
        return YitIdHelper.nextId();
    }
}
这样生成id的时候,就会自动调用nextId()方法,其中的id生成器可以根据需要进行替换,换成其他雪花id生成器或分布式id生成器。
配置的时候可以参考MyBaits Plus 自定义ID生成器文档。
7 测试
先随机插入三条数据,刷新三次如下页面:
localhost:8080/test/user/insert
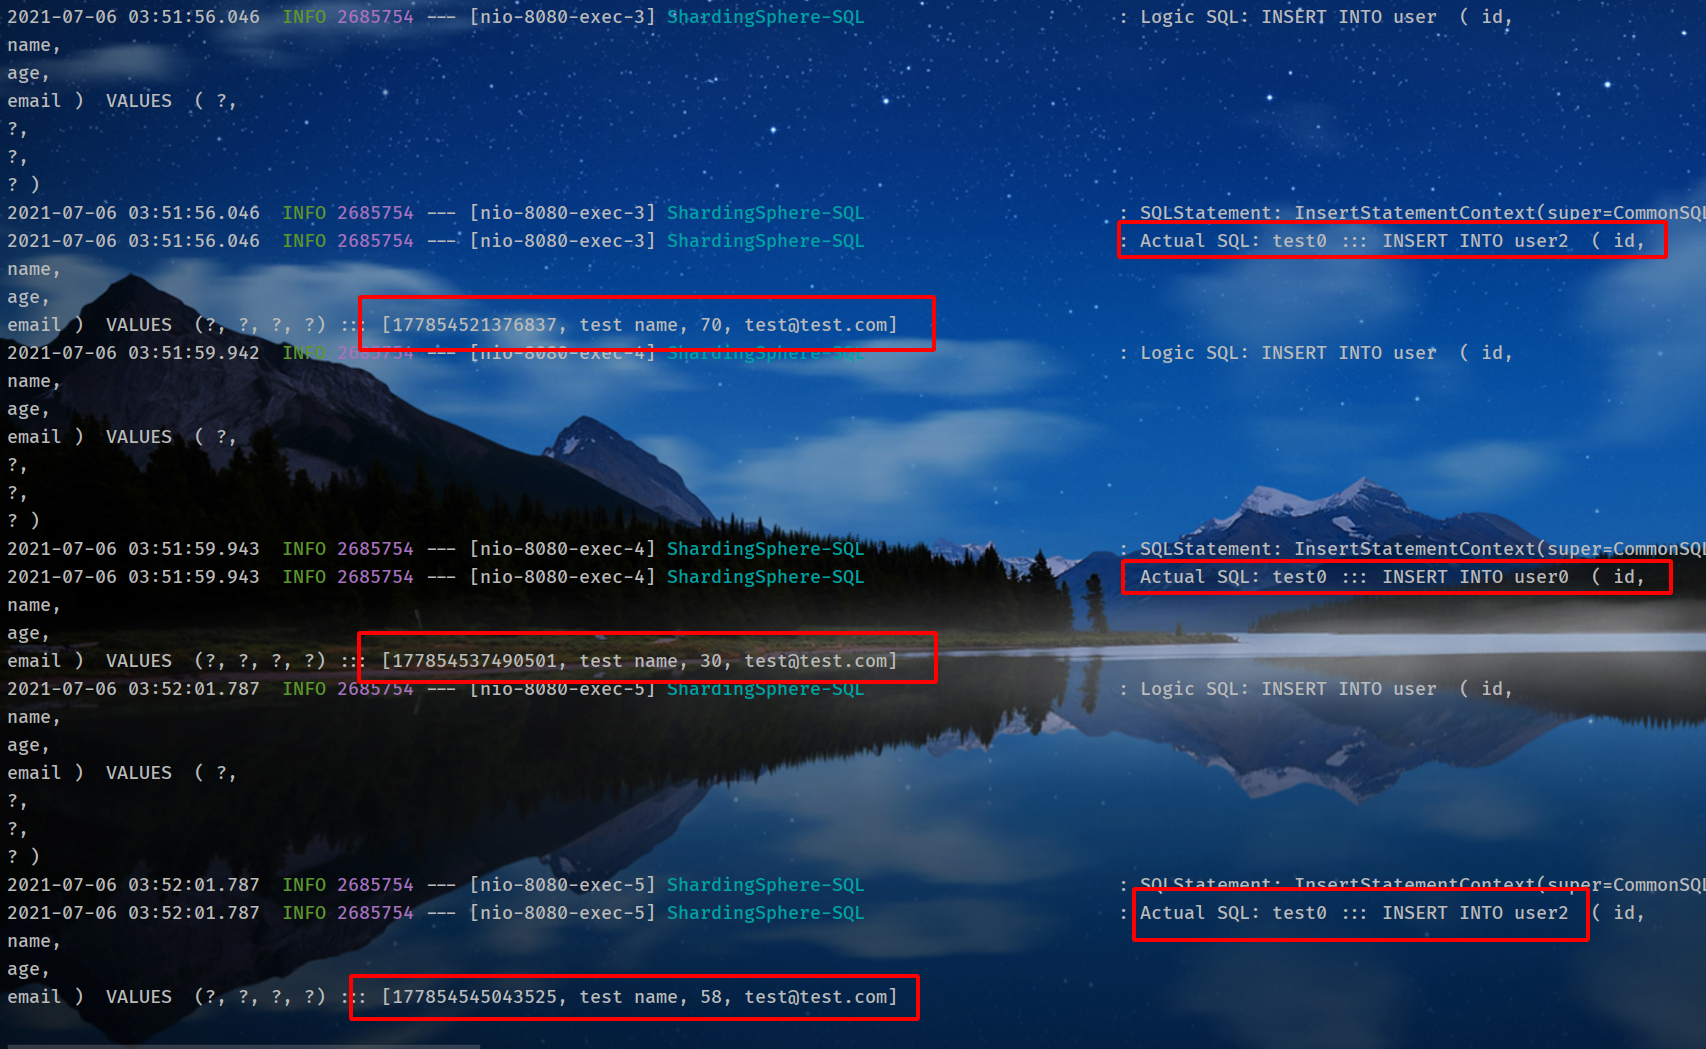
可以看到执行了三次插入操作,插入的三个表分别是:
test0.user2test0.user0test0.user2
因为这里测试的时候年龄都恰好是偶数,都插入到了test0表。
查看数据:
http://localhost:8080/user/select

日志输出如下:

表示这是对六个表查询的结果,并将最后的结果进行聚合返回。
8 参考源码
Java版:
Kotlin版: