知识点梳理

课堂讲义
1)事务回顾
1.1)什么是事务-视频01
事务可以看做是一次大的活动,它由不同的小活动组成,这些活动要么全部成功,要么全部失败。
1.2)事务的作用
事务特征(ACID)
-
原子性(Atomicity)指事务是一个不可分割的整体,其中的操作要么全执行或全不执行
-
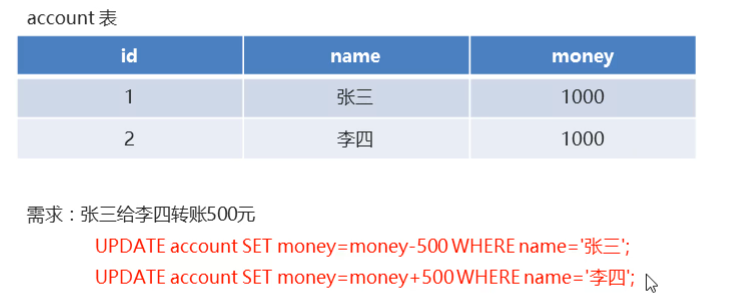
一致性(Consistency)事务前后数据的完整性必须保持一致。比如:张三向李四转100元,转账前和转账后的数据是正确状态这叫一致性,如果出现张三转出100元,李四账户没有增加100元这就出现了数据错误,就没有达到一致性。
-
隔离性(Isolation)事务的隔离性是多个用户并发访问数据库时,数据库为每一个用户开启的事务,不能被其他事务的操作数据所干扰,多个并发事务之间要相互隔离
-
持久性(Durability)持久性是指一个事务一旦被提交,它对数据库中数据的改变就是永久性的,接下来即使数据库发生故障也不应该对其有任何影响
1.3)事务的隔离级别
隔离级别:isolation level
并发访问数据库时,在多个访问间进行相互隔离,防止并发访问操作的结果互相干扰。可能会出现的几种问题:
-
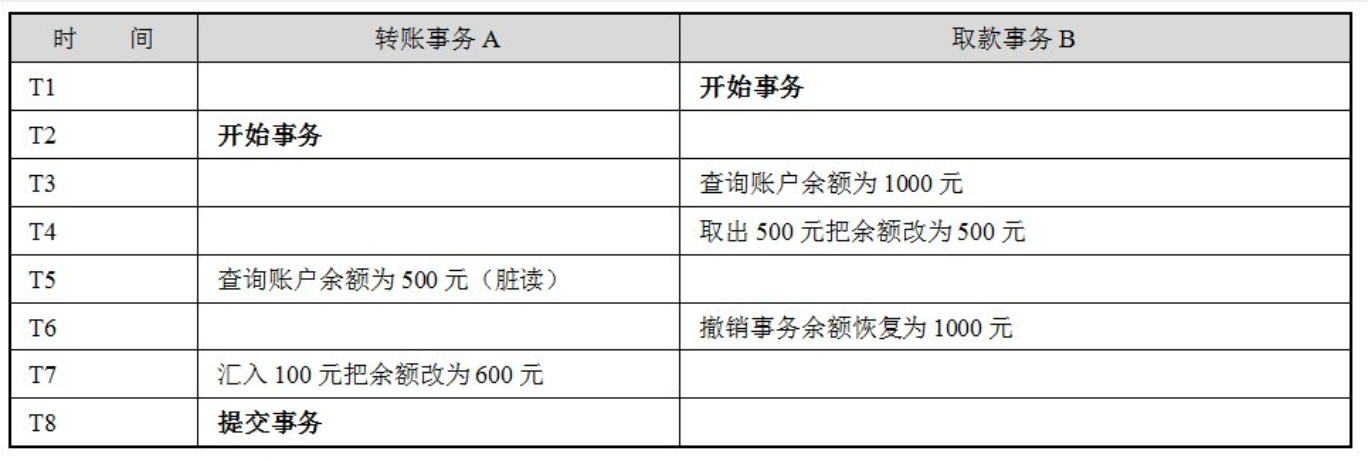
脏读:允许读取未提交的信息Read uncommitted,解决方案:Read committed(表级读锁)
-
在这个场景中,B希望取款500元而后又撤销了动作,而A往相同的账户中转账100元,就因为A事务读取了B事务尚未提交的数据,因而造成账户白白丢失了500元
xxxxxxxxxx 一个有结巴的人在饮料店柜台前转悠,老板很热情地迎上来说:“喝一瓶?”结巴连忙说:“我…喝…喝…”老板麻利地打开易拉罐递给结巴,结巴终于憋出了他的那句话:“我…喝…喝…喝不起啊!” -
不可重复读:A事务读取了B事务已经提交的更改数据
解决方案: Repeatable read (行级写锁)MySQL InnoDB默认级别
A在取款事务的过程中,B往该账户转账100元,A两次读取账户的余额发生不一致:
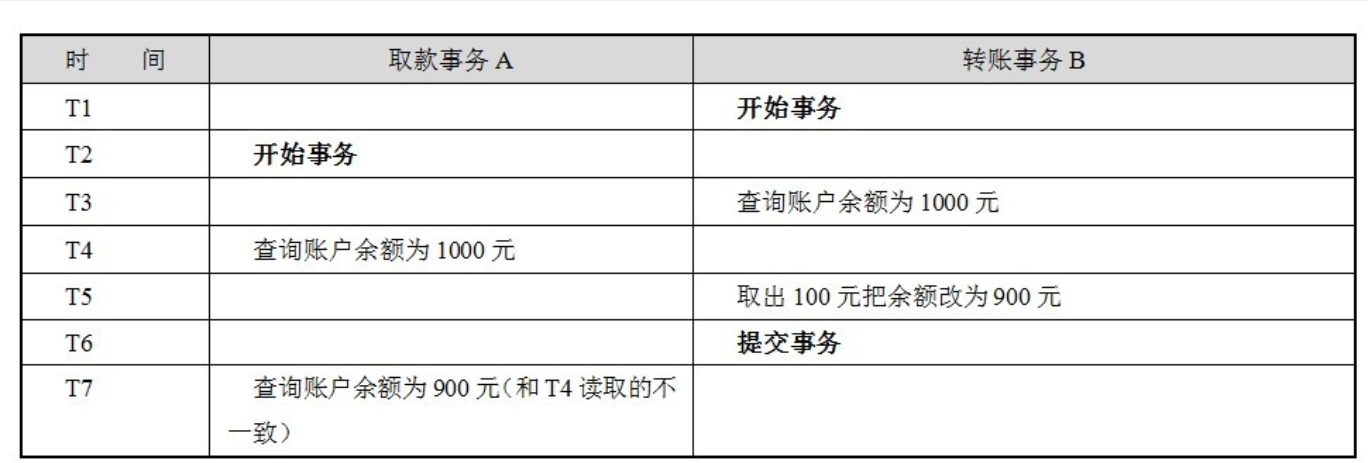
在同一事务中,T4时间点和T7时间点读取账户存款余额不一样
-
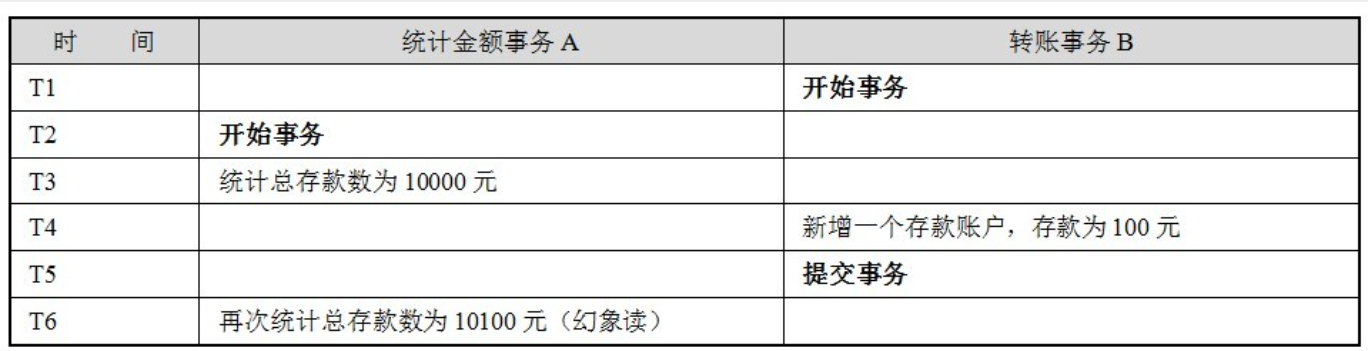
幻读:读取过程中数据条目发生了变化
假设银行系统在同一个事务中,两次统计存款账户的总金额,在两次统计过程中,刚好新增了一个存款账户,并存入100元,这时,两次统计的总金额将不一致:
解决方案: Serializable(表级写锁)
为了有效保证并发读取数据的正确性,用四种事务隔离级别来解决脏读、不可重复读、幻读等问题:
-
未提交读(Read Uncommitted):允许脏读,可能读取到其他会话中未提交事务修改的数据(一般不用)
-
提交读(Read Committed):只能读取到已经提交的数据,解决了脏读的问题
-
可重复读(Repeatable Read):可重复读,MySQL InnoDB默认级别。在SQL标准中,该隔离级别消除了不可重复读,但是还存在幻读
-
串行读(Serializable):最严格的隔离级别。在Serializable隔离级别下,所有事务按照次序依次执行,因此,脏读、不可重复读、幻读都不会出现。虽然Serializable隔离级别下的事务具有最高的安全性,但是由于事务是串行执行,所以效率会大大下降,应用程序的性能会急剧降低。如果没有特别重要的情景,一般都不会使用Serializable隔离级别。
2)事务管理
回顾之前的事务管理方式
2.1)Spring事务核心对象-视频02
Spring提供如下三个接口为业务层提供了整套的事务解决方案
-
事务定义对象:TransactionDefinition
-
事务状态:TransactionStatus
-
平台事务管理器:PlatformTransactionManager
2.2)TransactionDefinition
此接口定义了事务的基本信息
-
获取事务定义名称
String getName() -
获取事务的读写属性
boolean isReadOnly() -
获取事务隔离级别
int getIsolationLevel() -
获事务超时时间
int getTimeout() -
获取事务传播行为特征
int getPropagationBehavior()
2.3)TransactionStatus
此接口定义了事务在执行过程中某个时间点上的状态信息及对应的状态操作

2.4)PlatformTransactionManager
-
平台事务管理器实现类
-
DataSourceTransactionManager 适用于Spring JDBC或MyBatis
-
HibernateTransactionManager 适用于Hibernate3.0及以上版本
-
JpaTransactionManager 适用于JPA
-
JdoTransactionManager 适用于JDO
-
JtaTransactionManager 适用于JTA
-
-
JPA(Java Persistence API)Java EE 标准之一,为POJO提供持久化标准规范,并规范了持久化开发的统一API,符合JPA规范的开发可以在不同的JPA框架下运行
-
JDO(Java Data Object )是Java对象持久化规范,用于存取某种数据库中的对象,并提供标准化API。与JDBC相比,JDBC仅针对关系数据库进行操作,JDO可以扩展到关系数据库、文件、XML、对象数据库(ODBMS)等,可移植性更强
-
JTA(Java Transaction API)Java EE 标准之一,允许应用程序执行分布式事务处理。与JDBC相比,JDBC事务则被限定在一个单一的数据库连接,而一个JTA事务可以有多个参与者,比如JDBC连接、JDO 都可以参与到一个JTA事务中
此接口定义了事务的基本操作
-
获取事务 :
TransactionStatus getTransaction(TransactionDefinition definition)
-
提交事务 :
void commit(TransactionStatus status) -
回滚事务 :
void rollback(TransactionStatus status)
2.5)事务控制方式-视频03
-
编程式
-
声明式事务管理(XML)
-
声明式(注解)(重点)
2.6)制作案例
2.6.1)案例说明
银行转账操作中,涉及从A账户到B账户的资金转移操作;数据层仅提供单条数据的基础操作
2.6.2)案例环境准备
-
数据层AccountDao提供对应的入账与出账操作
/**
 * 入账操作
 * @param name      入账用户名
 * @param money     入账金额
 */
void inMoney(@Param("name") String name, @Param("money") Double money);

/**
 * 出账操作
 * @param name      出账用户名
 * @param money     出账金额
 */
void outMoney(@Param("name") String name, @Param("money") Double money);
AccountDao.xml
<update id="inMoney">
    update account set money = money + #{money} where name = #{name}
</update>
<update id="outMoney">
    update account set money = money - #{money} where name = #{name}
</update>
-
业务层接口AccountService提供转账操作
/**
* 转账操作
* @param outName     出账用户名
* @param inName      入账用户名
* @param money       转账金额
*/
public void transfer(String outName,String inName,Double money);
-
业务层实现提供转账操作:AccountServiceImpl
public void transfer(String outName,String inName,Double money){
        accountDao.outMoney(outName,money);
        accountDao.inMoney(inName,money);
}
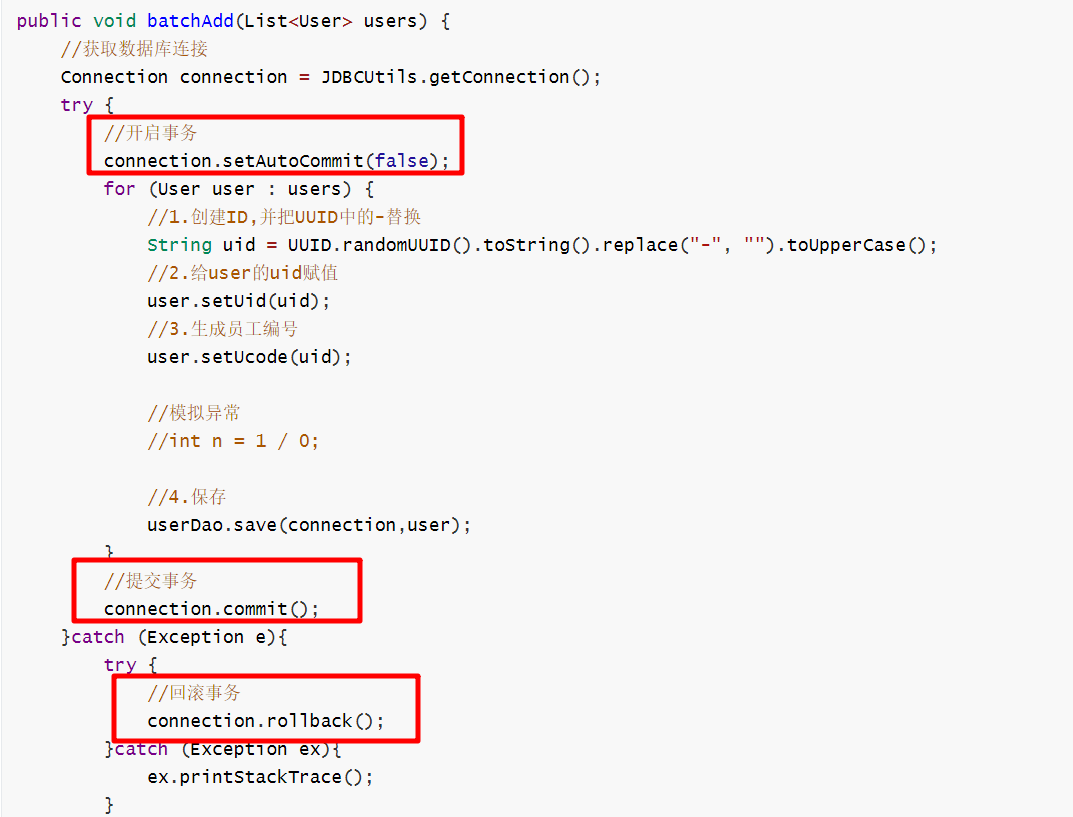
2.6.3)编程式事务-视频04
-
在AccountServiceImpl中实现转账方法:
private DataSource dataSource;
public void setDataSource(DataSource dataSource) {
    this.dataSource = dataSource;
}

public void transfer(String outName, String inName, Double money) {
    //1.创建事务管理器,为事务管理器设置与数据层相同的数据源
    PlatformTransactionManager ptm = new DataSourceTransactionManager(dataSource);
    //2.事务定义
    TransactionDefinition td = new DefaultTransactionDefinition();
    //3.创建事务状态对象,用于控制事务执行,开启事务
    TransactionStatus ts = ptm.getTransaction(td);

    accountDao.outMoney(outName,money);
    //模拟业务层事务过程中出现错误
    int i = 1/0;
    accountDao.inMoney(inName,money);

    //4.提交事务
    ptm.commit(ts);
}
-
在applicationContext.xml中配置Spring和MyBatis的整合
<?xml version="1.0" encoding="UTF-8"?>
<beans xmlns="http://www.springframework.org/schema/beans"
       xmlns:xsi="http://www.w3.org/2001/XMLSchema-instance"
       xmlns:context="http://www.springframework.org/schema/context"
       xmlns:aop="http://www.springframework.org/schema/aop"
       xsi:schemaLocation="http://www.springframework.org/schema/beans
        https://www.springframework.org/schema/beans/spring-beans.xsd
        http://www.springframework.org/schema/context
        https://www.springframework.org/schema/context/spring-context.xsd
        http://www.springframework.org/schema/aop
        https://www.springframework.org/schema/aop/spring-aop.xsd">

    <context:property-placeholder location="classpath:*.properties"/>

    <bean id="dataSource" class="com.alibaba.druid.pool.DruidDataSource">
        <property name="driverClassName" value="${jdbc.driver}"/>
        <property name="url" value="${jdbc.url}"/>
        <property name="username" value="${jdbc.username}"/>
        <property name="password" value="${jdbc.password}"/>
    </bean>

    <bean class="org.mybatis.spring.SqlSessionFactoryBean">
        <property name="dataSource" ref="dataSource"/>
        <property name="typeAliasesPackage" value="com.itheima.domain"/>
    </bean>

    <bean class="org.mybatis.spring.mapper.MapperScannerConfigurer">
        <property name="basePackage" value="com.itheima.dao"/>
    </bean>

</beans>
-
将accountService需要的accountDao和dataSource注入进去
<bean id="accountService" class="com.itheima.service.impl.AccountServiceImpl">
    <property name="accountDao" ref="accountDao"/>
    <property name="dataSource" ref="dataSource"/>
</bean>
-
测试转账
public class App {
    public static void main(String[] args) {
        ApplicationContext ctx = new ClassPathXmlApplicationContext("applicationContext.xml");
        AccountService accountService = (AccountService) ctx.getBean("accountService");
        accountService.transfer("tom","itheima",100D);
    }
}
2.7)使用AOP控制事务-视频05
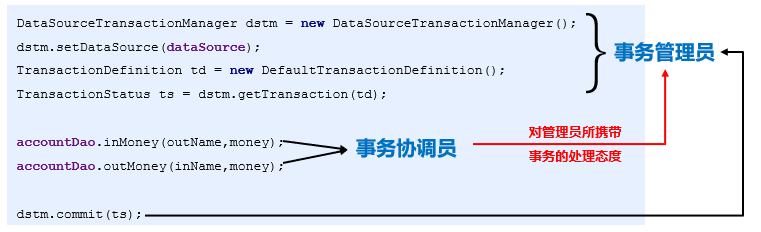
1.将业务层的事务处理功能抽取出来制作成AOP通知,利用环绕通知运行期动态织入
public Object tx(ProceedingJoinPoint pjp) throws Throwable {
    DataSourceTransactionManager dstm = new DataSourceTransactionManager();
    dstm.setDataSource(dataSource);
    TransactionDefinition td = new DefaultTransactionDefinition();
    TransactionStatus ts = dstm.getTransaction(td);

    Object ret = pjp.proceed(pjp.getArgs());

    dstm.commit(ts);
    return ret;
}
2.在applicationContext.xml中配置AOP通知类,并注入dataSource
<bean id="txAdvice" class="com.itheima.aop.TxAdvice">
    <property name="dataSource" ref="dataSource"/>
</bean>
3.配置事务管理AOP:使用环绕通知将通知类织入到原始业务对象执行过程中
<aop:config>
    <aop:pointcut id="pt" expression="execution(* com.itheima..transfer(..))"/>
    <aop:aspect ref="txAdvice">
        <aop:around method="transactionManager" pointcut-ref="pt"/>
    </aop:aspect>
</aop:config>
4.测试转账
public class App {
    public static void main(String[] args) {
        ApplicationContext ctx = new ClassPathXmlApplicationContext("applicationContext.xml");
        AccountService accountService = (AccountService) ctx.getBean("accountService");
        accountService.transfer("tom","itheima",100D);
    }
}
2.8声明式事务(XML)
使用声明式事务需要引入tx命名空间:
<?xml version="1.0" encoding="UTF-8"?>
<beans xmlns="http://www.springframework.org/schema/beans"
       xmlns:xsi="http://www.w3.org/2001/XMLSchema-instance"
       xmlns:context="http://www.springframework.org/schema/context"
       xmlns:aop="http://www.springframework.org/schema/aop"
       xmlns:tx="http://www.springframework.org/schema/tx"
       xsi:schemaLocation="http://www.springframework.org/schema/beans
        https://www.springframework.org/schema/beans/spring-beans.xsd
        http://www.springframework.org/schema/context
        https://www.springframework.org/schema/context/spring-context.xsd
        http://www.springframework.org/schema/tx
        https://www.springframework.org/schema/tx/spring-tx.xsd
        http://www.springframework.org/schema/aop
        https://www.springframework.org/schema/aop/spring-aop.xsd">
2.8.1)tx:advice
-
名称:tx:advice
-
类型:标签
-
归属:beans标签
-
作用:配置事务专属通知类
-
格式:
<beans>
    <tx:advice id="txAdvice" transaction-manager="txManager">
    </tx:advice>
</beans>
-
基本属性:
-
id :用于配置aop时指定通知类的id
-
transaction-manager :指定事务管理器bean
-
2.8.2)tx:attributes
-
名称:tx:attributes
-
类型:标签
-
归属:tx:advice标签
-
作用:定义通知属性
-
格式:
<tx:advice id="txAdvice" transaction-manager="txManager">
    <tx:attributes>
        <tx:method name="*" read-only="false" />
        <tx:method name="get*" read-only="true" />
        <tx:method name="find*" read-only="true" />
     </tx:attributes>
</tx:advice>
2.8.3)aop:advisor
使用aop:advisor在AOP配置中引用事务专属通知类
<aop:config>
    <aop:pointcut id="pt" expression="execution(* com.itheima.service.*Service.*(..))"/>
    <aop:advisor advice-ref="txAdvice" pointcut-ref="pt"/>
</aop:config>
2.8.4) 使用XML配置事务
-
设置事务管理器
<bean id="txManager" class="org.springframework.jdbc.datasource.DataSourceTransactionManager">
    <property name="dataSource" ref="dataSource"/>
</bean>
-
配置专用事务通知器
<!--定义事务管理的通知类-->
<tx:advice id="txAdvice" transaction-manager="txManager">
    <!--定义控制的事务-->
    <tx:attributes>
        <tx:method name="*" read-only="false"/>
        <tx:method name="get*" read-only="true"/>
        <tx:method name="find*" read-only="true"/>
        <tx:method name="transfer" read-only="false"/>
    </tx:attributes>
</tx:advice>
-
AOP配置切面,使用通知器绑定切入点
<aop:config>
    <aop:pointcut id="pt" expression="execution(* com.itheima.service.*Service.*(..))"/>
    <aop:advisor advice-ref="txAdvice" pointcut-ref="pt"/>
</aop:config>
-
测试转账
public class App {
    public static void main(String[] args) {
        ApplicationContext ctx = new ClassPathXmlApplicationContext("applicationContext.xml");
        AccountService accountService = (AccountService) ctx.getBean("accountService");
        accountService.transfer("tom","itheima",100D);
    }
}
事务的应用层场景
J2EE开发使用分层设计的思想进行,对于简单的业务层转调数据层的单一操作,事务开启在业务层或者数据层并无太大差别;当业务中包含多个数据层的调用时,需要在业务层开启事务,对数据层中多个操作进行组合并归属于同一个事务进行处理。
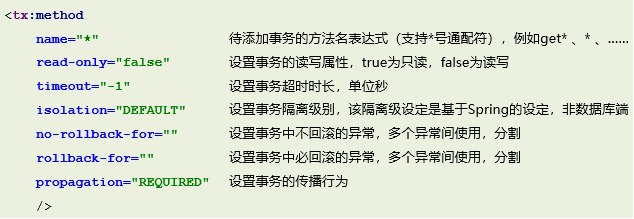
2.8.5)tx:method-视频07
-
名称:tx:method
-
类型:标签
-
归属:tx:attribute标签
-
作用:设置具体的事务属性
-
格式:
<tx:attributes>
    <tx:method name="*" read-only="false" />
    <tx:method name="get*" read-only="true" />
</tx:attributes>
-
说明:
通常事务属性会配置多个,包含1个读写的全事务属性,1个只读的查询类事务属性
tx:method属性
2.9)事务传播行为-视频08
-
事务传播行为用来描述由某一个事务传播行为修饰的方法被嵌套进另一个方法的时事务如何传播
public void methond1() {
    //在事务中执行
    methond2();

    //doSomething
}

public void methond2() {
    //在事务中执行
    //doSomething
}
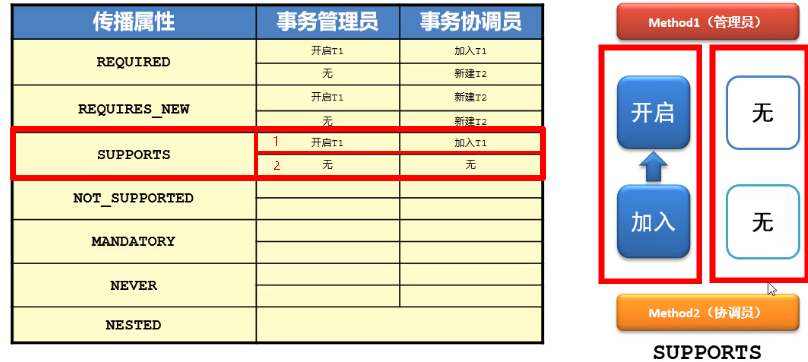
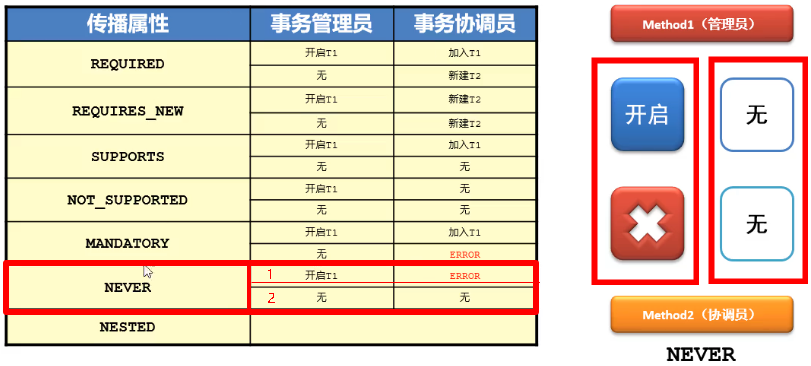
2.10)七种事务传播行为(了解)
Spring提供了七种事务传播行为,默认值为 REQUIRED
-
REQUIRED(需要): 如果当前存在事务,则加入该事务,如果当前不存在事务,则创建一个新的事务

- REQUIRES_NEW(需要新的): 新建事务,如果当前存在事务,把当前事务挂起
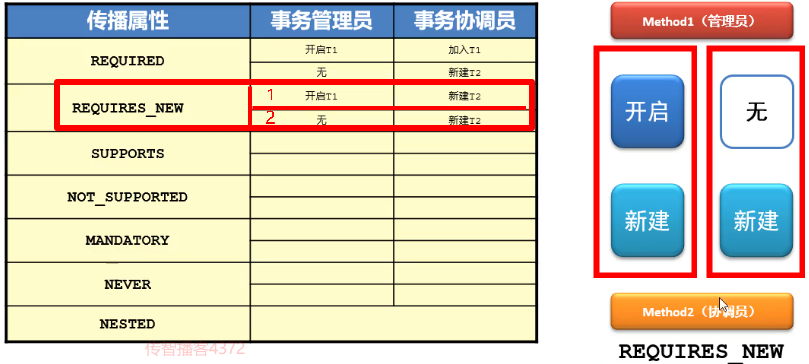
-
SUPPORTS: 支持当前事务,如果当前没有事务,就以非事务方式执行
-
NOT_SUPPORTED: 以非事务方式执行操作,如果当前存在事务,就把当前事务挂起

-
MANDATORY(强制的): 使用当前的事务,如果当前没有事务,就抛出异常

-
NEVER: 以非事务方式执行,如果当前存在事务,则抛出异常
-
NESTED: 如果当前存在事务,则在嵌套事务内执行。如果当前没有事务,则执行 REQUIRED类似的操作。
2.11)事务传播应用场景
生成订单业务需要3个步骤来完成:
-
子业务S1:记录日志到数据库表log
-
子业务S2:保存订单数据到数据库表order
-
子业务S3:更新支付表Z中的订单支付状态order_pay

如果S2或S3事务提交失败,S1需要保证本次数据库操作的日志记录,因此不能对S1的数据库操作进行回滚。
解决方案:S1需要在单独的事务中执行,传播行为配置为REQUIRES_NEW
2.12)声明式事务(注解)-视频09
2.12.1)@Transactional
-
名称:@Transactional
-
类型:方法注解,类注解,接口注解
-
位置:方法定义上方,类定义上方,接口定义上方
-
作用:设置当前类/接口中所有方法或具体方法开启事务,并指定相关事务属性
-
范例:
@Transactional(
    readOnly = false,
    timeout = -1,
    isolation = Isolation.DEFAULT,
    rollbackFor = {ArithmeticException.class, IOException.class},
    noRollbackFor = {},
    propagation = Propagation.REQUIRES_NEW
)
public void methond() {}
-
注意事项
-
只能应用到 public 方法上,如果在
protected、private或者默认可见性的方法上使用事务控制将被忽略,也不会抛出任何异常。 -
如果类级别配置了注解,方法级别也配置了,应用程序会以方法上配置的事务属性信息来管理事务,换言之,方法级别的事务属性信息会覆盖类级别的相关配置。
-
2.12.2)tx:annotation-driven
-
名称:tx:annotation-driven
-
类型:标签
-
归属:beans标签
-
作用:开启事务注解驱动,并指定对应的事务管理器
-
范例:
<tx:annotation-driven transaction-manager="txManager"/>
2.12.3 使用注解完成转账事务控制
1.在applicationContext.xml中开启注解驱动
<bean id="txManager" class="org.springframework.jdbc.datasource.DataSourceTransactionManager">
     <property name="dataSource" ref="dataSource"/>
</bean>

<tx:annotation-driven transaction-manager="txManager"/>
2.在transfer方法上使用@Transactional注解进行事务控制
@Transactional(
        readOnly = false,
        timeout = -1,
        isolation = Isolation.DEFAULT,
        rollbackFor = {},
        noRollbackFor = {},
        propagation = Propagation.REQUIRED
)
public void transfer(String outName, String inName, Double money) {
    accountDao.outMoney(outName,money);
    int i = 1/0;
    accountDao.inMoney(inName,money);
}
3.测试转账
public class App {
    public static void main(String[] args) {
        ApplicationContext ctx = new ClassPathXmlApplicationContext("applicationContext.xml");
        AccountService accountService = (AccountService) ctx.getBean("accountService");
        accountService.transfer("tom","itheima",100D);
    }
}
2.13)声明式事务(纯注解驱动)-视频10
-
名称:@EnableTransactionManagement
-
类型:类注解
-
位置:Spring注解配置类上方
-
作用:开启注解驱动,等同XML格式中的注解驱动
-
范例:
public class TransactionManagerConfig {
    @Bean
    public PlatformTransactionManager getTransactionManager(@Autowired DataSource dataSource){
        return new DataSourceTransactionManager(dataSource);
    }
}
启用事务管理:在SpringConfig类上导入TransactionManagerConfig
  @Import({JDBCConfig.class,MyBatisConfig.class,TransactionManagerConfig.class})
  @EnableTransactionManagement
  @Configuration
  @ComponentScan("com.itheima")
  @PropertySource("classpath:jdbc.properties")
  @Import({JDBCConfig.class,MyBatisConfig.class,TransactionManagerConfig.class})
  @EnableTransactionManagement
  public class SpringConfig {
  }
3)模板对象(了解)
3.1)Spring模板对象-视频11
Spring提供如下的模板对象:
-
JdbcTemplate
-
RedisTemplate
-
RestTemplate
-
RabbitTemplate
-
TransactionTemplate
-
JmsTemplate
-
HibernateTemplate
-
...
3.2)JdbcTemplate
3.2.1 JdbcTemplate简介
JdbcTemplate是Spring对JDBC的封装,提供标准的sql语句操作API,目的是使JDBC更加易于使用。
-
update:用于执行INSERT、UPDATE、DELETE等语句。public void save(Account account) { String sql = "insert into account(name,money)values(?,?)"; jdbcTemplate.update(sql,account.getName(),account.getMoney()); }
-
queryXxx:用于执行SELECT数据查询语句。public String findNameById(Integer id) { String sql = "select name from account where id = ? "; //单字段查询可以使用专用的查询方法,必须制定查询出的数据类型,例如name为String类型 return jdbcTemplate.queryForObject(sql,String.class,id ); }
3.2.1 使用JdbcTemplate
-
在JDBCConfig类中注册JdbcTemplate
public class JDBCConfig {
    @Value("${jdbc.driver}")
    private String driver;
    @Value("${jdbc.url}")
    private String url;
    @Value("${jdbc.username}")
    private String userName;
    @Value("${jdbc.password}")
    private String password;

    @Bean("dataSource")
    public DataSource getDataSource(){
        DruidDataSource ds = new DruidDataSource();
        ds.setDriverClassName(driver);
        ds.setUrl(url);
        ds.setUsername(userName);
        ds.setPassword(password);
        return ds;
    }

    //注册JdbcTemplate模块对象bean
    @Bean("jdbcTemplate")
    public JdbcTemplate getJdbcTemplate(@Autowired DataSource dataSource){
        return new JdbcTemplate(dataSource);
    }

    @Bean("jdbcTemplate2")
    public NamedParameterJdbcTemplate getJdbcTemplate2(@Autowired DataSource dataSource){
        return new NamedParameterJdbcTemplate(dataSource);
    }

}
-
使用JdbcTemplate实现AccountDaoImpl中的所有方法
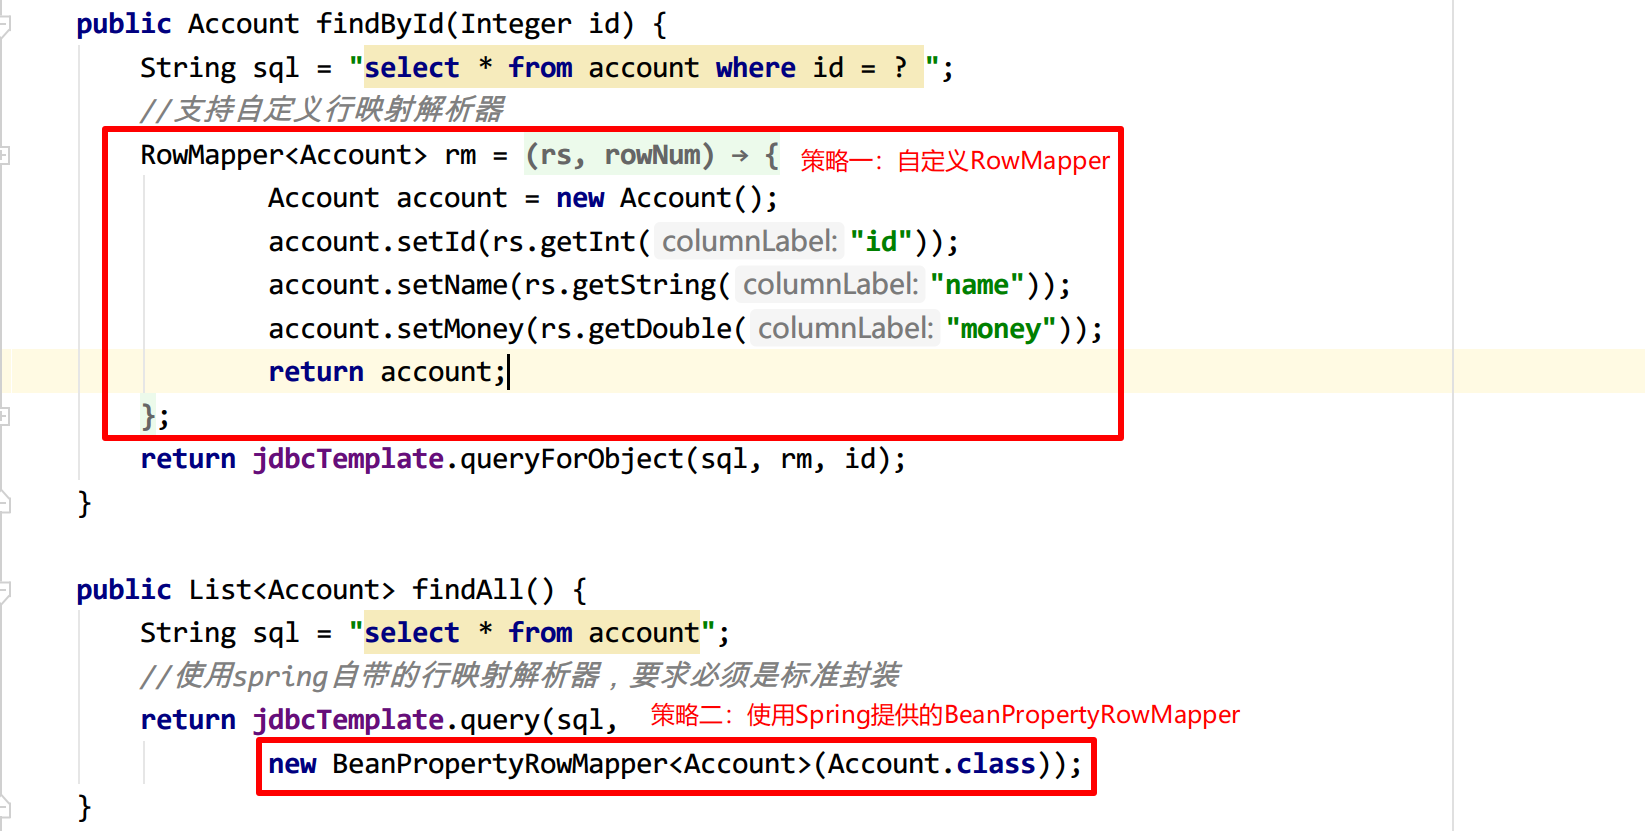
//dao注册为bean
@Repository("accountDao")
public class AccountDaoImpl implements AccountDao {

    //注入模板对象
    @Autowired
    private JdbcTemplate jdbcTemplate;

    public void save(Account account) {
        String sql = "insert into account(name,money)values(?,?)";
        jdbcTemplate.update(sql, account.getName(), account.getMoney());
    }

    public void delete(Integer id) {
        String sql = "delete from account where id = ?";
        jdbcTemplate.update(sql, id);
    }

    public void update(Account account) {
        String sql = "update account set name = ? , money = ? where id = ?";
        jdbcTemplate.update(sql, account.getName(), account.getMoney(), account.getId());
    }

    public String findNameById(Integer id) {
        String sql = "select name from account where id = ? ";
        //单字段查询可以使用专用的查询方法,必须制定查询出的数据类型,例如name为String类型
        return jdbcTemplate.queryForObject(sql, String.class, id);
    }

    public Account findById(Integer id) {
        String sql = "select * from account where id = ? ";
        //支持自定义行映射解析器
        //RowMapper<Account> rm = new RowMapper<Account>() {
        //    public Account mapRow(ResultSet rs, int rowNum) throws SQLException {
        //        Account account = new Account();
        //        account.setId(rs.getInt("id"));
        //        account.setName(rs.getString("name"));
        //        account.setMoney(rs.getDouble("money"));
        //        return account;
        //    }
        //};
        //return jdbcTemplate.queryForObject(sql, rm, id);
        return jdbcTemplate.queryForObject(sql, new BeanPropertyRowMapper<Account>(Account.class), id);
    }

    public List<Account> findAll() {
        String sql = "select * from account";
        //使用spring自带的行映射解析器,要求必须是标准封装
        return jdbcTemplate.query(sql,
                new BeanPropertyRowMapper<Account>(Account.class));
    }

    public List<Account> findAll(int pageNum, int pageSize) {
        String sql = "select * from account limit ?,?";
        //分页数据通过查询参数赋值
        return jdbcTemplate.query(sql,
                new BeanPropertyRowMapper<Account>(Account.class),
                (pageNum - 1) * pageSize,
                pageSize);
    }

    public Long getCount() {
        String sql = "select count(id) from account ";
        //单字段查询可以使用专用的查询方法,必须制定查询出的数据类型,例如数据总量为Long类型
        return jdbcTemplate.queryForObject(sql, Long.class);
    }
}
-
测试AccountService中的所有方法
//设定spring专用的类加载器
@RunWith(SpringJUnit4ClassRunner.class)
//设定加载的spring上下文对应的配置
@ContextConfiguration(classes = SpringConfig.class)
public class AccountServiceTest {
    @Autowired
    private AccountService accountService;

    @Test
    public void testSave() {
        Account account = new Account();
        account.setName("阿尔萨斯");
        account.setMoney(999.99d);
        accountService.save(account);
    }

    @Test
    public void testDelete() {
        accountService.delete(21);
    }

    @Test
    public void testUpdate() {
        Account account = new Account();
        account.setId(13);
        account.setName("itheima");
        account.setMoney(6666666666.66d);
        accountService.update(account);
    }

    @Test
    public void testFindNameById() {
        String name = accountService.findNameById(13);
        System.out.println(name);
    }

    @Test
    public void testFindById() {
        Account account = accountService.findById(13);
        System.out.println(account);
    }

    @Test
    public void testFindAll() {
        List<Account> list = accountService.findAll();
        System.out.println(list);
    }

    @Test
    public void testFindAll1() {
        List<Account> list = accountService.findAll(2, 2);
        System.out.println(list);
    }

    @Test
    public void testGetCount() {
        Long count = accountService.getCount();
        System.out.println(count);
    }
}
3.3)NamedParameterJdbcTemplate
提供标准的具名sql语句操作API
-
编写新的AccountDao实现类:AccountDaoImpl2
//dao注册为bean
@Repository("accountDao2")
@Primary
public class AccountDaoImpl2 implements AccountDao {

    //注入模板对象
    @Autowired
    private NamedParameterJdbcTemplate jdbcTemplate;

    public void save(Account account) {
        System.out.println(this.getClass().getName());
        String sql = "insert into account(name,money)values(:name,:money)";
        Map pm = new HashMap();
        pm.put("name",account.getName());
        pm.put("money",account.getMoney());
        System.out.println("NamedParameterJdbcTemplate");
        jdbcTemplate.update(sql,pm);
    }

    public void delete(Integer id) {

    }

    public void update(Account account) {

    }

    public String findNameById(Integer id) {
        return null;
    }

    public Account findById(Integer id) {
        return null;
    }

    public List<Account> findAll() {
        return null;
    }

    public List<Account> findAll(int pageNum, int preNum) {
        return null;
    }

    public Long getCount() {
        return null;
    }
}
-
测试NamedParameterJdbcTemplate使用
//设定spring专用的类加载器
@RunWith(SpringJUnit4ClassRunner.class)
//设定加载的spring上下文对应的配置
@ContextConfiguration(classes = SpringConfig.class)
public class AccountServiceTest {
    @Autowired
    private AccountService accountService;

    @Test
    public void testSave() {
        Account account = new Account();
        account.setName("阿尔萨斯");
        account.setMoney(999.99d);
        accountService.save(account);
    }
}

3.4)RedisTemplate(了解)
3.4.1)环境准备-视频12
-
配置redis.conf
bind 0.0.0.0
port 6379
protected-mode no
-
启动Redis
-
Linux
redis-server redis.conf
-
Windows:打开Redis安装目录,双击redis-server.exe
-
-
使用Redis控制台
#打开Redis控制台: Linux
redis-cli
#打开Redis控制台: Windows
#双击redis-cli.exe
3.4.2)对象结构-视频13
RedisTemplate提供的方法主要分为如下4类:
-
客户端基本操作
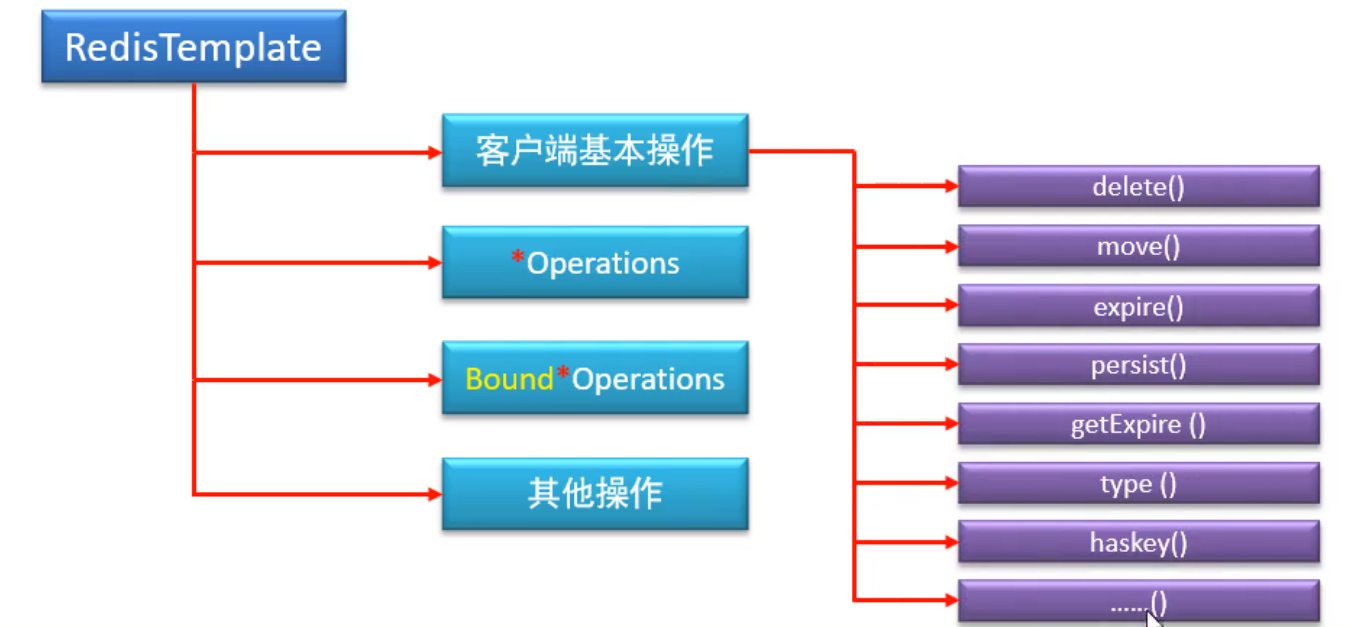
-
常用:Operations具体数据类型操作
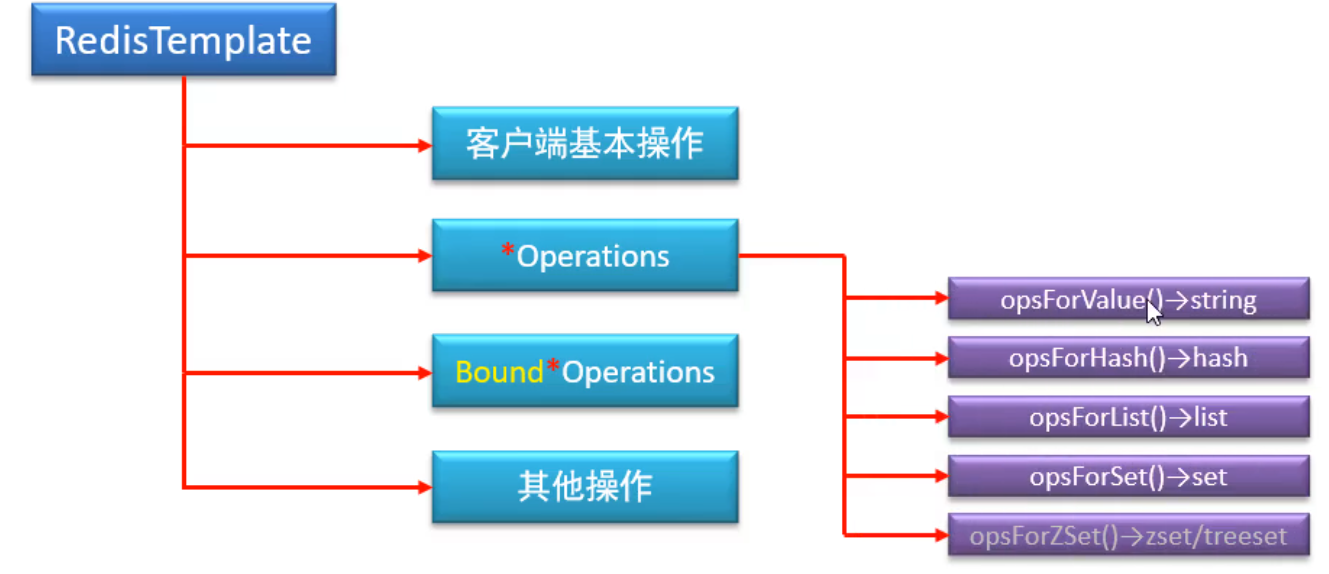
public void changeMoney(Integer id, Double money) {
    redisTemplate.opsForValue().set("account:id:"+id,money);
}
public Double findMondyById(Integer id) {
    Object money = redisTemplate.opsForValue().get("account:id:" + id);
    return new Double(money.toString());
}
-
Bound Operations阻塞式数据类型操作
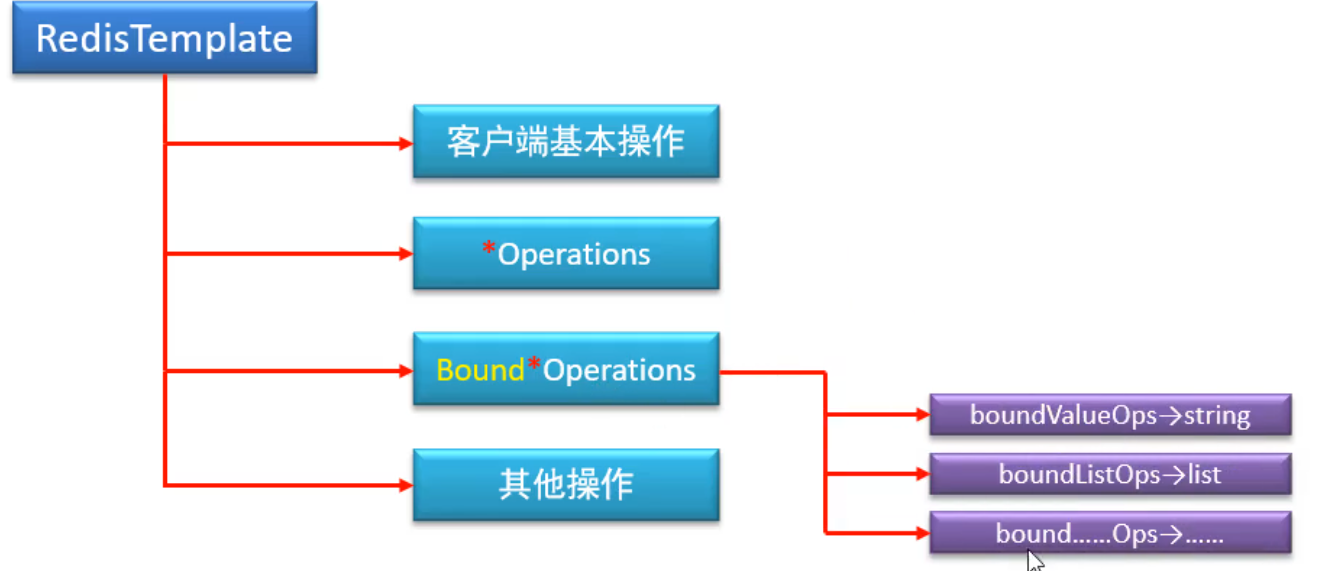
其他操作

3.4.3 使用RedisTemplate
-
在resources目录下新建redis.properties
# redis服务器主机地址
redis.host=127.0.0.1
#redis服务器主机端口
redis.port=6379
#redis服务器登录密码
#redis.password=itheima

#最大活动连接
redis.maxActive=20
#最大空闲连接
redis.maxIdle=10
#最小空闲连接
redis.minIdle=0
#最大等待时间
redis.maxWait=-1
-
新建RedisConfig配置类:com.itheima.config
package com.itheima.config;

@PropertySource("redis.properties")
public class RedisConfig {

    @Value("${redis.host}")
    private String hostName;

    @Value("${redis.port}")
    private Integer port;

//    @Value("${redis.password}")
//    private String password;

    @Value("${redis.maxActive}")
    private Integer maxActive;
    @Value("${redis.minIdle}")
    private Integer minIdle;
    @Value("${redis.maxIdle}")
    private Integer maxIdle;
    @Value("${redis.maxWait}")
    private Integer maxWait;
@Bean
    //配置RedisTemplate
    public RedisTemplate createRedisTemplate(RedisConnectionFactory redisConnectionFactory){
        //1.创建对象
        RedisTemplate redisTemplate = new RedisTemplate();
        //2.设置连接工厂
        redisTemplate.setConnectionFactory(redisConnectionFactory);
        //3.设置redis生成的key的序列化器,对key编码进行处理
        RedisSerializer stringSerializer = new StringRedisSerializer();
        redisTemplate.setKeySerializer(stringSerializer);
        redisTemplate.setHashKeySerializer(stringSerializer);
        //4.返回
        return redisTemplate;
    }
    @Bean
    //配置Redis连接工厂
    public RedisConnectionFactory createRedisConnectionFactory(RedisStandaloneConfiguration redisStandaloneConfiguration,GenericObjectPoolConfig genericObjectPoolConfig){
        //1.创建配置构建器,它是基于池的思想管理Jedis连接的
        JedisClientConfiguration.JedisPoolingClientConfigurationBuilder builder = (JedisClientConfiguration.JedisPoolingClientConfigurationBuilder)JedisClientConfiguration.builder();
        //2.设置池的配置信息对象
        builder.poolConfig(genericObjectPoolConfig);
        //3.创建Jedis连接工厂
        JedisConnectionFactory jedisConnectionFactory = new JedisConnectionFactory(redisStandaloneConfiguration,builder.build());
        //4.返回
        return jedisConnectionFactory;
    }


    @Bean
    //配置spring提供的Redis连接池信息
    public GenericObjectPoolConfig createGenericObjectPoolConfig(){
        //1.创建Jedis连接池的配置对象
        GenericObjectPoolConfig genericObjectPoolConfig = new GenericObjectPoolConfig();
        //2.设置连接池信息
        genericObjectPoolConfig.setMaxTotal(maxActive);
        genericObjectPoolConfig.setMinIdle(minIdle);
        genericObjectPoolConfig.setMaxIdle(maxIdle);
        genericObjectPoolConfig.setMaxWaitMillis(maxWait);
        //3.返回
        return genericObjectPoolConfig;
    }
    @Bean
    //配置Redis标准连接配置对象
    public RedisStandaloneConfiguration createRedisStandaloneConfiguration(){
        //1.创建Redis服务器配置信息对象
        RedisStandaloneConfiguration redisStandaloneConfiguration = new RedisStandaloneConfiguration();
        //2.设置Redis服务器地址,端口和密码(如果有密码的话)
        redisStandaloneConfiguration.setHostName(hostName);
        redisStandaloneConfiguration.setPort(port);
//        redisStandaloneConfiguration.setPassword(RedisPassword.of(password));
        //3.返回
        return redisStandaloneConfiguration;
    }

}
-
AccountService
public interface AccountService {

    void changeMoney(Integer id,Double money);

    Double findMoneyById(Integer id);
}
-
AccountServiceImpl:使用redis实现changeMoney和findMoneyById
@Service("accountService") public class AccountServiceImpl implements AccountService { @Autowired private RedisTemplate redisTemplate; public void changeMoney(Integer id, Double money) { //等同于redis中set account:id:1 100 redisTemplate.opsForValue().set("account:id:"+id, money); } public Double findMoneyById(Integer id) { //等同于redis中get account:id:1 Object money = redisTemplate.opsForValue().get("account:id:"+id); return new Double(money.toString()); } } -
编写单元测试:AccountServiceTest
//设定spring专用的类加载器
@RunWith(SpringJUnit4ClassRunner.class)
//设定加载的spring上下文对应的配置
@ContextConfiguration(classes = SpringConfig.class)
public class AccountServiceTest {
    @Autowired
    private AccountService accountService;

    @Test
    public void test(){
        Jedis jedis = new Jedis("127.0.0.1",6379);
        jedis.set("name","itheima");
        System.out.println(jedis.get("name"));
        jedis.close();
    }

    @Test
    public void changeMoney() {
        accountService.changeMoney(1,100D);
    }

    @Test
    public void findMoneyById() {
        Double money = accountService.findMoneyById(1);
        System.out.println(money);
    }
}
4)模板对象原理解析
4.1)策略模式-视频14
完成一项任务往往可以有多种不同的方式,每一种方式称为一个策略,我们可以根据环境或者条件的不同选择不同的策略来完成该项务。
策略模式(Strategy Pattern):定义一系列算法,将每一个算法封装起来,并让它们可以相互替换。

应用场景如下:
4.2)装饰模式应用
装饰模式在不改变原有设计基础上,对方法进行了增强。
-
JdbcTemplate

public void save(Account account) {
    String sql = "insert into account(name,money)values(?,?)";
    jdbcTemplate.update(sql, account.getName(), account.getMoney());
}
-
NamedParameterJdbcTemplate

public void save(Account account) {
    System.out.println(this.getClass().getName());
    String sql = "insert into account(name,money)values(:name,:money)";
    Map pm = new HashMap();
    pm.put("name",account.getName());
    pm.put("money",account.getMoney());
    System.out.println("NamedParameterJdbcTemplate");
    jdbcTemplate.update(sql,pm);
}