知识点梳理
课堂讲义
学习目标
-
能够阐述表单验证的分类和区别
-
能够运用表单验证的常用注解
-
能够编写表单验证的示例
-
能够编写SSM整合的应用案例
-
能够总结SSM整合的步骤
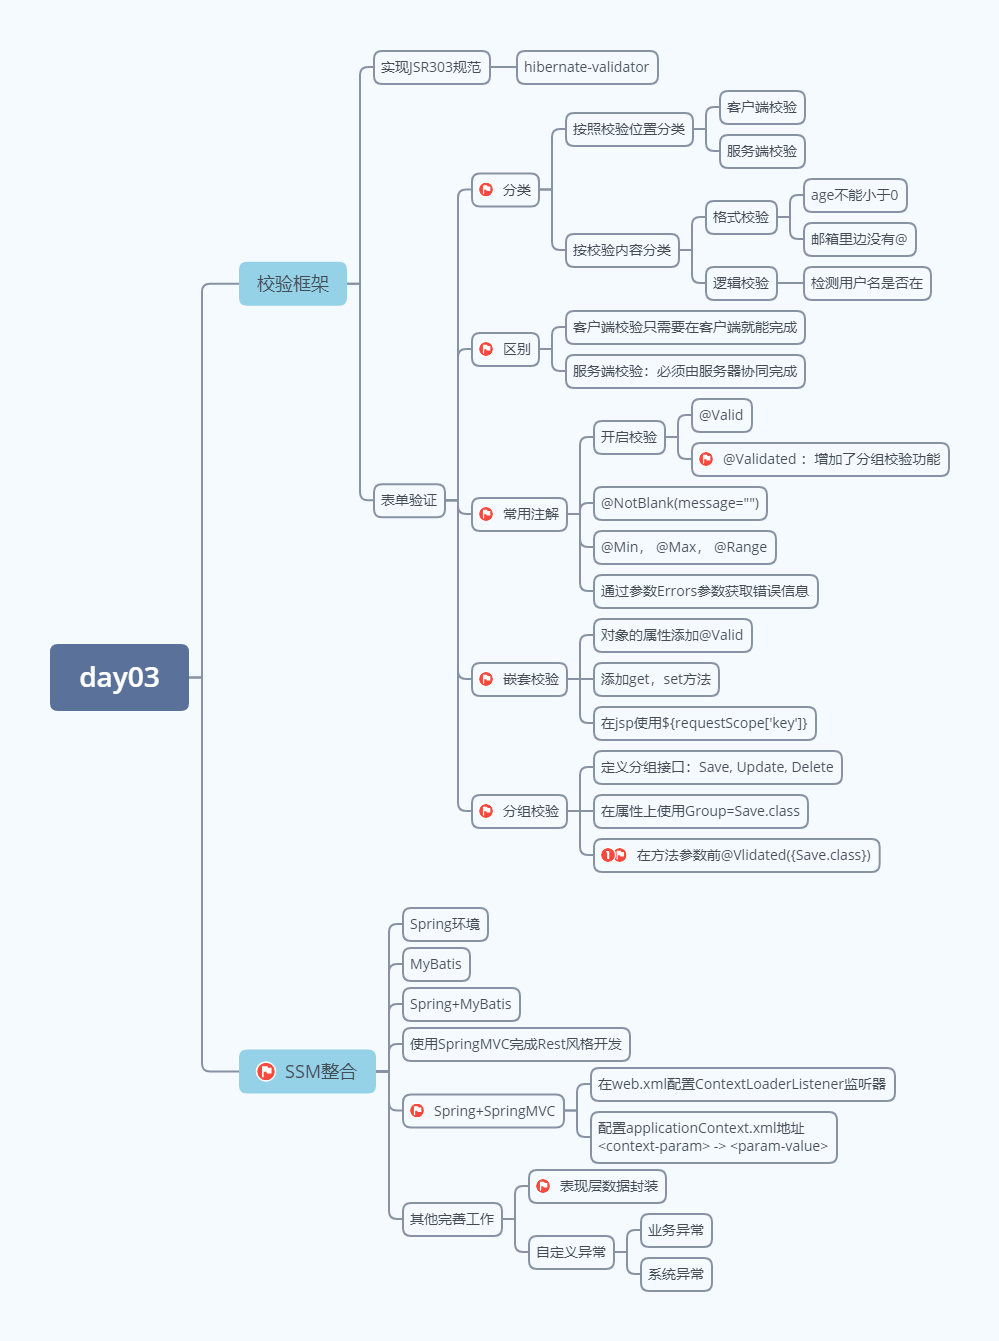
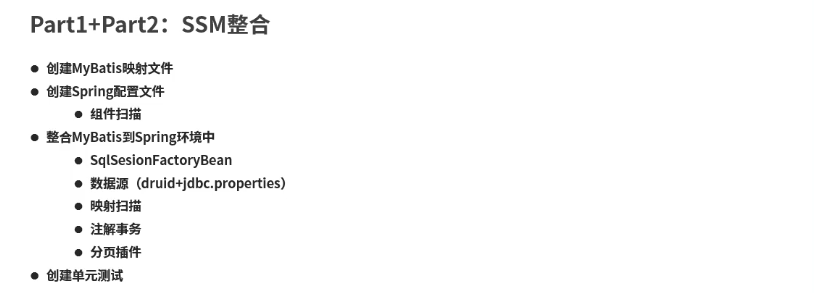
1 校验框架
1.1 入门-视频01
1.1.1 表单校验的重要性
表单校验保障了数据有效性、安全性

数据可以随意输入,导致错误的结果。
1.1.2 表单校验分类
-
按校验位置分类:
-
客户端校验:浏览器,手机APP
-
服务端校验:后端服务器代码校验
-
-
按校验内容分类:
-
格式校验:比如年龄是否为负数,邮箱是否符合规则
-
逻辑校验:比如用户名在当前项目中是否已注册(需要查询数据库或者业务校验)
-
1.1.3 格式校验规则
以下几种全部属于格式校验:
-
长度:例如用户名长度,评论字符数量
-
非法字符:例如用户名组成
-
数据格式:例如Email格式、 IP地址格式
-
边界值:例如转账金额上限,年龄上下限
1.1.4 表单校验框架
-
JSR(Java Specification Requests):Java 规范提案
303:提供bean属性相关校验规则
-
JCP(Java Community Process):提出JSR规范议案
-
一个开放性的国际技术标准组织,职责是发展和更新Java技术规范。
-
成员:Oracle、ARM、IBM、Intel、SAP、Twitter、阿里巴巴、亚马逊等
-
-
JSR规范列表
-
企业应用技术 Contexts and Dependency Injection for Java (Web Beans 1.0) (JSR 299) Dependency Injection for Java 1.0 (JSR 330)@postConstruct, @PreDestroy Bean Validation 1.0 (JSR 303) Enterprise JavaBeans 3.1 (includes Interceptors 1.1) (JSR 318) Java EE Connector Architecture 1.6 (JSR 322) Java Persistence 2.0 (JSR 317) Common Annotations for the Java Platform 1.1 (JSR 250) Java Message Service API 1.1 (JSR 914) Java Transaction API (JTA) 1.1 (JSR 907) JavaMail 1.4 (JSR 919)
-
Web应用技术 Java Servlet 3.0 (JSR 315) JavaServer Faces 2.0 (JSR 314) JavaServer Pages 2.2/Expression Language 2.2 (JSR 245) Standard Tag Library for JavaServer Pages (JSTL) 1.2 (JSR 52) Debugging Support for Other Languages 1.0 (JSR 45) 模块化 (JSR 294) Swing应用框架 (JSR 296) JavaBeans Activation Framework (JAF) 1.1 (JSR 925) Streaming API for XML (StAX) 1.0 (JSR 173)
-
管理与安全技术 Java Authentication Service Provider Interface for Containers (JSR 196) Java Authorization Contract for Containers 1.3 (JSR 115) Java EE Application Deployment 1.2 (JSR 88) J2EE Management 1.1 (JSR 77) Java SE中与Java EE有关的规范 JCache API (JSR 107) Java Memory Model (JSR 133) Concurrency Utilitie (JSR 166) Java API for XML Processing (JAXP) 1.3 (JSR 206) Java Database Connectivity 4.0 (JSR 221) Java Management Extensions (JMX) 2.0 (JSR 255) Java Portlet API (JSR 286)
-
-
Web Service技术 Java Date与Time API (JSR 310) Java API for RESTful Web Services (JAX-RS) 1.1 (JSR 311) Implementing Enterprise Web Services 1.3 (JSR 109) Java API for XML-Based Web Services (JAX-WS) 2.2 (JSR 224) Java Architecture for XML Binding (JAXB) 2.2 (JSR 222) Web Services Metadata for the Java Platform (JSR 181) Java API for XML-Based RPC (JAX-RPC) 1.1 (JSR 101) Java APIs for XML Messaging 1.3 (JSR 67) Java API for XML Registries (JAXR) 1.0 (JSR 93)
-
JSR303实现:校验框架hibernate-validator
1.2 快速使用
导入hibernate-validator校验框架的坐标
<!--导入校验的jsr303规范:接口-->
<dependency>
    <groupId>javax.validation</groupId>
    <artifactId>validation-api</artifactId>
    <version>2.0.1.Final</version>
</dependency>
<!--导入校验框架实现技术-->
<dependency>
    <groupId>org.hibernate</groupId>
    <artifactId>hibernate-validator</artifactId>
    <version>6.1.0.Final</version>
</dependency>
注意: tomcat7 :搭配hibernate-validator版本5...Final tomcat8.5↑ :搭配hibernate-validator版本6...Final ,必须使用外置tomcat
1. 开启校验
名称:@Valid 、 @Validated 类型:形参注解 位置:处理器类中的实体类类型的方法形参前方 作用:设定对当前实体类类型参数进行校验 范例:
@RequestMapping(value = "/addemployee")
public String addEmployee(@Valid Employee employee) {
    System.out.println(employee);
    return "success";
}
2.设置校验规则
名称:@NotNull, @NotBlank, @NotEmpty 类型:属性注解 位置:属性上方 作用:设定当前属性校验规则 范例:每个校验规则所携带的参数不同,根据校验规则进行相应的调整
public class Employee{

    @NotBlank(message = "姓名不能为空")
    private String name;//员工姓名

    //添加getter,setter方法
}
易错点:必须给name,age等属性编写getter,setter方法
3.获取错误信息
通过形参Errors获取校验结果数据,通过Model接口将数据封装后传递到页面显示
@RequestMapping(value = "/addemployee")
public String addEmployee(@Valid Employee employee, Errors errors, Model model){
    System.out.println(employee);
    if(errors.hasErrors()){
        for(FieldError error : errors.getFieldErrors()){
            model.addAttribute(error.getField(),error.getDefaultMessage());
        }
        return "addemployee.jsp";
    }
    return "success.jsp";
}
在JSP页面中获取后台封装的校验结果信息
<form action="/addemployee" method="post">
    员工姓名:<input type="text" name="name"><span style="color:red">${name}</span><br/>
    员工年龄:<input type="text" name="age"><span style="color:red">${age}</span><br/>
    <input type="submit" value="提交">
</form>
使用校验步骤小结
-
方法参数上开启校验:@Valid 、 @Validated
-
Bean的属性上设置校验规则:@NotBlank(message = "姓名不能为空")
-
通过参数Errors获取错误信息
-
获取所有错误:errors.getFieldErrors()
-
获取错误字段:error.getField()
-
获取错误提示:error.getDefaultMessage()
-
将错误信息放置到model中显示给用户 -> JSP页面中${name}
-
1.3 多规则校验-视频02
同一个字段有多个约束条件,比如对于年龄的校验:
if (age !=null && age >18 && age < 60)
@NotNull(message = "请输入您的年龄")
@Max(value = 60,message = "年龄最大值不允许超过60岁")
@Min(value = 18,message = "年龄最小值不允许低于18岁")
private Integer age;//员工年龄
1.4 嵌套校验
引用类型字段如何校验,比如Employee中有address属性记录地址
名称:@Valid 类型:属性注解 位置:实体类中的引用类型属性上方 作用:设定当前应用类型属性中的属性开启校验
1.在address属性上添加@Valid注解,开启嵌套属性校验
public class Employee {
    //实体类中的引用类型通过标注@Valid注解,设定开启当前引用类型字段中的属性参与校验
    @Valid
    private Address address;

    //添加address属性的get,set方法
}
2.开启嵌套校验后,被校验对象内部需要添加对应的校验规则,并添加嵌套属性的get,set方法
//嵌套校验的实体中,对每个属性正常添加校验规则即可 public class Address { @NotBlank(message = "请输入省份名称") private String provinceName;//省份名称 @NotBlank(message = "请输入城市名称") private String cityName;//城市名称 @NotBlank(message = "请输入详细地址") private String detail;//详细住址 @NotBlank(message = "请输入邮政编码") @Size(max = 6, min = 6, message = "邮政编码由6位组成") private String zipCode;//邮政编码 //添加get,set方法 } @PostMapping(value = "/addemployee") public String addEmployee(@Valid Employee employee, Errors errors, Model m) { //Errors对象用于封装校验结果,如果不满足校验规则,对应的校验结果封装到该对象中,包含校验的属性名和校验不通过返回的消息 //判定Errors对象中是否存在未通过校验的字段 if (errors.hasErrors()) { //获取所有未通过校验规则的信息 List<FieldError> fieldErrors = errors.getFieldErrors(); for (FieldError error : fieldErrors) { //将校验结果信息添加到Model对象中,用于页面显示,后期实际开发中无需这样设定,返回json数据即可 //name = 姓名不能为空 -> ${name} m.addAttribute(error.getField(), error.getDefaultMessage()); //address.cityName = 请输入城市名称 -> ${requestScope['address.provinceName']} //m.addAttribute("address.provinceName", "请输入省份名称"); } //el获取对象属性值 Address address = new Address(); address.setProvinceName("test省份不能为空"); //${address.provinceName} m.addAttribute("address", address); //当出现未通过校验的字段时,跳转页面到原始页面,进行数据回显 return "addemployee.jsp"; } return "success.jsp"; }
3.在jsp页面中获取嵌套属性中的错误信息
${requestScope['address.cityName']}
<%--注意,引用类型的校验未通过信息不是通过对象进行封装的,直接使用对象名.属性名的格式作为整体属性字符串进行保存的,和使用者的属性传递方式有关,不具有通用性,仅适用于本案例--%>
省:<input type="text" name="address.provinceName"><span style="color:red">${requestScope['address.provinceName']}</span><br/>
市:<input type="text" name="address.cityName"><span
         style="color:red">${requestScope['address.cityName']}</span><br/>
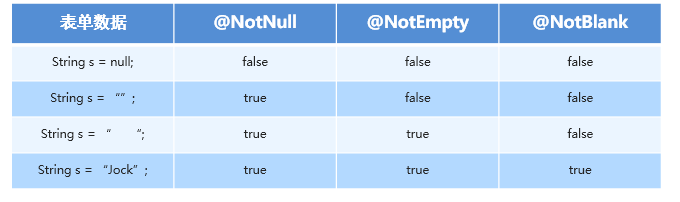
3种判定空校验器的区别
String 选择@NotBlank,底层会调用"字符串".trim()清除前后空格
int, double 选择@NotNull,不能使用@NotBlank
数组选择@NotEmpty
1.5 分组校验
根据业务不同需要调整是否参与校验,比如同一个模块,新增和修改时校验规则是不一致的
-
新增用户:新增时用户名不能为空
-
修改用户:修改时不能修改用户名,所以不用强制用户名不能为空
解决方案:对不同种类的属性进行分组,在校验时可以指定参与校验的字段所属的组类别
-
根据业务类型使用接口定义分组为Save, Update
public interface Save {
}
public interface Update {
}
-
在实体类Employee中为属性设置所属组,可以设置多个
姓名不能为空只在新增时校验
@NotEmpty(message = "姓名不能为空",groups = {Save.class}) private String name;//员工姓名年龄校验新增和修改都需要校验
@NotEmpty(message = "年龄不能为空",groups = {Save.class, Update.class}) private Integer age;//员工年龄 -
在Controller的方法参数上开启分组校验,并指定使用哪一种分组:@Validated({Save.class})
//新增Employee @RequestMapping("/addemployee") public String addEmployee(@Validated({Save.class}) Employee employee, Errors errors, Model m) { } //更新Employee @PostMapping(value = "/updateEmployee") public String updateEmployee(@Validated({Update.class}) EmployeeGroup employee, Errors errors, Model m) { }
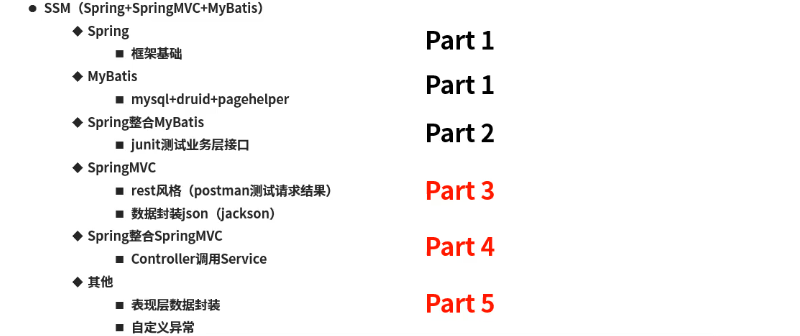
2 SSM整合
2.1 整合流程简介-视频03
整合步骤分析:SSM(Spring+SpringMVC+MyBatis)
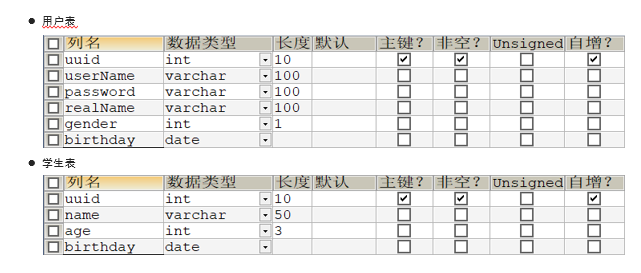
表结构
2.2 项目结构搭建-视频04
Part0:项目基础结构搭建
-
创建项目,组织项目结构,创建包
-
创建表与实体类
-
创建三层架构对应的模块、接口与实体类,建立关联关系
-
数据层接口(代理自动创建实现类)
-
业务层接口+业务层实现类
-
表现层类
-
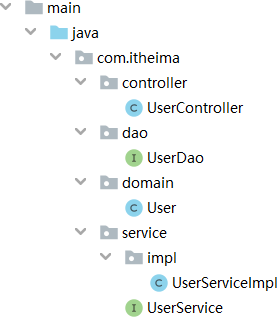
public interface UserDao { /** * 添加用户 * @param user * @return */ public boolean save(User user); /** * 修改用户 * @param user * @return */ public boolean update(User user); /** * 删除用户 * @param uuid * @return */ public boolean delete(Integer uuid); /** * 查询单个用户信息 * @param uuid * @return */ public User get(Integer uuid); /** * 查询全部用户信息 * @return */ public List<User> getAll(); /** * 根据用户名密码查询个人信息 * @param userName 用户名 * @param password 密码信息 * @return */ //注意:数据层操作不要和业务层操作的名称混淆,通常数据层仅反映与数据库间的信息交换,不体现业务逻辑 public User getByUserNameAndPassword(String userName,String password); } public interface UserService { /** * 添加用户 * @param user * @return */ public boolean save(User user); /** * 修改用户 * @param user * @return */ public boolean update(User user); /** * 删除用户 * @param uuid * @return */ public boolean delete(Integer uuid); /** * 查询单个用户信息 * @param uuid * @return */ public User get(Integer uuid); /** * 查询全部用户信息 * @return */ public List<User> getAll(); /** * 根据用户名密码进行登录 * @param userName * @param password * @return */ public User login(String userName,String password); }
2.3 Spring整合Mybatis(复习)

在pom.xml引入相关坐标
<dependencies>
    <!--spring+springmvc环境环境-->
    <dependency>
      <groupId>org.springframework</groupId>
      <artifactId>spring-webmvc</artifactId>
      <version>5.1.9.RELEASE</version>
    </dependency>


    <!--mybatis环境-->
    <!--mybatis环境-->
    <!--mybatis环境-->
    <dependency>
      <groupId>org.mybatis</groupId>
      <artifactId>mybatis</artifactId>
      <version>3.5.3</version>
    </dependency>

    <!--mysql环境-->
    <dependency>
      <groupId>mysql</groupId>
      <artifactId>mysql-connector-java</artifactId>
      <version>5.1.47</version>
    </dependency>

    <!--spring整合jdbc-->
    <dependency>
      <groupId>org.springframework</groupId>
      <artifactId>spring-jdbc</artifactId>
      <version>5.1.9.RELEASE</version>
    </dependency>

    <!--spring整合mybatis-->
    <dependency>
      <groupId>org.mybatis</groupId>
      <artifactId>mybatis-spring</artifactId>
      <version>2.0.3</version>
    </dependency>

    <!--druid连接池-->
    <dependency>
      <groupId>com.alibaba</groupId>
      <artifactId>druid</artifactId>
      <version>1.1.16</version>
    </dependency>

    <!--分页插件坐标-->
    <dependency>
      <groupId>com.github.pagehelper</groupId>
      <artifactId>pagehelper</artifactId>
      <version>5.1.2</version>
    </dependency>

    <!--jackson-->
    <dependency>
      <groupId>com.fasterxml.jackson.core</groupId>
      <artifactId>jackson-databind</artifactId>
      <version>2.9.0</version>
    </dependency>


    <!--其他组件-->
    <!--其他组件-->
    <!--其他组件-->
    <!--junit单元测试-->
    <dependency>
      <groupId>junit</groupId>
      <artifactId>junit</artifactId>
      <version>4.12</version>
    </dependency>
    <!--spring整合junit-->
    <dependency>
      <groupId>org.springframework</groupId>
      <artifactId>spring-test</artifactId>
      <version>5.1.9.RELEASE</version>
    </dependency>
  </dependencies>
2.3.1 Spring整合Mybatis-视频05
-
创建Spring配置文件:组件扫描
-
创建MyBatis映射文件
-
整合MyBatis到Spring环境中
-
SqlSesionFactoryBean
-
数据源(druid+jdbc.properties)
-
映射扫描
-
-
Spring环境配置:applicationContext.xml
<?xml version="1.0" encoding="UTF-8"?>
<beans xmlns="http://www.springframework.org/schema/beans"  xmlns:context="http://www.springframework.org/schema/context"  xmlns:tx="http://www.springframework.org/schema/tx"  xmlns:xsi="http://www.w3.org/2001/XMLSchema-instance"  xsi:schemaLocation="http://www.springframework.org/schema/beans  http://www.springframework.org/schema/beans/spring-beans.xsd  http://www.springframework.org/schema/context  http://www.springframework.org/schema/context/spring-context.xsd  http://www.springframework.org/schema/tx  http://www.springframework.org/schema/tx/spring-tx.xsd">

    <!--开启bean注解扫描-->
    <context:component-scan base-package="com.itheima"/>

</beans>
-
MyBatis映射文件:UserDao.xml 注意目录:resourcescomitheimadaoUserDao.xml
<?xml version="1.0" encoding="UTF-8"?>
<!DOCTYPE mapper
        PUBLIC "-//mybatis.org//DTD Mapper 3.0//EN"
        "http://mybatis.org/dtd/mybatis-3-mapper.dtd">
<mapper namespace="com.itheima.dao.UserDao">

    <!--添加-->
    <insert id="save" parameterType="user">
        insert into user(userName,password,realName,gender,birthday)values(#{userName},#{password},#{realName},#{gender},#{birthday})
    </insert>

    <!--删除-->
    <delete id="delete" parameterType="int">
        delete from user where uuid = #{uuid}
    </delete>

    <!--修改-->
    <update id="update" parameterType="user">
        update user set userName=#{userName},password=#{password},realName=#{realName},gender=#{gender},birthday=#{birthday} where uuid=#{uuid}
    </update>

    <!--查询单个-->
    <select id="get" resultType="user" parameterType="int">
        select * from user where uuid = #{uuid}
    </select>

    <!--分页查询-->
    <select id="getAll" resultType="user">
        select * from user
    </select>

    <!--登录-->
    <select id="getByUserNameAndPassword" resultType="user" >
        select * from user where userName=#{userName} and password=#{password}
    </select>

</mapper>
在UserDao中完成登录方法参数绑定:
/**
 * 根据用户名密码查询个人信息
 *
 * @param userName 用户名
 * @param password 密码信息
 * @return
 */
//注意:数据层操作不要和业务层操作的名称混淆,通常数据层仅反映与数据库间的信息交换,不体现业务逻辑
public User getByUserNameAndPassword(
        @Param("userName") String userName,
        @Param("password") String password);
-
整合MyBatis到Spring环境中:applicationContext.xml
-
数据源(druid+jdbc.properties)
-
SqlSesionFactoryBean
-
映射扫描MapperScannerConfigurer
<!--加载properties文件-->
<context:property-placeholder location="classpath*:jdbc.properties"/>

<!--数据源-->
<bean id="dataSource" class="com.alibaba.druid.pool.DruidDataSource">
    <property name="driverClassName" value="${jdbc.driver}"/>
    <property name="url" value="${jdbc.url}"/>
    <property name="username" value="${jdbc.username}"/>
    <property name="password" value="${jdbc.password}"/>
</bean>

<!--整合mybatis到spring中-->
<bean class="org.mybatis.spring.SqlSessionFactoryBean">
    <property name="dataSource" ref="dataSource"/>
    <property name="typeAliasesPackage" value="com.itheima.domain"/>
</bean>

<!--映射扫描-->
<bean class="org.mybatis.spring.mapper.MapperScannerConfigurer">
    <property name="basePackage" value="com.itheima.dao"/>
</bean>
-
2.3.2 配置分页插件与事务-视频06
-
添加分页插件pagehelper坐标
<!--分页插件坐标-->
<dependency>
  <groupId>com.github.pagehelper</groupId>
  <artifactId>pagehelper</artifactId>
  <version>5.1.2</version>
</dependency>
-
配置分页插件pagehelper:applicationContext.xml
-
<property name="plugins"> -> setPlugins()
-
<property name="properties"> -> setProperties()
<!--整合mybatis到spring中-->
<bean class="org.mybatis.spring.SqlSessionFactoryBean">
    <property name="dataSource" ref="dataSource"/>
    <property name="typeAliasesPackage" value="com.itheima.domain"/>
    <!--分页插件-->
    <property name="plugins">
        <array>
            <bean class="com.github.pagehelper.PageInterceptor">
                <property name="properties">
                    <props>
                        <prop key="helperDialect">mysql</prop>
                        <!--pageNum<=0 时会查询第一页,pageNum>pageSize(超过总数时),会查询最后一页-->
                        <prop key="reasonable">true</prop>
                    </props>
                </property>
            </bean>
        </array>
    </property>
</bean>
-
-
在UserServiceImpl中完善分页查询
 @Override
   public PageInfo<User> getAll(int page, int size) {
       PageHelper.startPage(page, size);
       List<User> all = userDao.getAll();
       return new PageInfo<User>(all);
   }
-
添加事务管理:applicationContext.xml
-
确认已添加tx命名空间
<?xml version="1.0" encoding="UTF-8"?>
<beans xmlns="http://www.springframework.org/schema/beans"
       xmlns:context="http://www.springframework.org/schema/context"
       xmlns:tx="http://www.springframework.org/schema/tx"
       xmlns:xsi="http://www.w3.org/2001/XMLSchema-instance"
       xsi:schemaLocation="http://www.springframework.org/schema/beans http://www.springframework.org/schema/beans/spring-beans.xsd
        http://www.springframework.org/schema/context http://www.springframework.org/schema/context/spring-context.xsd
        http://www.springframework.org/schema/tx http://www.springframework.org/schema/tx/spring-tx.xsd">
配置事务管理器 -
<!--开启注解式事务-->
<tx:annotation-driven transaction-manager="txManager"/>

<!--事务管理器-->
<bean id="txManager" class="org.springframework.jdbc.datasource.DataSourceTransactionManager">
    <property name="dataSource" ref="dataSource"/>
</bean>
-
在Service类上或方法上添加@Transactional注解
//类或接口上
@Transactional(readOnly = true)
//增删改方法上
@Transactional(readOnly = false)
-
2.4 整合junit(复习)-视频07
测试环境使用单独的数据库配置:在test esources放置一套applicationContext.xml和jdbc.properties

@RunWith(SpringJUnit4ClassRunner.class)
@ContextConfiguration(locations = "classpath:applicationContext.xml")
public class UserServiceTest {

@Autowired
    private UserService userService;

    @Test
    public void testSave(){
        User user = new User();
        user.setUserName("Jock");
        user.setPassword("root");
        user.setRealName("Jockme");
        user.setGender(1);
        user.setBirthday(new Date(333333000000L));

        userService.save(user);
    }

    @Test
    public void testDelete(){
        User user = new User();
        userService.delete(3);
    }

    @Test
    public void testUpdate(){
        User user = new User();
        user.setUuid(1);
        user.setUserName("Jockme");
        user.setPassword("root");
        user.setRealName("JockIsMe");
        user.setGender(1);
        user.setBirthday(new Date(333333000000L));

        userService.update(user);
    }

    @Test
    public void testGet(){
        User user = userService.get(1);
        System.out.println(user);
    }

    @Test
    public void testGetAll(){
        PageInfo<User> all = userService.getAll(2, 2);
        System.out.println(all);
        System.out.println(all.getList().get(0));
        System.out.println(all.getList().get(1));
    }

    @Test
    public void testLogin(){
        User user = userService.login("Jockme", "root");
        System.out.println(user);
    }
}
Spring整合MyBatis小结
2.5 Spring整合SpringMVC

2.5.1 Rest风格开发SpringMVC(复习)-视频08
Part3:配置SpringMVC,完成如下4个步骤:
-
在web.xml中配置DispatcherServlet,并加载spring-mvc.xml
<?xml version="1.0" encoding="UTF-8"?>
<web-app xmlns="http://xmlns.jcp.org/xml/ns/javaee"
         xmlns:xsi="http://www.w3.org/2001/XMLSchema-instance"
         xsi:schemaLocation="http://xmlns.jcp.org/xml/ns/javaee/web-app_3_1.xsd"
         version="3.1">
<servlet>
    <servlet-name>DispatcherServlet</servlet-name>
    <servlet-class>org.springframework.web.servlet.DispatcherServlet</servlet-class>
    <init-param>
        <param-name>contextConfigLocation</param-name>
        <param-value>classpath*:spring-mvc.xml</param-value>
    </init-param>
</servlet>
<servlet-mapping>
    <servlet-name>DispatcherServlet</servlet-name>
    <url-pattern>/</url-pattern>
</servlet-mapping>

</web-app>
-
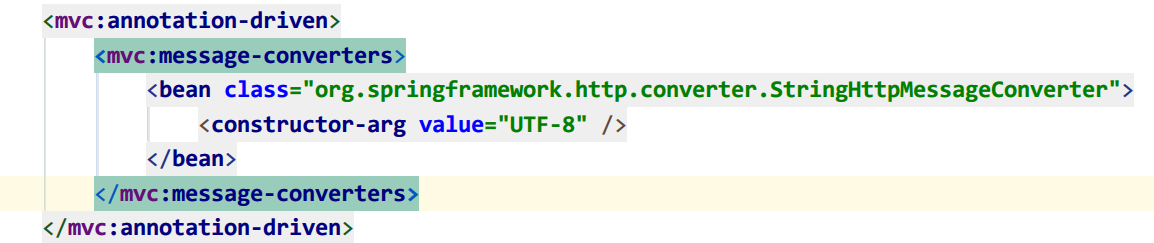
在spring-mvc.xml中配置只扫描com.itheima.controller包
<?xml version="1.0" encoding="UTF-8"?>
<beans xmlns="http://www.springframework.org/schema/beans"
       xmlns:context="http://www.springframework.org/schema/context"
       xmlns:mvc="http://www.springframework.org/schema/mvc"
       xmlns:xsi="http://www.w3.org/2001/XMLSchema-instance"
       xsi:schemaLocation="http://www.springframework.org/schema/beans http://www.springframework.org/schema/beans/spring-beans.xsd
        http://www.springframework.org/schema/mvc http://www.springframework.org/schema/mvc/spring-mvc.xsd
        http://www.springframework.org/schema/context http://www.springframework.org/schema/context/spring-context.xsd">

    <mvc:annotation-driven/>

    <context:component-scan base-package="com.itheima.controller"/>

</beans>
-
Spring的配置文件不加载controller:修改applicationContext.xml的包扫描,排除@Controller标记的类
<!--开启bean注解扫描--> <context:component-scan base-package="com.itheima"> <context:exclude-filter type="annotation" expression="org.springframework.stereotype.Controller"/> </context:component-scan> -
编写UserController
@RestController
@RequestMapping("/user")
public class UserController {

    @PostMapping
    public boolean save(User user){
        System.out.println("save ..." + user);
        return true;
    }

    @PutMapping
    public boolean update(User user){
        System.out.println("update ..." + user);
        return true;
    }

    @DeleteMapping("/{uuid}")
    public boolean delete(@PathVariable Integer uuid){
        System.out.println("delete ..." + uuid);
        return true;
    }

    @GetMapping("/{uuid}")
    public User get(@PathVariable Integer uuid){
        System.out.println("get ..." + uuid);
        return null;
    }

    @GetMapping("/{page}/{size}")
    public List getAll(@PathVariable Integer page,@PathVariable Integer size){
        System.out.println("getAll ..." + page+","+size);
        return null;
    }

    @PostMapping("/login")
    public User login(String userName,String password){
        System.out.println("login ..." + userName + " ," +password);
        return null;
    }

}
2.5.2 Spring整合SpringMVC-视频09
使用Spring时加载applicationContext.xml方式如下所示:
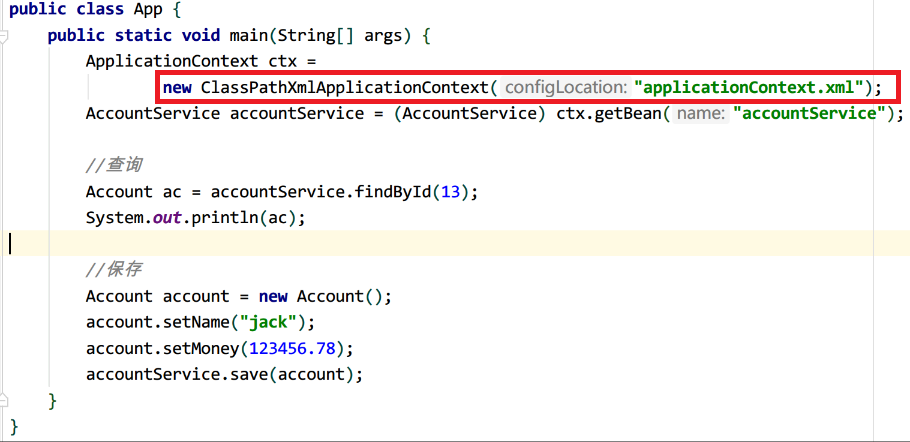
Part4:改为Web项目后,必须让tomcat启动时通过监听器加载Spring的配置文件:applicationContext.xml
-
web.xml加载Spring配置文件
<context-param>
    <param-name>contextConfigLocation</param-name>
    <param-value>classpath*:applicationContext.xml</param-value>
</context-param>

<!--启动服务器时,通过监听器加载spring运行环境-->
<listener>
    <listener-class>org.springframework.web.context.ContextLoaderListener</listener-class>
</listener>
-
Controller调用Service
@RestController
@RequestMapping("/user")
public class UserController {

    @Autowired
    private UserService userService;

    @PostMapping
    public boolean save(User user){
        return userService.save(user);
    }

    @PutMapping
    public boolean update(User user){
        return userService.update(user);
    }

    @DeleteMapping("/{uuid}")
    public boolean delete(@PathVariable Integer uuid){
        return userService.delete(uuid);
    }

    @GetMapping("/{uuid}")
    public User get(@PathVariable Integer uuid){
        return userService.get(uuid);
    }

    @GetMapping("/{page}/{size}")
    public PageInfo<User> getAll(@PathVariable Integer page, @PathVariable Integer size){
        return userService.getAll(page,size);
    }

    @PostMapping("/login")
    public User login(String userName,String password){
        return userService.login(userName,password);
    }

}
2.6 表现层数据封装(重点)
Part5-1:表现层数据封装
| 操作类型 | 返回数据 | 格式 |
|---|---|---|
| 操作是否成功 | true/false | 格式A |
| 单个数据 | 1, "zhangshan" | 格式B |
| 对象数据 | json对象:{"name":"Jock","age":39} | 格式C |
| 集合数据 | json数组:[{"name":"Jock","age":39},{"name":"Jockme","age":40}] | 格式D |

下面进行表现层数据封装,分为如下4个步骤:
-
返回数据格式设计

-
编写返回数据封装类:Result,添加get,set方法
public class Result { // 操作结果编码 private Integer code; // 操作数据结果 private Object data; // 消息 private String message; //添加get,set方法 public Result(Integer code) { this.code = code; } public Result(Integer code, Object data) { this.code = code; this.data = data; } public Result(Integer code, String message) { this.code = code; this.message = message; } }
-
状态码常量可以根据自己的业务需求设定
public class Code { // 操作结果编码 public static final Integer SAVE_OK = 20011; public static final Integer UPDATE_OK = 20021; public static final Integer DELETE_OK = 20031; public static final Integer GET_OK = 20041; public static final Integer SAVE_ERROR = 20010; public static final Integer UPDATE_ERROR = 20020; public static final Integer DELETE_ERROR = 20030; public static final Integer GET_ERROR = 20040; // 系统错误编码 // 操作权限编码 // 校验结果编码 }
-
Controller 调用
@RestController
@RequestMapping("/user")
public class UserController {

    @Autowired
    private UserService userService;

    @PostMapping
    public Result save(User user){
        boolean flag = userService.save(user);
        return new Result(flag ? Code.SAVE_OK:Code.SAVE_ERROR);
    }

    @PutMapping
    public Result update(User user){
        boolean flag = userService.update(user);
        return new Result(flag ? Code.UPDATE_OK:Code.UPDATE_ERROR);
    }

    @DeleteMapping("/{uuid}")
    public Result delete(@PathVariable Integer uuid){
        boolean flag = userService.delete(uuid);
        return new Result(flag ? Code.DELETE_OK:Code.DELETE_ERROR);
    }

    @GetMapping("/{uuid}")
    public Result get(@PathVariable Integer uuid){
        User user = userService.get(uuid);
        return new Result(null != user ?Code.GET_OK: Code.GET_ERROR,user);
    }

    @GetMapping("/{page}/{size}")
    public Result getAll(@PathVariable Integer page, @PathVariable Integer size){
        PageInfo<User> all = userService.getAll(page, size);
        return new Result(null != all ?Code.GET_OK: Code.GET_ERROR,all);
    }

    @PostMapping("/login")
    public Result login(String userName,String password){
        User user = userService.login(userName,password);
        return new Result(null != user ?Code.GET_OK: Code.GET_ERROR,user);
    }

}
2.7 自定义异常-视频11
Part5-2:自定义异常处理
-
设定自定义业务异常,封装程序执行过程中出现的问题,便于表现层进行统一的异常拦截并进行处理
在自定义异常类中添加错误编码属性code以及get方法
public class BusinessException extends RuntimeException {

    //自定义异常中封装对应的错误编码,用于异常处理时获取对应的操作编码
    private Integer code;

    public Integer getCode() {
        return code;
    }

    public void setCode(Integer code) {
        this.code = code;
    }

    public BusinessException(Integer code) {
        this.code = code;
    }

    public BusinessException(String message, Integer code) {
        super(message);
        this.code = code;
    }

    public BusinessException(String message, Throwable cause,Integer code) {
        super(message, cause);
        this.code = code;
    }

    public BusinessException(Throwable cause,Integer code) {
        super(cause);
        this.code = code;
    }

    public BusinessException(String message, Throwable cause, boolean enableSuppression, boolean writableStackTrace,Integer code) {
        super(message, cause, enableSuppression, writableStackTrace);
        this.code = code;
    }
}
-
自定义异常消息返回时需要与业务正常执行的消息按照统一的格式进行处理
@GetMapping("/{uuid}")
public Result get(@PathVariable Integer uuid){
    User user = userService.get(uuid);
    //模拟出现异常,使用条件控制,便于测试结果
    if (uuid == 10 ) throw new BusinessException("查询出错啦,请重试!",Code.GET_ERROR);
    return new Result(null != user ? Code.GET_OK: Code.GET_ERROR,user);
}
2.8 返回消息兼容异常信息(重点)
在异常处理类中,将异常信息封装成Result对象:通过e.getCode()获取异常编码
@RestControllerAdvice
public class ProjectExceptionAdvice {

    @ExceptionHandler(BusinessException.class)
    //对出现异常的情况进行拦截,并将其处理成统一的页面数据结果格式
    public Result doBusinessException(BusinessException e) {
        return new Result(e.getCode(), e.getMessage());
    }

    @ExceptionHandler(Exception.class)
    public Result doOtherException(Exception e) {
        //redis发送真正的异常信息给运维人员e.getMessage()
        return new Result(500, "请稍候重试");
    }

}
3 纯注解开发SSM
需要使用注解改造的配置文件如下所示:
-
UserDao.xml
-
applicationContext.xml
-
spring-mvc.xml
-
web.xml
3.1 用注解代替UserDao.xml-视频12
使用MyBatis提供的注解在UserDao接口中改造
public interface UserDao {
    /**
     * 添加用户
     * @param user
     * @return
     */
    @Insert("insert into user(userName,password,realName,gender,birthday)values(#{userName},#{password},#{realName},#{gender},#{birthday})")
    public boolean save(User user);

    /**
     * 修改用户
     * @param user
     * @return
     */
    @Update("update user set userName=#{userName},password=#{password},realName=#{realName},gender=#{gender},birthday=#{birthday} where uuid=#{uuid}")
    public boolean update(User user);

    /**
     * 删除用户
     * @param uuid
     * @return
     */
    @Delete("delete from user where uuid = #{uuid}")
    public boolean delete(Integer uuid);

    /**
     * 查询单个用户信息
     * @param uuid
     * @return
     */
    @Select("select * from user where uuid = #{uuid}")
    public User get(Integer uuid);

    /**
     * 查询全部用户信息
     * @return
     */
    @Select("select * from user")
    public List<User> getAll();


    /**
     * 根据用户名密码查询个人信息
     * @param userName 用户名
     * @param password 密码信息
     * @return
     */
    @Select("select * from user where userName=#{userName} and password=#{password}")
    //注意:数据层操作不要和业务层操作的名称混淆,通常数据层仅反映与数据库间的信息交换,不体现业务逻辑
    public User getByUserNameAndPassword(@Param("userName") String userName,@Param("password") String password);
}
易错点:删除UserDao.xml
3.2 用注解替代applicationContext.xml
共分为如下3个步骤:
-
新建Druid数据源配置类:JdbcConfig
public class JdbcConfig {
    //使用注入的形式,读取properties文件中的属性值,等同于<property name="*******" value="${jdbc.driver}"/>
    @Value("${jdbc.driver}")
    private String driver;
    @Value("${jdbc.url}")
    private String url;
    @Value("${jdbc.username}")
    private String userName;
    @Value("${jdbc.password}")
    private String password;

    //定义dataSource的bean,等同于<bean id="dataSource" class="com.alibaba.druid.pool.DruidDataSource">
    @Bean("dataSource")
    public DataSource getDataSource(){
        //创建对象
        DruidDataSource ds = new DruidDataSource();
        //手工调用set方法,等同于set属性注入<property name="driverClassName" value="******"/>
        ds.setDriverClassName(driver);
        ds.setUrl(url);
        ds.setUsername(userName);
        ds.setPassword(password);
        return ds;
    }
}
-
新建MyBatis配置类:MyBatisConfig,添加分页插件pageHelper配置
public class MyBatisConfig { //定义MyBatis的核心连接工厂bean,等同于<bean class="org.mybatis.spring.SqlSessionFactoryBean"> @Bean //参数使用自动装配的形式加载dataSource,为set注入提供数据,dataSource来源于JdbcConfig中的配置 public SqlSessionFactoryBean getSqlSessionFactoryBean(@Autowired DataSource dataSource,@Autowired Interceptor interceptor){ SqlSessionFactoryBean ssfb = new SqlSessionFactoryBean(); //等同于<property name="typeAliasesPackage" value="com.itheima.domain"/> ssfb.setTypeAliasesPackage("com.itheima.domain"); //等同于<property name="dataSource" ref="dataSource"/> ssfb.setDataSource(dataSource); ssfb.setPlugins(interceptor); return ssfb; } //定义MyBatis的映射扫描,等同于<bean class="org.mybatis.spring.mapper.MapperScannerConfigurer"> @Bean public MapperScannerConfigurer getMapperScannerConfigurer(){ MapperScannerConfigurer msc = new MapperScannerConfigurer(); //等同于<property name="basePackage" value="com.itheima.dao"/> msc.setBasePackage("com.itheima.dao"); return msc; } //分页插件pageHelper配置 @Bean("pageInterceptor") public Interceptor getPageInterceptor(){ Interceptor interceptor = new PageInterceptor(); Properties properties = new Properties(); properties.setProperty("helperDialect","mysql"); properties.setProperty("reasonable","true"); //等同于<property name="properties"> interceptor.setProperties(properties); return interceptor; } }
-
新建Spring配置类:SpringConfig,完成事务管理配置
@Configuration
//等同于<context:component-scan base-package="com.itheima">
@ComponentScan(value = "com.itheima",excludeFilters =
    //等同于<context:exclude-filter type="annotation" expression="org.springframework.stereotype.Controller"/>
    @ComponentScan.Filter(type= FilterType.ANNOTATION,classes = {Controller.class}))
//等同于<context:property-placeholder location="classpath*:jdbc.properties"/>
@PropertySource("classpath:jdbc.properties")
//等同于<tx:annotation-driven />,bean的名称默认取transactionManager
@EnableTransactionManagement
@Import({MyBatisConfig.class,JdbcConfig.class})
public class SpringConfig {
    //等同于<bean id="txManager"/>
    @Bean("transactionManager")
    //等同于<bean class="org.springframework.jdbc.datasource.DataSourceTransactionManager">
    public DataSourceTransactionManager getTxManager(@Autowired DataSource dataSource){
        DataSourceTransactionManager tm = new DataSourceTransactionManager();
        //等同于<property name="dataSource" ref="dataSource"/>
        tm.setDataSource(dataSource);
        return tm;
    }
}
3.3 用注解替代spring-mvc.xml
-
添加@EnableWebMvc注解
@Configuration
//等同于<context:component-scan base-package="com.itheima.controller"/>
@ComponentScan("com.itheima.controller")
//等同于<mvc:annotation-driven/>,还不完全相同
@EnableWebMvc
public class SpringMvcConfig implements WebMvcConfigurer {

    @Override
    public void configureMessageConverters(List<HttpMessageConverter<?>> converters) {
        //解决@ResponseBody返回中文乱码问题,指定编码格式为UTF-8
        converters.add(new StringHttpMessageConverter(StandardCharsets.UTF_8));
        //将Java对象转成JSON格式字符串格式
        converters.add(new MappingJackson2HttpMessageConverter());
    }
}
替换XML中@ResponseBody返回中文乱码的方式:
-
EnableWebMvc作用(了解)
-
支持ConversionService的配置,可以方便配置自定义类型转换器
-
支持@NumberFormat注解格式化数字类型
-
支持@DateTimeFormat注解格式化日期数据,日期包括Date,Calendar,JodaTime(JodaTime要导包)
-
支持@Valid的参数校验(需要导入JSR-303规范)
-
配合第三方jar包和SpringMVC提供的注解读写XML和JSON格式数据
-
3.4 用注解替代web.xml
-
新建Servlet容器初始化配置类:ServletContainersInitConfig
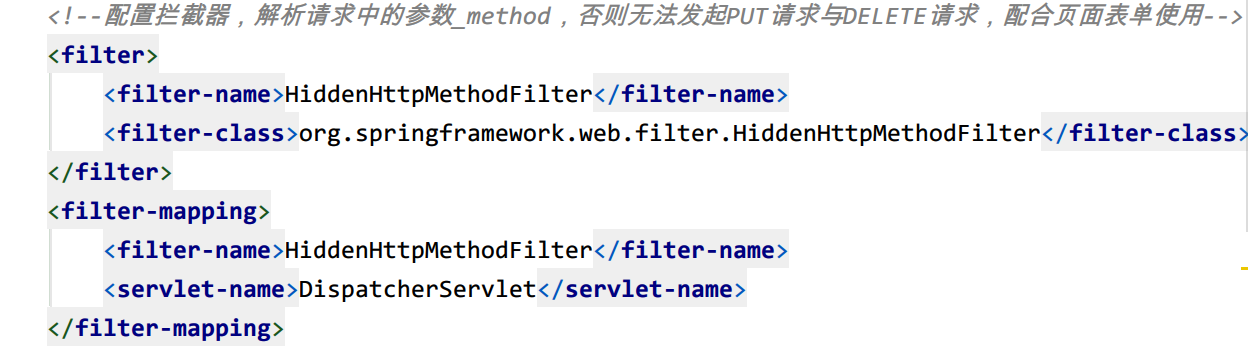
public class ServletContainersInitConfig extends AbstractDispatcherServletInitializer { //创建Servlet容器时,使用注解的方式加载SPRINGMVC配置类中的信息,并加载成WEB专用的ApplicationContext对象 //该对象放入了ServletContext范围,后期在整个WEB容器中可以随时获取调用 @Override protected WebApplicationContext createServletApplicationContext() { AnnotationConfigWebApplicationContext ctx = new AnnotationConfigWebApplicationContext(); ctx.register(SpringMvcConfig.class); return ctx; } //注解配置映射地址方式,服务于SpringMVC的核心控制器DispatcherServlet @Override protected String[] getServletMappings() { return new String[]{"/"}; } //乱码处理作为过滤器,在servlet容器启动时进行配置,相关内容参看Servlet零配置相关课程 @Override public void onStartup(ServletContext servletContext) throws ServletException { //触发父类的onStartup super.onStartup(servletContext); //1.创建字符集过滤器对象 CharacterEncodingFilter cef = new CharacterEncodingFilter(); //2.设置使用的字符集 cef.setEncoding("UTF-8"); //3.添加到容器(它不是ioc容器,而是ServletContainer) FilterRegistration.Dynamic registration = servletContext.addFilter("characterEncodingFilter", cef); //4.添加映射 registration.addMappingForUrlPatterns(EnumSet.of(DispatcherType.REQUEST, DispatcherType.FORWARD, DispatcherType.INCLUDE), false, "/*"); //使用隐藏域设置请求方式 //指定form表单请求方式为DELETE: <input type="text" name="_method" value="DELETE"/> //HiddenHttpMethodFilter httpMethodFilter = new HiddenHttpMethodFilter(); //FilterRegistration.Dynamic httpMethodFilterRegistration = // servletContext.addFilter( // "hiddenHttpMethodFilter", cef); //httpMethodFilterRegistration.addMappingForServletNames( // EnumSet.of(DispatcherType.REQUEST, DispatcherType.FORWARD, DispatcherType.INCLUDE), // false, // getServletName()); } }
-
添加加载spring核心配置文件,生成Spring核心容器(主容器/父容器/根容器)
@Override
//基本等同于<listener-class>org.springframework.web.context.ContextLoaderListener</listener-class>
protected WebApplicationContext createRootApplicationContext() {
    AnnotationConfigWebApplicationContext ctx = new AnnotationConfigWebApplicationContext();
    ctx.register(SpringConfig.class);
    return ctx;
}
-
父容器:Spring环境加载后形成的容器,包含spring环境下所有的bean,配置文件和Service层的bean
-
子容器:当前springmvc环境加载后形成的容器,不包含spring环境下的bean,只包含Controller层的bean
-
子容器可以访问父容器中的资源,父容器不可以访问子容器中的资源
-