原文链接:http://tutorials.jenkov.com/java-nio/buffers.html,如有侵权,立删。
Java NIO Buffer
- buffer的基本使用
- buffer的capacity、position、limit属性
- buffer类型
- 分配缓存区
- 向buffer中写入数据
- flip()方法
- 从buffer中读取数据
- rewind()方法
- clear()和compact()方法
- mark()和reset()方法
- equal()和compareTo()方法
Java buffer 和 channel 是相辅相成的,正如前文所言,通过channel写入数据到buffer中,通过channel从buffer中读取数据。
buffer是一个高校的内存块,供你写入数据用。这些内存块在buffer中被包装起来了,并且提供了方法让你轻松使用内存块。
Basic Buffer Usage
用buffer进行读取或写入数据,通常有如下四个步骤:
- 向buffer中写入数据
- 调用buffer的flip()方法
- 从buffer中读取出数据
- 调用buffer的clear()或者compact()方法
当你向buffer中写入数据,buffer会保存你向其中写入了多少个byte。一旦你从buffer中读取数据,你需要将buffer从写模式转化为读模式,通过flip()方法。
一旦你读取到所有的data后,你需要清空缓存区,让buffer为下一次写入做准备。你可以通过两种方法,clear()和compact()。clear()方法会清空所有的缓存,compact()方法仅仅清空你已经读过的数据。没有读过的数据会被转移到buffer的开始处,会在没有读过的数据后写入新数据。
以下是一个简单的例子
 1 RandomAccessFile aFile = new RandomAccessFile("data/nio-data.txt", "rw");
 2 FileChannel inChannel = aFile.getChannel();
 3
 4 //create buffer with capacity of 48 bytes
 5 ByteBuffer buf = ByteBuffer.allocate(48);
 6
 7 int bytesRead = inChannel.read(buf); //read into buffer.
 8 while (bytesRead != -1) {
 9
10   buf.flip();  //make buffer ready for read
11
12   while(buf.hasRemaining()){
13       System.out.print((char) buf.get()); // read 1 byte at a time
14   }
15
16   buf.clear(); //make buffer ready for writing
17   bytesRead = inChannel.read(buf);
18 }
19 aFile.close();
Buffer Capacity、Position、Limit
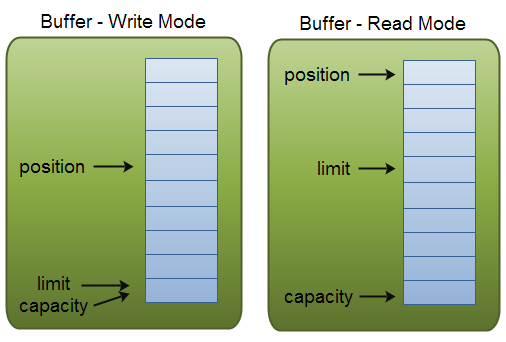
position和limit的含义会随着buffer的模式转换而不同,capacity无论哪一种模式,含义都是相同的。放两张图上来

Capacity,在创建一个缓存区时,缓存区的大小是固定的。你只能向缓存区中写入capacity的数据量,一旦缓存区满了,你需要在下一次写入新的数据时,通过clear()方法清空缓存区。
position,当你想缓存区写入数据时,你需要清楚你写到了哪个位置。position初始化为0,写入多少byte,position就会移动多少。position的最大值是capacity-1。
当你从缓存区读取数据时,要从给定的position处开始读。当你使用flip()方法,将buffer的写模式转换为读模式。position会被初始化为0,当你从buffer中读取出数据时,position会提前移到下一个要读的位置。
limit,在写模式中,limit就代表着你可以向buffer中写入多少数据,在写模式中limit等于capacity。
当转换buffer为读模式时,limit意味着你可以读取多少数据。因此,当buffer转换为读模式时,limit会被赋值为写模式中的position。另一种是,你写进去多少数据就读多少数据(limit被赋值为写入buffer中的字节数)
Buffer Types
Java NIO 有以下几种buffer类型
- ByteBuffer
- CharBuffer
- ShortBuffer
- IntBuffer
- LongBuffer
- FloatBuffer
- DoubleBuffer
- MappedByteBuffer
正如你所看见的那样,不同的buffer类型代表了不同的基本数据类型。
MappedByteBuffer是一种特殊的buffer类型,之后再讨论它。
Allocating a Buffer
在获得buffer之前,你必须进行分配。每一个Buffer类都有allocate()方法来进行分配,这里有一个例子,展示如何分配内存
ByteBuffer buf = ByteBuffer.allocate(48);
Writing Data to a Buffer
你可以通过两种方法向buffer写入数据
- 从channel向buffer写入数据
- 通过buffer自己的put()方法,向buffer写入数据
例子:
1 int bytesRead = inChannel.read(buf); //read into buffer.
1 buf.put(127);
这里还有很多put()方法的其他版本,允许你通过不同的方法向buffer中写入数据。
flip()
flip()方法将buffer从写模式转化为读模式。作用看代码:
1     public final Buffer flip() {
2         limit = position;
3         position = 0;
4         mark = -1;
5         return this;
6     }
Reading Data From a Buffer
这里有两种从buffer中读取数据的方法
- 通过channel读取数据
- 调用buffer自己的get()方法,读取数据
例子:
1 //read from buffer into channel.
2 int bytesWritten = inChannel.write(buf);
1 byte aByte = buf.get();
同样,也有很多版本的get()方法供你使用。
rewind()
先贴上代码:
1     public final Buffer rewind() {
2         position = 0;
3         mark = -1;
4         return this;
5     }
将position赋值为0,其余的不做变化。可以从头开始读取数据。
clear()和compact()
一旦你从buffer中读取完数据,你必须让buffer准备好下一次写入。你可以调用clear()方法和compact()方法。
clear方法,会将position设置为0,还是上源码吧
1     public final Buffer clear() {
2         position = 0;
3         limit = capacity;
4         mark = -1;
5         return this;
6     }
源码的注释说明:实际上clear()方法并不会将数据从缓存区中擦除,只是名字搞的鬼,因为大多数情况他确实会被用类清除数据
compact()方法,会将你没有读完的数据复制到buffer的开始处,然后将position设置为未读数据的下一个位置。
mark()和reset()
在buffer中你可以调用mark()方法标记一个给定的position位置,之后你可以通过调用reset()方法,重新设置position到刚刚mark()的位置。可以自己试验下
1 buffer.mark();
2
3 //call buffer.get() a couple of times, e.g. during parsing.
4
5 buffer.reset();  //set position back to mark.
equals()和compareTo()
两个比较buffer的方法
equals(),当满足以下条件时,为true
- 他们是相同的类型的buffer
- 他们有相同的剩余字节量
- 所有剩余的数据都相等
正如你所看到的,equals()只能判断buffer的一部分数据。直接上源码
 1     public boolean equals(Object ob) {
 2         if (this == ob)
 3             return true;
 4         if (!(ob instanceof ByteBuffer))
 5             return false;
 6         ByteBuffer that = (ByteBuffer)ob;
 7         if (this.remaining() != that.remaining())
 8             return false;
 9         int p = this.position();
10         for (int i = this.limit() - 1, j = that.limit() - 1; i >= p; i--, j--)
11             if (!equals(this.get(i), that.get(j)))
12                 return false;
13         return true;
14     }
compareTo(),直接上源码了
1     public int compareTo(ByteBuffer that) {
2         int n = this.position() + Math.min(this.remaining(), that.remaining());
3         for (int i = this.position(), j = that.position(); i < n; i++, j++) {
4             int cmp = compare(this.get(i), that.get(j));
5             if (cmp != 0)
6                 return cmp;
7         }
8         return this.remaining() - that.remaining();
9     }