0. 引言
利用机器学习的方法训练微笑检测模型,输入一张人脸照片,判断是否微笑;
精度在 95% 左右( 使用的数据集中 69 张没笑脸,65 张有笑脸 );
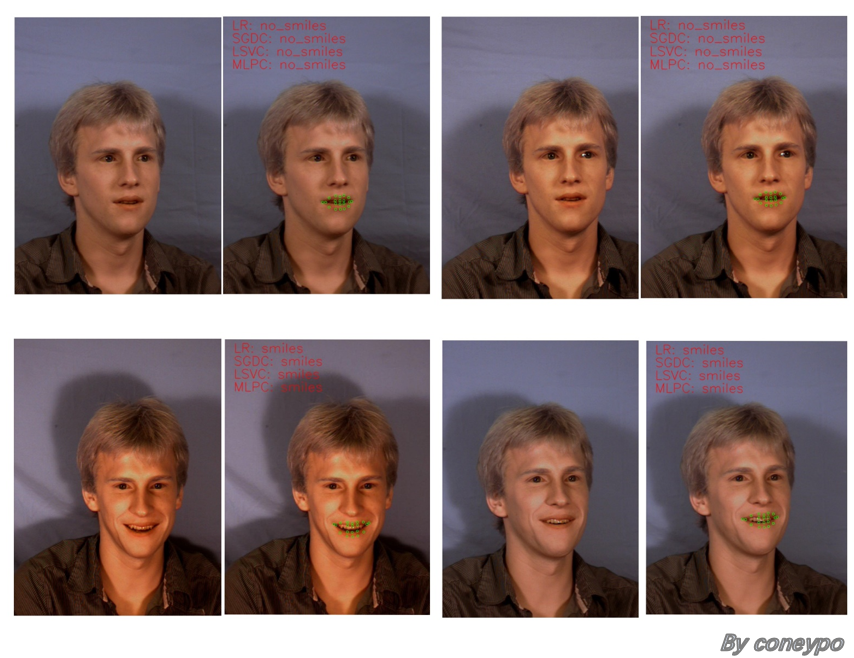
图1 测试图像与检测结果
项目实现的笑脸识别,并不是通过 计算嘴唇角度,满足一定弧度认定为笑脸进行判定,
而是通过机器学习模型,让模型去 学习人脸嘴唇的坐标和判定笑脸的关系:
输入: 人脸嘴唇的坐标
输出: 有没笑脸
借助 Dlib 进行 人脸嘴部 20 个特征点坐标( 40 维特征)的提取,然后根据这 40 维输入特征 作为 模型输入, 1 维特征( 1 代表有微笑 / 0 代表没微笑)作为 输出,进行 Machine Learning 建模;
利用几种机器学习模型进行建模,达到一个二分类(分类 有/无 笑脸)的目的,然后分析模型识别精度和性能,并且可以识别给定图片的人脸是否微笑;
源码:
GitHub: https://github.com/coneypo/Smile_Detector
1. get_features.py :
get_features(img_rd, pos_49to68) # 输入人脸图像路径,利用 Dlib 的 “shape_predictor_68_face_landmarks.dat” 提取嘴部20个特征点坐标的40个特征值;
write_into_CSV() # 将40维特征输入和1维的输出标记(1代表有微笑/0代表没微笑)写入 CSV 文件中;
2. ML_ways_sklearn.py :
      pre_data()         # 读取 CSV 中的数据,然后提取出训练集 X_train 和测试集 X_test

    3. show_lip.py :
显示某人嘴唇的位置
4. check_smiles.py:
输入给定测试图像,用 ML 模型检测其 有/无笑脸;
用到的几种机器学习分类模型:
model_LR() , Logistic Regression, (线性模型)中的逻辑斯特回归
model_Linear SVC() ,Support Vector Classification, (支持向量机)中的线性支持向量分类
model_MLPC() , Multi-Layer Perceptron Classification, (神经网络)多层感知机分类
model_SGDC() , Stochastic Gradient Descent Classification,(线性模型)随机梯度法求解
1. 开发环境
Python: 3.6.3
Dlib: 19.7
OpenCv, NumPy, sklearn, pandas, os, csv 等
get_features.py 中调用的库:
1 import dlib         # 人脸识别的库 Dlib
2 import numpy as np  # 数据处理的库 Numpy
3 import cv2          # 图像处理的库 OpenCv
4 import os           # 读取文件
5 import csv          # csv操作
ML_ways_sklearn.py 中调用的库:
 1 # pd 读取 CSV
 2 import pandas as pd
 3
 4 # 分割数据
 5 from sklearn.model_selection import train_test_split
 6
 7 # 用于数据预加工标准化
 8 from sklearn.preprocessing import StandardScaler
 9
10 from sklearn.linear_model import LogisticRegression     # 线性模型中的Logistic回归模型
11 from sklearn.neural_network import MLPClassifier        # 神经网络模型中的多层网络模型
12 from sklearn.svm import LinearSVC                       # SVM模型中的线性SVC模型
13 from sklearn.linear_model import SGDClassifier          # 线性模型中的随机梯度下降模型
使用的人脸来自于 The MUCT Face Database(Link: http://www.milbo.org/muct/)
(The MUCT database was prepared by Stephen Milborrow, John Morkel, and Fred Nicolls in December 2008 at the University Of Cape Town. We would like to send out a thanks to the people who allowed their faces to be used.)
2. 设计流程
工作内容主要以下两大块:提取人脸特征 和 建模;
整体的设计流程如下图所示:
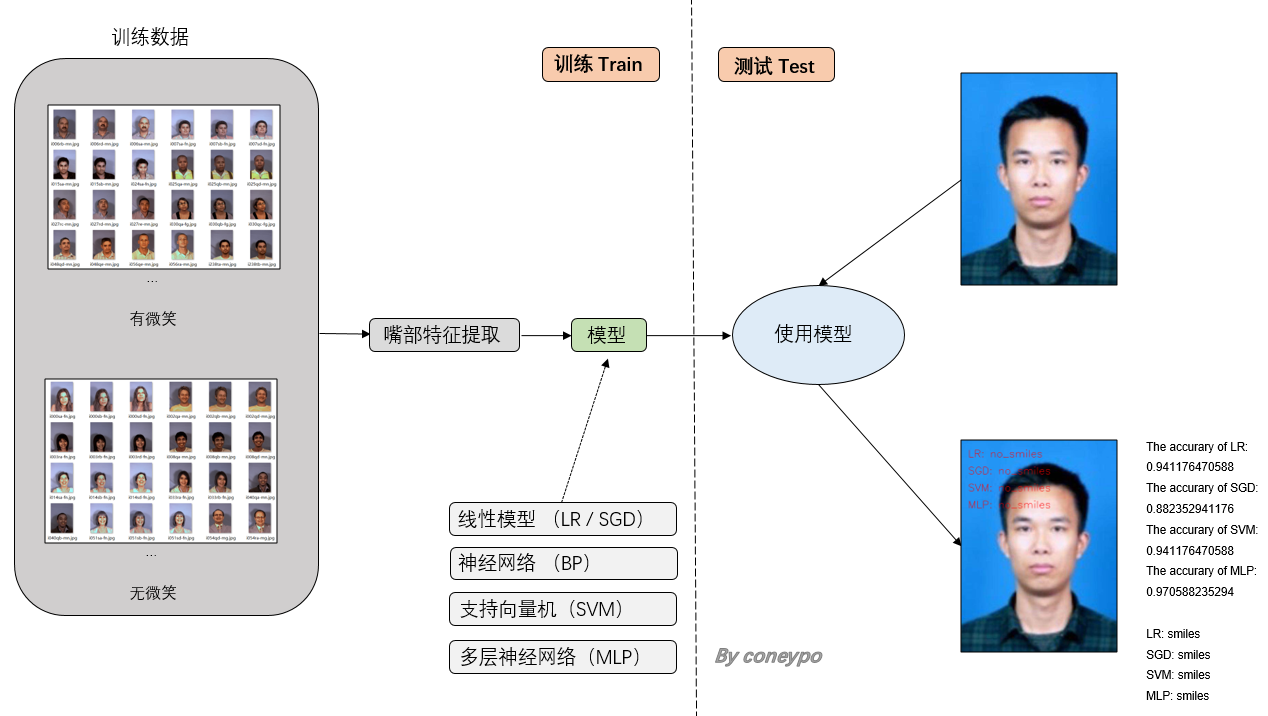
图 2 总体设计流程图
2.1 提取人脸特征:
该部分的设计流程图:
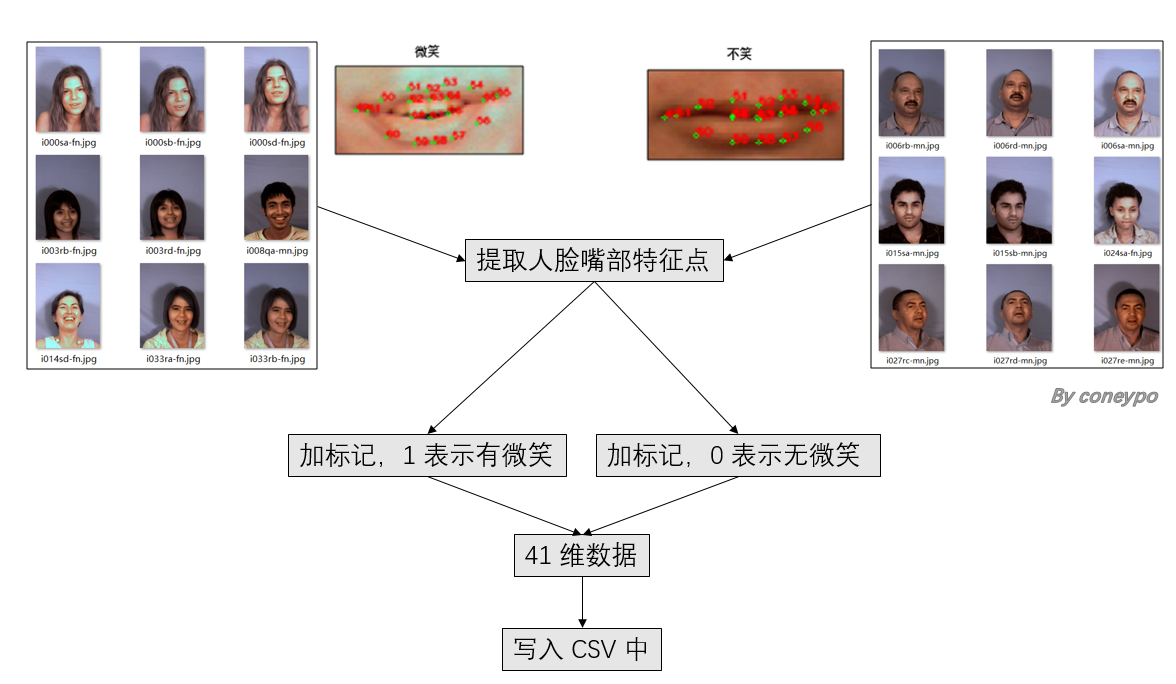
图 3 人脸提取特征部分流程图
先在项目目录下建立两个文件夹,分别存放
有笑脸的人脸的路径 : path_images_with_smiles = "data_imgs/database/smiles/"
无笑脸的人脸的路径: path_images_no_smiles = "data_imgs/database/no_smiles/"
这样之后读取的时候就可以知道人脸的标记有/无人脸;
关于利用 Dlib 进行人脸 68个特征点的提取,在我之前另一篇博客里面介绍过 (link: http://www.cnblogs.com/AdaminXie/p/7905888.html);
本项目中只使用其中嘴部 20个特征点的坐标作为特征输入,20个点的序号如下图所示:
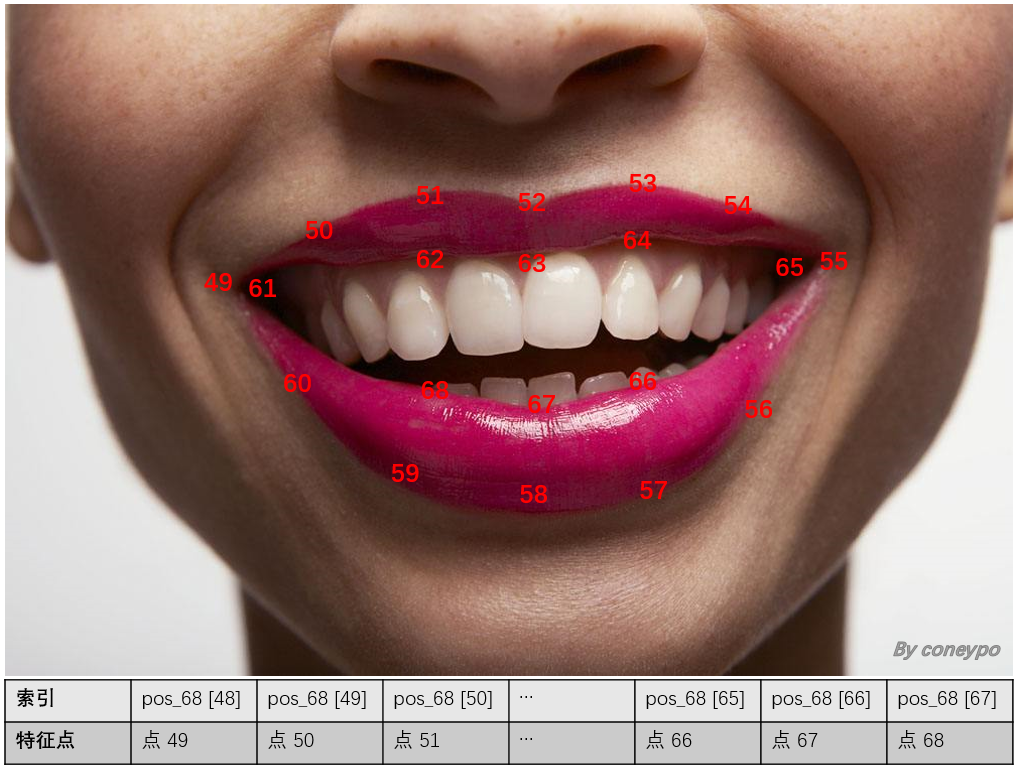
图 4 Dlib 标定的嘴部特征点序号
20 个特征点 40 个坐标值的提取,由 get_features() 函数实现;
输入是图像文件所在路径,返回的的是数组 pos_49to68(40个为特征点坐标值)
 1 # 输入图像文件所在路径,返回一个41维数组(包含提取到的40维特征和1维输出标记)
 2 def get_features(img_rd):
 3
 4     # 输入:  img_rd:      图像文件
 5     # 输出:  pos_49to68:  feature 49 to feature 68, 20 feature points in all, 40 points
 6
 7     # read img file
 8     img = cv2.imread(img_rd)
 9     # 取灰度
10     img_gray = cv2.cvtColor(img, cv2.COLOR_BGR2GRAY)
11
12     # 计算 68 点坐标
13     pos_68 = []
14     rects = detector(img_gray, 0)
15     landmarks = np.matrix([[p.x, p.y] for p in predictor(img, rects[0]).parts()])
16
17     for idx, point in enumerate(landmarks):
18         # 68点的坐标
19         pos = (point[0, 0], point[0, 1])
20         pos_68.append(pos)
21
22     pos_49to68 = []
23     # 将点 49-68 写入 CSV
24     # 即 pos_68[48]-pos_68[67]
25     for i in range(48, 68):
26         pos_49to68.append(pos_68[i][0])
27         pos_49to68.append(pos_68[i][1])
28
29     return pos_49to68
然后就遍历两个存放有/无笑脸的文件夹,读取图像文件,然后利用 get_features() 函数得到特征值,写入 CSV 中:
  1 def write_into_CSV():
 2     with open(path_csv+"data.csv", "w", newline="") as csvfile:
 3         writer = csv.writer(csvfile)
 4
 5         # 处理带笑脸的图像
 6         print("######## with smiles #########")
 7         for i in range(len(imgs_smiles)):
 8             print("img:", path_pic_smiles, imgs_smiles[i])
 9
10             # 用来存放41维特征
11             features_csv_smiles = []
12
13             # append "1" means "with smiles"
14             get_features(path_pic_smiles+imgs_smiles[i], features_csv_smiles)
15             features_csv_smiles.append(1)
16             print("features:", features_csv_smiles, "
")
17
18             # 写入CSV
19             writer.writerow(features_csv_smiles)
20
21         # 处理不带笑脸的图像
22         print("######## no smiles #########")
23         for i in range(len(imgs_no_smiles)):
24             print("img", path_pic_no_smiles, imgs_no_smiles[i])
25
26             # 用来存放41维特征
27             features_csv_no_smiles = []
28
29             # append "0" means "no smiles"
30             get_features(path_pic_no_smiles+imgs_no_smiles[i], features_csv_no_smiles)
31             features_csv_no_smiles.append(0)
32             print("features:", features_csv_no_smiles, "
")
33
34             # 写入CSV
35             writer.writerow(features_csv_no_smiles)
会得到一个 41 列的 CSV 文件,前 40 列为 40 维的输入特征,第 41 列为笑脸标记。
show_lip.py
 1 # Created on:   2018-01-27
 2 # Updated on:   2018-09-06
 3
 4 # Author:       coneypo
 5 # Blog:         http://www.cnblogs.com/AdaminXie/
 6 # Github:       https://github.com/coneypo/Smile_Detector
 7
 8 # draw the positions of someone's lip
 9
10 import dlib         # 人脸识别的库 Dlib
11 import cv2          # 图像处理的库 OpenCv
12 from get_features import get_features   # return the positions of feature points
13
14 path_test_img = "data_imgs/test_imgs/i064rc-mn.jpg"
15
16 detector = dlib.get_frontal_face_detector()
17 predictor = dlib.shape_predictor('shape_predictor_68_face_landmarks.dat')
18
19 pos_49to68 = get_features(path_test_img)
20
21 img_rd = cv2.imread(path_test_img)
22
23 # draw on the lip points
24 for i in range(0, len(pos_49to68), 2):
25     print(pos_49to68[i],pos_49to68[i+1])
26     cv2.circle(img_rd, tuple([pos_49to68[i],pos_49to68[i+1]]), radius=1, color=(0,255,0))
27
28 cv2.namedWindow("img_read", 2)
29 cv2.imshow("img_read", img_rd)
30 cv2.waitKey(0)
2.2 ML 建模和测试
这部分机器学习模型使用比较简单,之前的特征提取已经完成,写入了 CSV 文件中;接下来就是要从 CSV 中将想要的数据集提取出来,利用 sklearn 进行机器学习建模。
2.2.1 数据预加工
利用 pands.read_csv 读取 CSV 文件,然后利用 train_test_split 进行数据分割;
得到 训练集:X_train, y_train 和 测试集:X_test, y_test
 1 # 从 csv 读取数据
 2 def pre_data():
 3     # 41维表头
 4     column_names = []
 5     for i in range(0, 40):
 6         column_names.append("feature_" + str(i + 1))
 7     column_names.append("output")
 8
 9     # read csv
10     rd_csv = pd.read_csv("data_csv/data.csv", names=column_names)
11
12     # 输出 csv 文件的维度
13     # print("shape:", rd_csv.shape)
14
15     X_train, X_test, y_train, y_test = train_test_split(
16
17         # input 0-40
18         # output 41
19         rd_csv[column_names[0:40]],
20         rd_csv[column_names[40]],
21
22         # 25% for test, 75% for train
23         test_size=0.25,
24         random_state=33)
25
26     return X_train, X_test, y_train, y_test
2.2.2 机器学习建模
几种建模方法在 sklearn 中实现的代码类似,所以在此只介绍 LR, logistic regression, 逻辑斯特回归分类,它是属于线性模型一种;
1 from sklearn.linear_model import LogisticRegression
利用 LR.fit 训练数据:LR.fit(X_train_LR, y_train_LR),利用 LR.predict 预测标记:y_predict_LR = LR_predict(X_test_LR);
返回 ss_LR 和 LR,需要这两个返回值,是因为之后要利用它们对给定图像的进行检测,之后 2.2.3 节会介绍;
 1 # LR, logistic regression, 逻辑斯特回归分类(线性模型)
 2 def model_LR():
 3     # get data
 4     X_train_LR, X_test_LR, y_train_LR, y_test_LR = pre_data()
 5
 6     # 数据预加工
 7     # 标准化数据,保证每个维度的特征数据方差为1,均值为0。使得预测结果不会被某些维度过大的特征值而主导
 8     ss_LR = StandardScaler()
 9     X_train_LR = ss_LR.fit_transform(X_train_LR)
10     X_test_LR = ss_LR.transform(X_test_LR)
11
12     # 初始化 LogisticRegression
13     LR = LogisticRegression()
14
15     # 调用 LogisticRegression 中的 fit() 来训练模型参数
16     LR.fit(X_train_LR, y_train_LR)
17
18     # save LR model
19     joblib.dump(LR, path_models + "model_LR.m")
20
21     # 评分函数
22     score_LR = LR.score(X_test_LR, y_test_LR)
23     # print("The accurary of LR:", score_LR)
24
25     return (ss_LR)
我的数据集里面是69张没笑脸,65张有笑脸,测试精度如下,精度在95%附近:
The accurary of LR: 0.941176470588
The accurary of SGD: 0.882352941176
The accurary of SVM: 0.941176470588
The accurary of MLP: 0.970588235294
2.2.3 测试单张图片
现在我们已经建好机器学习模型,在 2.2.2 中可以利用 sklearn 机器学习模型的 score 函数得到模型精度;
但是如果想检测给定图像的笑脸,需要进行该部分工作:path_test_pic 就是需要进行检测的文件路径,需要精确到图像文件,比如 “F:/pic/test.pic”;
然后调用 get_features.py 中的 get_features() 函数进行特征提取,得到给定图像的40维特征数组 pos_49_68;
check_smile.py:
 1 # Created on:   2018-01-27
 2 # Updated on:   2018-09-07
 3 # Author:       coneypo
 4 # Blog:         http://www.cnblogs.com/AdaminXie/
 5 # Github:       https://github.com/coneypo/Smile_Detector
 6
 7 # use the saved model
 8 from sklearn.externals import joblib
 9
10 from get_features import get_features
11 import ML_ways_sklearn
12
13 import cv2
14
15 # path of test img
16 path_test_img = "data_imgs/test_imgs/test1.jpg"
17
18 # 提取单张40维度特征
19 pos_49to68_test = get_features(path_test_img)
20
21 # path of models
22 path_models = "data_models/"
23
24 print("The result of"+path_test_img+":")
25 print('
')
26
27 # #########  LR  ###########
28 LR = joblib.load(path_models+"model_LR.m")
29 ss_LR = ML_ways_sklearn.model_LR()
30 X_test_LR = ss_LR.transform([pos_49to68_test])
31 y_predict_LR = str(LR.predict(X_test_LR)[0]).replace('0', "no smile").replace('1', "with smile")
32 print("LR:", y_predict_LR)
33
34 # #########  LSVC  ###########
35 LSVC = joblib.load(path_models+"model_LSVC.m")
36 ss_LSVC = ML_ways_sklearn.model_LSVC()
37 X_test_LSVC = ss_LSVC.transform([pos_49to68_test])
38 y_predict_LSVC = str(LSVC.predict(X_test_LSVC)[0]).replace('0', "no smile").replace('1', "with smile")
39 print("LSVC:", y_predict_LSVC)
40
41 # #########  MLPC  ###########
42 MLPC = joblib.load(path_models+"model_MLPC.m")
43 ss_MLPC = ML_ways_sklearn.model_MLPC()
44 X_test_MLPC = ss_MLPC.transform([pos_49to68_test])
45 y_predict_MLPC = str(MLPC.predict(X_test_MLPC)[0]).replace('0', "no smile").replace('1', "with smile")
46 print("MLPC:", y_predict_MLPC)
47
48 # #########  SGDC  ###########
49 SGDC = joblib.load(path_models+"model_SGDC.m")
50 ss_SGDC = ML_ways_sklearn.model_SGDC()
51 X_test_SGDC = ss_SGDC.transform([pos_49to68_test])
52 y_predict_SGDC = str(SGDC.predict(X_test_SGDC)[0]).replace('0', "no smile").replace('1', "with smile")
53 print("SGDC:", y_predict_SGDC)
54
55 img_test = cv2.imread(path_test_img)
56
57 img_height = int(img_test.shape[0])
58 img_width = int(img_test.shape[1])
59
60 # show the results on the image
61 font = cv2.FONT_HERSHEY_SIMPLEX
62 cv2.putText(img_test, "LR:    "+y_predict_LR,   (int(img_height/10), int(img_width/10)), font, 0.8, (84, 255, 159), 1, cv2.LINE_AA)
63 cv2.putText(img_test, "LSVC:  "+y_predict_LSVC, (int(img_height/10), int(img_width/10*2)), font, 0.8, (84, 255, 159), 1, cv2.LINE_AA)
64 cv2.putText(img_test, "MLPC:  "+y_predict_MLPC, (int(img_height/10), int(img_width/10)*3), font, 0.8, (84, 255, 159), 1, cv2.LINE_AA)
65 cv2.putText(img_test, "SGDC:  "+y_predict_SGDC, (int(img_height/10), int(img_width/10)*4), font, 0.8, (84, 255, 159), 1, cv2.LINE_AA)
66
67 cv2.namedWindow("img", 2)
68 cv2.imshow("img", img_test)
69 cv2.waitKey(0)
3. 实现效果
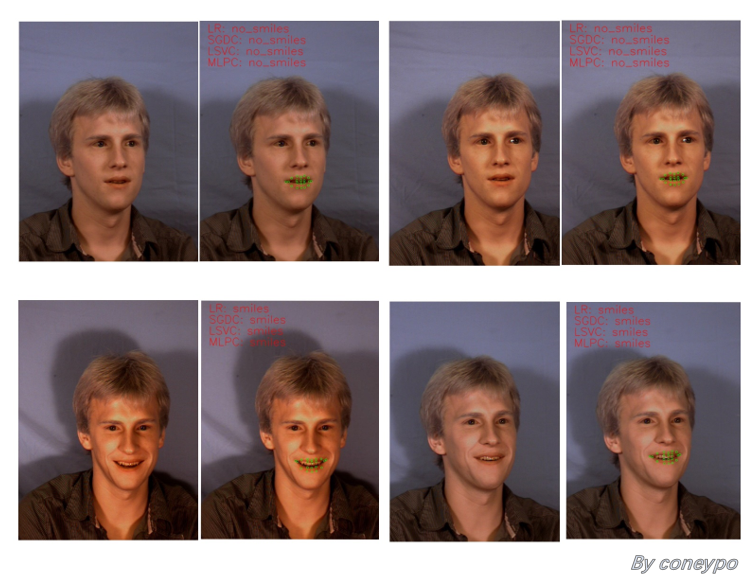
图 5 同一个人不同表情的笑脸检测结果
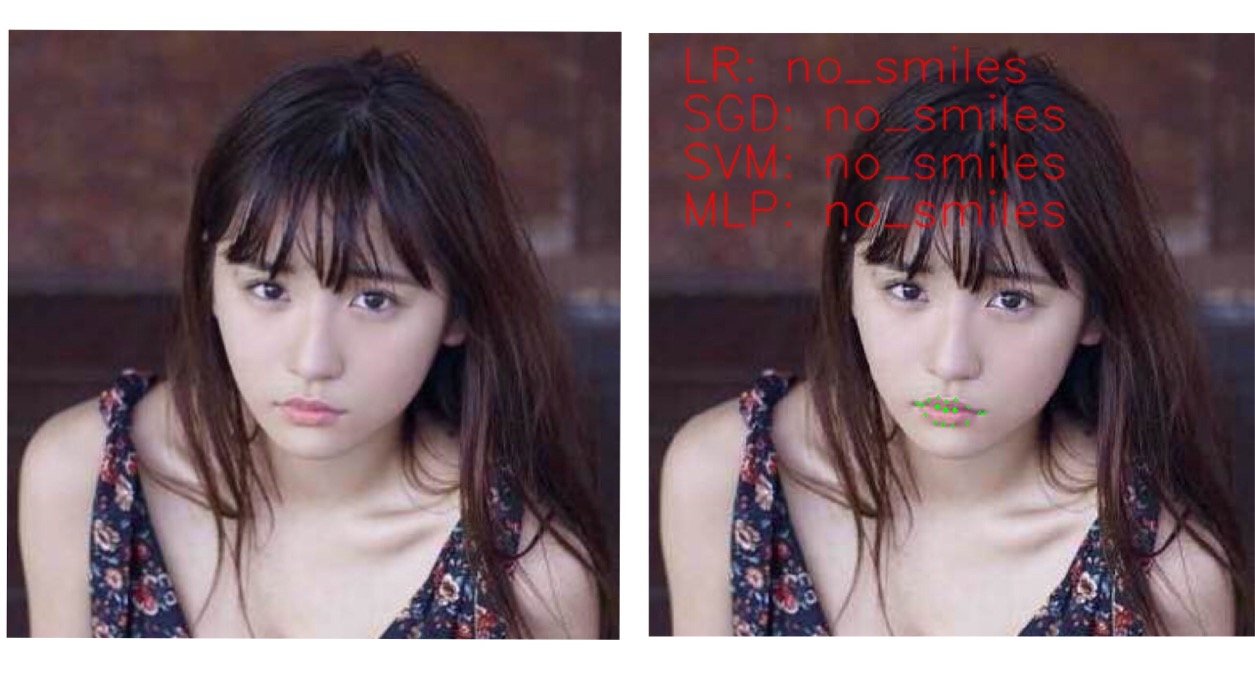
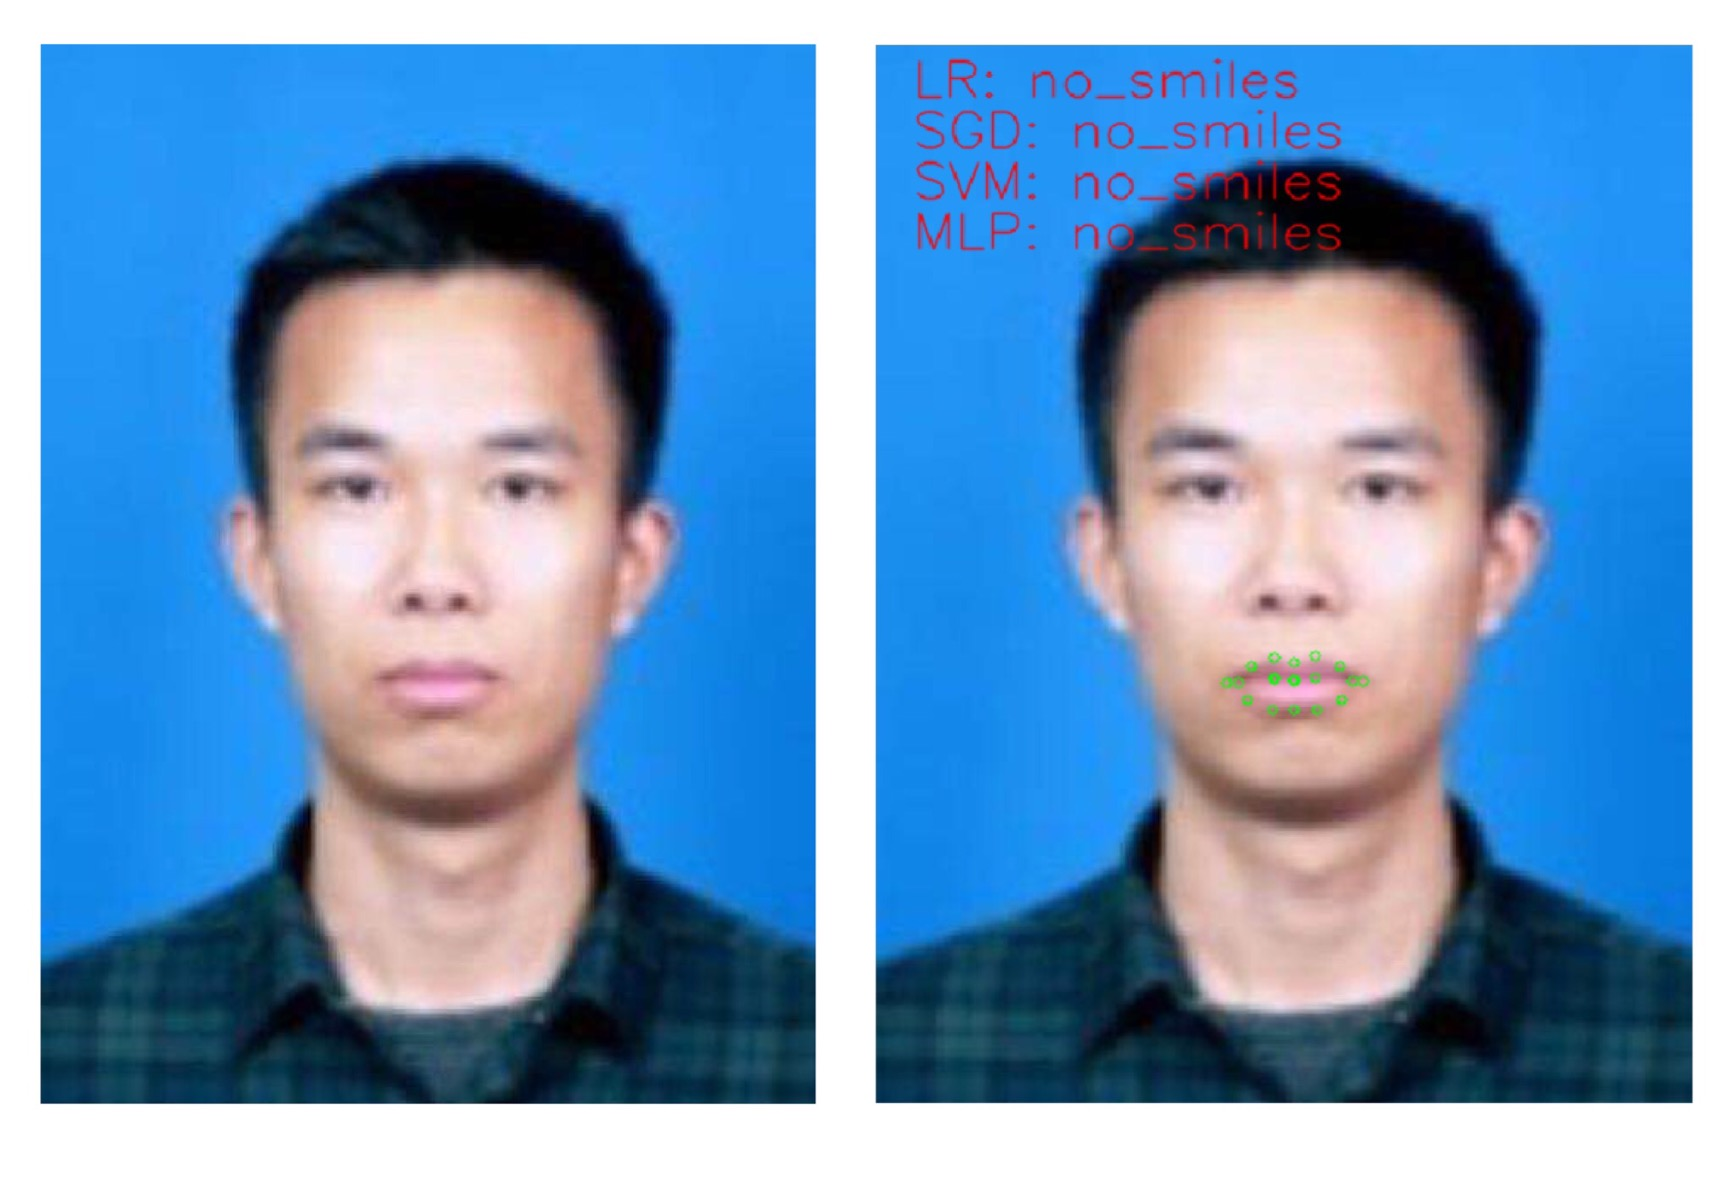
图 6 检测到没微笑
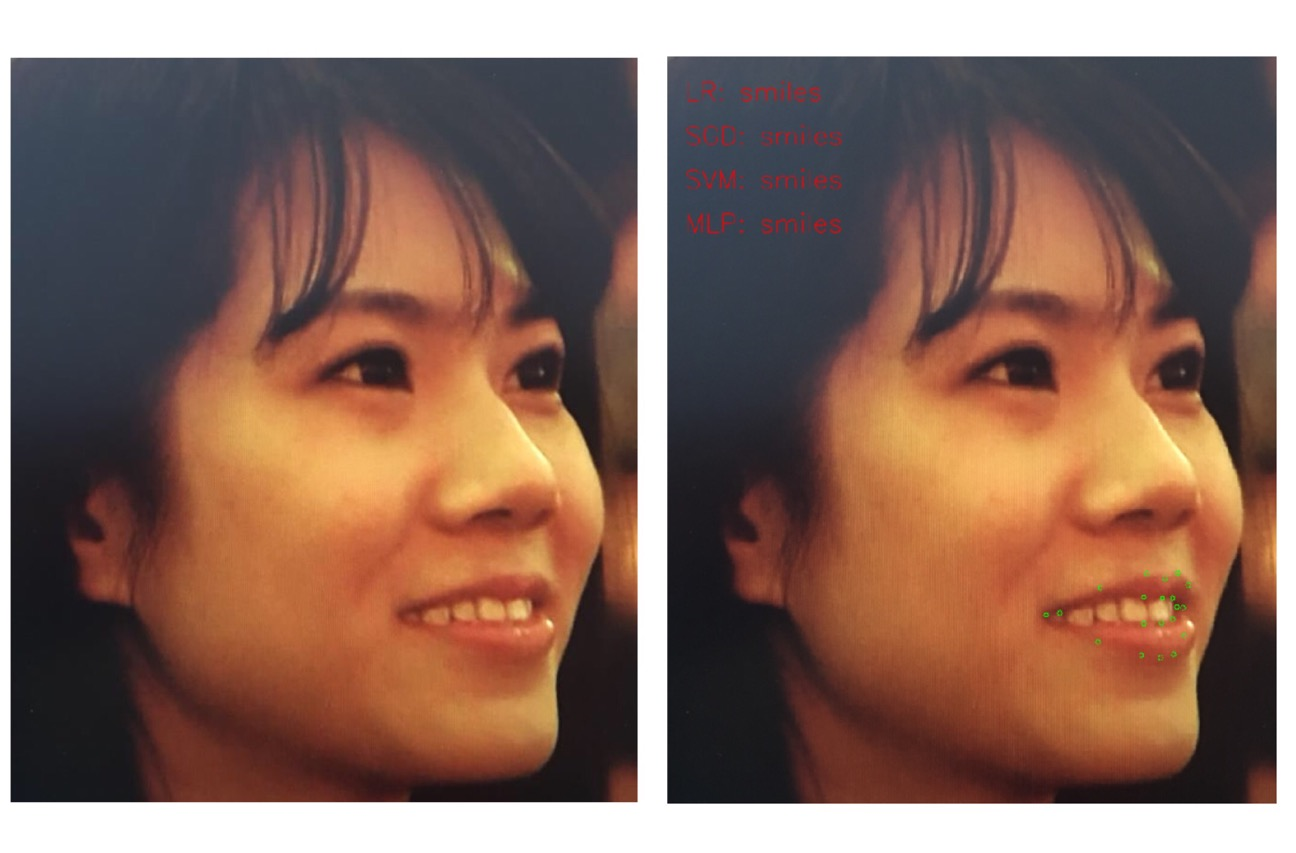
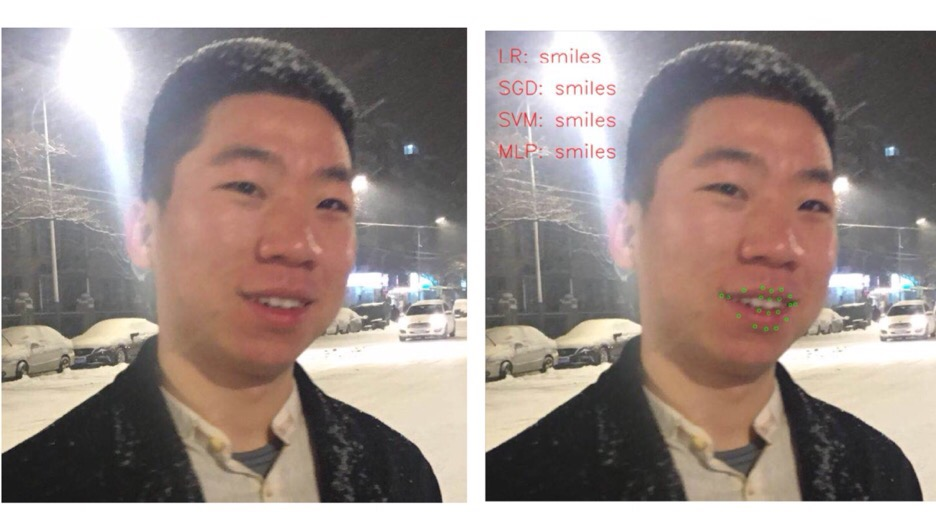
图 7 检测到有微笑
4. 总结
数据集中有无笑脸是自己进行分类的,而且有写的表情不太好界定,所以选取的是一些笑容比较明显的照片作为有笑脸,所以可能出来模型在检测一些微笑上有误差;
笑容检测模型的数据集测试精度在 95% 左右,比较理想;
其实人脸笑容检测的话,光靠嘴部特征去判断不太合适,要结合整张人脸特征点进行训练,改进的话也比较简单;
# 源码上传到了 GitHub,我也在不断更新优化,如果对您有帮助或者感兴趣欢迎 Star 支持我: https://github.com/coneypo/Smile_Detector
# 请尊重他人劳动成果,转载或者使用源码请注明出处:http://www.cnblogs.com/AdaminXie
# 交流学习可以联系邮箱 coneypo@foxmail.com