0. 引言
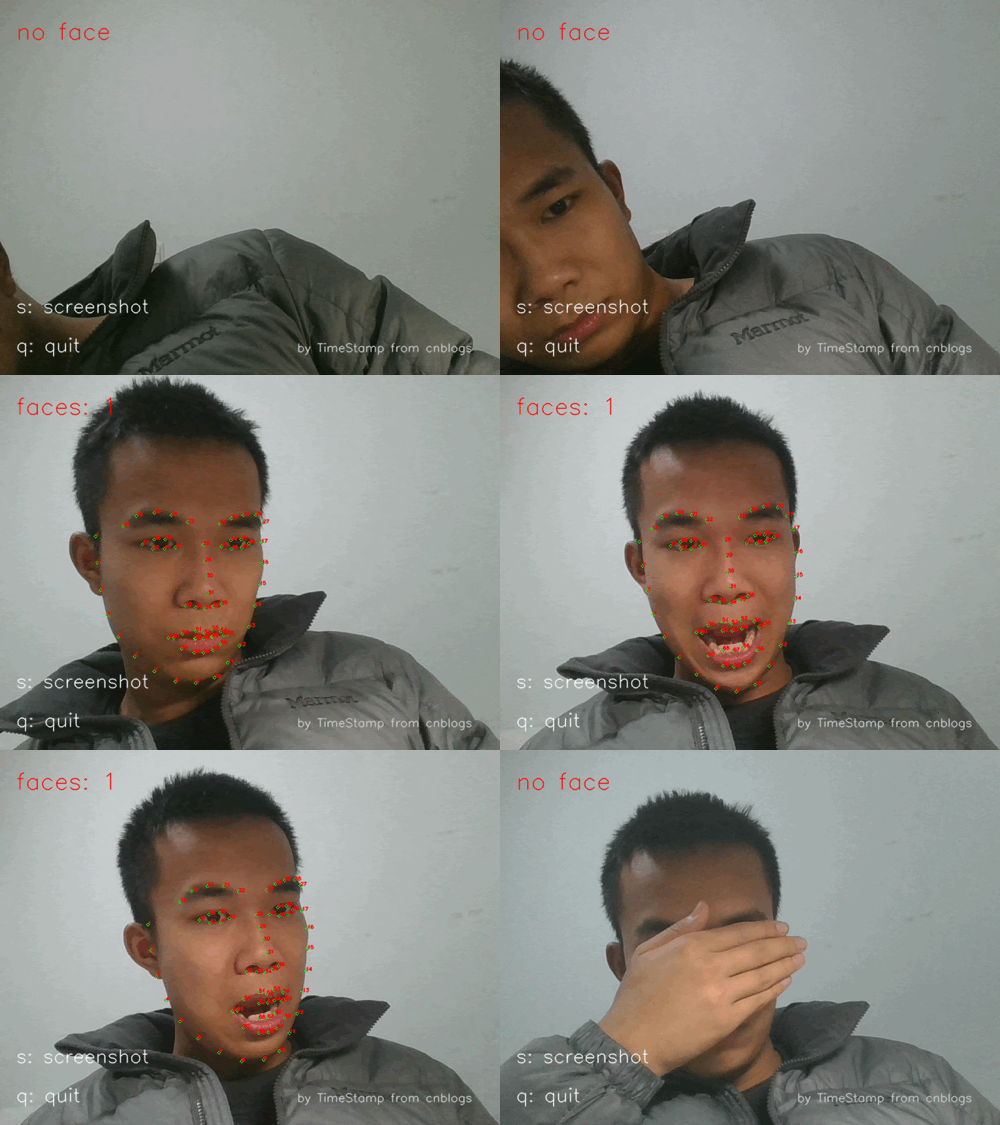
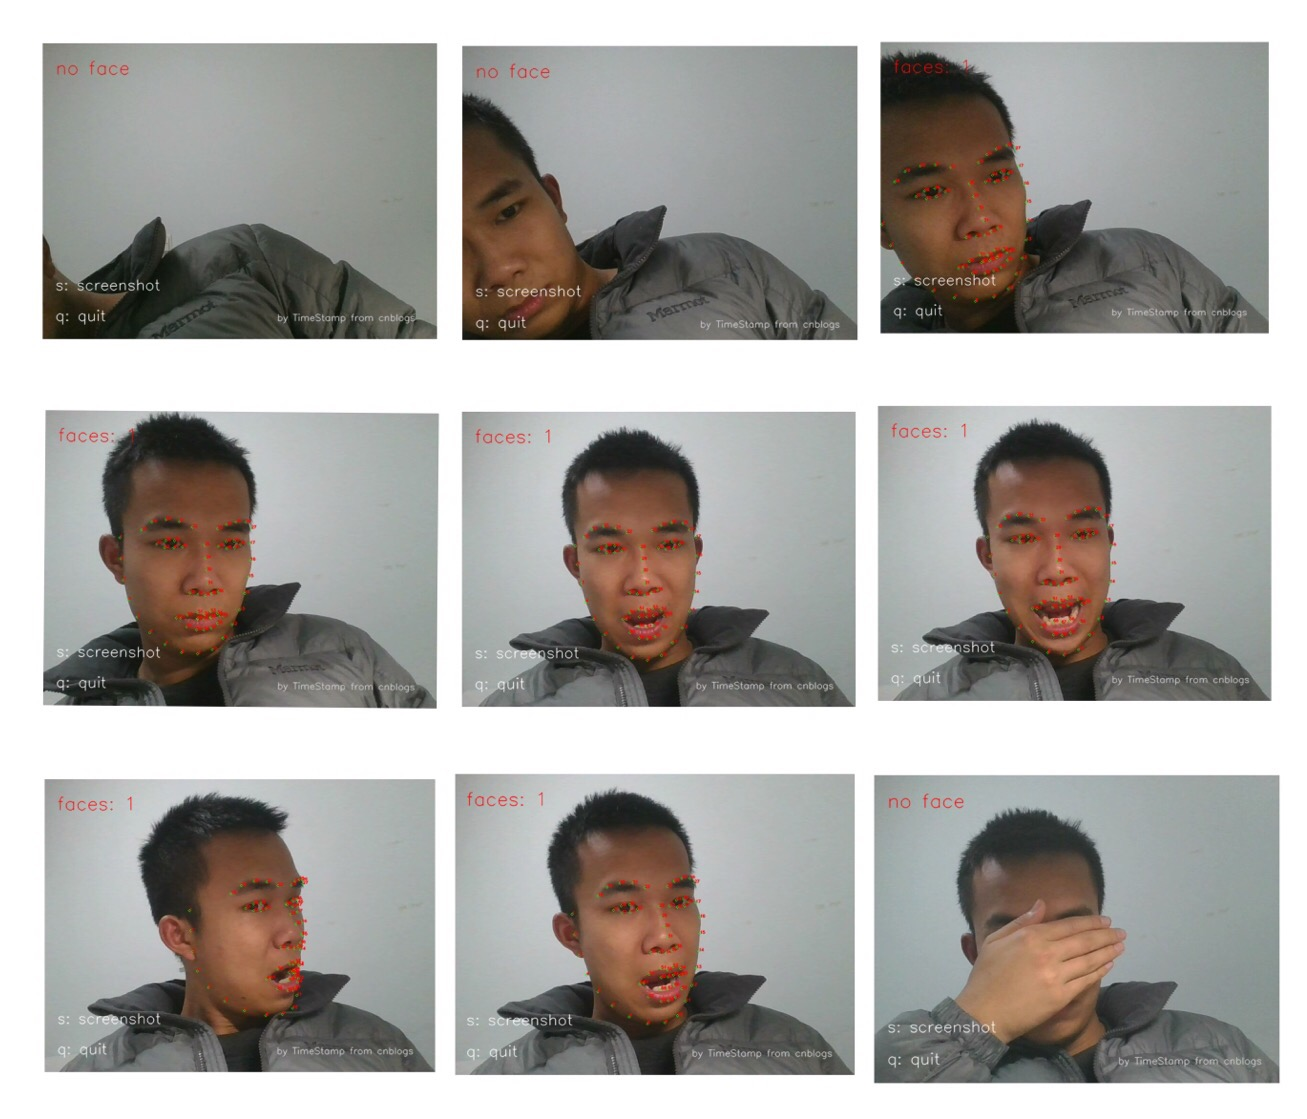
利用 Python 开发,借助 Dlib 库捕获摄像头中的人脸,进行实时人脸 68 个特征点标定;
支持多张人脸;
有截图功能;

图 1 工程效果示例( gif )

图 2 工程效果示例( 静态图片 )
1. 开发环境
Python: 3.6.3
Dlib: 19.7
OpenCv, NumPy
import dlib                  # 人脸检测的库 Dlib
import numpy as np   # 数据处理的库 NumPy
import cv2                   # 图像处理的库 OpenCv
2. 源码介绍
其实实现很简单,主要分为两个部分:摄像头调用 + 人脸特征点标定
2.1 摄像头调用
介绍下 OpenCv 中摄像头的调用方法,用到以下几个 OpenCv 函数:
cv2.VideoCapture(0) 创建一个对象;
cv2.VideoCapture.set(propId, value) 设置视频参数;
cv2.VideoCapture.isOpened() 检测读取视频是否成功;
cv2.VideoCapture.read() 返回是否读取成功和读取到的帧图像;
(具体可以参考官方文档:https://docs.opencv.org/2.4/modules/highgui/doc/reading_and_writing_images_and_video.html)
关于 cv2 中 VideoCapture 类的一些函数参数的说明如下:
# Sort by coneypo
# Updated at 10, Oct
# Blog: http://www.cnblogs.com/AdaminXie


###### 1. cv2.VideoCapture(), 创建cv2摄像头对象 / Open the default camera ######
"""
    Python: cv2.VideoCapture() → <VideoCapture object>

    Python: cv2.VideoCapture(filename) → <VideoCapture object>
    filename – name of the opened video file (eg. video.avi) or image sequence (eg. img_%02d.jpg, which will read samples like img_00.jpg, img_01.jpg, img_02.jpg, ...)

    Python: cv2.VideoCapture(device) → <VideoCapture object>
    device – id of the opened video capturing device (i.e. a camera index). If there is a single camera connected, just pass 0.
"""
cap = cv2.VideoCapture(0)


##### 2. cv2.VideoCapture.set(propId, value),设置视频参数; #####
"""
    propId:
    CV_CAP_PROP_POS_MSEC Current position of the video file in milliseconds.
    CV_CAP_PROP_POS_FRAMES 0-based index of the frame to be decoded/captured next.
    CV_CAP_PROP_POS_AVI_RATIO Relative position of the video file: 0 - start of the film, 1 - end of the film.
    CV_CAP_PROP_FRAME_WIDTH Width of the frames in the video stream.
    CV_CAP_PROP_FRAME_HEIGHT Height of the frames in the video stream.
    CV_CAP_PROP_FPS Frame rate.
    ...
    value: 设置的参数值/ Value of the property
"""
cap.set(3, 480)


##### 3. cv2.VideoCapture.isOpened(), 检查摄像头初始化是否成功, 返回true或false / check if open camera successfully #####
cap.isOpened()


##### 4. cv2.VideoCapture.read([imgage]) -> retval,image, 读取视频 / Grabs, decodes and returns the next video frame #####
"""
返回两个值:
    一个是布尔值true/false,用来判断读取视频是否成功/是否到视频末尾
    图像对象,图像的三维矩阵
"""
flag, im_rd = cap.read()
2.2 人脸特征点标定
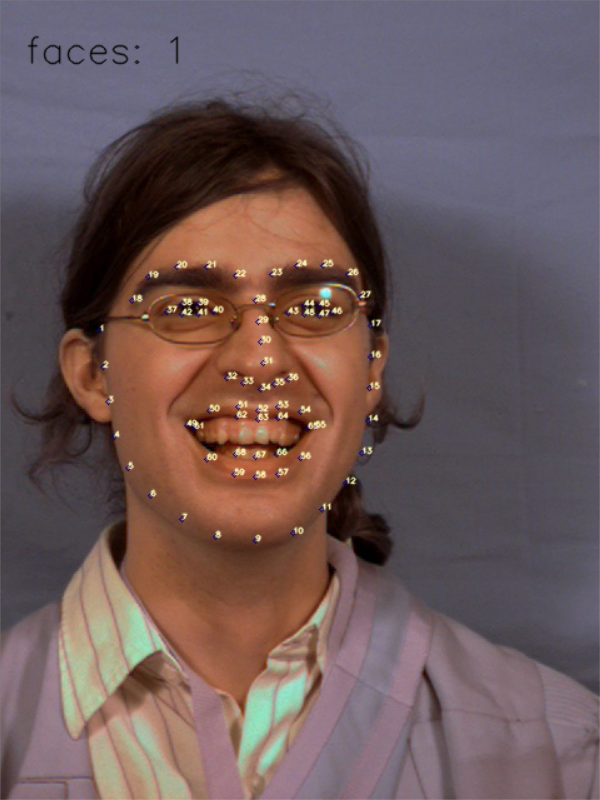
调用预测器 “shape_predictor_68_face_landmarks.dat” 进行 68 点标定,这是 Dlib 训练好的模型,可以直接调用,进行人脸 68 个人脸特征点的标定;
需要进行的后续工作是,利用坐标值进行特征点绘制;
具体可以参考我的另一篇博客(Python 3 利用 Dlib 19.7 实现人脸68个特征点的标定);


图 3 Dlib 中人脸 68 个特征点位置说明
2.3 源码
既然已经能够利用训练好的模型进行特征点检测,需要进行的工作是将摄像头捕获到的视频流,转换为 OpenCv 的图像对象,这样才能进行人脸特征点检测;
然后利用返回的特征点坐标值,绘制特征点,实时的再绘制到摄像头界面上,达到实时人脸检测追踪的目的;
利用 cv2.VideoCapture() 创建摄像头对象,然后利用 flag, im_rd = cv2.VideoCapture.read() 读取摄像头视频,im_rd 就是视频中的一帧帧图像;
然后就类似于单张图像进行人脸检测,对这一帧帧的图像 im_rd 利用 Dlib 进行特征点标定,然后绘制特征点;
可以按下 's' 键来获取当前截图,会存下带有时间戳的本地图像文件如 “screenshoot_1_2018-05-14-11-04-23.jpg”;
或者按下 'q' 键来退出摄像头窗口;
有四个 python 文件:
how_to_use_camera.py OpenCv 调用摄像头;
get_features_from_image.py 绘制 "data/face_to_detect/face_x.jpg" 本地图像人脸文件的特征点;
get_features_from_camera.py 从摄像头实时人脸检测绘制特征点;
remove_ss.py: 删除 "data/screenshots/" 路径下的所有截图;
( 源码都上传到了 GitHub: https://github.com/coneypo/Dlib_face_detection_from_camera )
这里只给出 get_features_from_camera.py 的源码;
get_features_from_camera.py:
  1 # 调用摄像头,进行人脸捕获,和 68 个特征点的追踪
  2
  3 # Author:   coneypo
  4 # Blog:     http://www.cnblogs.com/AdaminXie
  5 # GitHub:   https://github.com/coneypo/Dlib_face_detection_from_camera
  6
  7 # Created at 2018-02-26
  8 # Updated at 2019-01-28
  9
 10 import dlib         # 机器学习的库 Dlib
 11 import numpy as np  # 数据处理的库 numpy
 12 import cv2          # 图像处理的库 OpenCv
 13 import time
 14 import timeit
 15 import statistics
 16
 17 # 储存截图的目录
 18 path_screenshots = "data/screenshots/"
 19
 20 detector = dlib.get_frontal_face_detector()
 21 predictor = dlib.shape_predictor('data/dlib/shape_predictor_68_face_landmarks.dat')
 22
 23 # 创建 cv2 摄像头对象
 24 cap = cv2.VideoCapture(0)
 25
 26 # cap.set(propId, value)
 27 # 设置视频参数,propId 设置的视频参数,value 设置的参数值
 28 cap.set(3, 480)
 29
 30 # 截图 screenshots 的计数器
 31 cnt = 0
 32
 33 time_cost_list = []
 34
 35 # cap.isOpened() 返回 true/false 检查初始化是否成功
 36 while cap.isOpened():
 37
 38     # cap.read()
 39     # 返回两个值:
 40     #    一个布尔值 true/false,用来判断读取视频是否成功/是否到视频末尾
 41     #    图像对象,图像的三维矩阵
 42     flag, im_rd = cap.read()
 43
 44     # 每帧数据延时 1ms,延时为 0 读取的是静态帧
 45     k = cv2.waitKey(1)
 46
 47     # 取灰度
 48     img_gray = cv2.cvtColor(im_rd, cv2.COLOR_RGB2GRAY)
 49
 50     # start point
 51     start = timeit.default_timer()
 52
 53     # 人脸数
 54     faces = detector(img_gray, 0)
 55
 56     # print(len(faces))
 57
 58     # 待会要写的字体
 59     font = cv2.FONT_HERSHEY_SIMPLEX
 60
 61     # 标 68 个点
 62     if len(faces) != 0:
 63         # 检测到人脸
 64         for i in range(len(faces)):
 65             landmarks = np.matrix([[p.x, p.y] for p in predictor(im_rd, faces[i]).parts()])
 66
 67             for idx, point in enumerate(landmarks):
 68                 # 68 点的坐标
 69                 pos = (point[0, 0], point[0, 1])
 70
 71                 # 利用 cv2.circle 给每个特征点画一个圈,共 68 个
 72                 cv2.circle(im_rd, pos, 2, color=(139, 0, 0))
 73
 74                 # 利用 cv2.putText 输出 1-68
 75                 cv2.putText(im_rd, str(idx + 1), pos, font, 0.2, (187, 255, 255), 1, cv2.LINE_AA)
 76
 77         cv2.putText(im_rd, "faces: " + str(len(faces)), (20, 50), font, 1, (0, 0, 0), 1, cv2.LINE_AA)
 78
 79         # end point
 80         stop = timeit.default_timer()
 81         time_cost_list.append(stop - start)
 82         print("%-15s %f" % ("Time cost:", (stop - start)))
 83
 84     else:
 85         # 没有检测到人脸
 86         cv2.putText(im_rd, "no face", (20, 50), font, 1, (0, 0, 0), 1, cv2.LINE_AA)
 87
 88
 89     # 添加说明
 90     im_rd = cv2.putText(im_rd, "press 'S': screenshot", (20, 400), font, 0.8, (255, 255, 255), 1, cv2.LINE_AA)
 91     im_rd = cv2.putText(im_rd, "press 'Q': quit", (20, 450), font, 0.8, (255, 255, 255), 1, cv2.LINE_AA)
 92
 93     # 按下 's' 键保存
 94     if k == ord('s'):
 95         cnt += 1
 96         print(path_screenshots + "screenshot" + "_" + str(cnt) + "_" + time.strftime("%Y-%m-%d-%H-%M-%S", time.localtime()) + ".jpg")
 97         cv2.imwrite(path_screenshots + "screenshot" + "_" + str(cnt) + "_" + time.strftime("%Y-%m-%d-%H-%M-%S", time.localtime()) + ".jpg", im_rd)
 98
 99     # 按下 'q' 键退出
100     if k == ord('q'):
101         break
102
103     # 窗口显示
104     # 参数取 0 可以拖动缩放窗口,为 1 不可以
105     # cv2.namedWindow("camera", 0)
106     cv2.namedWindow("camera", 1)
107
108     cv2.imshow("camera", im_rd)
109
110 # 释放摄像头
111 cap.release()
112
113 # 删除建立的窗口
114 cv2.destroyAllWindows()
115
116 print("%-15s" % "Result:")
117 print("%-15s %f" % ("Max time:", (max(time_cost_list))))
118 print("%-15s %f" % ("Min time:", (min(time_cost_list))))
119 print("%-15s %f" % ("Average time:", statistics.mean(time_cost_list)))
实时输出处理时间:
...
Time cost:      0.065273
Time cost:      0.059348
Time cost:      0.093570
Time cost:      0.091448
Time cost:      0.084946
Time cost:      0.089457
Time cost:      0.084367
Time cost:      0.094103
Time cost:      0.096082
Time cost:      0.073331
Time cost:      0.073685
Time cost:      0.065583
Time cost:      0.061161
Time cost:      0.061650
Time cost:      0.060952
Time cost:      0.084485

Result:
Max time:       0.112430
Min time:       0.057525
Average time:   0.085478
笔记本 CPU: i5-6200U@2.30GHz, Memory: 8G 处理时间平均在 0.08s;
# 请尊重他人劳动成果,转载或者使用源码请注明出处:http://www.cnblogs.com/AdaminXie
# 如果对您有帮助,欢迎在 GitHub 上 star 支持下: https://github.com/coneypo/Dlib_face_detection_from_camera
# 如有问题可以联系本人邮箱,商业合作勿扰谢谢: coneypo@foxmail.com