Android五大布局
本篇开始介绍Android的五大布局的知识,一个丰富的界面显示总是要有众多的控件来组成的,那么怎样才能让这些控件能够按你的想法进行摆放,从而自定义你所想要的用户界面呢?这就牵涉到本章将要学习的知识————五大布局。本篇将依次对LinearLayout(线性布局)、RelativeLayout(相对布局)、TableLayout(表格布局)、FrameLayout(帧布局)、GridLayout(网格布局)进行介绍。
LinearLayout(线性布局)
这是一个非常常用的布局,它会将其中的控件在线性方向上依次排列,通过android:orientation属性指定其控件的排列方向,有vertical(垂直方向)以及horizontal(水平方向)排列。新建UILayoutTsetOne项目,其他设置保持默认。修改activity_main.xml中的代码:
<?xml version="1.0" encoding="utf-8"?>
<LinearLayout xmlns:android="http://schemas.android.com/apk/res/android"
    android:orientation="vertical"
    android:layout_width="match_parent"
    android:layout_height="match_parent">

    <Button
        android:layout_width="wrap_content"
        android:layout_height="wrap_content"
        android:text="Button 1" />

    <Button
        android:layout_width="wrap_content"
        android:layout_height="wrap_content"
        android:text="Button 2" />

    <Button
        android:layout_width="wrap_content"
        android:layout_height="wrap_content"
        android:text="Button 3" />

</LinearLayout>
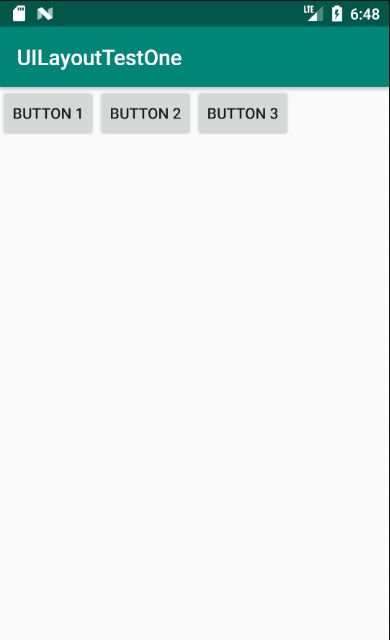
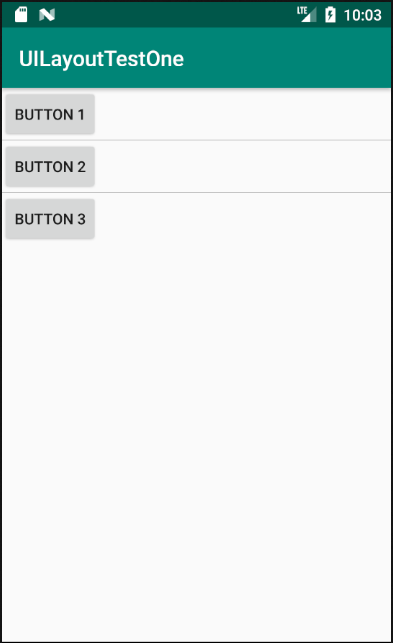
模拟器中运行结果如下图所示,从图中可以看出,定义的三个button控件按照vertical依次排列。

接下来将vertical参数改变为horizontal参数。
<?xml version="1.0" encoding="utf-8"?>
<LinearLayout xmlns:android="http://schemas.android.com/apk/res/android"
    android:orientation="horizontal"
    android:layout_width="match_parent"
    android:layout_height="match_parent">

    <Button
        android:layout_width="wrap_content"
        android:layout_height="wrap_content"
        android:text="Button 1" />

    <Button
        android:layout_width="wrap_content"
        android:layout_height="wrap_content"
        android:text="Button 2" />

    <Button
        android:layout_width="wrap_content"
        android:layout_height="wrap_content"
        android:text="Button 3" />

</LinearLayout>
运行程序,效果如下,从图中可以看出,定义的三个button组件按照horizontal依次排列。
attention!
倘若LinearLayout的排列方向指定为horizontal,则内部的控件就绝对不能将宽度指定为match_parent,因为如果这样设置,单独的控件将会将整个水平方向占满,其他控件将没有放置的位置了。
<?xml version="1.0" encoding="utf-8"?>
<LinearLayout xmlns:android="http://schemas.android.com/apk/res/android"
    android:orientation="horizontal"
    android:layout_width="match_parent"
    android:layout_height="match_parent">

    <Button
        android:layout_width="match_parent"
        android:layout_height="wrap_content"
        android:text="Button 1" />

    <Button
        android:layout_width="wrap_content"
        android:layout_height="wrap_content"
        android:text="Button 2" />

    <Button
        android:layout_width="wrap_content"
        android:layout_height="wrap_content"
        android:text="Button 3" />

</LinearLayout>
效果如图:

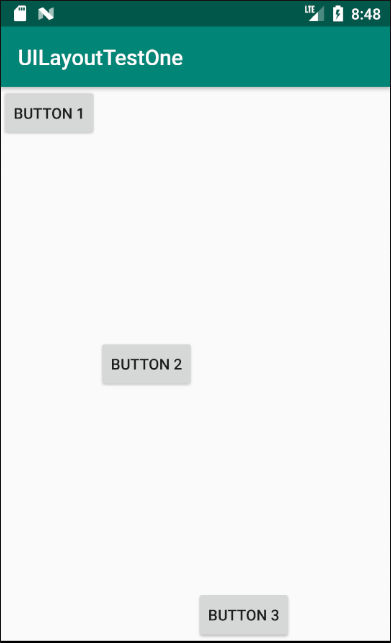
同样,倘若LinearLayout的排列方向指定为vertical,则内部的控件就绝对不能将高度指定为match_parent。
<?xml version="1.0" encoding="utf-8"?>
<LinearLayout xmlns:android="http://schemas.android.com/apk/res/android"
    android:orientation="vertical"
    android:layout_width="match_parent"
    android:layout_height="match_parent">

    <Button
        android:layout_width="wrap_content"
        android:layout_height="match_parent"
        android:text="Button 1" />

    <Button
        android:layout_width="wrap_content"
        android:layout_height="wrap_content"
        android:text="Button 2" />

    <Button
        android:layout_width="wrap_content"
        android:layout_height="wrap_content"
        android:text="Button 3" />

</LinearLayout>
效果如图:

下面来看两个长得很像的属性:android:gravity属性和android:layout_gravity属性。
- android:gravity属性:用于指定文字在控件中的对齐方式。可以选择的值有:top、bottom、left、right、center等,还可以用“|”来同时指定多个值,其中center值将相当于center_vertical|center_horizontal,表示文字在垂直和水平方向都居中对齐。
- android:layout_gravity属性:用于指定控件在布局中的对齐方式。其可选值和android:gravity属性差不多,需要注意的是,当LinearLayout的排列方向是horizontal时只有垂直方向上的对齐方式才会生效,因为此时水平方向上的长度是不固定的,每添加一个控件,水平方向上的长度都会改变,因而无法指定该方向上的对齐方式。同样,当LinearLayout的排列方向是vertical时,只有水平方向上的对齐方式才会生效。修改activity_main.xml中的代码:
<?xml version="1.0" encoding="utf-8"?>
<LinearLayout xmlns:android="http://schemas.android.com/apk/res/android"
    android:orientation="horizontal"
    android:layout_width="match_parent"
    android:layout_height="match_parent">

    <Button
        android:layout_width="wrap_content"
        android:layout_height="wrap_content"
        android:layout_gravity="top"
        android:text="Button 1" />

    <Button
        android:layout_width="wrap_content"
        android:layout_height="wrap_content"
        android:layout_gravity="center_vertical"
        android:text="Button 2" />

    <Button
        android:layout_width="wrap_content"
        android:layout_height="wrap_content"
        android:layout_gravity="bottom"
        android:text="Button 3" />

</LinearLayout>
运行效果如图:
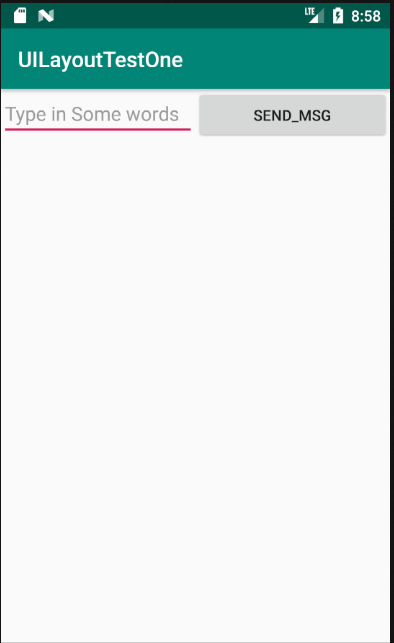
接下来,我们学习另一个重要属性:android:layout_weight,它允许我们使用比例的方式来指定控件的大小,在手机的适配性方面可以起到非常重要的作用。这里通过编写一个消息发送界面来做演示。所用到的控件有:一个文本编辑框和一个发送按钮。
修改activity_main.xml中的代码:
<?xml version="1.0" encoding="utf-8"?>
<LinearLayout xmlns:android="http://schemas.android.com/apk/res/android"
    android:orientation="horizontal"
    android:layout_width="match_parent"
    android:layout_height="match_parent">

    <EditText
        android:id="@+id/input_msg"
        android:layout_width="0dp"
        android:layout_height="wrap_content"
        android:layout_weight="1"
        android:hint="Type in Some words" />

    <Button
        android:id="@+id/send_button"
        android:layout_width="0dp"
        android:layout_height="wrap_content"
        android:layout_weight="1"
        android:text="send_msg" />

</LinearLayout>
运行程序,效果如图:
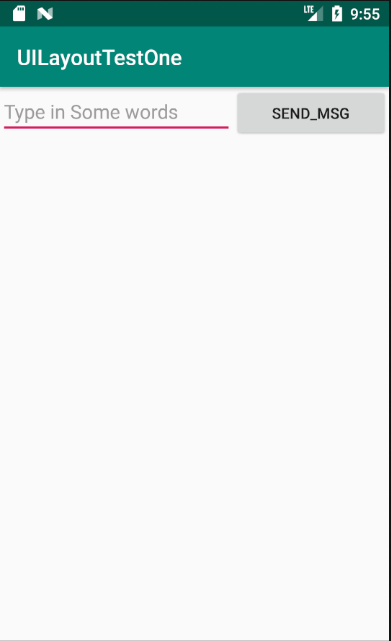
这里你会发现EditText和Button的宽度都被指定为了0dp,你可能会担心这样这两个控件还能正常的显示出来吗?不用担心,因为这里,使用了android:layout_weight属性,此时控件的宽度就不由android:layout_width来决定了,这里写成了0dp是一种比较标准的写法。另外,dp是Android中用于指定控件大小、间距等属性的单位。可以看到这里通过android:layout_weight属性将值指定为了1,这表示两个控件在水平方向上平分宽度。原理:系统会将所有控件指定的layout_weight值相加,得到一个总值,然后每个控件所占大小的比例就是用该控件指定的layout_weight值除以刚才算出的总值。因此如果想让EditText占据屏幕宽度的3/5,Button占据屏幕宽度的2/5,只需要将EditText的layout_weight改成3,Button的layout_weight改成2就可以了。重新运行程序,效果如图:
接着再来看一下如何实现在两个控件之间用分割线进行分割,效果如图:
实现这种效果有两种方式:
- 1.直接在布局中添加一个view,这个view的作用仅仅是显示出一条线,实现如下:
<View
        android:layout_width="match_parent"
        android:layout_height="1px"
        android:background="#000000" />
实现代码如下:
<?xml version="1.0" encoding="utf-8"?>
<LinearLayout xmlns:android="http://schemas.android.com/apk/res/android"
    android:orientation="vertical"
    android:layout_width="match_parent"
    android:layout_height="match_parent">

    <Button
        android:layout_width="wrap_content"
        android:layout_height="wrap_content"
        android:text="button 1" />

    <View
        android:layout_width="match_parent"
        android:layout_height="1px"
        android:background="#000000" />

    <Button
        android:layout_width="wrap_content"
        android:layout_height="wrap_content"
        android:text="button 2" />

    <View
        android:layout_width="match_parent"
        android:layout_height="1px"
        android:background="#000000" />

    <Button
        android:layout_width="wrap_content"
        android:layout_height="wrap_content"
        android:text="button 3" />
</LinearLayout>
- 2.使用LinearLayout的一个divider属性,直接为LinearLayout设置分割线,这里需要准备一张线的图片 1)android:divider设置作为分割线的图片 2)android:showDividers设置分割线的位置,none(无),beginning(开始),end(结束),middle(每两个组件间) 3)dividerPadding设置分割线的Padding
<LinearLayout xmlns:android="http://schemas.android.com/apk/res/android"
    xmlns:tools="http://schemas.android.com/tools"
    android:id="@+id/LinearLayout1"
    android:layout_width="match_parent"
    android:layout_height="match_parent"
    android:divider="@drawable/thread"
    android:orientation="vertical"
    android:showDividers="middle"
    android:dividerPadding="10dp"
    tools:context="com.example.uilayouttestone.MainActivity" >

    <Button
        android:layout_width="wrap_content"
        android:layout_height="wrap_content"
        android:text="Button 1" />

    <Button
        android:layout_width="wrap_content"
        android:layout_height="wrap_content"
        android:text="Button 2" />

    <Button
        android:layout_width="wrap_content"
        android:layout_height="wrap_content"
        android:text="Button 3" />

</LinearLayout>