据说.net 世界里,最强的依赖注入容器是Autofac 。不管是谁,Nopcommerce2.8 用了它,所以就简单研究一下喽。
用vs 2012 创建一个Asp.net mvc3 的样例项目。然后使用NuGet(Vs2012 自带的有,版本低的话,似乎要安装插件),下载安装autofac的dll,如图1,2.

图1 NuGet
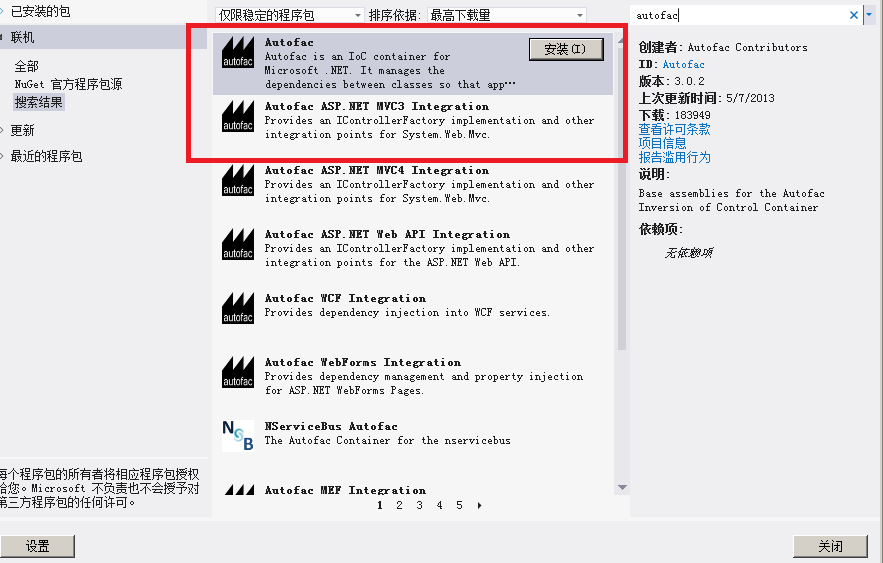
图2 ,load autofac
autofac 要加载两个dll哦,一个是autofac 的core ,另外一个是和asp.net mvc3集成的dll
然后,我新建一个实体数据模型,链接我的数据库,加载Customer这个我已经建好的表,字段随意,数据随意。实体类Customer自动生成。加一个集合类,装customer,
public class LCust
{
  public List<Customer> clist;
}
接下来是一个ICusotmer接口和一个它的实现CustomerService:

 public interface ICustomer
 {
        List<Customer>GetCustomers( );
 }
 public class CustomerService : ICustomer
 {

        public List<Customer>GetCustomers()
        {

            return new SeendioEntities().T_Adv_Customer.ToList();
        }
}
好,准备工作就绪,开始依赖注入了。
在Gloabal.ascx文件中:
using Autofac;
using Autofac.Builder;
using Autofac.Integration.Mvc;
下面是编辑Application_Start()方法,对ICustomer进行依赖注入:
var builder = new ContainerBuilder();builder.RegisterType<CustomerService>().As<ICustomer>(); |
在HomeController.cs中,修改构造函数:
private ICustomer _icustomer;
public HomeController(ICustomer customerservice)
{
      _icustomer = customerservice;

}
修改action:
  public ActionResult Index( )
 {
     ViewBag.Message = "欢迎使用 ASP.NET MVC!";
     List<Customer> clist = _icustomer.GetCustomers();//调用借口方法,获取所有的Customer
     LCust c = new LCust();
     c.clist = clist;
     return View(c); //把Customer返回给视图
 }
在index.cshtml 中显示Customer列表中每一个customer的email:
@model MvcApplication2.LCust

@{
    ViewBag.Title = "主页";
}
<ul>
@foreach (var item in Model.clist)
{
    <li>@item.Email</li>
}
    </ul>
运行,发现报了错:
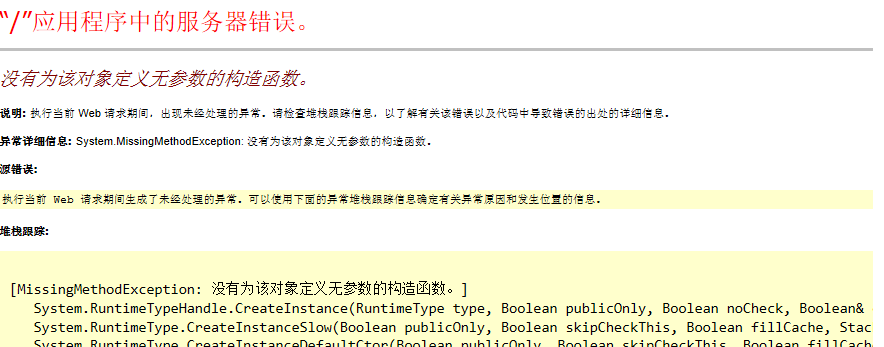
解决这个问题的方法似乎不少,我翻了翻Nopcommerce 2.8的代码,发现了这么一个方法:RegisterControllers
于是在Application_Start()方法加上一句,对Controller进行依赖注入
builder.RegisterControllers(Assembly.GetExecutingAssembly());
问题解决,运行出结果。
Autofac 粗浅的用还简单,但是在Nopcommerce2.8里,我看到了对它进行封装的代码,好纠结。
Autofac是传说中速度最快的一套.NET高效的依赖注入框架。Autofac的介绍与使用请去参考Autofac全面解析系列(版本:3.5)。 这里介绍的已经挺详细的啦。
下面我就先来说说MVC4中使用Autofac吧,至于工厂模式与依赖注入的区别的话,这个我简单的解释一下,也只是我的个人观点。使用依赖注入最主要的就是为了解耦,当然工厂模式也可以实现实现大部分的解耦,这个是毋庸置疑的。工厂模式实现方式是向客户端提供一个接口,使客户端不要指定具体产品对象,创建多个产品族的产品对象。将具体实例的创建延迟到对应实现的子类中。但是当我们每次要去拿这个接口的时候就要通过这个工厂来拿了,那么就是说虽然我们排除了对实现接口的具体的方法的依赖,但是我们对工厂模式产生接口的方式产生了依赖。那么依赖注入就可以解决这个依赖了。我们在使用接口的时候可以完全的不需要考虑去取这个接口然后再继续使用接口。我们只要直接拿接口来用就可以了。这就是我个人对工厂模式和依赖注入的解释了,是不是把你们给搞混淆了。
下面我就在MVC4中使用下Autofac吧。首先我们要先去NuGet下载一个Autofac MVC4的东西


点击安装。
将AuthoryManage.AutofacRegister 也引入Autofac包
导入成功之后,我先在AuthoryManage.InterfaceRepository这个类库中添加一个接口,
 接口
接口然后在AuthoryManage.Repository中分别加入下面这些类
下面是代码:

    public class BaseRepository :IBaseRepository{
        public string GetData() {
            return "这里是MsSql";
        }
    }
    public class BaseRepository : IBaseRepository {
        public string GetData() {
            return "这里是MySql";
        }
    }
    public class BaseRepository : IBaseRepository {
        public string GetData() {
            return "这里是Oracle";
        }
    }
记得添加对AuthoryManage.InterfaceRepository的引用。
接下来写下Service层的代码
    public interface IBaseService {
        string GetData();
    }
    public interface IBaseService {
        string GetData();
    }
最值得注意的Service实现类代码,请看:
    public class BaseService:IBaseService {
        private readonly IBaseRepository _repository;
        public BaseService(IBaseRepository repository) {
            this._repository = repository;
        }
        public string GetData() {
            return _repository.GetData();
        }
    }
这是建好之后的Service层结构

也要记得引用对应DLL,那么接下来就看看控制器这边怎么写吧。
我就简单先建立一个Home控制器吧。 并添加对service的引用。
    public class HomeController : Controller {
        //
        // GET: /Home/
        private IBaseService _service;
        public HomeController(IBaseService service) {
            this._service = service;
        }
        public ActionResult Index() {
            ViewBag.SSSS = _service.GetData();
            return View();
        }

    }
视图代码如下:
@{
    ViewBag.Title = "Index";
}

<h2>@ViewBag.SSSS</h2>
接下来就去Global中实现我们的注入:
using Autofac;
using System;
using System.Collections.Generic;
using System.Linq;
using System.Reflection;
using Autofac.Integration.Mvc;
using System.Web;
using System.Web.Http;
using System.Web.Mvc;
using System.Web.Optimization;
using System.Web.Routing;

namespace AuthoryManage.Web {
    // 注意: 有关启用 IIS6 或 IIS7 经典模式的说明,
    // 请访问 http://go.microsoft.com/?LinkId=9394801

    public class MvcApplication : System.Web.HttpApplication {
        protected void Application_Start() {
            AreaRegistration.RegisterAllAreas();

            WebApiConfig.Register(GlobalConfiguration.Configuration);
            FilterConfig.RegisterGlobalFilters(GlobalFilters.Filters);
            RouteConfig.RegisterRoutes(RouteTable.Routes);
            BundleConfig.RegisterBundles(BundleTable.Bundles);


            var builder = new ContainerBuilder();
            var assembly = Assembly.GetExecutingAssembly();
            var repository = System.Reflection.Assembly.Load("AuthoryManage.MsSqlRepository");
            builder.RegisterAssemblyTypes(repository, repository)
              .AsImplementedInterfaces();
            var service = System.Reflection.Assembly.Load("AuthoryManage.Service");
            builder.RegisterAssemblyTypes(service, service)
              .AsImplementedInterfaces();
            builder.RegisterControllers(typeof(MvcApplication).Assembly);
            //容器
            var container = builder.Build();
            //注入改为Autofac注入
            DependencyResolver.SetResolver(new AutofacDependencyResolver(container));
        }
    }
}
要记住,在反射程序集的时候你要引用相对应的程序集。然后我们在运行一下程序来看下界面效果:
我们把global.asax里面的代码更改下,改成对Oracle的程序集注册,
using Autofac;
using System;
using System.Collections.Generic;
using System.Linq;
using System.Reflection;
using Autofac.Integration.Mvc;
using System.Web;
using System.Web.Http;
using System.Web.Mvc;
using System.Web.Optimization;
using System.Web.Routing;

namespace AuthoryManage.Web {
    // 注意: 有关启用 IIS6 或 IIS7 经典模式的说明,
    // 请访问 http://go.microsoft.com/?LinkId=9394801

    public class MvcApplication : System.Web.HttpApplication {
        protected void Application_Start() {
            AreaRegistration.RegisterAllAreas();

            WebApiConfig.Register(GlobalConfiguration.Configuration);
            FilterConfig.RegisterGlobalFilters(GlobalFilters.Filters);
            RouteConfig.RegisterRoutes(RouteTable.Routes);
            BundleConfig.RegisterBundles(BundleTable.Bundles);


            var builder = new ContainerBuilder();
            var assembly = Assembly.GetExecutingAssembly();
            var repository = System.Reflection.Assembly.Load("AuthoryManage.OracleRepository");
            builder.RegisterAssemblyTypes(repository, repository)
              .AsImplementedInterfaces();
            var service = System.Reflection.Assembly.Load("AuthoryManage.Service");
            builder.RegisterAssemblyTypes(service, service)
              .AsImplementedInterfaces();
            builder.RegisterControllers(typeof(MvcApplication).Assembly);
            //容器
            var container = builder.Build();
            //注入改为Autofac注入
            DependencyResolver.SetResolver(new AutofacDependencyResolver(container));
        }
    }
}
看下运行效果:
需要注意的是我们需要引用下AuthoryManage.OracleRepository这个dll引用,那么就是说我实现的方法更改了 我UI层也要去改动对应的引用。