函数
函数申明创建调用方式
 1     <script>
 2         // 申明函数
 3         function add(x, y) {
 4             console.log(x + y);
 5             return x + y;
 6         }
 7
 8         add(1, 2);
 9
10         //arguments它不是一个数组,伪数组。它有数组的索引和length方法
11         function sub() {
12             console.log(arguments);
13
14         }
15         sub('热狗', '潘帅');
16
17         // 函数对象 将匿名函数赋值给变量
18         var fun = function () {
19             console.log(111);
20         };
21         fun();
22     </script>
DOM操作
入口函数与文档树加载顺序
 1 <!DOCTYPE html>
 2 <html lang="en">
 3 <head>
 4     <meta charset="UTF-8">
 5     <title></title>
 6     <!--DOM:Document Object Model  使用-->
 7     <script>
 8         // 入口函数
 9         // 窗口加载 先是文档加载再是图片加载
10
11         // 1.必须等待图片资源加载完成之后才执行js代码  异步的
12         window.onload = function () {
13             console.log(document); //文档对象
14             console.log(document.documentElement); //文档中元素
15             console.log(document.body); //文档中body元素
16         };
17         // 2.有事件覆盖
18         window.onload = function () {
19            console.log(111);
20         };
21     </script>
22 </head>
23 <body>
24     <div id="div">div</div>
25 </body>
26 </html>
事件三步走
1.获取事件源(标签)2.事件 3.事件驱动js代码
 1 <!DOCTYPE html>
 2 <html lang="en">
 3 <head>
 4     <meta charset="UTF-8">
 5     <title></title>
 6     <style>
 7         .box{
 8             height: 200px;
 9              200px;
10             background-color: blue;
11         }
12     </style>
13 </head>
14 <body>
15 <div id="box" class="box"></div>
16
17 <script>
18     // 1.获取事件源(标签)2.事件 3.事件驱动js代码
19
20     // 1.获取事件源
21     var oDiv = document.getElementById('box');
22     var oDiv2 = document.getElementsByClassName('box')[0];
23     var oDiv3 = document.getElementsByTagName('div')[0];
24
25     // var oDiv4 = document.querySelector('.box');
26
27     var isRed = true;
28     // 2.事件
29     oDiv.onclick = function () {
30         if (isRed) {
31             // 3.驱动程序
32             console.log(oDiv.style);
33             oDiv.style.backgroundColor = 'green';
34             isRed = false;
35         }else {
36             oDiv.style.backgroundColor = 'red';
37             isRed = true;
38         }
39
40     };
41 </script>
42 </body>
43 </html>
隐藏显示盒子以及事件种类
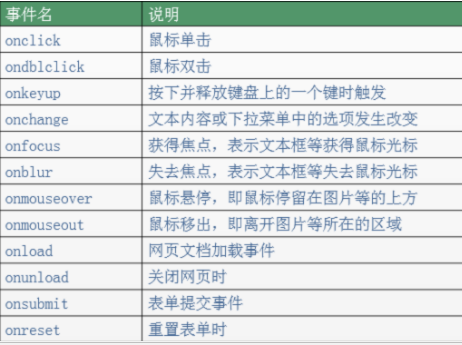
事件种类
隐藏显示效果
 1.样式属性  $('box').style.display = 'block';
 2.标签属性  id class title img的src alt a标签的href input标签type name
 1 <!DOCTYPE html>
 2 <html lang="en">
 3 <head>
 4     <meta charset="UTF-8">
 5     <title></title>
 6     <style>
 7         #box{
 8              100px;
 9             height: 100px;
10             background-color: blue;
11         }
12         .active{
13             display: none;
14         }
15     </style>
16
17 </head>
18 <body>
19     <button id="btn">隐藏</button>
20     <div id="box" class="app"></div>
21
22     <script>
23         // 1.样式属性  $('box').style.display = 'block';
24         // 2.标签属性  id class title img的src alt a标签的href input标签type name
25         // var oBtn = document.getElementById('btn');
26         // var oDiv = document.getElementById('box');
27
28         function $(id) {
29             return document.getElementById(id);
30         }
31
32         /*
33         var isShow = true;
34         $('btn').onclick = function () {
35             if (isShow) {
36                 $('box').style.display = 'none';
37                 isShow = false;
38                 //this就是谁在绑定事件this就是代表谁这个对象
39                 this.innerText = '显示';
40             }else {
41                 $('box').style.display = 'block';
42                 isShow = true;
43                 this.innerText = '隐藏';
44             }
45
46         }
47
48         */
49
50         $('btn').onclick = function () {
51             // 点语法 set方法和get方法
52             $('box').className += 'active';
53             // console.log($('box').className);
54         }
55
56     </script>
57 </body>
58 </html>
js金典了解更多https://developer.mozilla.org/zh-CN/
对样式,标签属性,标签值操作补充:初始化的时候有渲染开销
<!DOCTYPE html>
<html lang="en">
<head>
    <meta charset="UTF-8">
    <title></title>
    <style>
        .box{
             200px;
            height: 200px;
            background-color: blue;
        }
    </style>
</head>
<body>
    <div class="box" id="wrap"></div>
    <p>egin</p>
    <script>
        /*
        // 对样式操作
        var oDiv = document.getElementById('wrap');
        oDiv.onclick = function () {
            // oDiv.style.backgroundColor = 'red';
            // oDiv.style.width = '300px';
            // oDiv.style.float = 'left';
        }
        */

    </script>
</body>
</html>
<!DOCTYPE html>
<html lang="en">
<head>
    <meta charset="UTF-8">
    <title>Title</title>
    <style>
        /*
        .box{
             42px;
            height: 70px;
            background: url("./images/icon-slides.png") no-repeat -84px 0;
        }
        */
    </style>
</head>
<body>
    <div class="box"></div>
    <img src="./images/事件.png" width="100" alt="" id="shop">
    <script>

        /*
        var oDiv = document.getElementsByClassName('box')[0];
        oDiv.onmouseover = function () {
            this.style.backgroundPosition = '0 0';
        };

        oDiv.onmouseout = function () {
            this.style.backgroundPosition = '0 0';
        };
        */


        document.getElementById('shop').onclick = function () {

            // console.log(this.getAttribute('src'));
            // this.setAttribute('src', './images/1.png');
            this.src = './images/1.png';
            this.className = 'app';
            this.alt = '哈哈哈';
            this.title = '哈哈哈';
        }

    </script>
</body>
</html>
<!DOCTYPE html>
<html lang="en">
<head>
    <meta charset="UTF-8">
    <title>Title</title>
    <style>
        .child {
             100px;
            height: 100px;
            background-color: blue;
        }
        .hidden{
            display: none;
        }
    </style>
</head>
<body>
    <button id="btn">
        ttt<span>隐藏</span>
    </button>
    <div class="box">
        <div class="child" id="child"></div>
    </div>

    <input type="text" value="大帅比" id="user">
    <!--
        1.样式属性 display:none|block
        2.通过控制标签的属性className 对类型添加 移除
        3.DOM创建销毁
     -->
    <script>
        var oChild = document.getElementById('child');
        document.getElementById('btn').onclick = function () {
            //1.样式
            // oChild.style.display = 'none';
            //2.标签属性
            oChild.className += ' hidden';
            //3.对标签值的操作

            console.log(this.innerText);  // 获取里边的文本
            console.log(this.innerHTML);  // 连同标签文本一起获取
            // this.innerHTML = ' <span>哈哈</span>'; //要解析成标签显示在页面上
            // this.innerText = ' <span>哈哈</span>'; //不解析标签
            console.log(this.value);
        };

            console.log(document.getElementById('user').value);
            document.getElementById('user').value = '小水笔';
    </script>
</body>
</html>