1、EXCEL文件接口保存方式,如图。

2、然后就是读取EXCEL文件中的数据方法,如下:
 1 import xlrd
 2
 3
 4 class readExcel(object):
 5     def __init__(self, path):
 6         self.path = path
 7
 8     @property
 9     def getSheet(self):
10         # 获取索引
11         xl = xlrd.open_workbook(self.path)
12         sheet = xl.sheet_by_index(0)
13         return sheet
14
15     @property
16     def getRows(self):
17         # 获取行数
18         row = self.getSheet.nrows
19         return row
20
21     @property
22     def getCol(self):
23         # 获取列数
24         col = self.getSheet.ncols
25         return col
26
27     # 以下是分别获取每一列的数值
28     @property
29     def getName(self):
30         TestName = []
31         for i in range(1, self.getRows):
32             TestName.append(self.getSheet.cell_value(i, 0))
33         return TestName
34
35     @property
36     def getData(self):
37         TestData = []
38         for i in range(1, self.getRows):
39             TestData.append(self.getSheet.cell_value(i, 1))
40         return TestData
41
42     @property
43     def getUrl(self):
44         TestUrl = []
45         for i in range(1, self.getRows):
46             TestUrl.append(self.getSheet.cell_value(i, 2))
47         return TestUrl
48
49     @property
50     def getMethod(self):
51         TestMethod = []
52         for i in range(1, self.getRows):
53             TestMethod.append(self.getSheet.cell_value(i, 3))
54         return TestMethod
55
56     @property
57     def getUid(self):
58         TestUid = []
59         for i in range(1, self.getRows):
60             TestUid.append(self.getSheet.cell_value(i, 4))
61         return TestUid
62
63     @property
64     def getCode(self):
65         TestCode = []
66         for i in range(1, self.getRows):
67             TestCode.append(self.getSheet.cell_value(i, 5))
68         return TestCode
3、EXCEL中的数据读取成功后,然后我们需要对于读出来的数据进行相应的处理。如下。当然示例中只是简单列了一下关于POST,GET等二种方式,实际还有很多其它方式,如put,delete等,请求中也还会包括headers,这些都可以自已添加上去。
 1 import requests
 2 import json
 3 from xl.read_xl import readExcel
 4 from pubulic_way.get_token import get_token
 5
 6
 7 class testApi(object):
 8     def __init__(self, method, url, data):
 9         self.method = method
10         self.url = url
11         self.data = data
12
13
14     @property
15     def testApi(self):
16         # 根据不同的访问方式来访问接口
17         try:
18             if self.method == 'post':
19                 r = requests.post(self.url, data=json.dumps(eval(self.data)))
20             elif self.method == 'get':
21                 r = requests.get(self.url, params=eval(self.data))
22             return r
23         except:
24             print('失败')
25
26     def getCode(self):
27         # 获取访问接口的状态码
28         code = self.testApi.json()['error']
29         return code
30
31     def getJson(self):
32         # 获取返回信息的json数据
33         json_data = self.testApi.json()
34         return json_data
4、最后我们就可以调用之前准备好的方法进去测试了。
 1 from base.base_test import baseTest
 2 from xl.read_xl import readExcel
 3 from pubulic_way.test_api_way import testApi
 4 import unittest
 5
 6
 7 class testLoginApi(unittest.TestCase):
 8     def testLoginApi(self):
 9         '''测试发布评伦接口。'''
10         excel = readExcel(r'F:pathadd_thread_data.xlsx')
11         name = excel.getName
12         data = excel.getData
13         url = excel.getUrl
14         method = excel.getMethod
15         uid = excel.getUid
16         code = excel.getCode
17         row = excel.getRows
18         for i in range(0, row - 1):
19             api = testApi(method[i], url[i], data[i])
20             apicode = api.getCode()
21             apijson = api.getJson()
22             if apicode == code[i]:
23                 print('{}、{}:测试成功。json数据为:{}'.format(i + 1, name[i], apijson))
24             else:
25                 print('{}、{}:测试失败'.format(i + 1, name[i]))
26
27
28 if __name__ == '__main__':
29     unittest.main(verbosity=2)
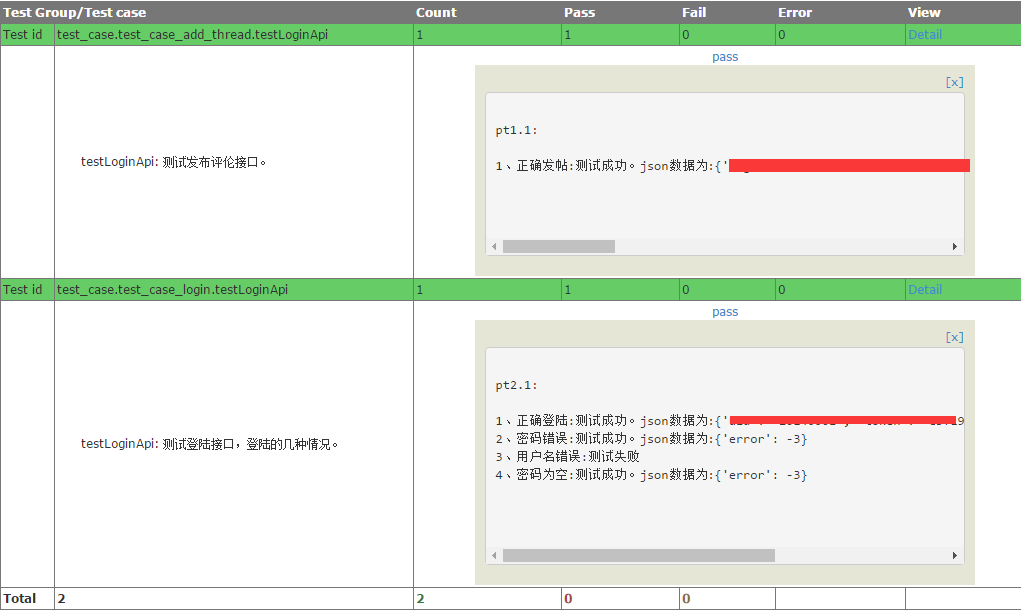
5、最后还需要把我们的结果展示出来,这个就很简单了,利用htmltestrunner来展示。展示一张报告的切图。

源码地址:https://git.coding.net/gfihdx/demo.git 如果有需要的话可以去clone一下。