今天看了《Google Android游戏开发》,看到第五章的时候,发现有实现google地图的示例,于是想copy下看看。才发现,书上的示例是对于google map api version1版本,其api已于去年年度升级至version2了。
先贴上官方的网站,大家可以细看:https://developers.google.com/maps/documentation/android/?hl=zh-CN
v2与v1变化还蛮大的,现在大致发现有三大区别:
1、API Key的获取方式不同
1) v1是拿MD5编码去登陆网站http://code.google.com/android/maps-api-signup.html 申请由Google签署的key
2) v2则是拿SHA-1 fingerprint登录网站https://code.google.com/apis/console/申请API Key(具体怎么拿,会再后面给出)
2、显示组件不同
- Maps are now encapsulated in the
MapFragmentclass, an extension of Android'sFragmentclass. Now you can add a map as a piece of a largerActivity. With aMapFragmentobject, you can show a map by itself on smaller screens, such as mobile phones, or as a part of a more complex UI on larger-screen devices, such as tablets.- Because maps are encapsulated in the
MapFragmentclass, you can implement them by extending the Android standardActivityclass, rather than extending theMapActivityused in version 1.
1)v1中是采用MapView+MapActivity来实现地图的展示
2)v2是采用MapFragment来实现
3、2D+3D视图
v2中增加了2D的不同方位展示,以及3D效果展示,更加地服务于大众了,尤其是对于像我这样东南西北分不清楚的人。
现在贴上使用google map api v2的步骤:
1、安装Google Play services SDK:
如果是使用Eclipse开发工具,则可以点击窗口—Android SDK Manage – Extras – Google Play service,install packages...安装。如下图:
2、获取API Key
1)先获取SHA-1 fingerprint:
注意,这里的数字证书是有两种的,一种是debug,还有release。前者只能用于测试;后者才可以用于实际产品。
- Debug certificate: The Android SDK tools generate this certificate automatically when you do a "debug" build from the command line, or when you build and run a project from Eclipse without exporting it as a released application. The certificate is only for use with an application that you're testing; you can't publish an app that's signed with a debug certificate. The debug certificate is described in more detail in the section Signing in Debug Mode in the Android Developer Documentation. You can generate an API key from this certificate, but only use the key for testing, never for production.
- Release certificate: The Android SDK tools generate this certificate when you do a "release" build with either
antprogram or Eclipse. You can also generate this certificate using thekeytoolprogram. This certificate can be used with an app you release to the world. Once you have the correct certificate for your needs, you can display its SHA-1 fingerprint using thekeytoolprogram.
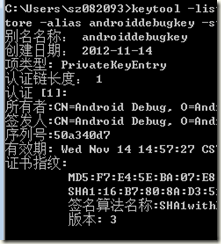
现在就是用debug.keystore来获取数字证书。在命令行中输入命令:keytool -list -v -keystore "C:\Users\your_user_name\.android\debug.keystore" -alias androiddebugkey -storepass android -keypass android
得到SHA1。如下图:
至于release版本的数字证书:
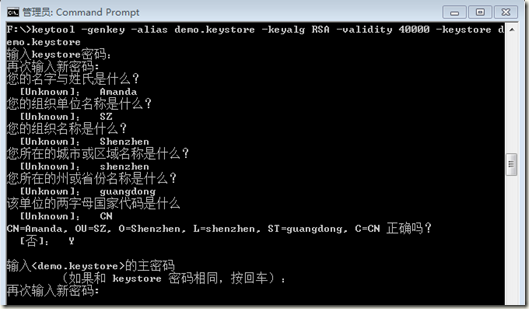
1)使用keytool生成keystore.基本命令如下:keytool –genkey –alias demo.keystore –keyalg RSA –validity 40000 –keystore demo.keystore
说明:-genkey:产生密钥
-alias demo.keystore: 别名demo.keystore
-keyalg RSA: 使用RSA算法对签名加密
-validity 40000: 有效期限40000天
-keystore demo.keystore
2)获取SHA1的方式同debug是类似的,区别在于keystore密码不是android,而是你在生成keystore时设置的密码。
3)画外音:生成release版本的APK,是另外的一个议题了。
2)登录网站获取API Key
去这个网址:https://code.google.com/apis/console/ 用Gmail的账户登录,如果是第一次的话,需要创建项目,默认情况会创建一个叫做API Project的项目。
点击左边的Services,会在中间看到很多的APIs和Services,找到Google Maps Android API v2,然后把它设置成on,需要接受一些服务条款。
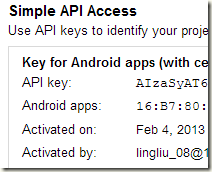
在左边的导航条中选择API Access。在出来的页面中选择Create New Android Key...就可以生成key了:
如上截图给出的API Key就是我们所需要的。
注意:在申请API Key是会要求写上包名,这里请填上你需要测试的工程的包名(例如,我的包名是com.amanda.activity)。
3、创建工程
这里就只贴上一些代码了。如果需要查看具体是什么意思,请参考链接:https://developers.google.com/maps/documentation/android/start?hl=zh-CN
AndroidManifest.xml
<?xml version="1.0" encoding="utf-8"?>
<manifest xmlns:android="http://schemas.android.com/apk/res/android"
    package="com.amanda.activity"
    android:versionCode="1"
    android:versionName="1.0" >

    <uses-sdk
        android:minSdkVersion="15"
        android:targetSdkVersion="15" />

    <application
        android:allowBackup="true"
        android:icon="@drawable/ic_launcher"
        android:label="@string/app_name"
        android:theme="@style/AppTheme" >
        <activity
            android:name="com.amanda.activity.MainActivity"
            android:label="@string/app_name" >
            <intent-filter>
                <action android:name="android.intent.action.MAIN" />

                <category android:name="android.intent.category.LAUNCHER" />
            </intent-filter>
        </activity>

        <meta-data
            android:name="com.google.android.maps.v2.API_KEY"
            android:value="AIzaSyAT6jZbQOgdX8JR6zvylp1o_SX7gxN--yM"/>

    </application>

    <permission
        android:name="com.amanda.activity.permission.MAPS_RECEIVE"
        android:protectionLevel="signature"/>

    <uses-permission android:name="com.amanda.activity.permission.MAPS_RECEIVE"/>
    <uses-permission android:name="android.permission.INTERNET"/>
	<uses-permission android:name="android.permission.WRITE_EXTERNAL_STORAGE"/>
	<uses-permission android:name="com.google.android.providers.gsf.permission.READ_GSERVICES"/>
	<uses-permission android:name="android.permission.ACCESS_COARSE_LOCATION"/>
	<uses-permission android:name="android.permission.ACCESS_FINE_LOCATION"/>

	<uses-feature
	    android:glEsVersion="0x00020000"
	    android:required="true"/>
</manifest>
布局文件activity_main.xml:
<?xml version="1.0" encoding="utf-8"?>
<fragment xmlns:android="http://schemas.android.com/apk/res/android"
  android:id="@+id/map"
  android:layout_width="match_parent"
  android:layout_height="match_parent"
  class="com.google.android.gms.maps.MapFragment"/>
主程序MainActivity.java:
package com.amanda.activity;

import android.os.Bundle;
import android.app.Activity;
import android.view.Menu;

public class MainActivity extends Activity {

    @Override
    protected void onCreate(Bundle savedInstanceState) {
        super.onCreate(savedInstanceState);
        setContentView(R.layout.activity_main);
    }

    @Override
    public boolean onCreateOptionsMenu(Menu menu) {
        // Inflate the menu; this adds items to the action bar if it is present.
        getMenuInflater().inflate(R.menu.activity_main, menu);
        return true;
    }

}
4、导入Google Play services类库:
1)在Eclipse里面选择:File > Import > Android > Existing Android Code Into Workspace然后点击Next.
之后Browse..., 找到路径下的<android-sdk-folder>/extras/google/google_play_services/libproject/google-play-services_lib, 然后选择Finish。
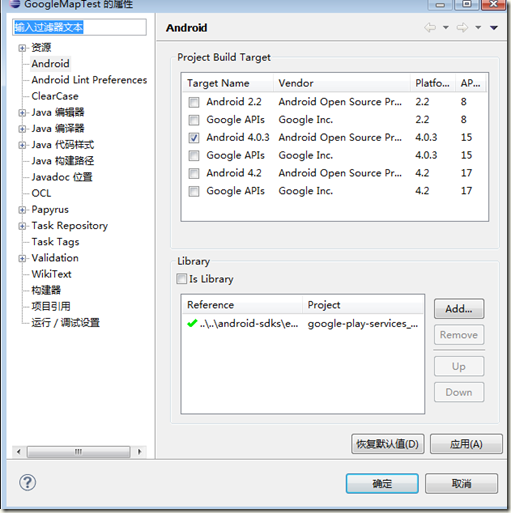
2)添加对这个库的引用:
在自己的项目上右键,选Properties,左边选Android,然后在下面的Library里面Add刚才的google-play-services_lib。
基本就是以上内容了。
运行时,出现了一些问题,现在也一并贴上。
问题一:没有导入google-play-services_lib类
出现以上问题,请见上述步骤4.
问题二:提示没有google play服务
郁闷的是,自己的手机是精简版的,手机上没有google play。在运行自己的工程时,提示“您的手机中没有google play服务...”。
这个解决办法是找了以下链接解决的,大家也可以看看:
http://bbs.lewaos.com/thread-65641-1-1.html
因为还没有花多少时间研究该API,只是让它跑起来了。后期再加上其他功能的。例如,3D显示,经纬度定位等等。
参考文献:
【1】Google Map API官网介绍:https://developers.google.com/maps/documentation/android/?hl=zh-CN
【2】http://www.cnblogs.com/mengdd/archive/2013/01/01/2841390.html


