整合S2SH
一、导入jar包
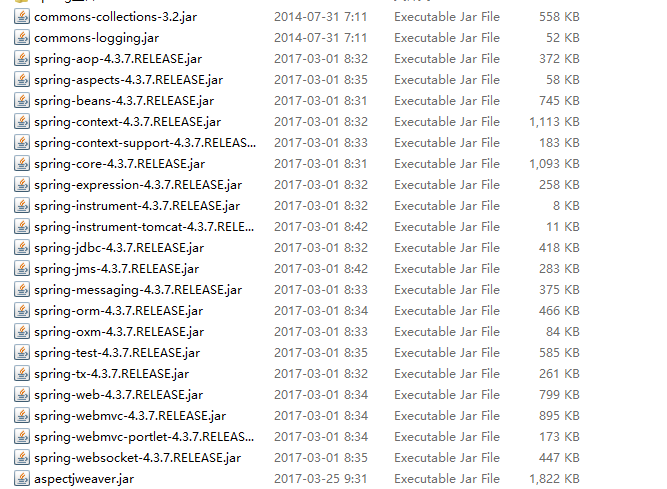
Spring jar包

Hibernate jar包


Struts2 jar包

以上就是整合需要的所有jar包,当然其中有重复的包,(对比之后去掉版本低的就可以了,还有就是在整合Spring4和hibernate时我们配置的hibernate最多只能配置到hibernate4[现在多数都用的是hibernate5,所以通常都会报一个错误:org/hibernate/engine/transaction/spi/TransactionContext:碰上这个错误的话不要慌张,下载hibernate4.0版本的hibernate-core-4.3.8.Finarror替换掉对应的的高版本,问题就解决了。])。
最后别忘了最重要常用的工具类包:数据驱动包是绝对不能忘记的!
二、配置spring的XML文件
1.配置数据源
建立db.properties的资源文件,配置数据源的连接信息。
在Spring配置文件中导入db.properties <context:property-placehoder/>
配置实体化c3p0的数据源ComboPooledDataSource(测试数据源配置成功)
<!-- 读取配置文件 -->
    <context:property-placeholder location="classpath:db_hrm.properties" />
    <!-- 定义数据源,c3p0连接池 -->
    <bean class="com.mchange.v2.c3p0.ComboPooledDataSource" id="dataSource">
        <property name="driverClass" value="${driverClass}"></property>
        <property name="jdbcUrl" value="${jdbcUrl}"></property>
        <property name="user" value="${user}"></property>
        <property name="password" value="${password}"></property>

        <property name="minPoolSize" value="${minPoolSize}"></property>
        <property name="maxPoolSize" value="${maxPoolSize}"></property>
        <property name="initialPoolSize" value="${initialPoolSize}"></property>
    </bean>
2.配置Hibernate的SessionFactory——通过Spring提供的LocalSessionFactoryBean来配置
<bean id="sessionFactory" class="org.springframework.orm.hibernate4.LocalSessionFactoryBean">
<!--配置数据源属性-->
<property name="dataSource" ref="dataSource"></property>
<!--配置Hibernate配置文件的位置-->
<property name="configLocation" value="classpath:hibernate.cfg.xml"></property>
<!--配置Hibernate映射文件的位置,可以使用通配符-->
<property name="mappingLocation" value="classpath:com/itnba/entities/*.hbm.xml"></property>
</bean>
<!-- sessionFactory -->
    <bean id="sessionFactory" class="org.springframework.orm.hibernate4.LocalSessionFactoryBean">
        <!-- 引入数据源 -->
        <property name="dataSource" ref="dataSource"></property>
        <!-- 读取hibernate.cfg.xml文件 -->
        <property name="configLocation" value="classpath:hibernate.cfg.xml"></property>
        <!-- 自动扫描——注解方式——配置的hibernate类文件 -->
        <!-- <property name="packagesToScan">
            <list>
                <value>com.maya.model</value>
            </list>
        </property>  -->
        <!-- 加载实体类的映射文件位置及名称 -->
        <property name="mappingLocations" value="classpath:com/maya/model/*.hbm.xml"></property>
    </bean>
3.配置Spring的声明式事务
配置事务管理器 -- HibernateTransactionManager
<bean id="transactionManager" class="org.springframework.orm.hibernate4.HibernateTransactionManager">
<property name="sessionFactory" ref="sessionFactory"></property>
</bean>
配置事务属性 -- 导入tx命名空间
<tx:advice id="txAdvice" transaction-manager="transactionManager">
<tx:attributes>
<tx:method name="get*" read-only="true" />
<tx:method name="*" />
</tx:attributes>
</tx:advice>
配置事务切点,并把切点和事务属性关联起来。--导入aop命名空间
<aop:config>
<aop:pointcut expression="execution(* com.itnba.service.*.*(..))" id="pointCut"/>
<aop:advisor advice-ref="txAdvice" pointcut-ref="pointcut"/>
</aop:config>
<!-- 配置Spring声明式事务 -->
    <bean id="transactionManager" class="org.springframework.orm.hibernate4.HibernateTransactionManager">
        <property name="sessionFactory" ref="sessionFactory"></property>
    </bean>


    <!-- 配置事物通知属性 -->
    <tx:advice id="txAdvice" transaction-manager="transactionManager">
        <!-- 配置事务通知属性 -->
        <tx:attributes>
            <tx:method name="insert*" propagation="REQUIRED" />
            <tx:method name="update*" propagation="REQUIRED" />
            <tx:method name="edit*" propagation="REQUIRED" />
            <tx:method name="save*" propagation="REQUIRED" />
            <tx:method name="add*" propagation="REQUIRED" />
            <tx:method name="new*" propagation="REQUIRED" />
            <tx:method name="set*" propagation="REQUIRED" />
            <tx:method name="remove*" propagation="REQUIRED" />
            <tx:method name="delete*" propagation="REQUIRED" />
            <tx:method name="change*" propagation="REQUIRED" />
            <tx:method name="get*" propagation="REQUIRED" read-only="true" />
            <tx:method name="find*" propagation="REQUIRED" read-only="true" />
            <tx:method name="load*" propagation="REQUIRED" read-only="true" />
            <tx:method name="*" propagation="REQUIRED" read-only="true" />
        </tx:attributes>
    </tx:advice>
    <!-- 配置事务切面 -->
    <aop:config>
        <aop:pointcut expression="execution(* com.maya.service..*.*(..))" id="pointCut"/>
        <aop:advisor advice-ref="txAdvice" pointcut-ref="pointCut"/>
    </aop:config>
以上就配置完成了:(下面是完整的)
<?xml version="1.0" encoding="UTF-8"?>
<beans xmlns="http://www.springframework.org/schema/beans"
    xmlns:xsi="http://www.w3.org/2001/XMLSchema-instance"
    xmlns:context="http://www.springframework.org/schema/context"
    xmlns:aop="http://www.springframework.org/schema/aop"
    xmlns:tx="http://www.springframework.org/schema/tx"
    xmlns:jee="http://www.springframework.org/schema/jee"
    xmlns:p="http://www.springframework.org/schema/p"
    xsi:schemaLocation="http://www.springframework.org/schema/jee http://www.springframework.org/schema/jee/spring-jee-4.3.xsd
        http://www.springframework.org/schema/beans http://www.springframework.org/schema/beans/spring-beans.xsd
        http://www.springframework.org/schema/context http://www.springframework.org/schema/context/spring-context-4.3.xsd
        http://www.springframework.org/schema/aop http://www.springframework.org/schema/aop/spring-aop-4.3.xsd
        http://www.springframework.org/schema/tx http://www.springframework.org/schema/tx/spring-tx-4.3.xsd"
        default-autowire="byName">

    <!-- 自动扫描构建bean -->
    <context:component-scan base-package="com.maya.util,com.maya.serviceImp,com.maya.daoImp,com.maya.model,com.maya.action"></context:component-scan>

    <!-- 读取配置文件 -->
    <context:property-placeholder location="classpath:db_hrm.properties" />
    <!-- 定义数据源,c3p0连接池 -->
    <bean class="com.mchange.v2.c3p0.ComboPooledDataSource" id="dataSource">
        <property name="driverClass" value="${driverClass}"></property>
        <property name="jdbcUrl" value="${jdbcUrl}"></property>
        <property name="user" value="${user}"></property>
        <property name="password" value="${password}"></property>

        <property name="minPoolSize" value="${minPoolSize}"></property>
        <property name="maxPoolSize" value="${maxPoolSize}"></property>
        <property name="initialPoolSize" value="${initialPoolSize}"></property>
    </bean>

    <!-- hibernateTemplate --><!-- 如果需要可以引入hibernatTemolate来替代sessionFactory -->
    <!-- <bean class="org.springframework.orm.hibernate4.HibernateTemplate" id="hibernateTemplate">
        <property name="sessionFactory" ref="sessionFactory"></property>
    </bean> -->
    <!-- jdbcTemplate --><!-- 如果需要可以jdbcTemplate -->
    <!-- <bean class="org.springframework.jdbc.core.JdbcTemplate" id="jdbcTemplate">
        <property name="dataSource" ref="dataSource"></property>
    </bean> -->

    <!-- sessionFactory -->
    <bean id="sessionFactory" class="org.springframework.orm.hibernate4.LocalSessionFactoryBean">
        <!-- 引入数据源 -->
        <property name="dataSource" ref="dataSource"></property>
        <!-- 读取hibernate.cfg.xml文件 -->
        <property name="configLocation" value="classpath:hibernate.cfg.xml"></property>
        <!-- 自动扫描——注解方式——配置的hibernate类文件 -->
        <!-- <property name="packagesToScan">
            <list>
                <value>com.maya.model</value>
            </list>
        </property>  -->
        <!-- 加载实体类的映射文件位置及名称 -->
        <property name="mappingLocations" value="classpath:com/maya/model/*.hbm.xml"></property>
    </bean>


    <!-- 配置Spring声明式事务 -->
    <bean id="transactionManager" class="org.springframework.orm.hibernate4.HibernateTransactionManager">
        <property name="sessionFactory" ref="sessionFactory"></property>
    </bean>

    <!-- 配置事物通知属性 -->
    <tx:advice id="txAdvice" transaction-manager="transactionManager">
        <!-- 配置事务通知属性 -->
        <tx:attributes>
            <tx:method name="insert*" propagation="REQUIRED" />
            <tx:method name="update*" propagation="REQUIRED" />
            <tx:method name="edit*" propagation="REQUIRED" />
            <tx:method name="save*" propagation="REQUIRED" />
            <tx:method name="add*" propagation="REQUIRED" />
            <tx:method name="new*" propagation="REQUIRED" />
            <tx:method name="set*" propagation="REQUIRED" />
            <tx:method name="remove*" propagation="REQUIRED" />
            <tx:method name="delete*" propagation="REQUIRED" />
            <tx:method name="change*" propagation="REQUIRED" />
            <tx:method name="get*" propagation="REQUIRED" read-only="true" />
            <tx:method name="find*" propagation="REQUIRED" read-only="true" />
            <tx:method name="load*" propagation="REQUIRED" read-only="true" />
            <tx:method name="*" propagation="REQUIRED" read-only="true" />
        </tx:attributes>
    </tx:advice>
    <!-- 配置事务切面 -->
    <aop:config>
        <aop:pointcut expression="execution(* com.maya.service..*.*(..))" id="pointCut"/>
        <aop:advisor advice-ref="txAdvice" pointcut-ref="pointCut"/>
    </aop:config>

</beans>
以上示例就把hibernate整合完了,下面整合struts2:(整合struts实际上就是让spring来管理其控制层,所以实例化action类是必须的:[在上面的bean中已经通过自动扫描了],之前加载Spring的IoC容器是用代码ApplicationContext context = new ClasspathXml......("beans.xml");加载的。在Web中加载需要放在应用程序启动的时候加载,这可以使用监听器来实现。)
<?xml version="1.0" encoding="UTF-8"?>
<web-app xmlns:xsi="http://www.w3.org/2001/XMLSchema-instance" xmlns="http://xmlns.jcp.org/xml/ns/javaee" xsi:schemaLocation="http://xmlns.jcp.org/xml/ns/javaee http://xmlns.jcp.org/xml/ns/javaee/web-app_3_1.xsd" id="WebApp_ID" version="3.1">
  <display-name>S2SH_Demo</display-name>
  <welcome-file-list>
    <welcome-file>index.jsp</welcome-file>
  </welcome-file-list>

  <!-- 添加对spring的支持 -->
  <context-param>
    <param-name>contextConfigLocation</param-name>
    <param-value>classpath:beans.xml</param-value>
  </context-param>

  <!-- 定义Spring监听器,加载Spring  -->
  <listener>
      <listener-class>org.springframework.web.context.ContextLoaderListener</listener-class>
  </listener>

  <!-- struts拦截器 -->
  <filter>
      <filter-name>struts</filter-name>
      <filter-class>org.apache.struts2.dispatcher.ng.filter.StrutsPrepareAndExecuteFilter</filter-class>
  </filter>
  <filter-mapping>
      <filter-name>struts</filter-name>
      <url-pattern>/*</url-pattern>
  </filter-mapping>

  <!-- Session延迟加载到页面  -->
  <filter>
    <filter-name>openSessionInViewFilter</filter-name>
    <filter-class>org.springframework.orm.hibernate4.support.OpenSessionInViewFilter</filter-class>
    <init-param>
      <param-name>singleSession</param-name>
      <param-value>true</param-value>
    </init-param>
  </filter>

  <filter-mapping>
    <filter-name>openSessionInViewFilter</filter-name>
    <url-pattern>*.action</url-pattern>
  </filter-mapping>

</web-app>
***********************************************************************************
以下是通过Spring的注解来注入和管理类
Dao类
@Repository("baseDao")//(实现dao访问)(自动扫描生成bean)
@SuppressWarnings("all")
public class BaseDaOImpl<T> implements BaseDao<T> {

    @Autowired
    private SessionFactory sessionFactory;

    public SessionFactory getSessionFactory() {
        return sessionFactory;
    }

    public void setSessionFactory(SessionFactory sessionFactory) {
        this.sessionFactory = sessionFactory;
    }

    private Session getCurrentSession() {
        return sessionFactory.getCurrentSession();
    }
Service层
@Service("menuService")
public class MenuServiceImp implements MenuService {

    @Resource
    private BaseDao<SysMenu> baseDao;

    @Override
    public void saveOrUpdate(SysMenu sysMenu) {
        baseDao.saveOrUpdate(sysMenu);
    }
Entity实体层
@Component//@Component 是一个泛化的概念,仅仅表示一个组件 (Bean) ,可以作用在任何层次。
public class SysMenu implements java.io.Serializable {

    private Integer id;
    private String authDescription;
    private String authName;
    private String authPath;
    private Date gmtCreate;
    private Date gmtModified;
    private String iconCls;
    private Integer parentId;
    private String state;
    private Set<SysRoleidMenuid> sysRoleidMenuids = new HashSet<SysRoleidMenuid>();

    public SysMenu() {
    }
控制层
@Controller//@Constroller 通常作用在控制层,但是目前该功能与 @Component 相同。
public class PowerAction extends ActionSupport {
    private String roleId;//获取角色id(用来判断给角色授予权限时,已经拥有的权限)
通过在类上使用 @Repository、@Component、@Service 和 @Constroller 注解,Spring 会自动创建相应的 BeanDefinition 对象,并注册到 ApplicationContext 中。这些类就成了 Spring 受管组件。(如果对注解还有什么不理解的,请参考我转的一片文章,地址:http://www.cnblogs.com/AnswerTheQuestion/p/6653574.html)