概述
Silverlight 2 Beta 1版本发布了,无论从Runtime还是Tools都给我们带来了很多的惊喜,如支持框架语言Visual Basic, Visual C#, IronRuby, Ironpython,对JSON、Web Service、WCF以及Sockets的支持等一系列新的特性。《一步一步学Silverlight 2系列》文章将从Silverlight 2基础知识、数据与通信、自定义控件、动画、图形图像等几个方面带您快速进入Silverlight 2开发。
本文将简单介绍在Silverlight 2中如何与WCF进行通信。
简单示例
在本示例中,我们将通过WCF来获取一个最新随笔的列表,在Silverlight中显示出来,最终完后效果如下所示。

先定义一个数据契约:
[DataContract]
public class Post
{
    public Post(int id,string title,string author)
    {
        this.Id = id;
        this.Title = title;
        this.Author = author;
    }

    [DataMember]
    public int Id { get; set; }

    [DataMember]
    public string Title { get; set; }

    [DataMember]
    public string Author { get; set; }
}
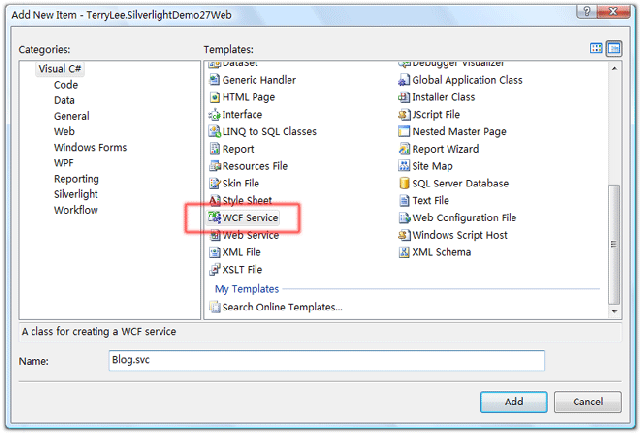
在Web项目中添加一个WCF Service文件,命名为Blog.svc
定义服务契约:
[ServiceContract]
public interface IBlog
{
    [OperationContract]
    Post[] GetPosts();
}
实现服务,这里可以是从数据库或者其他数据源读取,为了演示方便,我们直接初始化一个集合:
public class Blog : IBlog
{
    public Post[] GetPosts()
    {
        List<Post> posts = new List<Post>()
        {
            new Post(1,"一步一步学Silverlight 2系列(13):数据与通信之WebRequest","TerryLee"),
            new Post(2,"一步一步学Silverlight 2系列(12):数据与通信之WebClient","TerryLee"),
            new Post(3,"一步一步学Silverlight 2系列(11):数据绑定","TerryLee"),
            new Post(4,"一步一步学Silverlight 2系列(10):使用用户控件","TerryLee"),
            new Post(5,"一步一步学Silverlight 2系列(9):使用控件模板","TerryLee"),
            new Post(6,"一步一步学Silverlight 2系列(8):使用样式封装控件观感","TerryLee")
        };

        return posts.ToArray();
    }
}
修改Web.config中的服务配置,这里使用basicHttpBinding绑定,并且开启httpGetEnabled,以便后面我们可以在浏览器中查看服务:
<system.serviceModel>
    <behaviors>
        <serviceBehaviors>
            <behavior name="TerryLee.SilverlightDemo27Web.BlogBehavior">
                <serviceMetadata httpGetEnabled="true" />
                <serviceDebug includeExceptionDetailInFaults="false" />
            </behavior>
        </serviceBehaviors>
    </behaviors>
    <services>
        <service behaviorConfiguration="TerryLee.SilverlightDemo27Web.BlogBehavior"
            name="TerryLee.SilverlightDemo27Web.Blog">
            <endpoint address="" binding="basicHttpBinding" contract="TerryLee.SilverlightDemo27Web.IBlog">
            </endpoint>
        </service>
    </services>
</system.serviceModel>
设置一下Web应用程序的端口号为固定端口52424,在浏览器中输入http://localhost:52424/Blog.svc,看看服务是否正常:

好了,现在服务端我们就实现完成了。现在编写界面展示部分,XAML如下:
<Grid Background="#46461F">
    <Grid.RowDefinitions>
        <RowDefinition Height="40"></RowDefinition>
        <RowDefinition Height="*"></RowDefinition>
    </Grid.RowDefinitions>
    <Grid.ColumnDefinitions>
        <ColumnDefinition></ColumnDefinition>
    </Grid.ColumnDefinitions>
    <Border Grid.Row="0" Grid.Column="0" CornerRadius="15"
            Width="240" Height="36" Background="Orange"
            Margin="20 0 0 0" HorizontalAlignment="Left">
        <TextBlock Text="最新随笔" Foreground="White"
                   HorizontalAlignment="Left" VerticalAlignment="Center"
                   Margin="20 0 0 0"></TextBlock>
    </Border>
    <ListBox x:Name="Posts" Grid.Row="1" Margin="40 10 10 10">
        <ListBox.ItemTemplate>
            <DataTemplate>
                <StackPanel Orientation="Horizontal">
                    <TextBlock Text="{Binding Id}" Height="40" Foreground="Red"></TextBlock>
                    <TextBlock Text="{Binding Title}" Height="40"></TextBlock>
                    <TextBlock Text="{Binding Author}" Height="40" Foreground="Orange"></TextBlock>
                </StackPanel>
            </DataTemplate>
        </ListBox.ItemTemplate>
    </ListBox>
</Grid>
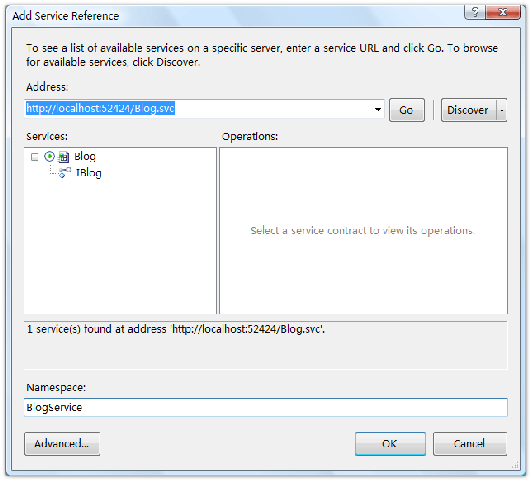
在Silverlight项目中添加服务引用,输入地址http://localhost:52424/Blog.svc,输入命名空间BlogService。
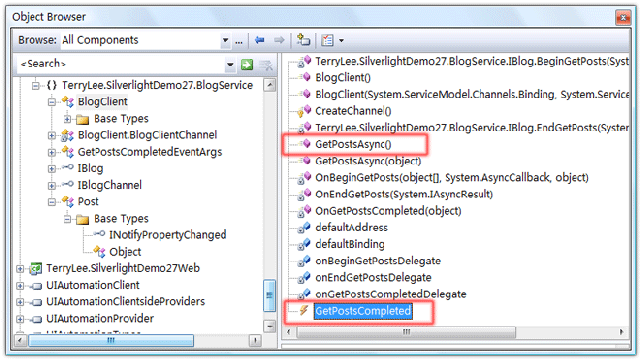
添加完成后,我们可以在对象浏览器中浏览一下生成的客户端对象:
当然大家也可以手工去编写客户端的代码,请参考WCF的相关内容,这里不再赘述。下面编写调用服务并获取数据,这里仍然是采用异步模式,由于在WCF服务的配置中我们采取了BasicHttpBinding,客户端也要采用BasicHttpBinding。我们需要注册GetPostsCompleted事件处理方法,以便完成后回调,同时调用GetPostsAsync()方法获取数据。完整的代码如下所示:
public partial class Page : UserControl
{
    public Page()
    {
        InitializeComponent();
    }

    private void UserControl_Loaded(object sender, RoutedEventArgs e)
    {
        Binding binding = new BasicHttpBinding();
        EndpointAddress endPoint = new EndpointAddress(
                "http://localhost:52424/Blog.svc");

        BlogClient client = new BlogClient(binding, endPoint);
        client.GetPostsCompleted += new EventHandler<GetPostsCompletedEventArgs>(client_GetPostsCompleted);
        client.GetPostsAsync();
    }

    void client_GetPostsCompleted(object sender, GetPostsCompletedEventArgs e)
    {
        if (e.Error == null)
        {
            Posts.ItemsSource = e.Result;
        }
    }
}
至此,一个完整的在Silverlight 2中调用WCF的示例就完成了,运行后效果如下:
结束语
本文简单演示了在Silverlight 2中如何与WCF进行通信,你可以从这里下载示例代码。