十八. Python基础(18)常用模块
1 ● 常用模块及其用途
collections模块: 一些扩展的数据类型→Counter, deque, defaultdict, namedtuple, OrderedDict time模块: 三种时间表示方法的转换 案例: 计算时间差 random模块: ① random.random() ② random.randint(1,5) ③ random.choice([1,'23',[4,5]]) ④ random.sample([1,'23',[4,5]],2) 案例: 随机生成验证码, 洗牌 os模块: 用于和操作系统交互→① 文件夹和文件的路径; ②文件夹和文件的创建和删除 sys模块: 用于和解释器交互→例如: 参数向量, 退出python程序 序列化模块: 用于数据类型和字符串之间的转换→(目的): 数据持久化(存储), 网络交互(交互) re模块: 正则 案例: 验证字符串的合法性, 爬虫
|

2 ● 模块的概念
A module is a file consisting of Python code. A module can define functions, classes and variables. Three roles of modules: ① Code reuse ② System namespace partitioning ③ Implementing shared services or data |
3 ● collections模块扩展类型示例
① collections.Counter([iterable-or-mapping]) from collections import Counter print(Counter('Hello').keys()) # 返回字典, dict_keys(['H', 'e', 'l', 'o']) |
② class collections.deque([iterable[, maxlen]]) from collections import deque dq = deque(['a', 'b', 'c']) dq.append('x') print(dq) # deque(['a', 'b', 'c', 'x']) dq.appendleft('y') print(dq) # deque(['y', 'a', 'b', 'c', 'x']) |
③ class collections.OrderedDict([items]/dictionary) # 案例1 dic = dict(int_list=[1, 2, 3], text='string', number=3.44, boolean=True, none=None) # 注意: 关键字参数中的关键字不能是表达式,即关键字不能写成'a' # 也不能用非字符串, 如整型数字, 列表等
print(dic) ord_dic = collections.OrderedDict(dic) # 建立有序词典 print(ord_dic.keys()) # odict_keys(['int_list', 'text', 'number', 'boolean', 'none'])
# 上面的关键字参数都打了引号 # {'int_list': [1, 2, 3], 'text': 'string', 'number': 3.44, 'boolean': True, 'none': None}
# 案例2 import collections od = collections.OrderedDict([('a', 1), ('b', 2), ('c', 3)]) #OrderedDict的参数是一个列表, 元素是元组类型 print(od.keys()) # odict_keys(['a', 'b', 'c']) |
⑤ class collections.defaultdict([default_factory[, …]]) # default_factory 接收一个工厂函数作为参数, 例如int str list set等 from collections import defaultdict
values = [11, 22, 33,44,55,66,77,88,99,90]
my_dict = defaultdict(list)
for value in values: if value>66: my_dict['k1'].append(value) else: my_dict['k2'].append(value)
print(my_dict) |
④ collections.namedtuple(typename, [field_names]/(field_names)) # "typename"随便起名, 但要尽量表示现在命名的字段(field) import collections Po = collections.namedtuple('Point', ['x', 'y']) # 也可以写成('Point', ('x', 'y')) , # 一般写成: Point = collections.namedtuple('Point', ['x', 'y']), p = Po(1,2) # 不能写成Point print(p.x) print(type(Po)) # <class 'type'> print(type(p)) # <class '__main__.Point'> |
4 ● 有关time模块的几种用法
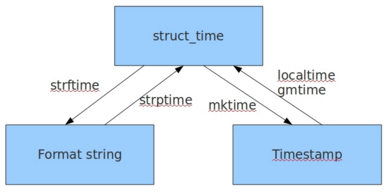
在Python中,通常有如下三种方式来表示时间: ① 时间戳(timestamp)--从格林威治时间1970年1月1日00:00:00以来的秒数, 浮点型 ② 结构化时间(struct_time)--元组形式(9个元素) ③ 格式化的时间字符串(formatted string of time)(例如: 'Tue Dec 11 18:07:14 2008') |
# 计算时间差 import time time_old=time.mktime(time.strptime('2017-09-11 08:30:00','%Y-%m-%d %H:%M:%S')) time_now=time.mktime(time.strptime('2017-09-12 11:00:00','%Y-%m-%d %H:%M:%S')) dif_time=time_now-time_old print(dif_time) # 95400.0 struct_time=time.gmtime(dif_time) # 转换为格林威治时间(Greenwich Mean Time, GMT) print('过去了%d年%d月%d天%d小时%d分钟%d秒'%(struct_time.tm_year-1970,struct_time.tm_mon-1, struct_time.tm_mday-1,struct_time.tm_hour, struct_time.tm_min,struct_time.tm_sec))
# 过去了0年0月1天2小时30分钟0秒 |
import time 一. 结构化时间-->字符串时间: time.strftime ("f"代表from) ① 无中文的情况 t = time.strftime("%Y-%m-%d %H-%M-%S") print(t) # 2017-09-12 22-57-34
② 有中文的情况 t = time.strftime("%Y{y}%m{m}%d{d}, %H{h}%M{mi}%S{s}").format(y='年', m='月', d='日', h='时', mi='分', s='秒') print(t) # 2017年09月12日, 22时57分34秒
二. 字符串时间-->结构化时间(返回包含9个元素的元组) t = time.strptime('2008-08-08','%Y-%m-%d') print(t) ''' time.struct_time(tm_year=2008, tm_mon=8, tm_mday=8, tm_hour=0, tm_min=0, tm_sec=0, tm_wday=4, tm_yday=221, tm_isdst=-1) ''' print(t[0:3]) ''' (2008, 8, 8) ''' |
import time print(time.ctime()) # Tue Sep 12 20:10:45 2017 # ctime()函数 print(time.asctime(time.localtime())) # Tue Sep 12 20:10:45 2017 |
※ 几种时间格式之间的准换
① time.localtime([secs]): Accepts an instant expressed in seconds since the epoch and returns a time-tuple t of the local time ② time.asctime([tupletime]): Accepts a time-tuple and returns a readable 24-character string such as 'Tue Dec 11 18:07:14 2008'. ③ time.ctime([secs]): Like asctime(localtime(secs)) and without arguments is like asctime( ) ④ time.gmtime([secs]): Accepts an instant expressed in seconds since the epoch and returns a time-tuple t with the UTC time. ⑤ time.mktime(tupletime): Accepts an instant expressed as a time-tuple in local time and returns a floating-point value with the instant expressed in seconds since the epoch.
#① 结构化时间-->字符串时间 #time.strftime("格式定义","结构化时间") 结构化时间参数若不传,则现实当前时间
#② 字符串时间-->结构化时间 #time.strptime(时间字符串,字符串对应格式)
#③ 时间戳-->结构化时间 #time.gmtime(时间戳) #UTC时间,与英国伦敦当地时间一致 #time.localtime(时间戳) #当地时间。例如我们现在在北京执行这个方法:与UTC时间相差8小时,UTC时间+8小时 = 北京时间
#④ 结构化时间-->时间戳 #time.mktime(结构化时间)
#⑤ 结构化时间 --> %a %b %d %H:%M:%S %Y串(例如:Tue Dec 11 18:07:14 2008) #time.asctime(结构化时间) 如果不传参数,直接返回当前时间的格式化串
#⑥ %a %d %d %H:%M:%S %Y串 --> 结构化时间 #time.ctime(时间戳) 如果不传参数,直接返回当前时间的格式化串 |
5 ● json模块和pickle模块
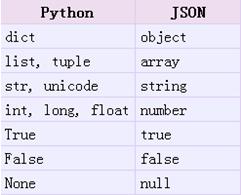
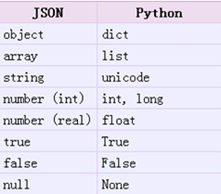
① json模块: 可以直接处理Python内置的数据类型(string、unicode、int、float、list、tuple、dict) 不能直接处理自定义的数据类型, 否则报错; ※ 如果要用json直接处理自定义的数据类型, 需要把自定义的类型转化为dict,然后再进行处理, 过程比较繁琐(详见: http://www.jb51.net/article/63668.htm) ② pickle模块可以直接处理Python内置的和自定义的类型. 具体的互相转化对照如下:
json模块提供了四个功能:dumps、dump(序列化,存)、loads、load(反序列化,读) pickle模块提供了四个功能:dumps、dump(序列化,存)、loads、load(反序列化,读) |
import json # ① json.dumps, json.loads, # 序列化:将字典转换成字符串 dic = {'k1':'v1','k2':'v2','k3':'值三'} # <class 'str'> {"k1": "v1", "k2": "v2", "k3": "u503cu4e09"} str_dic = json.dumps(dic,ensure_ascii=False) #print(type(str_dic ), str_dic) # <class 'str'> {"k1": "v1", "k2": "v2", "k3": "值三"} #注意,json转换完的字符串类型的字典中的字符串是由""表示的
dic2 = json.loads(str_dic) # 此时不用管编码的问题 #print(type(dic2), dic2) # <class 'dict'> {'k1': 'v1', 'k2': 'v2', 'k3': '值三'}
# 处理嵌套的数据类型 list_dic = [1,['a','b','c'],3,{'k1':'v1','k2':'v2'}] str_lst = json.dumps(list_dic) lst_dic2 = json.loads(str_lst) #print(type(str_lst), str_lst) # <class 'str'> [1, ["a", "b", "c"], 3, {"k1": "v1", "k2": "v2"}]
# ② json.dump, json,load # 反序列化:将字符串转换为字典 import json f = open("json.txt", encoding= 'utf-8', mode = "w") dic = {'k1':'v1','k2':'v2','k3':'值三'} json.dump(dic,f, ensure_ascii=False) f.close()
import json f = open("json.txt", encoding="utf-8", mode = "r") dic2 = json.load(f) print(type(dic2), dic2) # <class 'dict'> {'k1': 'v1', 'k2': 'v2', 'k3': '值三'} f.close() |
# 实现多行的序列化 import json f = open('new_json.txt',encoding = "utf-8", mode = 'w') # json.dump({'国籍':'美国'},f,ensure_ascii=False) ret = json.dumps({'国籍':'美国'},ensure_ascii=False) f.write(ret+' ') f.close() ################################################ f = open('json_file', encoding='utf-8', mode='w') for i in range(10): dic = {} dic[i] = i ret = json.dumps(dic, ensure_ascii=False) + " " f.write(ret) f.close() |
● json和pickle 模块的综合案例
import json
str_dumps = json.dumps({'键1':'值1','键2':'值2'}, ensure_ascii= False) # pickle没有ensure_ascii这个参数 print(type(str_dumps), str_dumps) # <class 'str'> {"键1": "值1", "键2": "值2"}
# 存 f = open('json_file','w') # 不能是wb模式 dic = {'键1':'值1','键2':'值2'} json.dump(dic,f, ensure_ascii= False) #dump方法接收一个文件句柄,直接将字典转换成json字符串写入文件, ensure_ascii= False可有可无 f.close() # 读 f = open('json_file','r') # 不能是rb模式 load_dic = json.load(f) print(type(load_dic), load_dic) # <class 'dict'> {'键1': '值1', '键2': '值2'} |
import pickle
class Birthday: def __init__(self,year,month,day): self.year = year self.month = month self.day = day def show_info(self): print(''' 出生日期为: 年: %s 月: %s 日: %s '''%(self.year, self.month, self.day))
birth_dict= {} # 作为整体序列化的对象, 里面是多个对象 birth_liu = Birthday('1988年','11月','11日') birth_dict['liu'] = birth_liu birth_wang = Birthday('1999年','12月','21日') birth_dict['wang'] = birth_wang
# 序列化, 存 f = open('pickle_file', mode = 'wb') # pickle_file必须以二进制可写模式打开 pickle.dump(birth_dict, f) f.close()
# 序列化, 读 f = open('pickle_file', mode = 'rb') # pickle_file必须以二进制可读模式打开, load_birth_dict = pickle.load(f) print(type(load_birth_dict)) # <class 'dict'>
for key in load_birth_dict: print(type(key)) # <class 'str'> print(load_birth_dict[key].__dict__)
load_birth_dict['liu'].show_info() #调用load出来的对象的方法{'year': 1999, 'month': 12, 'day': 21} ''' 出生日期为: 年: 1988 月: 11 日: 11 ''' |
● shelve模块
import shelve s = shelve.open('test.dat', writeback=True) s['x'] = ['a', 'b', 'c'] s['x'].append('d') print(s['x']) # ['a', 'b', 'c', 'd'] # 如果不设定writeback这个参数, 或者writeback=False, 那么s['x']是['a', 'b', 'c'] # 如果writeback=False,那么s['x']是['a', 'b', 'c'] |
● random随机数模块
random.random(): [0.0, 1.0),即>=0.0, 小于1.0的浮点数()
random.randint(a, b): >=a, <=b的整数(可以是负数) random.randrange(stop): 0到stop之间的整数(stop不可以是0或负数; 返回值可能是0) random.randrange(start, stop[, step]): 以step为步长, 0到stop之间的整数(返回值可能是整数或负数)
random.choice(seq) : 序列中的任意一个元素 random.sample(seqn, k) : 序列中的任意k个元素
random.shuffle(list): 打乱列表的顺序(返回None) |
import random print(random.random()) # 0.3193339282590387
print(random.randint(-10, 2)) # -9 print(random.randrange(9)) # 5 print(random.randrange(3, 9, 2)) # 7 print(random.randrange(-10, -2, 2))
print(random.choice([1,'23',[4,5]])) # 23 print(random.sample([1,'23',[4,5]], 2)) # [1, [4, 5]] l=[1,'23',[4,5]] random.shuffle(l) print(l) # [[4, 5], '23', 1] |
● hashlib模块
# ① 简单案例 import hashlib
md5 = hashlib.md5() md5.update('hello world'.encode('utf-8')) # 编码不同, 得到的,md5值也不一样 print(md5.hexdigest()) # ab0d1919682bf28718384c7ac797cc2f
# 上面的写法等价于: # md5.update(bytes('你好 世界', encoding='utf-8')) # 也可以多次调用update(), 得到的结果一样: # md5.update('你好'.encode('utf-8')) # md5.update(' 世界'.encode('utf-8')) # print(md5.hexdigest()) # ab0d1919682bf28718384c7ac797cc2f
# 注意下面这种更加直接的写法 print(hashlib.md5('你好 世界'.encode('utf-8')).hexdigest()) # ab0d1919682bf28718384c7ac797cc2f |
# ② 计算一个文件md5码 import os
def GetFileMd5_1(filename): # 用于计算文件的MD5码 if not os.path.isfile(filename): return file_MD5= hashlib.md5() f = open(filename,'rb') for line in f: file_MD5.update(line) return file_MD5.hexdigest()
def GetFileMd5_2(filename): # 用于计算文件的MD5码 if not os.path.isfile(filename): return file_MD5= hashlib.md5() f = open(filename,'rb') while True: b = f.read(1024) if not b : break file_MD5.update(b) f.close() return file_MD5.hexdigest()
print(GetFileMd5_1('许巍-九月.wma')) # dfeccc069b1ff5796dd76c789bacf30b print(GetFileMd5_2('许巍-九月.wma')) # dfeccc069b1ff5796dd76c789bacf30b |
● configparser模块
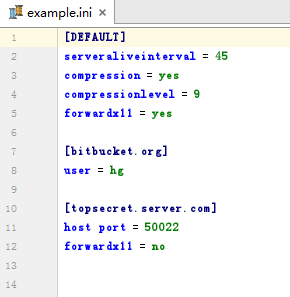
※ .ini配置文件的格式: [section1] 键1=值1 键2=值1 ... ... [section2] 键3=值3 ... ... ... ... |
# .ini配置文件创建 import configparser
config=configparser.ConfigParser() # 返回一个ConfigParser对象
# 下面ConfigParser对象属性设置的与魔法方法__setitem__()相关 config['DEFAULT']={'ServerAliveInterval':'45', 'Compression': 'yes', 'CompressionLevel': '9', 'ForwardX11':'yes' }
config['bitbucket.org'] = {'User':'hg'}
config['topsecret.server.com'] = {'Host Port':'50022','ForwardX11':'no'}
with open('example.ini', 'w') as configfile: config.write(configfile)
|
● 日志模块logging
# 将日志输入文件, 并打印到控制台 # 将日志输入文件, 并打印到控制台 import logging
# ① 建立一个日志对象 logger = logging.getLogger() # 创建一个handler,用于写入日志文件 fh = logging.FileHandler('test.log') # 再创建一个handler,用于输出到控制台 ch = logging.StreamHandler()
# ② 设置输出的日志显示格式 formatter = logging.Formatter('%(asctime)s - %(name)s - %(levelname)s - %(message)s')
# ③ 指定日志显示格式 fh.setFormatter(formatter) # 指定写入文件日志显示格式 ch.setFormatter(formatter) # 指定输出到控制台的日志显示格式
# ④ 指定日志的输出目的地 logger.addHandler(fh) #logger对象可以添加多个fh和ch对象 logger.addHandler(ch) #logger对象可以添加多个fh和ch对象
# ⑤ 设置日志的级别 #logger.setLevel(logging.DEBUG) # 默认输出的日志级别是WARNING, 这里将日志级别设置为DEBUG
# ⑥ 设置具体的日志信息 logger.debug('logger debug message') logger.info('logger info message') logger.warning('logger warning message') logger.error('logger error message') logger.critical('logger critical message') ''' 2017-09-25 17:20:19,518 - root - WARNING - logger warning message 2017-09-25 17:20:19,519 - root - ERROR - logger error message 2017-09-25 17:20:19,520 - root - CRITICAL - logger critical message ''' |
详见: http://www.cnblogs.com/goodhacker/p/3355660.html |