我们在上一节Jenkins简明入门(二) 中见识到了Jenkins能做些什么:利用Jenkins完成python程序的build、test、deployment。
同时,也有一种简单的方法,不需要写Jenkinsfile文件,只需要通过可视化配置,就可以完成Jenkins的部署。
BlueOcean的背景就是为了适应Jenkins Pipeline和 Freestyle jobs任务,Jenkins推出了BlueOcean UI,让程序员执行任务时,降低工作流程的复杂度和提升工作流程的清晰度,它具有如下特征:
清晰的可视化,对CI/CD pipelines, 可以快速直观的观察项目pipeline状态。
pipeline可编辑(开发中),可视化编辑pipeline,现在只能通过配置中Pipeline的Pipeline script编辑。
pipeline精确度,通过UI直接介入pipeline的中间问题。
集成代码分支和pull请求。
本节内容改编自https://jenkins.io/doc/tutorials/create-a-pipeline-in-blue-ocean/
在Blue Ocean中创建你的Pipline Project
-
登录http://localhost:8080/,点击左边的Blue Ocean按钮
-
点击右上角的"New Pipline"创建新的Pipline
-
在In Where do you store your code中, 选择 GitHub.
- 如果遇到Github设置问题,请参考Jenkins简明入门(二)解决。
-
选择好organization和对应的repo(也就是在Jenkins简明入门(二)中你设置好的simple-python-pyinstaller-app)
-
点击 Create Pipeline.
创建你的初始Pipeline
-
在Pipline的编辑界面,在Agent下拉列表中选择docker。

-
在Image参数界面,选择python:2-alpine

-
回到主Pipeline编辑器,点击“+”符号,这个将会创建一个新的stage

-
在这个界面,将stage命名为Build,然后点击"Add step"

-
在这个界面,点击Shell Script,将会打开Build/Shell Script界面,你可以输入具体的Step

-
在 the Build / Shell Script 界面, 输入 “python -m py_compile sources/add2vals.py sources/calc.py”.

-
( Optional ) 点击图标
 来返回到主Pipeline编辑器。
 -
点击右上角的Save按钮,把你的新的Pipeline的"Build" stage保存下来。
-
在保存Pipeline的对话框,可以输入commit信息来描述。(e.g.
Add initial Pipeline (Jenkinsfile)).
-
点击Save & run ,Jenkins 将会 build 你的 Pipeline.
-
当Blue Ocean的主界面出现时,点击你创建的Pipline的那一行去观察Jenkins Build你的Pipeline的过程。
Note: 你可能需要等几分钟整个运行过程才会完成,在这个时间里,Jenkins做了以下几件事:-
将你的Pipeline保存为Jenkinsfiile文件,保存在你的repo的分支上。
-
进行队列初始化,在Agent上build的你的Project.
-
下载Docker Image,将其run成container.
-
在Python的container里执行Build Stage(在Jenkinsfile里定义好的)

如果你的Application成功build,那么Blue Ocean的界面将会变绿。

-
-
点击右上角的X,返回Blue Ocean主界面。

Note: 在继续之前,你可以check一下Jenkins已经为你创建了一个Jenkinsfile,路径是你的Github的repo的root路径。
给你的Pipeline加一个Test Stage
-
在Blue Ocean的主界面,点击右上角的"Branches"来访问你的repo的branches page,在这里你可以访问到master branch。

-
点击master branch的"Edit Pipeline" icon
 ,打开Pipeline编辑器。
 -
在Pipeline主编辑器,点击Build Stage右边的 “ + ” 图标,这样就在右边打开了新的stage面板。

-
在本面板里,将stage命名为Test,然后点击Add Step按钮进入下一步。
-
在列表里选择Shell Script.
-
在Shell Script里输入“py.test --verbose --junit-xml test-reports/results.xml sources/test_calc.py”
-
点击Add Step选择"Archieve JUnit-formatted test results", 然后输入"test-reports/results.xml"
-
点击Setting右边图标,进入setting页面。在这里可以填写/编辑 Test Stage跑在什么环境里,环境变量是怎样的。
-
Agent选择"docker",Image选择“qnib/pytest“”,环境变量不用添加。

-
点击
返回 Pipeline 编辑器. -
点击Save按钮,在Save Pipeline对话框,填写commit message (e.g.
Add 'Test' stage). -
其他不用改,点击 Save & run and Jenkins,执行新编辑后的Pipeline.
-
当Blue Ocean主页面出现后,点击最上面的行观察Jenkins的运行情况。
Note: 你将会看到Jenkins不再需要下载Python的Docker image,而是会直接用之前下好的Docker image运行为Cotainer,所以你的这次Pipeline运行的会更快。
如果你新添加的Pipeline成功的运行,Blue Ocean界面将会如下所示。点击"Build"或者"Test"会进入相应的stage circle,访问到相应的结果。
-
Click the X at the top-right to return to the main Blue Ocean interface.
Add a final deliver stage to your Pipeline
-
From the main Blue Ocean interface, click Branches at the top-right to access your respository’s
masterbranch. -
Click the
masterbranch’s "Edit Pipeline" icon to open the Pipeline editor for this branch. -
In the main Pipeline editor, click the + icon to the right of the Test stage you created above to open the new stage panel.

-
In this panel, type
Deliverin the Name your stage field and then click the Add Step button below to open the Choose step type panel. -
In this panel, click Shell Script near the top of the list.
-
In the resulting Deliver / Shell Script panel, specify
./jenkins/scripts/deliver.shand then click the top-left back arrow icon to return to the Pipeline stage editor.
Note: For an explanation of this step, refer to thedeliver.shfile itself located in thejenkins/scriptsof your forked repository on GitHub. -
Click the Add Step button again.
-
In the Choose step type panel, type
inputinto the Find steps by name field.
-
Click the filtered Wait for interactive input step type.
-
In the resulting Deliver / Wait for interactive input panel, specify
Finished using the web site? (Click "Proceed" to continue)in the Message field and then click the top-left back arrow icon to return to the Pipeline stage editor.
Note: For an explanation of this step, refer to annotation 4 of the Declarative Pipeline in the “Add a final deliver stage…” section of the Build a Node.js and React app tutorial. -
Click the Add Step button (last time).
-
Click Shell Script near the top of the list.
-
In the resulting Deliver / Shell Script panel, specify
./jenkins/scripts/kill.sh.
Note: For an explanation of this step, refer to thekill.shfile itself located in thejenkins/scriptsof your forked repository on GitHub. -
( Optional ) Click the top-left back arrow icon
to return to the main Pipeline editor. -
Click the Save button at the top right to begin saving your Pipeline with with its new "Deliver" stage.
-
In the Save Pipeline dialog box, specify the commit message in the Description field (e.g.
Add 'Deliver' stage). -
Leaving all other options as is, click Save & run and Jenkins proceeds to build your amended Pipeline.
-
When the main Blue Ocean interface appears, click the top row to see Jenkins build your Pipeline project.
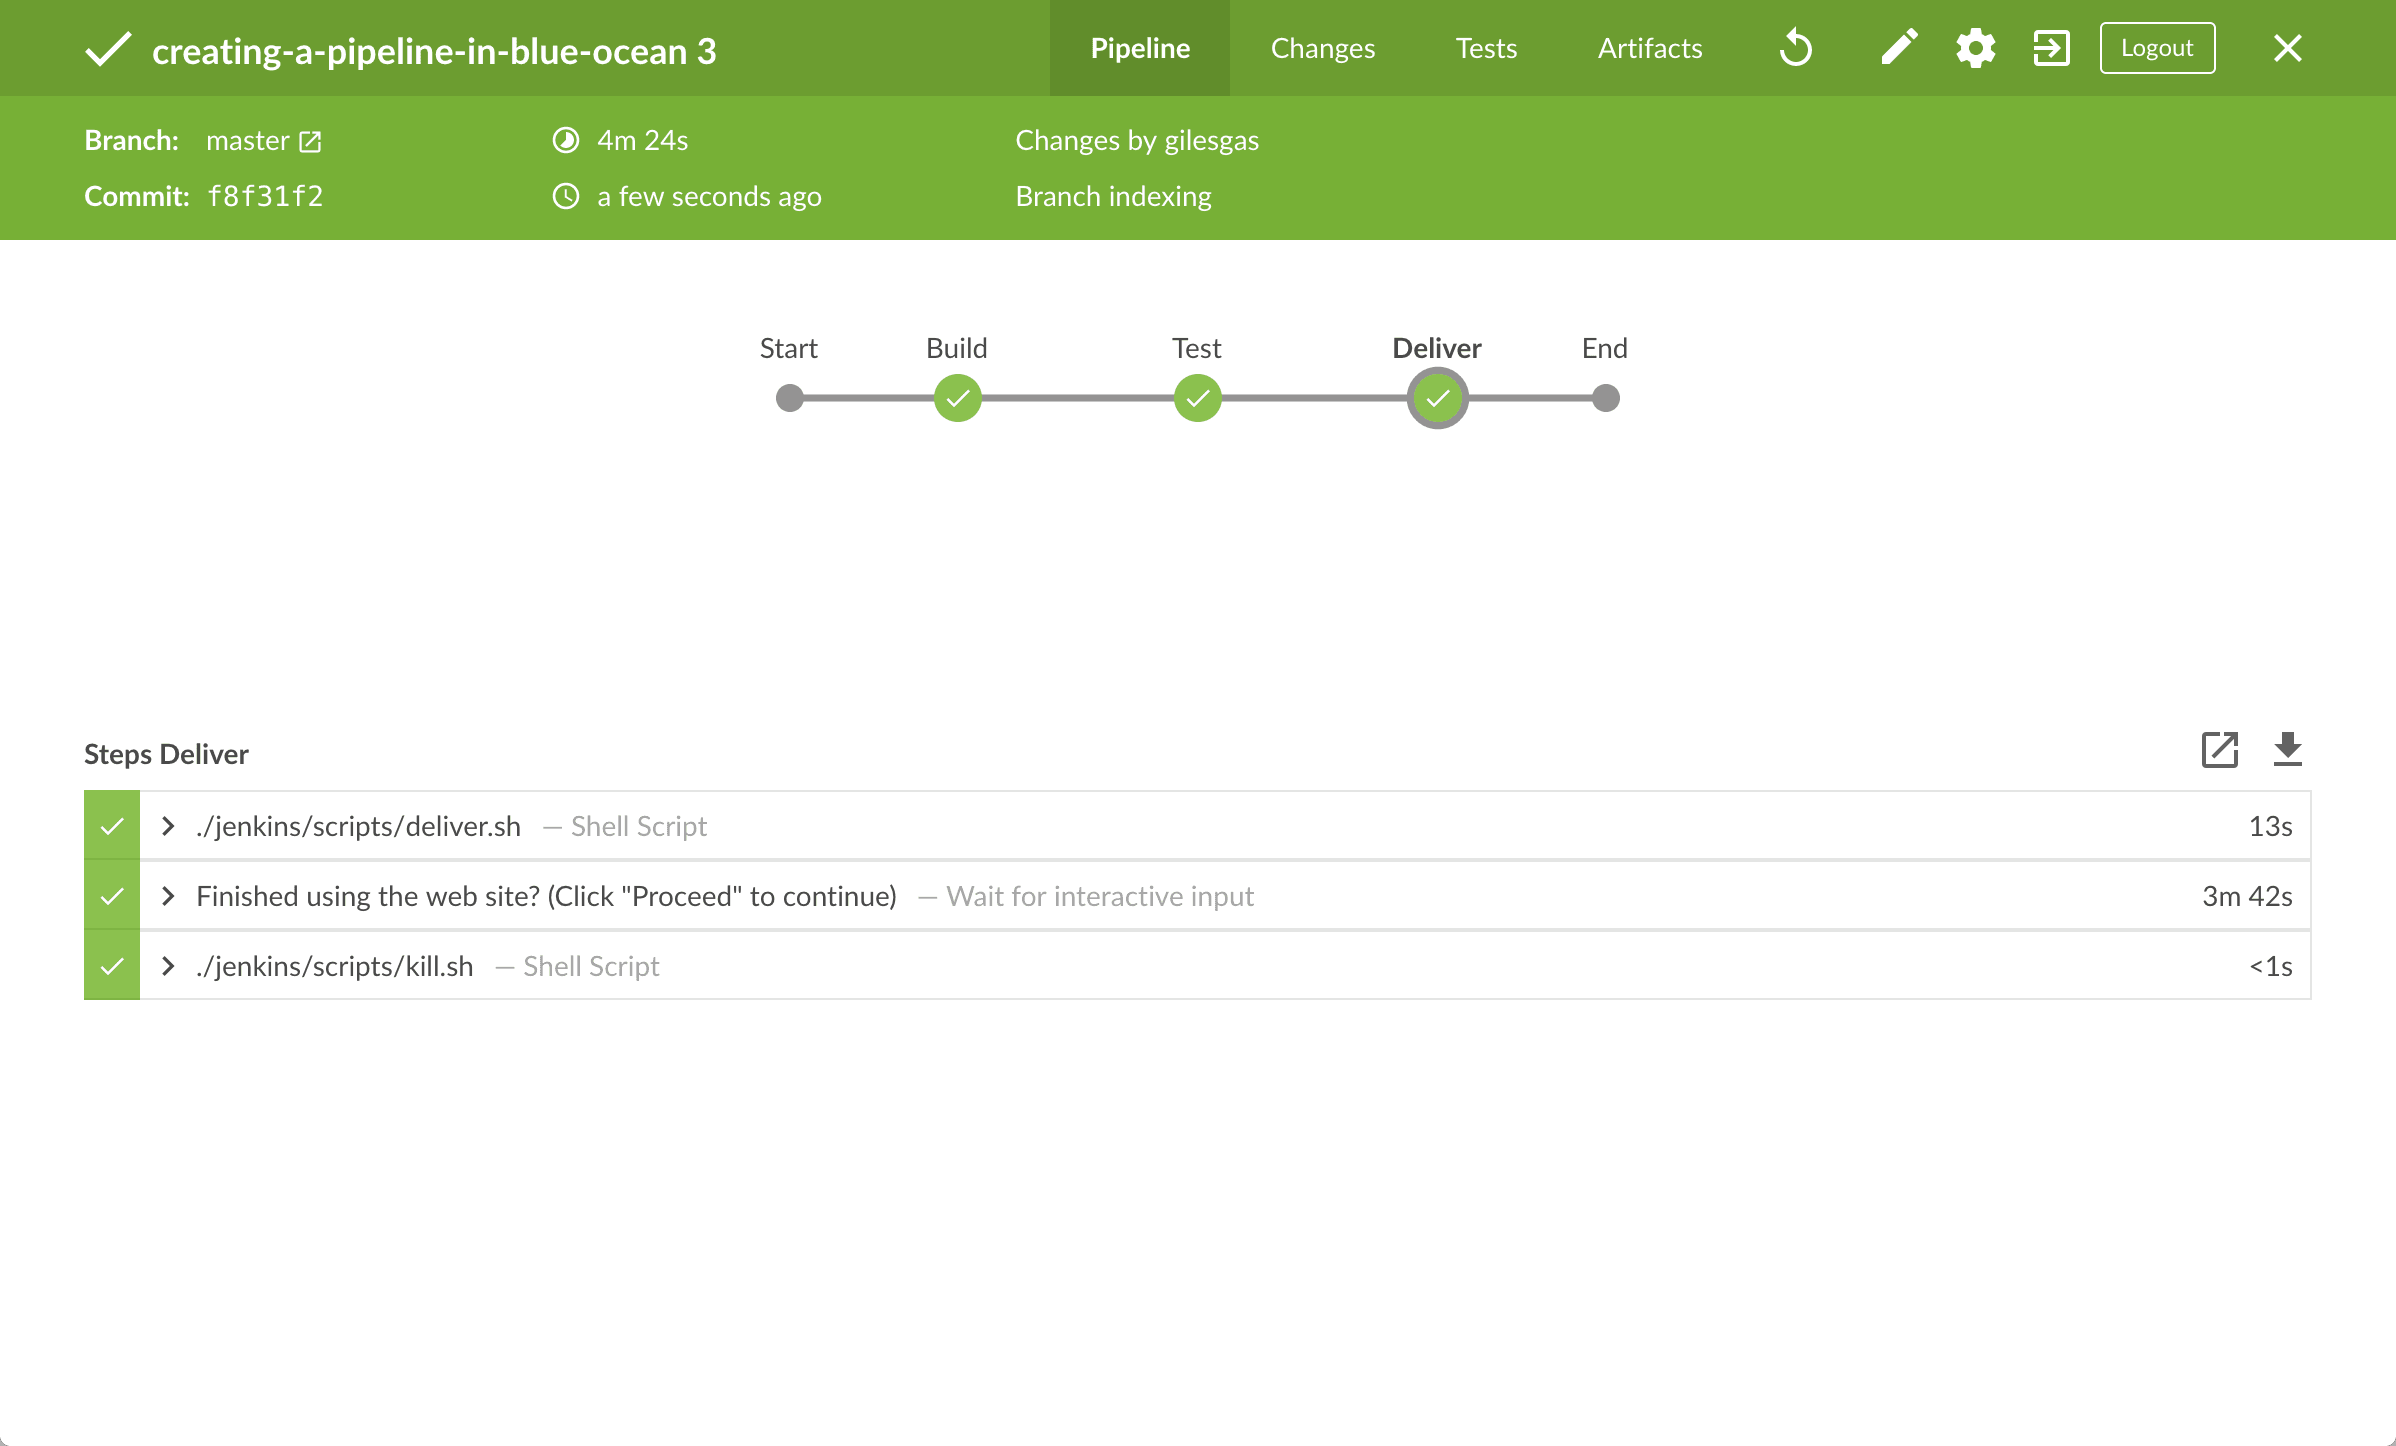
If your amended Pipeline ran successfully, here’s what the Blue Ocean interface should look like. Notice the additional "Deliver" stage. Click on the previous "Test" and "Build" stage circles to access the outputs from those stages.
-
Ensure you are viewing the "Deliver" stage (click it if necessary), then click the green
./jenkins/scripts/deliver.shstep to expand its content and scroll down until you see thehttp://localhost:3000link.
-
Click the
http://localhost:3000link to view your Node.js and React application running (in development mode) in a new web browser tab. You should see a page/site with the title Welcome to React on it. -
When you are finished viewing the page/site, click the Proceed button to complete the Pipeline’s execution.
-
Click the X at the top-right to return to the main Blue Ocean interface, which lists your previous Pipeline runs in reverse chronological order.

Follow up (optional)
If you check the contents of the Jenkinsfile that Blue Ocean created at the root of your forked creating-a-pipeline-in-blue-ocean repository, notice the location of the environment directive. This directive’s location within the "Test" stage means that the environment variable CI (with its value of true) is only available within the scope of this "Test" stage.
You can set this directive in Blue Ocean so that its environment variable is available globally throughout Pipeline (as is the case in the Build a Node.js and React app with npm tutorial). To do this:
-
From the main Blue Ocean interface, click Branches at the top-right to access your respository’s
masterbranch. -
Click the
masterbranch’s "Edit Pipeline" icon to open the Pipeline editor for this branch. -
In the main Pipeline editor, click the Test stage you created above to begin editing it.
-
In the stage panel on the right, click Settings to reveal this section of the panel.
-
Click the minus (-) icon at the right of the
CIenvironment directive (you created earlier) to delete it. -
Click the top-left back arrow icon
to return to the main Pipeline editor. -
In the Pipeline Settings panel, click the + icon at the right of the Environment heading (for which you’ll configure a globalenvironment directive).
-
In the Name and Value fields that appear, specify
CIandtrue, respectively. -
Click the Save button at the top right to begin saving your Pipeline with with its relocated environment directive.
-
In the Save Pipeline dialog box, specify the commit message in the Description field (e.g.
Make environment directive global). -
Leaving all other options as is, click Save & run and Jenkins proceeds to build your amended Pipeline.
-
When the main Blue Ocean interface appears, click the top row to see Jenkins build your Pipeline project.
You should see the same build process you saw when you completed adding the final deliver stage (above). However, when you inspect theJenkinsfileagain, you’ll notice that theenvironmentdirective is now a sibling of theagentsection.