编写一个单例模式
1.某个类智能有一个实例
2.它必须自行创建这个实例
3.它必须自行向整个系统提供这个实例
饿汉式: 直接创建对象,不存在线程安全问题
1.直接实例化
public class Singleton {
    public static Singleton INSTANCE = new Singleton();
    private Singleton(){
    }
}
2.枚举
public enum Singleton2 {
    INSTANCE
}
3.静态代码块
public class Singleton3 {

    public static final Singleton3 INSTANCE;

    static {
        //此处可以加载配置文件的信息到类中
        INSTANCE = new Singleton3();
    }

    private Singleton3() {

    }
}
懒汉式: 延迟创建对象
单线程下安全
public class Singleton3 {

    private static Singleton3 instance;

    private Singleton3() {

    }

    public static Singleton3 getInstance() {
        if (instance == null) {
            instance = new Singleton3();
        }
        return instance;

    }
}
如果对象创建时间长,则有可能出现多次创建对象的情况
public class Singleton3 {

    private static Singleton3 instance;

    private Singleton3() {

    }

    public static Singleton3 getInstance() throws InterruptedException {
        if (instance == null) {
            Thread.sleep(1000);
            instance = new Singleton3();
        }
        return instance;

    }
}
多线程测试代码:
    public static void main(String[] args) throws ExecutionException, InterruptedException {

        Callable<Singleton3> c = new Callable<Singleton3>() {
            @Override
            public Singleton3 call() throws Exception {
                return Singleton3.getInstance();
            }
        };

        ExecutorService es = Executors.newFixedThreadPool(2);

        Future<Singleton3> f1 = es.submit(c);
        Future<Singleton3> f2 = es.submit(c);
        System.out.println(f1.get());
        System.out.println(f2.get());

    }
解决办法:
getInstance增加synchronize
 public static Singleton3 getInstance() throws InterruptedException {
        synchronized (Singleton3.class){
            if (instance == null) {
                Thread.sleep(1000);
                instance = new Singleton3();
            }
            return instance;
        }


    }
改进效率版本:在执行同步前增加一层判断,这样不会都走到线程安全块的代码
 public static Singleton3 getInstance() throws InterruptedException {
        if (instance == null) {
            synchronized (Singleton3.class) {
                if (instance == null) {
                    Thread.sleep(1000);
                    instance = new Singleton3();
                }

            }
        }
        return instance;
    }
静态内部类:当调用getInstance时才会执行内部类的方法,内部类不会随着外部类的初始化而初始化
public class Singleton3 {
    private Singleton3() {

    }

    private static class Inner {
        private static Singleton3 instance = new Singleton3();
    }

    public static Singleton3 getInstance() throws InterruptedException {
        return Inner.instance;
    }
}
类初始化过程
样例代码
public class Father {
    private int i = test();
    private static int j = method();

    static {
        System.out.print("(1)");
    }

    Father() {
        System.out.print("(2)");
    }

    {
        System.out.print("(3)");
    }

    public int test() {
        System.out.print("(4)");
        return 1;
    }

    public static int method() {
        System.out.print("(5)");
        return 1;
    }

}

public class Son extends Father {
    private int i = test();
    private static int j = method();

    static {
        System.out.print("(6)");
    }

    Son() {
        System.out.print("(7)");
    }

    {
        System.out.print("(8)");
    }

    public int test() {
        System.out.print("(9)");
        return 1;
    }

    public static int method() {
        System.out.print("(10)");
        return 1;
    }

    public static void main(String[] args) {
        Son s1 = new Son();
        System.out.print("");
        Son s2 = new Son();
    }
}
结果为: (5)(1)(10)(6)(9)(3)(2)(9)(8)(7)(9)(3)(2)(9)(8)(7)
1.包含static的变量和方法按照顺序执行,从父类到子类,所以是 (5)(1)(10)(6)
2.实例初始化过程: 非静态实例变量显式赋值代码和非静态代码块代码从上往下执行,而对应的构造器最后执行
子类实例化方法:
(1) 调用super()
(2) 非静态变量
(3) 非静态代码块
(4) 子类无参构造器
注意方法的重写问题,非静态方法前面是隐藏着一个this对象,指向正在创建的对象
所以实例中父类的test方法其实是调用了子类的test方法
- final方法,静态方法,private等子类中不可见方法是不能被override的,所以静态方法中不存在这个问题
变量

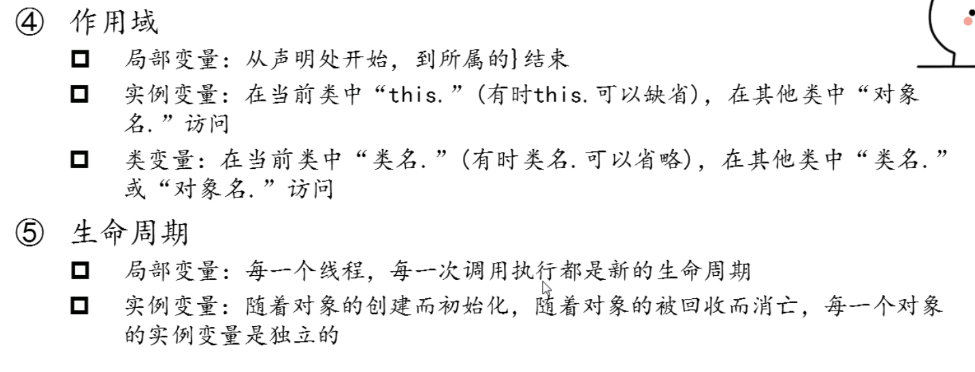
如果没有this,则变量遵循就近原则
成员变量保存在堆中,局部变量保存在栈中
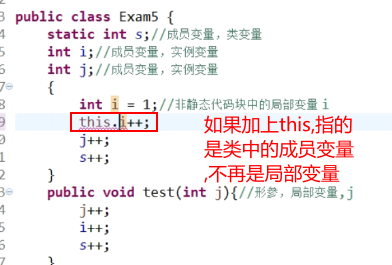
实例:
public class Exam5 {
    static int s;
    int i;
    int j;

    {
        int i = 1;
        i++;
        j++;
        s++;
    }

    public void test(int j) {
        j++;
        i++;
        s++;
    }

    public static void main(String[] args) {
        Exam5 obj1 = new Exam5();
        Exam5 obj2 = new Exam5();
        obj1.test(10);
        obj1.test(10);
        obj2.test(30);
        System.out.println(obj1.i + "," + obj1.j + "," + obj1.s);
        System.out.println(obj2.i + "," + obj2.j + "," + obj2.s);
    }
}
输出结果为
2,1,5
1,1,5
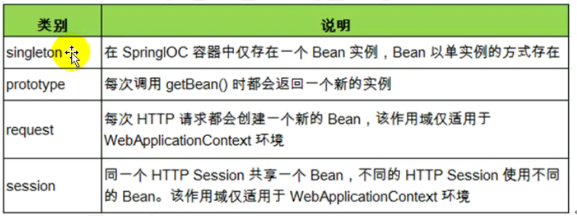
bean作用域
在spring中可以在
spring支持的常用数据库事务和隔离级别
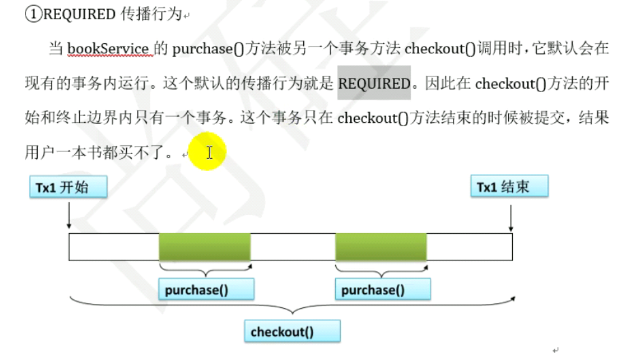
事务传播属性:当事务方法被另一个事务方法调用时,必须指定事务如何传播,例如方法可以继续在现有事务运行,也可能开启一个新的事务,并在自己的事务中运行
@Transactional 默认为REQUIRED,使用原来的事务
7种事务传播属性:
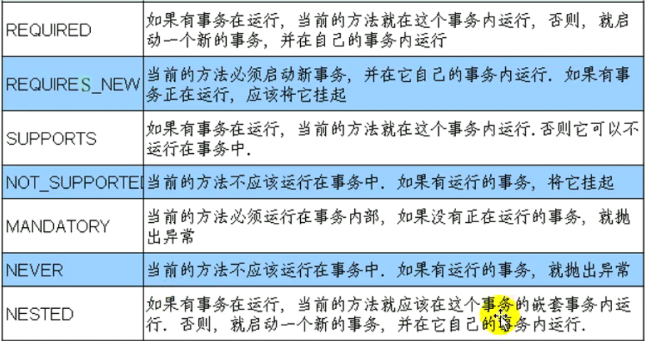
常用的是REQUEST和REQUEST_NEW
REQUEST:
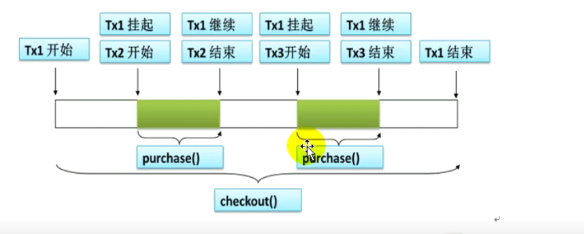
REQUEST_NEW:
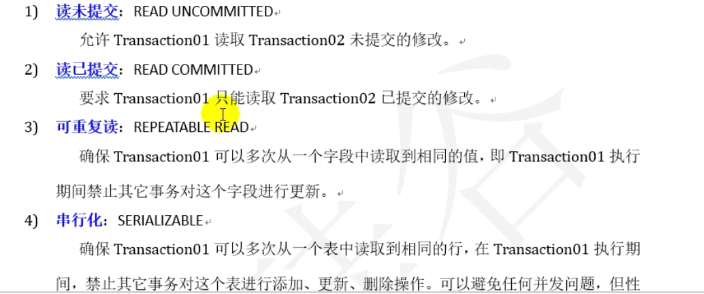
数据库隔离级别
脏写和脏读: 无论是脏写还是脏读,都是因为一个事务去更新或者查询了另外一个还没提交的事务更新过的数据。因为另外一个事务还没提交,所以它随时可能会回滚,那么必然导致你更新的数据就没了,或者你之前查询到的数据就没了,这就是脏写和脏读两种场景。
不可重复读: 事务A开始一个读事务,然后事务B更新值,然后事务C更新值,导致A事务在多次读的时候数据不一致
如果你希望看到的场景是不可重复读,也就是事务 A 在执行期间多次查询一条数据,每次都可以查到其它已经提交的事务修改过的值,那么就是不可重复读,如果你希望这样子,那也没问题。
如果你期望的是可重复读,但是数据库表现的是不可重复读,让你事务 A 执行期间多次查到的值都不一样,都的问题是别的提交过的事务修改过的,那么此时你就可以认为,数据库有问题,这个问题就是「不可重复读」
幻读: 就是你一个事务用一样的 SQL 多次查询,结果每次查询都会发现查到一些之前没看到过的数据。注意,幻读特指的是你查询到了之前查询没看到过的数据。此时说明你是幻读了
SpringMVC中怎样避免post中文乱码,get中文乱码
post请求: 增加CharacterEncodingFilter
get请求: 修改tomcat的server.xml 在Connector标签中配置URIEncoding="utf-8"
mybatis中当实体类的属性名和表中字段名不一样怎样处理
1.写sql时写别名
2.mybatais开启驼峰命名
3.resultMap映射
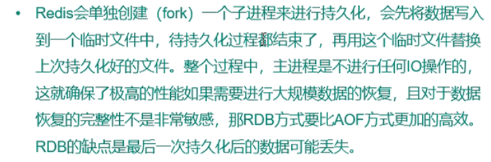
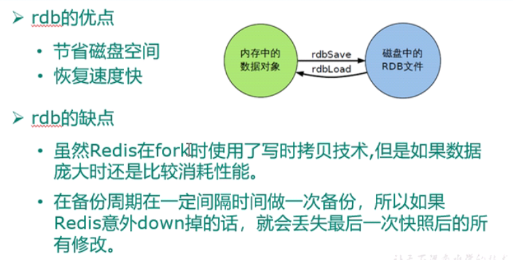
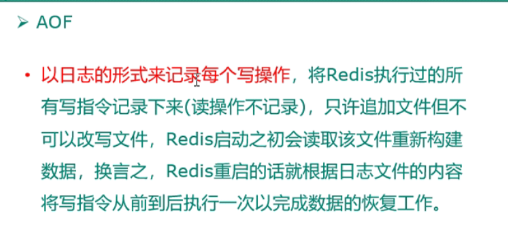
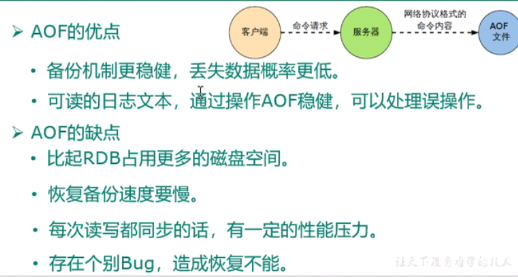
redis持久化
Elasticsearch和solr区别
都是基于lucene搜索引擎
都是基于java开发
Solr:2004年诞生
ES:2010年诞生
solr利用zookeeper进行分布式管理
es自身电邮分布式管理
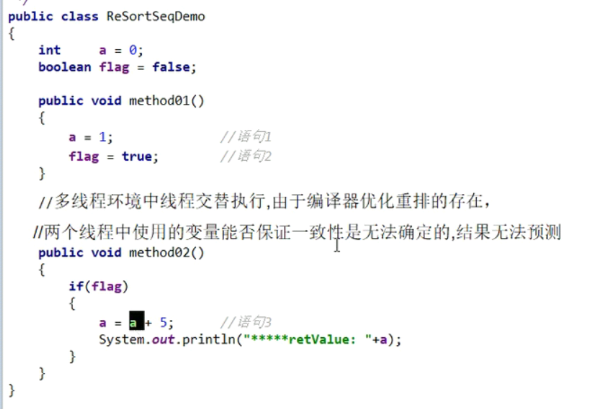
volitile关键字
1.保证可见性
2.不保证原子性
3.禁止指令重排
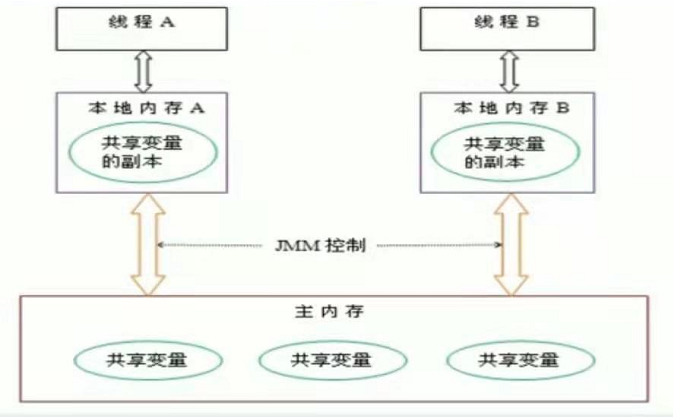
JMM内存模型
JMM本身是一种抽象概念,并不真实存在,描述的是一组规范
JMM关于同步的规定
1.线程解锁前,必须要把共享变量的值刷新回主内存
2.线程加锁前,必须读取主内存的最新值到自己的工作内存
3.加锁解锁是同一把锁
每个线程在创建时都会创建一个工作内存,又称为栈空间
工作内存是每个线程的私有数据区域
java内存模型规定所有变量存储在主内存,所有线程都可以访问,但是线程对变量的操作在工作内存进行,首先要讲变量拷贝到自己的工作内存,然后对变量操作,操作完成后写进主内存
线程之间的交流要通过主内存进行
可见性测试:(number加上volitile关键字后,程序会3秒后结束)
class MyData{
    int number = 0;
    public void add(){
        this.number=60;
    }
}
public class Test {
    public static void main(String[] args) {
        MyData myData = new MyData();
        new Thread(()->{
            System.out.println(Thread.currentThread().getName()+"	 come in");
            try{
                TimeUnit.SECONDS.sleep(3);
            }  catch (InterruptedException e) {
                e.printStackTrace();
            }
            myData.add();
            System.out.println(Thread.currentThread().getName()+"	 udpate to 60");
        }).start();

        while(myData.number ==0){
             //此处子线程已经改成60了,但是主线程不知道,所以一直会卡在这里
        }
        System.out.println(Thread.currentThread().getName()+"	 mission is over");
    }
}
不保证原子性的测试: 因为volatile不保证原子性,所有结果都不会是2万
class MyData{
    volatile int number = 0;
    public void add(){
        number++;
    }
}
public class Test {
    public static void main(String[] args) {
    MyData myData = new MyData();
        for (int i = 1; i <=20 ; i++) {
            new Thread(()->{
                for (int j = 1; j <=1000 ; j++) {
                    myData.add();

                }
            },String.valueOf(i)).start();
        }
        while(Thread.activeCount()>2){
            Thread.yield();
        }
        System.out.println(Thread.currentThread().getName()+"number="+ myData.number);
    }
}
指令重排

用到volatile的地方
1.单例模式
多线程下需要DEL双重检测锁保证线程安全
在多线程环境下单例模式并不是单例,私有构造器会执行多次,所以需要双重检测锁保证多线程情况下线程安全
public class Singleton {
    private static Singleton instance = null;

    private Singleton() {
        System.out.println("执行了... ");
    }

    public static Singleton getInstance() {
        if (instance == null) {
            instance = new Singleton();
        }
        return instance;
    }

    public static void main(String[] args) {
        for (int i = 0; i < 10; i++) {
            new Thread(() -> {
                Singleton.getInstance();
            }).start();

        }

    }
}
public class Singleton {
    private static Singleton instance = null;

    private Singleton() {
        System.out.println("执行了... ");
    }

    public static Singleton getInstance() {
        if (instance == null) {
            synchronized (Singleton.class){
                if (instance == null) {
                    instance = new Singleton();
                }
            }
        }
        return instance;
    }

    public static void main(String[] args) {
        for (int i = 0; i < 10; i++) {
            new Thread(() -> {
                Singleton.getInstance();
            }).start();

        }

    }
}
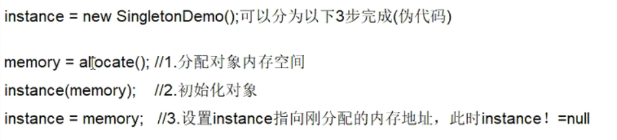

有可能引用是有值的,但是由于指令重排,导致实际的对象还没有创建出来,所有取到的对象有可能为空,加上volatile后可以禁止指令重排
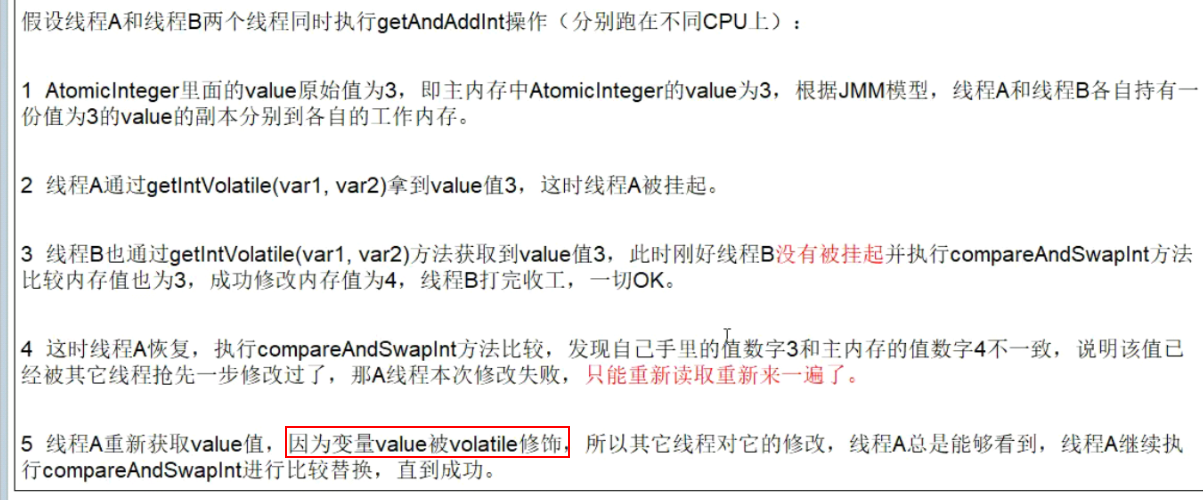
CAS
1.CAS就是比较,交换: 如果线程值和主存值相同,则设置新值,否则返回false,修改失败
2.底层: usafe类
CAS为什么能保证原子性,靠的是底层的Unsage类,unsage类来自于rt.jar包底下的类,


    public final int getAndAddInt(Object var1, long var2, int var4) {
        int var5;
        do {
            var5 = this.getIntVolatile(var1, var2); //先获取该对象的内存偏移量中的值,拷贝到当前线程
        } while(!this.compareAndSwapInt(var1, var2, var5, var5 + var4)); //如果当前对象中的内存值如果也是var5则修改,如果是true,修改成功则跳出循环并返回,否则执行循环

        return var5;
    }
cas缺点:
1.循环时间长,开销大
2.智能保证一个共享变量的原子操作
3.引出啦ABA问题: 狸猫换太子,A线程耗时10s,B线程耗时2S, 当B线程将值1改成2,然后又改成1,然后A线程读取到值,发现是没变,但实际上已经改过一遍了
如何避免产生ABA问题(中间过程不能被别人修改):
原子引用
@Getter
@ToString
@AllArgsConstructor
class User{
    String userName;
    int age;
}
public class Test {
    public static void main(String[] args) {

        User a = new User("a",1);
        User b = new User("b",1);
        AtomicReference<User> atomicReference = new AtomicReference<>();
        atomicReference.set(a);
        System.out.println(atomicReference.compareAndSet(a,b)+","+atomicReference.get().toString());
    }
}
时间戳原子引用
新增一种机制,增加修改的版本号
**ABA问题演示**
public class Test {
    static AtomicReference<Integer>  a = new AtomicReference<>(100);
    public static void main(String[] args) {
        new Thread(()->{
            a.compareAndSet(100,101);
            a.compareAndSet(101,100);
        },"t1").start();
        new Thread(()->{
            try {
                TimeUnit.SECONDS.sleep(1);
            } catch (InterruptedException e) {
                e.printStackTrace();
            }
            System.out.println(a.compareAndSet(100,2016));
        },"t2").start();
    }
}
**基于版本号更新,通过版本号避免ABA问题**
public class Test {
    static AtomicStampedReference<Integer>  b = new AtomicStampedReference(100,1);
    public static void main(String[] args) {
        new Thread(()->{
            int version = b.getStamp();
            System.out.println("第一次版本号"+version);
            try {
                TimeUnit.SECONDS.sleep(3);
            } catch (InterruptedException e) {
                e.printStackTrace();
            }
            b.compareAndSet(100,101,b.getStamp(),b.getStamp()+1);
            System.out.println(Thread.currentThread().getName()+"第2次版本号:"+ b.getStamp());
            b.compareAndSet(101,100,b.getStamp(),b.getStamp()+1);
            System.out.println(Thread.currentThread().getName()+"第3次版本号:"+b.getStamp());
        },"t1").start();
        new Thread(()->{
            int version = b.getStamp();
            System.out.println("第一次版本号"+version);
            try {
                TimeUnit.SECONDS.sleep(3);
            } catch (InterruptedException e) {
                e.printStackTrace();
            }
            Boolean result = b.compareAndSet(100,2019,version,b.getStamp()+1);
            System.out.println(Thread.currentThread().getName()+":"+result);
        },"t2").start();
    }
}
ArrayList
举一个线程不安全的例子
    public static void main(String[] args) {
        List<String> list = new ArrayList<>();
        for (int i = 0; i < 5; i++) {
            new Thread(() -> {
                list.add(UUID.randomUUID().toString().substring(1, 5));
                System.out.println(list);
            }, String.valueOf(i)).start();
        }
    }
报错:Exception in thread "1" java.util.ConcurrentModificationException 并发修改异常
怎样避免
1.使用Vector
2.使用Collections.synchronizedList(new ArrayList<>());
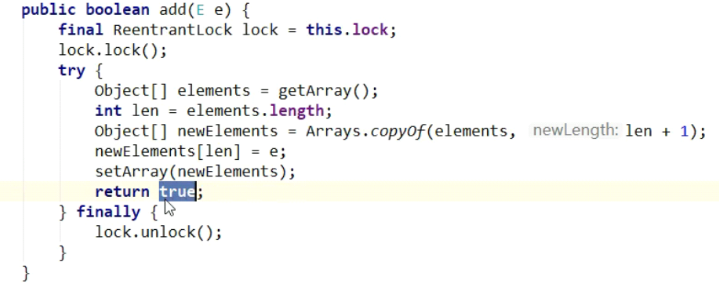
3.使用new CopyOnWriteArrayList<>();
写时复制

HashSet
1.使用Collections.synchronizedSet
2.使用CopyOnWriteArraySet,底层也是CopyOnWriteArrayList
HashSet的底层结构就是HashMap
HashSet的add会调用HashMap的put方法,但是value设置为一个叫PreSent的空对象
HashMap
1.ConcurrentHashMap
公平锁和非公平锁
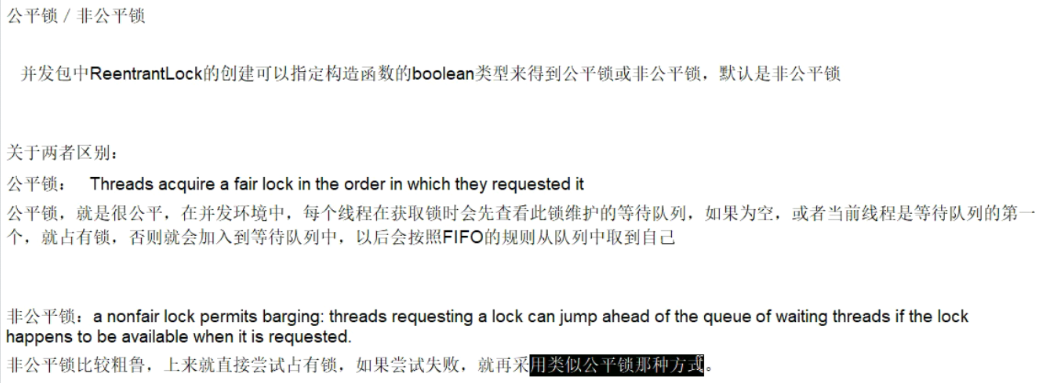
非公平锁比公平锁吞吐量大
可重入锁又叫递归锁,可重入锁最大作用是避免死锁

一个线程的上下文方法可以重入
class Phone {
    public synchronized void sendSMS() {
        System.out.println(Thread.currentThread().getName() + "sendSMS");
        sendEmail();
    }

    public synchronized void sendEmail() {
        System.out.println(Thread.currentThread().getName() + "sendEmail");
    }
}

public class Test {
    public static void main(String[] args) {
        Phone phone = new Phone();
        new Thread(()->{
            phone.sendSMS();
        },"t1").start();
        new Thread(()->{
            phone.sendSMS();
        },"t2").start();
    }

}
自旋锁

手写一个自旋锁
public class Test {
    AtomicReference<Thread> atomicReference = new AtomicReference<>();

    public void myLock() {
        Thread thread = Thread.currentThread();
        System.out.println(Thread.currentThread().getName() + "come in");
        while (!atomicReference.compareAndSet(null, thread)) {
            System.out.println(Thread.currentThread().getName() + "wait");
        }
    }

    public void myUnlock() {
        Thread thread = Thread.currentThread();
        atomicReference.compareAndSet(thread, null);
        System.out.println(Thread.currentThread().getName() + "come out");

    }

    public static void main(String[] args) {
        Test test = new Test();
        new Thread(() -> {
            test.myLock();
            try {
                TimeUnit.SECONDS.sleep(5);
            } catch (InterruptedException e) {
                e.printStackTrace();
            }
            test.myUnlock();
        }, "t1").start();
        new Thread(() -> {
            test.myLock();
            test.myUnlock();
        }, "t2").start();

    }
}
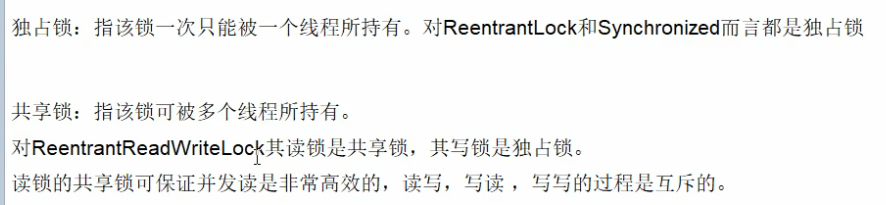
独占锁(写锁)/共享锁(读锁)/互斥锁
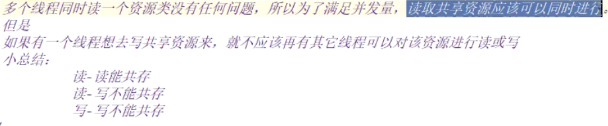
**模拟缓存,读写锁**
class MyCache {
    private volatile Map<Integer, Object> map = new HashMap<>();
    private ReentrantReadWriteLock rwLock = new ReentrantReadWriteLock();

    public void put(int key, Object value) throws InterruptedException {
        rwLock.writeLock().lock();
        System.out.println(Thread.currentThread().getName() + "正在写入" + key);
        TimeUnit.SECONDS.sleep(1);
        map.put(key, value);
        System.out.println(Thread.currentThread().getName() + "写入完成" + key);
        rwLock.writeLock().unlock();
    }

    public Object get(int key) throws InterruptedException {
        rwLock.readLock().lock();
        System.out.println(Thread.currentThread().getName() + "正在读取" + key);
        Object o = map.get(key);
        System.out.println(Thread.currentThread().getName() + "读取完成" + key);
        rwLock.readLock().unlock();
        return o;
    }

}


public class ReadWriteLock {
    public static void main(String[] args) {
        MyCache myCache = new MyCache();
        for (int i = 0; i < 5; i++) {
            int finalI = i;
            new Thread(() -> {
                try {
                    myCache.put(finalI, finalI);
                } catch (InterruptedException e) {
                    e.printStackTrace();
                }
            }).start();
        }
        for (int i = 0; i < 5; i++) {
            int finalI = i;
            new Thread(() -> {
                try {
                    myCache.get(finalI);
                } catch (InterruptedException e) {
                    e.printStackTrace();
                }
            }).start();
        }
    }
}
CounDownLatch/CyclicBarrier/Semaphone
CounDownLatch
CounDownLatch实例:晚自习等到所有人离开后班长关门
public class CountDownLatchDemo {
    public static void main(String[] args) throws InterruptedException {
        CountDownLatch countDownLatch = new CountDownLatch(6);
        for (int i = 0; i < 6; i++) {
            new Thread(()->{
                System.out.println(Thread.currentThread().getName()+"离开教室");
                countDownLatch.countDown();
            },String.valueOf(i)).start();
        }
        countDownLatch.await();
        System.out.println("班长关门");
    }
}
CyclicBarrier

**每凑够7个线程就开始干活**
public class CountDownLatchDemo {
    public static void main(String[] args) throws InterruptedException {
        CyclicBarrier cyclicBarrier = new CyclicBarrier(7,()->{
            System.out.println("********开始干活");
        });
        for (int i = 0; i <= 7; i++) {
            new Thread(()->{
                System.out.println(Thread.currentThread().getName()+"到了");
                try {
                    cyclicBarrier.await();
                } catch (InterruptedException e) {
                    e.printStackTrace();
                } catch (BrokenBarrierException e) {
                    e.printStackTrace();
                }
            },String.valueOf(i)).start();
        }
    }
}
Semaphone 类似于抢车位
public static void main(String[] args) {
        Semaphore semaphore = new Semaphore(3);
        for (int i = 0; i <= 6; i++) {
            new Thread(() -> {
                try {
                    semaphore.acquire();
                    System.out.println(Thread.currentThread().getName() + "抢到车位");
                    TimeUnit.SECONDS.sleep(3);
                    System.out.println(Thread.currentThread().getName() + "离开车位");
                    semaphore.release();
                } catch (InterruptedException e) {
                    e.printStackTrace();
                }
            }, String.valueOf(i)).start();
        }
    }
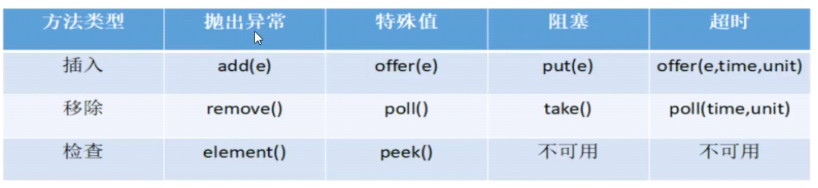
阻塞队列


利用lock实现的生产者消费者(在等待的时候一定要用while,不能用if,否则在多个线程的情况下会有生产了多个的问题,明明是生产一个,消费一个)
public class ShareData {
    private int number = 0;
    private Lock lock = new ReentrantLock();
    private Condition condition = lock.newCondition();

    public void increment() {
        lock.lock();
        try {
            while (number != 0) {
                condition.await();
            }
            number++;
            System.out.println(Thread.currentThread().getName() + number);
            condition.signalAll();
        } catch (InterruptedException e) {
            e.printStackTrace();
        } finally {
            lock.unlock();
        }
    }

    public void decrement() {
        lock.lock();
        try {
            while (number == 0) {
                condition.await();
            }
            number--;
            System.out.println(Thread.currentThread().getName() + number);
            condition.signalAll();
        } catch (InterruptedException e) {
            e.printStackTrace();
        } finally {
            lock.unlock();
        }
    }

    public static void main(String[] args) {
        ShareData shareData = new ShareData();
        new Thread(()->{
            for (int i = 1; i <=5; i++) {
                try{
                    shareData.increment();
                }catch (Exception e){
                    e.printStackTrace();
                }
            }
        },"AA").start();

        new Thread(()->{
            for (int i = 1; i <=5; i++) {
                try{
                    shareData.decrement();
                }catch (Exception e){
                    e.printStackTrace();
                }
            }
        },"BB").start();
    }
}
Lock和synchronize的区别


多线程之间顺序调用,实现A->B->C 三个线程启动,
要求:A打印5次,B打印10次C打印15次,循环10次
public class ShareResource {
    private int number = 1;
    private Lock lock = new ReentrantLock();
    private Condition c1 = lock.newCondition();
    private Condition c2 = lock.newCondition();
    private Condition c3 = lock.newCondition();

    public void print5() {
        lock.lock();
        try {
            while (number != 1) {
                c1.await();
            }
            for (int i = 1; i <= 5; i++) {
                System.out.println(Thread.currentThread().getName() + "	" + i);
            }
            number = 2;
            c2.signalAll();
        } catch (Exception e) {
            e.printStackTrace();
        } finally {
            lock.unlock();
        }
    }

    public void print10() {
        lock.lock();
        try {
            while (number != 2) {
                c2.await();
            }
            for (int i = 1; i <= 10; i++) {
                System.out.println(Thread.currentThread().getName() + "	" + i);
            }
            number = 3;
            c3.signalAll();
        } catch (Exception e) {
            e.printStackTrace();
        } finally {
            lock.unlock();
        }
    }

    public void print15() {
        lock.lock();
        try {
            while (number != 3) {
                c3.await();
            }
            for (int i = 1; i <= 15; i++) {
                System.out.println(Thread.currentThread().getName() + "	" + i);
            }
            number = 1;
            c1.signalAll();
        } catch (Exception e) {
            e.printStackTrace();
        } finally {
            lock.unlock();
        }
    }

    public static void main(String[] args) {
        ShareResource shareResource = new ShareResource();
        new Thread(() -> {
            for (int i = 1; i <= 10; i++) {
                try {
                    shareResource.print5();
                } catch (Exception e) {
                    e.printStackTrace();
                }
            }
        }, "A").start();

        new Thread(() -> {
            for (int i = 1; i <= 10; i++) {
                try {
                    shareResource.print10();
                } catch (Exception e) {
                    e.printStackTrace();
                }
            }
        }, "B").start();
        new Thread(() -> {
            for (int i = 1; i <= 10; i++) {
                try {
                    shareResource.print15();
                } catch (Exception e) {
                    e.printStackTrace();
                }
            }
        }, "C").start();
    }
}
线程池
方法:
ExecutorService threadPool = Executors.newCachedThreadPool();
ExecutorService threadPool = Executors.newFixedThreadPool(10);
ExecutorService threadPool = Executors.newSingleThreadExecutor();
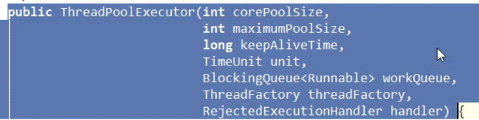
重要参数介绍:
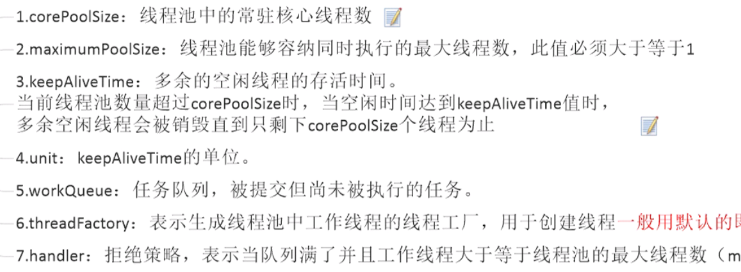
线程池的拒绝策略

AbortPolicy: 超过8个异常则直接抛异常
 public static void main(String[] args) {
        ExecutorService threadPool = new ThreadPoolExecutor(
                2,
                5,
                1L,
                TimeUnit.SECONDS,
                new LinkedBlockingDeque<Runnable>(3), Executors.defaultThreadFactory(),
                new ThreadPoolExecutor.AbortPolicy());
        try{
            for (int i = 1; i <= 10; i++) {
                threadPool.execute(() -> {
                    System.out.println(Thread.currentThread().getName() + "办理业务");
                });
            }
        }catch (Exception e){
            e.printStackTrace();
        }finally {
            threadPool.shutdown();
        }
    }
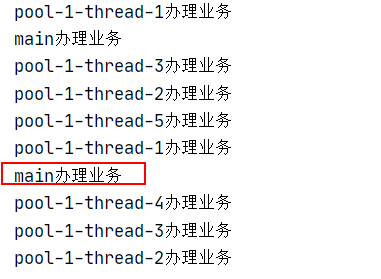
CallerRunsPolicy: 超过的任务会回退给调用线程
public static void main(String[] args) {
        ExecutorService threadPool = new ThreadPoolExecutor(
                2,
                5,
                1L,
                TimeUnit.SECONDS,
                new LinkedBlockingDeque<Runnable>(3), Executors.defaultThreadFactory(),
                new ThreadPoolExecutor.CallerRunsPolicy());
        try{
            for (int i = 1; i <= 10; i++) {
                threadPool.execute(() -> {
                    System.out.println(Thread.currentThread().getName() + "办理业务");
                });
            }
        }catch (Exception e){
            e.printStackTrace();
        }finally {
            threadPool.shutdown();
        }
    }
DiscardOldestPolicy:抛弃队列中等待最久的任务,然后把当前任务加入队列中尝试再次提交当前任务
DiscardPolicy:直接丢弃任务
如何合理配置线程池
1.cpu密集型
1)获取cpu核数:Runtime.getRuntime().availableProcessors()
2)核数+1的线程数
2.io密集型
- cpu核数/1-阻塞系数 阻塞系数在0.8-0.9 eg:8核cpu: 8/(1-0.9)=80个线程数
死锁编码及定位分析
jps -l 查看到线程id
jstat 线程id 得到死锁内容