先看效果图: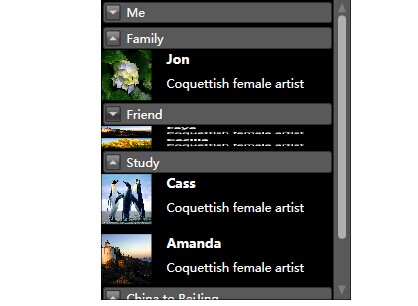 这个是折叠特效。
代码结构:
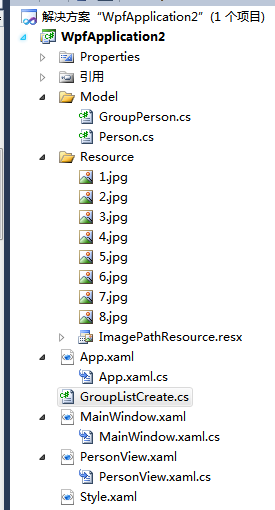 model是我们的数据模型,定义了在列表显示的人物名称 图片 简介 。
Resource是我们的图片资源 和 存储图片资源路径、名称的资源文件。
GroupListCreate是我们的主要创建列表的模块。
代码如下:


public StackPanel CreateModuleEntry(List<GroupPerson> hrvGroups)
        {
            if (hrvGroups != null)
            {

                StackPanel spl = new StackPanel();   //创建一个最外围的框
                List<GroupPerson> groups = hrvGroups;
                foreach (GroupPerson g in groups)      //根据分组去遍历
                {
                    int count = 1;
                    Expander ex = new Expander();     //每一个分组
                    ex.Header = g.Name;
                    List<Person> modules = new List<Person>();
                    modules = g.Persons;
                    StackPanel sp = new StackPanel();     //每一个分组的框
                    foreach (Person m in modules)
                    {
                        DockPanel dp = new DockPanel();
                        if (count >= 2)
                        {
                            Thickness dpMargin = new Thickness(0, 10, 0, 0);
                            dp.Margin = dpMargin;
                        }
                        dp.MouseLeave += new System.Windows.Input.MouseEventHandler(dp_MouseLeave);
                        dp.MouseEnter += new System.Windows.Input.MouseEventHandler(dp_MouseEnter);
                        dp.MouseLeftButtonDown += new System.Windows.Input.MouseButtonEventHandler(dp_MouseLeftButtonDown);
                        dp.MouseLeftButtonUp += new System.Windows.Input.MouseButtonEventHandler(dp_MouseLeftButtonUp);
                        //人物头像
                        Bitmap bm = new Bitmap(ImagePathResource.ImageSource+m.Ico);
                        MemoryStream ms = new MemoryStream();
                        bm.Save(ms, System.Drawing.Imaging.ImageFormat.Png);
                        BitmapImage bi = new BitmapImage();
                        bi.BeginInit();
                        bi.StreamSource = new MemoryStream(ms.ToArray());
                        bi.EndInit();
                        ms.Dispose();
                        System.Windows.Controls.Image image = new System.Windows.Controls.Image();
                        Thickness imageMargin = new Thickness(0, 0, 0, 0);
                        image.Margin = imageMargin;
                        image.Source = bi;
                        image.Width = 50;
                        image.Height = 50;
                        image.Stretch = Stretch.Fill;


                        //人物名称
                        Label lblName = new Label();
                        Thickness lblNameMargin = new Thickness(15, 0, 0, 0);
                        lblName.Margin = lblNameMargin;
                        lblName.Height = 25;
                        lblName.Content = m.Name;
                        lblName.FontSize = 13;
                        lblName.FontWeight = FontWeights.Bold;


                        //人物说明
                        WrapPanel dpl = new WrapPanel();
                        Thickness t3 = new Thickness(15, 0, 0, 0);
                        dpl.Margin = t3;
                        //说明文字的自动换行
                        for (int i = 0; i < m.Introduction.Length; i++)
                        {
                            string s = m.Introduction.Substring(i, 1);
                            Label lblResume = new Label();
                            lblResume.Content = s;
                            dpl.Children.Add(lblResume);
                        }
                        dpl.ItemHeight = 18;

                        dp.Children.Add(image);
                        dp.Children.Add(lblName);
                        dp.Children.Add(dpl);
                        DockPanel.SetDock(image, Dock.Left);
                        DockPanel.SetDock(lblName, Dock.Top);
                        sp.Children.Add(dp);
                        count++;
                    }

                    ex.Content = sp;

                    spl.Children.Add(ex);

                }
                return spl;
            }
            return null;
        }
这里我们直接返回一个stackpanel用来在界面展示,这样自动创捷列表基本上就完成了。
里面的四个事件是用来做鼠标浮动其上和按下的效果
void dp_MouseEnter(object sender, System.Windows.Input.MouseEventArgs e)
        {
            dp = sender as DockPanel;
            dp.Background = System.Windows.Media.Brushes.LightGray;
        }
        DockPanel dp = null;
        void dp_MouseLeftButtonUp(object sender, System.Windows.Input.MouseButtonEventArgs e)
        {
            dp = sender as DockPanel;
            dp.Background = System.Windows.Media.Brushes.LightGray;
        }

        void dp_MouseLeftButtonDown(object sender, System.Windows.Input.MouseButtonEventArgs e)
        {
            dp = sender as DockPanel;
            dp.Background = System.Windows.Media.Brushes.Gray;
        }

        void dp_MouseLeave(object sender, System.Windows.Input.MouseEventArgs e)
        {
            dp = sender as DockPanel;
            dp.Background = System.Windows.Media.Brushes.Transparent;
        }
剩下的工作就是怎样去显示 和 显示出比较炫的效果了。
先说说显示,显示主要就在PersonView.xaml文件里面,这是一个UserControl;
这个很简单 首先在PersonView.xaml里面用一个Grid,里面再放一个ScrollViewer再加上我们的 StackPanel就大功告成了!
代码如下:
<UserControl x:Class="WpfApplication2.PersonView"
             xmlns="http://schemas.microsoft.com/winfx/2006/xaml/presentation"
             xmlns:x="http://schemas.microsoft.com/winfx/2006/xaml"
             xmlns:mc="http://schemas.openxmlformats.org/markup-compatibility/2006"
             xmlns:d="http://schemas.microsoft.com/expression/blend/2008"
             mc:Ignorable="d"
             Background="Black"
             d:DesignHeight="300" d:DesignWidth="250"
              Loaded="UserControl_Loaded">
    <Grid Name="gd">
        <ScrollViewer Name="sv" Width="250" Height="300"  VerticalScrollBarVisibility="Auto">
            <StackPanel Name="sp">
            </StackPanel>
        </ScrollViewer>
    </Grid>
</UserControl>
PersonView.xaml.cs文件代码:
private void UserControl_Loaded(object sender, RoutedEventArgs e)
        {
            List<GroupPerson> gps = GetListGroup();
            GroupListCreate glc = new GroupListCreate();
            sp = glc.CreateModuleEntry(gps);
            sv.Content = sp;
        }
关于GetListGroup 我就不写了这个就是根据我们定义的数据模型去给初始化一下。
数据模型和Style我就不贴了 数据模型看我创建的列表就能看出来, Style代码实在太多。
需要完整代码的朋友请加群
C#/WPF技术交流群: 94234450
点击加入QQ群:
不管你遇到了什么问题,我们都不会让你独自去面对!