在直系学长曾经的指导下,参考了直系学长的博客(https://www.cnblogs.com/WellHold/p/6655769.html)学习Spring的另一个核心概念--面向切片编程,即AOP(Aspect Oriented Programming)。
Java是一种经典的面向对象的编程语言(OOP,Object Oriented Programming)。而面向对象的编程语言有三大特性:封装、继承和多台。其中继承允许我们定义从上到下的关系,即子类可以继承父类的一些功能参数,也可以改写父类的一些功能参数。但是,要为分散的对象(即不是同一父类的对象,这里的父类不包括Object)引入一个公共的行为的时候,OOP就显得很乏力,它需要在每一个对象里头都添加这个共用的行为,这样的代码就会显得很重复,很繁杂,最典型的就是添加日志功能,这个日志功能和对象的核心功能毫无关系,但是腰围分散的对象添加日志功能,就必须打开每一个分散的封装好的对象,然后添加日志功能代码,将这种分散在各处与对象核心功能无关的代码,称为横切代码。为了解决这个问题,AOP就应用而生。
AOP是将多个类的公共行为封装到一个可重用的模块(如我们上一段所说的日志功能)并将其命名为“Aspect”,即是说将那些和类的核心业务无关的,却为业务模块所公共调用的逻辑处理封装起来,便可以减少系统的重复代码,降低模块间的耦合度,并有利于未来的可操作性和可维护性。AOP弥补了OOP在横向关系上操作的不足。而实现AOP的技术的主要两种方式,其中一种就是我们《常用设计模式:代理模式》所提到的动态代理技术;还有一种方式就是采用静态织入的方式,引入特定的语法创建“方面”,从而使得编译器可以在编译期间织入有关“方面”的代码。
Spring的AOP的实现原理就是动态代理技术。
一、代理模式
通过之前学习过的设计模式可以知道,简而言之,代理模式就是:“代理人”尽力肩负着工作使命,当“代理人”不能解决某些问题时,就会“转交”给“本人”,这里的“转交”就是“委托”。
那么,究竟什么是代理模式呢?所谓的代理模式,主要分为一下几个角色:1.代理方;2.目标方;3.客户方;为了让读者和将来的自己能够更好的理解这三个角色,举个例子,比如我们要在买一双鞋子,但是鞋店离我们很远,我们需要让一个朋友帮我们代购,那么在这个关系当中,我们就是作为客户方,朋友作为代理方,而鞋店则是目标方,我们需要做的是要讲我们要买的鞋子的需求告诉朋友听,然后朋友帮我们到店里去购买,购买之后还可以为我们的鞋子简单的包装之后再邮寄回我们。这就是代理的三方关系,从这个例子我们可以给出代理的定义:为其他对象提供一种代理以控制对这个对象的访问。在某些情况下,一个对象不适合或者不能直接引用另一个对象,而代理对象可以在客户端和目标对象之间起到中介的作用, 其特征是代理类与委托类有同样的接口。
在进一步理解这个代理类的作用,代理类除了能帮我们把消息递交给目标类之外,还可以为目标类预处理消息,过滤消息,事后处理消息等。在我们的例子中的体现就是朋友不仅可以帮我们买鞋子,还可以为鞋店提供一些购买请求的过滤,比如我们要买的鞋子如果鞋店没有,朋友会直接告诉我们没有这双鞋,而不需要到鞋店去再问一遍,并且在我们购买到鞋子之后,朋友还会负责之后的邮寄和鞋子的包装,这就是相当于代理类为目标类做的消息预处理,消息过滤,以及事后消息预处理。代理类的对象本身并不真正实现服务,而是通过调用目标类的对象的相关方法,来提供特定的服务,从我们的例子来看,朋友自身是不生产鞋子的,而是鞋店生产的鞋子,并且提供销售,是一个道理。真正的业务是由目标类来实现的,但是在实现目标类之前的一些公共服务,例如在项目开发中我们没有加入缓冲,日志这些功能,后期想加入,我们就可以使用代理来实现,而没有必要打开已经封装好的目标类。
(1)静态代理模式(单个接口)
静态代理模式,就是由程序员创建或特定工具自动生成的源代码,再对其编译。在程序运行前,代理的类文件就已经存在。
以买鞋子为例,结合示例程序理解静态代理模式:
- 首先为了保持代理类和目标类的一致性,定义一个通用接口:
1 package bjtu.bigjunoba.staticProxy;
2
3 public interface BuyShoes {
4
5     public void BuyTheShoes();
6 }
- 然后编写目标类方法:
 1 package bjtu.bigjunoba.staticProxy;
 2
 3 public class ShoesSeller implements BuyShoes {
 4
 5     @Override
 6     public void BuyTheShoes() {
 7         System.out.println("我是鞋店老板,即目标类,你执行了BuyTheShoes()这个方法就可以买到鞋了!");
 8     }
 9
10 }
- 然后编写代理类方法,代理类中会调用目标类的方法,这里要注意的是,目标类的BuyTheShoes()方法被增强了,即实现了预处理和事后处理的逻辑代码块:
 1 package bjtu.bigjunoba.staticProxy;
 2
 3 public class ShoesSellerProxy implements BuyShoes {
 4
 5     private ShoesSeller shoesSeller;
 6
 7     public ShoesSellerProxy(ShoesSeller shoesSeller) {
 8         this.shoesSeller = shoesSeller;
 9     }
10     @Override
11     public void BuyTheShoes() {
12         System.out.println("我是帮你买鞋的朋友,即代理类,(预先处理)我要去执行鞋店老板的BuyTheShoes()方法,就可以帮你买鞋!");
13         shoesSeller.BuyTheShoes();
14         System.out.println("我是帮你买鞋的朋友,即代理类,(事后处理)我已经执行鞋店老板的BuyTheShoes()方法,买到了你的鞋子!");
15     }
16
17 }
- 最后,客户类调用代理类中的方法:
1 package bjtu.bigjunoba.staticProxy;
2
3 public class BuyShoesClient {
4     public static void main(String[] args) {
5         ShoesSeller seller = new ShoesSeller();
6         ShoesSellerProxy sellerProxy = new ShoesSellerProxy(seller);
7         System.out.println("我是客户方,我要执行代理方的BuyTheShoes()方法,就可以让朋友帮我买到鞋!");
8         sellerProxy.BuyTheShoes();
9     }
- 输出:
我是客户方,我要执行代理方的BuyTheShoes()方法,就可以让朋友帮我买到鞋!
我是帮你买鞋的朋友,即代理类,(预先处理)我要去执行鞋店老板的BuyTheShoes()方法,就可以帮你买鞋!
我是鞋店老板,即目标类,你执行了BuyTheShoes()这个方法就可以买到鞋了!
我是帮你买鞋的朋友,即代理类,(事后处理)我已经执行鞋店老板的BuyTheShoes()方法,买到了你的鞋子!
(2)静态代理模式(两个接口)
上例中的一个代理类只实现一个业务接口可以很好地理解代理模式这个概念。当然,一个代理类也可以实现多个接口,也就是说朋友既可以帮我买鞋子,也可以帮我买手机。
对于事前处理和事后处理来说,不管是买鞋子还是买手机都是相同的流程:选好商品准备给钱--老板按照商品收钱--拿好商品发我快递。观察SellerProxy类可以发现:这个代理类需要重写很多业务方法,看起来特别冗杂。所以可以通过动态代理模式来解决这个问题。
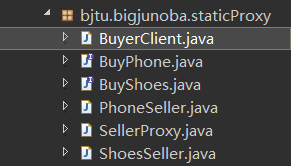
代码结构为:
- 定义买鞋子接口:
1 package bjtu.bigjunoba.staticProxy;
2
3 public interface BuyShoes {
4
5     public void BuyTheShoes();
6 }
- 定义买手机接口:
1 package bjtu.bigjunoba.staticProxy;
2
3 public interface BuyPhone {
4
5     public void BuyThePhone();
6 }
- 实现了买鞋子接口的目标类:
 1 package bjtu.bigjunoba.staticProxy;
 2
 3 public class ShoesSeller implements BuyShoes {
 4
 5     @Override
 6     public void BuyTheShoes() {
 7         System.out.println("我是鞋店老板,即目标类,你把钱给我就可以拿走你要的鞋了!");
 8     }
 9
10 }
- 实现了买手机接口的目标类:
 1 package bjtu.bigjunoba.staticProxy;
 2
 3 public class PhoneSeller implements BuyShoes {
 4
 5     @Override
 6     public void BuyTheShoes() {
 7         System.out.println("我是手机店老板,即目标类,你把钱给我就可以拿走你要的手机了!");
 8     }
 9
10 }
- 代理类,同时实现了买鞋子和买手机,并且包括相同的事前事后处理:
 1 package bjtu.bigjunoba.staticProxy;
 2
 3 public class SellerProxy implements BuyShoes, BuyPhone {
 4
 5     private ShoesSeller shoesSeller;
 6     private PhoneSeller phoneSeller;
 7
 8     public SellerProxy(ShoesSeller shoesSeller) {
 9         this.shoesSeller = shoesSeller;
10     }
11
12
13     public SellerProxy(PhoneSeller phoneSeller) {
14         this.phoneSeller = phoneSeller;
15     }
16
17     @Override
18     public void BuyTheShoes() {
19         System.out.println("我是你的朋友,即代理类,(事前处理)朋友选好了商品,准备把钱付给店家。");
20         shoesSeller.BuyTheShoes();
21         System.out.println("我是你的朋友,即代理类,(事后处理)朋友拿到了商品,并把商品发了快递。");
22     }
23     @Override
24     public void BuyThePhone() {
25         System.out.println("我是你的朋友,即代理类,(事前处理)朋友选好了商品,准备把钱付给店家。");
26         phoneSeller.BuyTheShoes();
27         System.out.println("我是你的朋友,即代理类,(事后处理)朋友拿到了商品,并把商品发了快递。");
28     }
29
30 }
- 客户类,调用代理类的方法:
 1 package bjtu.bigjunoba.staticProxy;
 2
 3 public class BuyerClient {
 4     public static void main(String[] args) {
 5
 6         ShoesSeller sSeller = new ShoesSeller();
 7         PhoneSeller pSeller = new PhoneSeller();
 8
 9         SellerProxy sSellerProxy = new SellerProxy(sSeller);
10         SellerProxy pSellerProxy = new SellerProxy(pSeller);
11
12         System.out.println("我是客户方,我要买鞋!");
13         sSellerProxy.BuyTheShoes();
14
15         System.out.println("我是客户方,我要买手机!");
16         pSellerProxy.BuyThePhone();
17     }
18 }
- 输出:
我是客户方,我要买鞋!
我是你的朋友,即代理类,(事前处理)朋友选好了商品,准备把钱付给店家。
我是鞋店老板,即目标类,你把钱给我就可以拿走你要的鞋了!
我是你的朋友,即代理类,(事后处理)朋友拿到了商品,并把商品发了快递。
我是客户方,我要买手机!
我是你的朋友,即代理类,(事前处理)朋友选好了商品,准备把钱付给店家。
我是手机店老板,即目标类,你把钱给我就可以拿走你要的手机了!
我是你的朋友,即代理类,(事后处理)朋友拿到了商品,并把商品发了快递。
(3)动态代理模式
如果有N个目标类的话,代理类就会显得有很多重复的代码,会显得很冗长,而且代码的利用效率也不高。但是由于在代理类当中的事前处理和事后处理是一样,仅仅是目标类的不同,这个时候就可以使用动态代理模式。
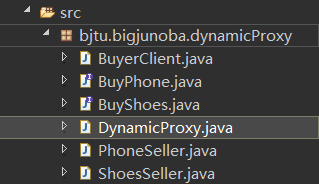
代码结构为:
- 动态代理类:
 1 package bjtu.bigjunoba.dynamicProxy;
 2
 3 import java.lang.reflect.InvocationHandler;
 4 import java.lang.reflect.Method;
 5
 6 public class DynamicProxy implements InvocationHandler {
 7
 8     private Object subject;
 9
10     public DynamicProxy(Object subject) {
11         this.subject = subject;
12     }
13
14     @Override
15     public Object invoke(Object arg0, Method arg1, Object[] arg2) throws Throwable {
16         System.out.println("我是你的朋友,即代理类,(事前处理)朋友选好了商品,准备把钱付给店家。");
17         arg1.invoke(subject, arg2);
18         System.out.println("我是你的朋友,即代理类,(事后处理)朋友拿到了商品,并把商品发了快递。");
19         return null;
20     }
21
22 }
- 客户类,调用构造动态代理类的实例,同时调用动态代理类的方法:
 1 package bjtu.bigjunoba.dynamicProxy;
 2
 3 import java.lang.reflect.InvocationHandler;
 4 import java.lang.reflect.Proxy;
 5
 6
 7 public class BuyerClient {
 8
 9     public static void main(String[] args) {
10
11         ShoesSeller shoesSeller = new ShoesSeller();
12         PhoneSeller phoneSeller = new PhoneSeller();
13
14         InvocationHandler shoeshandler = new DynamicProxy(shoesSeller);
15         InvocationHandler phonehandler = new DynamicProxy(phoneSeller);
16
17         BuyShoes buyTheShoes = (BuyShoes) Proxy.newProxyInstance
18                 (shoeshandler.getClass().getClassLoader(),shoesSeller.getClass().getInterfaces(), shoeshandler);
19         System.out.println("我想要买鞋子。");
20         buyTheShoes.BuyTheShoes();
21
22         System.out.println();
23
24         BuyPhone buyThePhone=(BuyPhone)Proxy.newProxyInstance
25                 (phonehandler.getClass().getClassLoader(), phoneSeller.getClass().getInterfaces(),phonehandler);
26         System.out.println("我想要买手机。");
27         buyThePhone.BuyThePhone();
28
29
30     }
31
32 }
- 输出:
我想要买鞋子。
我是你的朋友,即代理类,(事前处理)朋友选好了商品,准备把钱付给店家。
我是鞋店老板,即目标类,你把钱给我就可以拿走你要的鞋了!
我是你的朋友,即代理类,(事后处理)朋友拿到了商品,并把商品发了快递。

我想要买手机。
我是你的朋友,即代理类,(事前处理)朋友选好了商品,准备把钱付给店家。
我是手机店老板,即目标类,你把钱给我就可以拿走你要的手机了!
我是你的朋友,即代理类,(事后处理)朋友拿到了商品,并把商品发了快递。
InvocationHandler接口的invoke()方法:
1 public class DynamicProxy implements InvocationHandler {
2
3     @Override
4     public Object invoke(Object proxy, Method method, Object[] args) throws Throwable {
5         // TODO Auto-generated method stub
6         return null;
7     }
Proxy类的newProxyInstance()方法:
    public static Object newProxyInstance(ClassLoader loader, Class<?>[] interfaces, InvocationHandler h)
        throws IllegalArgumentException
    {
        Objects.requireNonNull(h);

        final Class<?>[] intfs = interfaces.clone();
        final SecurityManager sm = System.getSecurityManager();
        if (sm != null) {
            checkProxyAccess(Reflection.getCallerClass(), loader, intfs);
        }
        try {
            if (sm != null) {
                checkNewProxyPermission(Reflection.getCallerClass(), cl);
            }

            final Constructor<?> cons = cl.getConstructor(constructorParams);
            final InvocationHandler ih = h;
            if (!Modifier.isPublic(cl.getModifiers())) {
                AccessController.doPrivileged(new PrivilegedAction<Void>() {
                    public Void run() {
                        cons.setAccessible(true);
                        return null;
                    }
                });
            }
            return cons.newInstance(new Object[]{h});
        } catch (IllegalAccessException|InstantiationException e) {
            throw new InternalError(e.toString(), e);
        } catch (InvocationTargetException e) {
            Throwable t = e.getCause();
            if (t instanceof RuntimeException) {
                throw (RuntimeException) t;
            } else {
                throw new InternalError(t.toString(), t);
            }
        } catch (NoSuchMethodException e) {
            throw new InternalError(e.toString(), e);
        }
    }
二、面向切面编程(AOP)
在软件系统中,散布于应用中多处的功能被称为横切关注点。通常来讲,这些横切关注点从从概念上是与应用的业务逻辑相分离的(但是往往会直接嵌入到应用的业务逻辑之中)。把这些横切关注点与业务逻辑相分离正是面向切面编程所要解决的问题。
简而言之,横切关注点可以被描述为影响应用多处的功能。

例如,安全就是一个横切关注点,应用中的很多方法都会涉及到安全规则。上图展现了一个被划分为模块的典型应用。每个模块的核心功能都是为特定业务领域提供服务,但是这些模块都需要类似的辅助功能,例如安全和事务管理。
如果要重用通用功能的话,最常见的面向对象技术是继承或委托。但是,如果在整个应用中都是用相同的基类,继承往往会导致一个脆弱的对象体系,而使用委托可能需要对委托对象进行复杂的调用。
在使用面向切面编程时,仍然在一个地方定义通用功能,但是可以通过声明的方式定义这个功能要以何种方式在何处应用,而无需修改受影响的类。横切关注点可以被模块化为特殊的类,这些类被称为切面。
1.AOP各部分介绍

(1)通知(Advice)
切面的工作被称为通知。通知定义了切面是什么以及何时使用。除了描述切面要完成的工作,通知还解决了何时执行这个工作的问题。它应该在某个方法被调用之前?之后?之前和之后都调用?还是只在方法抛出异常时调用?
Spring切面可以应用5种类型的通知:
- 前置通知(Before):在目标方法被调用之前调用通知功能。
- 后置通知(After): 在目标方法完成之后调用通知,此时不会关心方法的输出是什么。
- 返回通知(After-returning):在目标方法成功执行之后调用通知。
- 异常通知(After-throwing): 在目标方法抛出异常后调用通知。
- 环绕通知(Around):通知包裹了被通知的方法,在被通知的方法调用之前和调用之后执行自定义的行为。
(2)连接点(Join point)
应用可能有数以千计的时机应用通知,这些时机被称为连接点。连接点是在应用执行过程中能够插入切面的一个点。这个点可以是调用方法时、抛出异常时、甚至修改一个字段时。切面代码可以利用这些点插入到应用的正常流程之中,并添加新的行为。
(3)切点(Poincut)
一个切面并不需要通知应用的所有连接点。切点有助于缩小切面所通知的连接点的范围。如果说通知定义了切面的“什么”和“何时”的话,那么切点就定义了“何处”。切点的定义会匹配通知所要织入的一个或多个连接点。通常使用明确的类和方法名称,或是利用正则表达式定义所匹配的类和方法名称来指定这些切点。
(4)切面(Aspect)
切面是通知和切点的集合。通知和切点共同定义了切面的全部内容--它是什么,在何时和何处完成其功能。
(5)引入(Introduction)
引入允许我们向现有的类添加新方法或属性。新方法或属性被引入到现有的类中,可以在无需修改这些现有的类的情况下,让它们具有新的行为和状态。
(6)织入(Weaving)
织入是把切面应用到目标对象并创建新的代理对象的过程。切面在指定的连接点被织入到目标对象中。
2.Spring对AOP的支持
Spring提供了4种典型的AOP支持:
- 基于代理的经典Spring AOP
- 纯POJO切面
- @AspectJ注解驱动的切面
- 注入式AspectJ切面(适用于Spring各版本)
在了解了Spring对AOP的支持之后,还是以一些示例程序来理解实际是如何使用AOP的。还是以买鞋子买手机为例子,先给出下面的几个示例程序中都会用到的业务逻辑类:
- 买鞋子接口:
1 public interface BuyShoes {
2
3     public void BuyTheShoes();
4 }
- 买手机接口:
1 public interface BuyPhone {
2
3     public void BuyThePhone();
4 }
- 实现了买鞋子接口的目标类:
1 public class ShoesSeller implements BuyShoes {
2     @Override
3     public void BuyTheShoes() {
4         System.out.println("我是鞋店老板,即目标类,你把钱给我就可以拿走你要的鞋了!");
5     }
6 }
- 实现了买手机接口的目标类:
1 public class PhoneSeller implements BuyPhone {
2     @Override
3     public void BuyThePhone() {
4         System.out.println("我是手机店老板,即目标类,你把钱给我就可以拿走你要的手机了!");
5     }
6 }
三、基于静态代理的经典AOP
这种方式类似于静态代理模式,但是与静态代理模式不同的是,统一的事前处理和事后处理被单独地放在一个AOP当中的“通知类”当中,也就是说,不需要在代理类当中重写两个业务方法的时候重复写两遍事前处理和事后处理。这种方式需要XML配置,需要将目标类和增强类都注册到容器中,然后定义相应的切点,在根据切点和增强类结合定义切面,还需要定义代理,过程很繁琐,但是对于理解代理模式和AOP却是个很好的例子,虽然实际中不常用,但是可以牢记这个例子作为基础好好理解代理模式和基于代理的AOP。
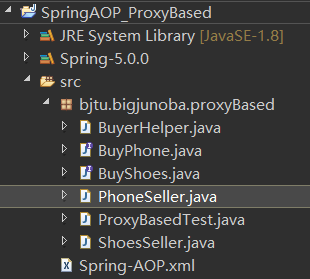
代码结构为:
- 包含统一的事前处理和事后处理的BuyerHelper类:
 1 package bjtu.bigjunoba.proxyBased;
 2
 3 import java.lang.reflect.Method;
 4
 5 import org.springframework.aop.AfterReturningAdvice;
 6 import org.springframework.aop.MethodBeforeAdvice;
 7
 8 public class BuyerHelper implements AfterReturningAdvice, MethodBeforeAdvice {
 9
10     @Override
11     public void before(Method arg0, Object[] arg1, Object arg2) throws Throwable {
12         System.out.println("我是你的朋友,即代理类,(事前处理)朋友选好了商品,准备把钱付给店家。");
13     }
14
15     @Override
16     public void afterReturning(Object arg0, Method arg1, Object[] arg2, Object arg3) throws Throwable {
17         System.out.println("我是你的朋友,即代理类,(事后处理)朋友拿到了商品,并把商品发了快递。");
18     }
19 }
BuyerHelper类实现了Spring框架的AOP部分的两个接口:AfterReturningAdvice接口和MethodBeforeAdvice接口,实现这两个接口之后需要重写两个方法,这两个方法就对应着事前处理和事后处理逻辑。
从功能上来说,BuyerHelper类可以作为PhoneSeller和ShoesSeller两个类的增强类,可以扩展两个业务类的方法的功能,为两个业务类的方法提供统一的事前处理和事后处理。
- Spring AOP的配置文件Spring-AOP.xml:
 1 <?xml version="1.0" encoding="UTF-8"?>
 2 <beans xmlns="http://www.springframework.org/schema/beans"
 3        xmlns:xsi="http://www.w3.org/2001/XMLSchema-instance"
 4        xmlns:aop="http://www.springframework.org/schema/aop"
 5        xmlns:context="http://www.springframework.org/schema/context"
 6        xsi:schemaLocation="
 7        http://www.springframework.org/schema/beans
 8        http://www.springframework.org/schema/beans/spring-beans-3.0.xsd
 9        http://www.springframework.org/schema/aop
10        http://www.springframework.org/schema/aop/spring-aop-3.0.xsd
11        http://www.springframework.org/schema/context
12        http://www.springframework.org/schema/context/spring-context-3.0.xsd">
13
14     <bean class="org.springframework.context.annotation.CommonAnnotationBeanPostProcessor" />
15
16     <context:annotation-config />
17
18     <!--对应bean注册入Spring -->
19     <bean id="buyerHelper" class="bjtu.bigjunoba.proxyBased.BuyerHelper"/>
20     <bean id="shoesSeller" class="bjtu.bigjunoba.proxyBased.ShoesSeller"/>
21     <bean id="phoneSeller" class="bjtu.bigjunoba.proxyBased.PhoneSeller"/>
22
23
24     <!-- 定义切点,匹配所有的BuyTheshoes方法 -->
25     <bean id ="buyShoesPointcut" class="org.springframework.aop.support.JdkRegexpMethodPointcut">
26            <property name="pattern" value=".*BuyTheShoes"></property>
27     </bean>
28
29     <!-- 定义切点,匹配所有的BuyThePhone方法 -->
30     <bean id ="buyPhonePointcut" class="org.springframework.aop.support.JdkRegexpMethodPointcut">
31            <property name="pattern" value=".*BuyThePhone"></property>
32     </bean>
33
34
35     <!-- 定义一个基于Advisor的buyPhone 切面 = 通知 + 切点 -->
36     <bean id="buyPhoneHelperAdvisor" class="org.springframework.aop.support.DefaultPointcutAdvisor">
37          <property name="advice"   ref="buyerHelper"/>
38          <property name="pointcut" ref="buyPhonePointcut"/>
39     </bean>
40
41     <!-- 定义一个基于Advisor的buyPhone 切面 = 通知 + 切点 -->
42     <bean id="buyShoesHelperAdvisor" class="org.springframework.aop.support.DefaultPointcutAdvisor">
43          <property name="advice"   ref="buyerHelper"/>
44          <property name="pointcut" ref="buyShoesPointcut"/>
45     </bean>
46
47
48     <!-- 定义phoneSeller代理对象 -->
49     <bean id="buyPhoneProxy" class="org.springframework.aop.framework.ProxyFactoryBean">
50             <property name="target" ref="phoneSeller"/>
51             <property name="interceptorNames" value="buyPhoneHelperAdvisor"/>
52     </bean>
53
54     <!-- 定义shoesSeller代理对象 -->
55     <bean id="buyShoesProxy" class="org.springframework.aop.framework.ProxyFactoryBean">
56             <property name="target" ref="shoesSeller"/>
57             <property name="interceptorNames" value="buyShoesHelperAdvisor"/>
58     </bean>
59
60 </beans>
配置文件主要分为以下几个部分:
①将目标类和代理类注册到Spring中并形成对应的bean:buyerHelper、shoesSeller、phoneSeller。
②根据正则表达式匹配两个业务类中的业务方法,即BuyTheShoes()方法和BuyThePhone()方法(可以看成接口中的方法,也可以看成实现了接口的目标类中的方法,但是最好是看成接口中的方法,因为这里是以接口中的方法来定义切面的),形成两个切点buyShoesPointcut和buyPhonePointcut。根据之前切点的定义,切点是定义了通知在“何处”被触发执行。就以切点buyShoesPointcut举例,当代码运行过程中如果运行到.BuyTheShoes这个方法的这个地方,Spring就知道可以触发通知了,然后就根据通知的定义,在.BuyTheShoes这个方法的执行前和执行后分别执行通知的具体方法。
③根据之前的定义我们可以理解到,通知定义了切面的“什么”和“何时”,而切点定义了切面的“何处”,所以说切面就是通知和切点的结合,也就是切面的全部内容就是在什么地方什么时候完成什么工作。这里是将两个切点和两个通知分别结合形成了两个切面buyPhoneHelperAdvisor和buyShoesHelperAdvisor。
④基于代理的经典Spring AOP就体现在要定义两个代理对象, 即buyPhoneProxy和buyShoesProxy。代理对象bean的形成是由目标业务类和对应的切面结合而成的。这两个代理对象去执行目标类方法的同时,还要根据切面的内容在合适的地点合适的时间执行合适的方法,也就是说“朋友”替“我”去做两件事“买鞋子”和“买衣服”。
- 测试类ProxyBasedTest:
 1 package bjtu.bigjunoba.proxyBased;
 2
 3 import org.springframework.context.ApplicationContext;
 4 import org.springframework.context.support.ClassPathXmlApplicationContext;
 5
 6 public class ProxyBasedTest {
 7
 8     public static void main(String[] args) {
 9         @SuppressWarnings("resource")
10         ApplicationContext cfg = new ClassPathXmlApplicationContext("Spring-AOP.xml");
11
12         System.out.println("我要买手机!");
13         BuyPhone pSeller = cfg.getBean("buyPhoneProxy", BuyPhone.class);
14         pSeller.BuyThePhone();
15
16         System.out.println();
17
18         System.out.println("我要买鞋子!");
19         BuyShoes sSeller = cfg.getBean("buyShoesProxy", BuyShoes.class);
20         sSeller.BuyTheShoes();
21     }
22 }
通过代理对象来执行业务方法,在执行业务方法的同时触发通知,从而在执行业务方法的事前和事后执行对应的增强方法。
- 输出结果:
我要买手机!
我是你的朋友,即代理类,(事前处理)朋友选好了商品,准备把钱付给店家。
我是手机店老板,即目标类,你把钱给我就可以拿走你要的手机了!
我是你的朋友,即代理类,(事后处理)朋友拿到了商品,并把商品发了快递。

我要买鞋子!
我是你的朋友,即代理类,(事前处理)朋友选好了商品,准备把钱付给店家。
我是鞋店老板,即目标类,你把钱给我就可以拿走你要的鞋了!
我是你的朋友,即代理类,(事后处理)朋友拿到了商品,并把商品发了快递。
四、自动配置代理将纯POJO转化为切面的AOP
基于代理的经典Spring AOP在应对每一个不同的目标类的时候需要定义不同的代理去进行方法增强,这样会使得配置XML的时候显得很冗长。为了解决这个问题,可以让Spring去自动帮我们配置代理,而不再需要手动定义代理对象。
这里你一定会有一个和我当时刚看的时候的疑问,为什么是从IoC容器中获取的是目标类的实例呢?而且最关键是为什么还能实现在切入点去调用增强类的方法呢?为此我也进行了一番调研,发现原来在使用DefaultAdvisorAutoProxyCreator的时候,这时候我们去调用getBean(“phoneSeller”),它其实给我们返回的是自动生成的AOP代理,而不是真实的phoneSeller这个目标类的实例。
用这种方式去进行AOP的实现,可以说比第一种方式来的好方便很多,但是也有可能造成一定的不便。如我们需要在代码中调用到原始的目标类,那这时候我们就没办法再从Spring容器当中去获取了,应为通过getBean方法去获取的话,返回的是AOP代理。
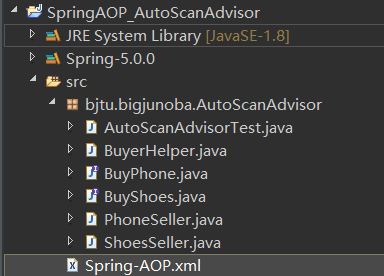
代码结构为:
- 包含统一的事前处理和事后处理的BuyerHelper类:
 1 package bjtu.bigjunoba.AutoScanAdvisor;
 2
 3 import java.lang.reflect.Method;
 4
 5 import org.springframework.aop.AfterReturningAdvice;
 6 import org.springframework.aop.MethodBeforeAdvice;
 7
 8 public class BuyerHelper implements AfterReturningAdvice, MethodBeforeAdvice {
 9
10     @Override
11     public void before(Method arg0, Object[] arg1, Object arg2) throws Throwable {
12         System.out.println("我是你的朋友,即代理类,(事前处理)朋友选好了商品,准备把钱付给店家。");
13     }
14
15     @Override
16     public void afterReturning(Object arg0, Method arg1, Object[] arg2, Object arg3) throws Throwable {
17         System.out.println("我是你的朋友,即代理类,(事后处理)朋友拿到了商品,并把商品发了快递。");
18     }
19 }
- Spring AOP的配置文件Spring-AOP.xml:
 1 <?xml version="1.0" encoding="UTF-8"?>
 2 <beans xmlns="http://www.springframework.org/schema/beans"
 3     xmlns:xsi="http://www.w3.org/2001/XMLSchema-instance"
 4     xmlns:aop="http://www.springframework.org/schema/aop"
 5     xmlns:context="http://www.springframework.org/schema/context"
 6     xsi:schemaLocation="
 7        http://www.springframework.org/schema/beans
 8        http://www.springframework.org/schema/beans/spring-beans-3.0.xsd
 9        http://www.springframework.org/schema/aop
10        http://www.springframework.org/schema/aop/spring-aop-3.0.xsd
11        http://www.springframework.org/schema/context
12        http://www.springframework.org/schema/context/spring-context-3.0.xsd">
13
14     <bean class="org.springframework.context.annotation.CommonAnnotationBeanPostProcessor" />
15
16     <context:annotation-config />
17
18     <!--对应bean注册入Spring  -->
19     <bean id="buyerHelper" class="bjtu.bigjunoba.AutoScanAdvisor.BuyerHelper"/>
20     <bean id="shoesSeller" class="bjtu.bigjunoba.AutoScanAdvisor.ShoesSeller"/>
21     <bean id="phoneSeller" class="bjtu.bigjunoba.AutoScanAdvisor.PhoneSeller"/>
22
23
24     <!-- 定义切点,匹配所有的BuyTheshoes方法 -->
25     <bean id ="buyShoesPointcut" class="org.springframework.aop.support.JdkRegexpMethodPointcut">
26            <property name="pattern" value=".*BuyTheShoes"></property>
27     </bean>
28     <!-- 定义切点,匹配所有的BuyTheshoes方法 -->
29     <bean id ="buyPhonePointcut" class="org.springframework.aop.support.JdkRegexpMethodPointcut">
30            <property name="pattern" value=".*BuyThePhone"></property>
31     </bean>
32
33
34     <!-- 定义一个基于Advisor的buyPhone切面 = 通知+切点结合 -->
35     <bean id="buyPhoneHelperAdvisor" class="org.springframework.aop.support.DefaultPointcutAdvisor">
36          <property name="advice"   ref="buyerHelper"/>
37          <property name="pointcut" ref="buyPhonePointcut"/>
38     </bean>
39
40     <!-- 定义一个基于Advisor的buyPhone切面 = 通知+切点结合 -->
41     <bean id="buyShoesHelperAdvisor" class="org.springframework.aop.support.DefaultPointcutAdvisor">
42          <property name="advice"   ref="buyerHelper"/>
43          <property name="pointcut" ref="buyShoesPointcut"/>
44     </bean>
45
46     <!-- 自动扫描配置文件中的Advisor,并且去匹配其对应的实现切入点拦截方法接口的目标类 -->
47      <bean class="org.springframework.aop.framework.autoproxy.DefaultAdvisorAutoProxyCreator"/>
48 </beans>
其中第47行配置就是自动扫描Spring中的所有的切面,然后根据切点匹配规则将切面和目标业务类匹配起来,从而让Spring实现自动代理。利用DefaultAdvisorAutoProxyCreator去扫描Spring配置文件当中的Advisor,并且为每一个Advisor匹配对应实现了切点拦截方法的业务接口的实现类。比如,buyShoesHelperAdvisor切面中,切点buyPhonePointcut的拦截方法是BuyThePhone(),那么Spring会自动匹配究竟有那个类去实现了声明了BuyThePhone()方法的接口,就找到了phoneSeller这个简单Java Bean(如果还有其他的类实现了这个方法的业务接口,也会一起被代理),并且自动为其配置代理。
- 测试类AutoScanAdvisorTest:
 1 package bjtu.bigjunoba.AutoScanAdvisor;
 2
 3 import org.springframework.context.ApplicationContext;
 4 import org.springframework.context.support.ClassPathXmlApplicationContext;
 5
 6 public class AutoScanAdvisorTest {
 7
 8     public static void main(String[] args) {
 9         @SuppressWarnings("resource")
10         ApplicationContext cfg = new ClassPathXmlApplicationContext("Spring-AOP.xml");
11
12         System.out.println("我要买手机!");
13         BuyPhone pSeller = cfg.getBean("phoneSeller", BuyPhone.class);
14         pSeller.BuyThePhone();
15
16         System.out.println();
17
18         System.out.println("我要买鞋子!");
19         BuyShoes sSeller = cfg.getBean("shoesSeller", BuyShoes.class);
20         sSeller.BuyTheShoes();
21     }
22 }
这里的不同之处在于,getBean()方法的参数只需要设置目标类POJO(简单JavaBean)就可以实现将目标业务类和对应切面相互关联,而不用再定义代理对象。
- 输出结果为:
我要买手机!
我是你的朋友,即代理类,(事前处理)朋友选好了商品,准备把钱付给店家。
我是手机店老板,即目标类,你把钱给我就可以拿走你要的手机了!
我是你的朋友,即代理类,(事后处理)朋友拿到了商品,并把商品发了快递。

我要买鞋子!
我是你的朋友,即代理类,(事前处理)朋友选好了商品,准备把钱付给店家。
我是鞋店老板,即目标类,你把钱给我就可以拿走你要的鞋了!
我是你的朋友,即代理类,(事后处理)朋友拿到了商品,并把商品发了快递。
五、基于@AspectJ注解驱动的AOP
回顾一下将纯POJO转化为切面方式的XML配置,会发现相比较于基于代理方式,XML配置文件并没有简化多少,反正看起来还是很复杂。于是基于@AspectJ注解的形式的优点就可以显现出来了,这种形式比让Spring进行自动代理看起来更舒服更简单一些,只用掌握几个简单的注解使用方法就可以灵活运用这种方式。
但是这种方式的问题还是同样的:可以看到和之前一样,我们通过获取PhoneSeller和ShoesSeller的实例,Spring会给我们自动返回他们的代理对象,然后通过他们的代理对象去调用相应方法的接口,实现目标类的方法的增强,效果与其他方式一致。
学到这里,看到基于注解这几个字,突然就想起了之前已经学习过的《装配Bean》里面的自动配置方式,通过注解将POJO类都声明为Spring中的组件,然后通过Java或者xml开启组件扫描,就不用再在xml里面再进行注册bean这一些操作,这样我们的xml的配置就更加更加的简化了。于是在这里就采用了这种方法,在xml中开启组件扫描,这个时候又会想,我干脆就不想要这个什么xml配置文件了可以不,当然可以。
代码结构为:
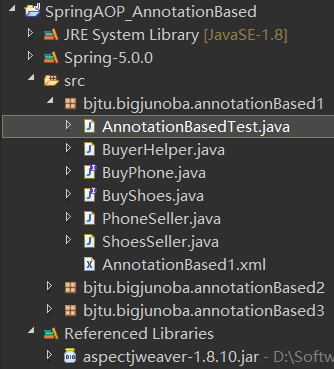
- (切面类通知类)包含统一的事前处理和事后处理的BuyerHelper类:
 1 package bjtu.bigjunoba.annotationBased1;
 2
 3 import org.aspectj.lang.annotation.AfterReturning;
 4 import org.aspectj.lang.annotation.Aspect;
 5 import org.aspectj.lang.annotation.Before;
 6 import org.aspectj.lang.annotation.Pointcut;
 7 import org.springframework.stereotype.Component;
 8
 9 @Aspect
10 @Component("BuyerHelperAspect")
11 public class BuyerHelper {
12
13     @Pointcut("execution(* bjtu.bigjunoba.annotationBased1.*.*(..))")
14     public void BuySomething() {
15     }
16
17     @Before("BuySomething()")
18     public void before() {
19         System.out.println("我是你的朋友,即代理类,(事前处理)朋友选好了商品,准备把钱付给店家。");
20     }
21
22     @AfterReturning("BuySomething()")
23     public void after() {
24         System.out.println("我是你的朋友,即代理类,(事后处理)朋友拿到了商品,并把商品发了快递。");
25     }
26 }
切面类是基于注解的AOP的最重要的一个类:
①BuyerHelper类使用@Aspect注解进行了标注,该标注表明BuyerHelper类是一个切面,回顾一下之前学习过的内容:切面=切点+通知,再看BuyerHelper类,果然是这样。
②BuyerHelper类还使用了@Component注解进行了标注,表明BuyerHelper类是一个POJO,如果开启组件扫描的话,就可以把BuyerHelper类注册成bean到Spring当中。
③BuySomething()方法使用@Pointcut注解进行了标注,首先解释一下切点表达式:
@Pointcut("execution(* bjtu.bigjunoba.annotationBased1.*.*(..))")
这是一个切点表达式:
execution()指示器:在方法执行时触发。
*:返回值的类型为任意类型。
bjtu.bigjunoba.annotationBased1.*.*(..):用正则表达式来表示bjtu.bigjunoba.annotationBased1包下的任意类的任意方法都作为切点
假如方法before是带参数的,可以使用下面的表示方法传递参数:
@Pointcut("execution(* bjtu.bigjunoba.annotationBased1.*.*(..))"
     + "&& args(参数1, 参数2)")
public void before(类型1 参数1,类型2 参数2) {
    ...
}
如果不在BuySomething()方法上使用@Pointcut注解的话,那么就要将通知的两个注解都改成切点表达式,即
@Aspect
@Component("BuyerHelperAspect")
public class BuyerHelper {

    @Before("execution(* bjtu.bigjunoba.annotationBased1.*.*(..))")
    public void before() {
        System.out.println("我是你的朋友,即代理类,(事前处理)朋友选好了商品,准备把钱付给店家。");
    }

    @AfterReturning("execution(* bjtu.bigjunoba.annotationBased1.*.*(..))")
    public void after() {
        System.out.println("我是你的朋友,即代理类,(事后处理)朋友拿到了商品,并把商品发了快递。");
    }
}
这样表达也可以,但是假设有N个不同的处理类,那就要将相同的切点表达式重复N遍,这样就会显得很繁琐。解决办法就是,只定义这个切点一次,然后每次需要的时候引用它,这里通过在BuySomething()方法上使用@Pointcut注解扩展了切点表达式语言,这样就可以在任何切点表达式中使用BuySomething()方法了。BuySomething()方法的实际内容并不重要,在这里它实际上应该是空的, 其实该方法本身只是一个标识,供@Pointcut注解依附。
④事前处理方法before()和事后处理方法after()。
- Spring AOP的配置文件Spring-AOP.xml:
<?xml version="1.0" encoding="UTF-8"?>
<beans xmlns="http://www.springframework.org/schema/beans"
    xmlns:xsi="http://www.w3.org/2001/XMLSchema-instance"
    xmlns:aop="http://www.springframework.org/schema/aop"
    xmlns:context="http://www.springframework.org/schema/context"
    xsi:schemaLocation="
       http://www.springframework.org/schema/beans
       http://www.springframework.org/schema/beans/spring-beans-3.0.xsd
       http://www.springframework.org/schema/aop
       http://www.springframework.org/schema/aop/spring-aop-3.0.xsd
       http://www.springframework.org/schema/context
       http://www.springframework.org/schema/context/spring-context-3.0.xsd">

    <bean class="org.springframework.context.annotation.CommonAnnotationBeanPostProcessor" />

    <context:annotation-config />

    <!-- 扫描包 -->
    <context:component-scan base-package="bjtu.bigjunoba.annotationBased1" annotation-config="true"/>

    <!-- ASPECTJ注解 -->
    <aop:aspectj-autoproxy  proxy-target-class="true" />

    <!-- 目标类 -->
    <bean id="phoneSeller" class="bjtu.bigjunoba.annotationBased1.PhoneSeller"/>
    <bean id="shoesSeller" class="bjtu.bigjunoba.annotationBased1.ShoesSeller"/>

</beans>
①开启组件扫描,扫描包中所有带有@Component注解的组件类,并在Spring中注册成JavaBean。
②<aop:aspectj-autoproxy />用来启用AspectJ自动代理, 启用之后,AspectJ会为使用@Aspect注解的bean创建一个代理,这个代理会围绕着所有该切面的切点所匹配的bean。需要注意的是,Spring的AspectJ自动代理仅仅使用@AspectJ作为创建切面的指导,切面依然是基于代理的。在本质上,它依然是Spring基于代理的切面,这意味着,尽管使用的是@AspectJ注解,但我们仍然限于代理方法的调用。当然也可以在JavaConfig中启用AspectJ注解的自动代理,这个在后面会提到。
- 测试类AnnotationBasedTest(注意文件路径):
 1 package bjtu.bigjunoba.annotationBased1;
 2
 3 import org.springframework.context.ApplicationContext;
 4 import org.springframework.context.support.ClassPathXmlApplicationContext;
 5
 6 public class AnnotationBasedTest {
 7
 8     public static void main(String[] args) {
 9         @SuppressWarnings("resource")
10         ApplicationContext cfg = new ClassPathXmlApplicationContext("classpath:bjtu/bigjunoba/annotationBased1/AnnotationBased1.xml");
11
12         System.out.println("我要买手机!");
13         BuyPhone pSeller = cfg.getBean("phoneSeller", BuyPhone.class);
14         pSeller.BuyThePhone();
15
16         System.out.println();
17
18         System.out.println("我要买鞋子!");
19         BuyShoes sSeller = cfg.getBean("shoesSeller", BuyShoes.class);
20         sSeller.BuyTheShoes();
21     }
22 }
针对这种方式,还有一些变体:
- 将目标类使用@Component注解,同时不用再在XML配置中定义目标类bean,在测试类中通过读取XML配置文件。
- 添加@Component注解到目标类PhoneSeller中:
 1 package bjtu.bigjunoba.annotationBased2;
 2
 3 import org.springframework.stereotype.Component;
 4
 5 @Component("phoneSeller")
 6 public class PhoneSeller implements BuyPhone {
 7
 8     @Override
 9     public void BuyThePhone() {
10         System.out.println("我是手机店老板,即目标类,你把钱给我就可以拿走你要的手机了!");
11     }
12 }
- 添加@Component注解到目标类ShoesSeller中:
 1 package bjtu.bigjunoba.annotationBased2;
 2
 3 import org.springframework.stereotype.Component;
 4
 5 @Component("shoesSeller")
 6 public class ShoesSeller implements BuyShoes {
 7
 8     @Override
 9     public void BuyTheShoes() {
10         System.out.println("我是鞋店老板,即目标类,你把钱给我就可以拿走你要的鞋了!");
11     }
12 }
- 删除目标类注册bean的XML配置文件:
 1 <?xml version="1.0" encoding="UTF-8"?>
 2 <beans xmlns="http://www.springframework.org/schema/beans"
 3     xmlns:xsi="http://www.w3.org/2001/XMLSchema-instance" xmlns:aop="http://www.springframework.org/schema/aop"
 4     xmlns:context="http://www.springframework.org/schema/context"
 5     xsi:schemaLocation="
 6        http://www.springframework.org/schema/beans
 7        http://www.springframework.org/schema/beans/spring-beans-3.0.xsd
 8        http://www.springframework.org/schema/aop
 9        http://www.springframework.org/schema/aop/spring-aop-3.0.xsd
10        http://www.springframework.org/schema/context
11        http://www.springframework.org/schema/context/spring-context-3.0.xsd">
12
13     <bean class="org.springframework.context.annotation.CommonAnnotationBeanPostProcessor" />
14
15     <context:annotation-config />
16
17     <!--扫描包 -->
18     <context:component-scan base-package="bjtu.bigjunoba.annotationBased2" annotation-config="true"/>
19
20     <!-- ASPECTJ注解 -->
21     <aop:aspectj-autoproxy  proxy-target-class="true" />
22
23 </beans>
- 读取配置文件获取通过@Component注解的bean的测试类:
 1 package bjtu.bigjunoba.annotationBased2;
 2
 3 import org.springframework.context.ApplicationContext;
 4 import org.springframework.context.support.ClassPathXmlApplicationContext;
 5
 6 public class AnnotationBasedTest {
 7
 8     public static void main(String[] args) {
 9         @SuppressWarnings("resource")
10         ApplicationContext cfg = new ClassPathXmlApplicationContext("classpath:bjtu/bigjunoba/annotationBased2/AnnotationBased2.xml");
11
12         System.out.println("我要买手机!");
13         BuyPhone pSeller = (BuyPhone) cfg.getBean("phoneSeller");
14         pSeller.BuyThePhone();
15
16         System.out.println();
17
18         System.out.println("我要买鞋子!");
19         BuyShoes sSeller = (BuyShoes) cfg.getBean("shoesSeller");
20         sSeller.BuyTheShoes();
21     }
22 }
2.不使用XML配置文件,直接使用JavaConfig开启自动扫描和AspectJ自动代理。
代码结构为:
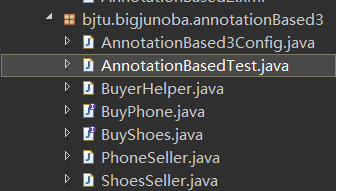
- JavaConfig核心配置类:
package bjtu.bigjunoba.annotationBased3;

import org.springframework.context.annotation.ComponentScan;
import org.springframework.context.annotation.Configuration;
import org.springframework.context.annotation.EnableAspectJAutoProxy;

@Configuration
@EnableAspectJAutoProxy
@ComponentScan
public class AnnotationBased3Config {

}
- 读取核心配置类的测试类:
package bjtu.bigjunoba.annotationBased3;

import org.springframework.context.ApplicationContext;
import org.springframework.context.annotation.AnnotationConfigApplicationContext;
import org.springframework.test.context.ContextConfiguration;

@ContextConfiguration(classes = AnnotationBased3Config.class)
public class AnnotationBasedTest {

    public static void main(String[] args) {
        @SuppressWarnings("resource")
        ApplicationContext cfg = new AnnotationConfigApplicationContext(AnnotationBased3Config.class);

        System.out.println("我要买手机!");
        BuyPhone pSeller = (BuyPhone) cfg.getBean("phoneSeller");
        pSeller.BuyThePhone();

        System.out.println();

        System.out.println("我要买鞋子!");
        BuyShoes sSeller = (BuyShoes) cfg.getBean("shoesSeller");
        sSeller.BuyTheShoes();

    }
}
六、基于XML配置的AOP
如果需要声明切面,但是又不能为通知类添加注解的时候,就必须要使用XML配置了。
代码结构为:
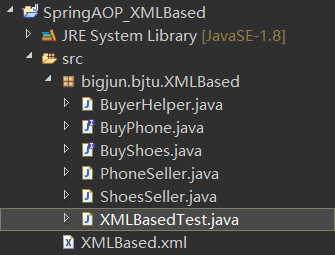
- 取出@Aspect注解的通知类BuyerHelper(但是还是要通过@Service注解将通知类当成业务bean注册到Spring中):
 1 package bigjun.bjtu.XMLBased;
 2
 3 import org.springframework.stereotype.Service;
 4
 5 @Service("BuyerHelper")
 6 public class BuyerHelper {
 7
 8     public void before() {
 9         System.out.println("我是你的朋友,即代理类,(事前处理)朋友选好了商品,准备把钱付给店家。");
10     }
11
12     public void after() {
13         System.out.println("我是你的朋友,即代理类,(事后处理)朋友拿到了商品,并把商品发了快递。");
14     }
15 }
- 通过XML配置声明切面的配置文件XMLBased.xml:
 1 <?xml version="1.0" encoding="UTF-8"?>
 2 <beans xmlns="http://www.springframework.org/schema/beans"
 3     xmlns:xsi="http://www.w3.org/2001/XMLSchema-instance"
 4     xmlns:aop="http://www.springframework.org/schema/aop"
 5     xmlns:context="http://www.springframework.org/schema/context"
 6     xsi:schemaLocation="
 7        http://www.springframework.org/schema/beans
 8        http://www.springframework.org/schema/beans/spring-beans-3.0.xsd
 9        http://www.springframework.org/schema/aop
10        http://www.springframework.org/schema/aop/spring-aop-3.0.xsd
11        http://www.springframework.org/schema/context
12        http://www.springframework.org/schema/context/spring-context-3.0.xsd">
13
14     <bean class="org.springframework.context.annotation.CommonAnnotationBeanPostProcessor" />
15
16     <context:annotation-config />
17
18     <!--扫描包 -->
19     <context:component-scan base-package="bigjun.bjtu.XMLBased" annotation-config="true"/>
20
21     <aop:config>
22        <aop:aspect ref="BuyerHelper">
23             <aop:before method="before" pointcut="execution(* bigjun.bjtu.XMLBased.*.*(..))"/>
24             <aop:after  method="after"  pointcut="execution(* bigjun.bjtu.XMLBased.*.*(..))"/>
25        </aop:aspect>
26     </aop:config>
27
28
29 </beans>
①ref="BuyerHelper引用了一个POJO bean,该bean实现了切面的功能,在这里就是BuyerHelper bean,BuyerHelper bean提供了在切面中通知所调用的before()方法和after()方法
②pointcut属性定义了通知所应用的切点,它的值是使用AspectJ切点表达式语法所定义的切点。
③就像是基于注解的AOP使用@Pointcut注解来消除重复的内容一样,在基于XML的切面声明中,也可以使用<aop:pointcut>元素,比如可以将XMLBased.xml修改成:
 1 <?xml version="1.0" encoding="UTF-8"?>
 2 <beans xmlns="http://www.springframework.org/schema/beans"
 3     xmlns:xsi="http://www.w3.org/2001/XMLSchema-instance"
 4     xmlns:aop="http://www.springframework.org/schema/aop"
 5     xmlns:context="http://www.springframework.org/schema/context"
 6     xsi:schemaLocation="
 7        http://www.springframework.org/schema/beans
 8        http://www.springframework.org/schema/beans/spring-beans-3.0.xsd
 9        http://www.springframework.org/schema/aop
10        http://www.springframework.org/schema/aop/spring-aop-3.0.xsd
11        http://www.springframework.org/schema/context
12        http://www.springframework.org/schema/context/spring-context-3.0.xsd">
13
14     <bean class="org.springframework.context.annotation.CommonAnnotationBeanPostProcessor" />
15
16     <context:annotation-config />
17
18     <!--扫描包 -->
19     <context:component-scan base-package="bigjun.bjtu.XMLBased" annotation-config="true"/>
20
21     <aop:config>
22        <aop:aspect ref="BuyerHelper">
23                <aop:pointcut id="BuySomething" expression="execution(* bigjun.bjtu.XMLBased.*.*(..))"/>
24             <aop:before   method="before" pointcut-ref="BuySomething"/>
25             <aop:after    method="after"  pointcut-ref="BuySomething"/>
26        </aop:aspect>
27     </aop:config>
28
29 </beans>
- 测试类和输出结果没有变化
七、AOP中五种通知Advice的使用
首先回顾一下五种通知:
- @After (后置通知):通知方法会在目标方法返回或抛出异常后调用
- @AfterReturning(返回通知):通知方法会在目标方法返回后调用
- @AfterThrowing(异常通知):通知方法会在目标方法抛出异常后调用
- @Around (环绕通知):通知方法将目标方法封装起来
- @Before (前置通知):通知方法会在目标方法调用之前执行
然后以包含五种通知的代码来理解一下这5种通知的使用:
代码结构为:
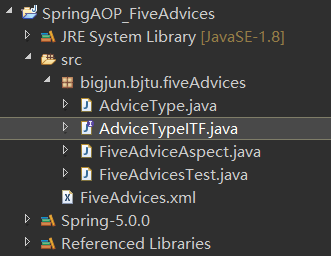
- 目标方法接口:
1 package bigjun.bjtu.fiveAdvices;
2
3 public interface AdviceTypeITF {
4
5     public String Method1(String name);
6     public void Method2(String name, String id);
7 }
- 实现目标方法接口并且包含两个目标方法的目标类:
 1 package bigjun.bjtu.fiveAdvices;
 2
 3 import org.springframework.stereotype.Component;
 4
 5 @Component("adviceType")
 6 public class AdviceType implements AdviceTypeITF {
 7
 8     @Override
 9     public String Method1(String name) {
10         System.out.println("方法1的输出");
11         return "方法1的返回值";
12     }
13
14     @Override
15     public void Method2(String name, String id) {
16         System.out.println("方法2的输出");
17     }
18
19 }
- 包含五种通知的切面类:
package bigjun.bjtu.fiveAdvices;

import org.aspectj.lang.JoinPoint;
import org.aspectj.lang.ProceedingJoinPoint;
import org.aspectj.lang.annotation.After;
import org.aspectj.lang.annotation.AfterReturning;
import org.aspectj.lang.annotation.AfterThrowing;
import org.aspectj.lang.annotation.Around;
import org.aspectj.lang.annotation.Aspect;
import org.aspectj.lang.annotation.Before;
import org.aspectj.lang.annotation.Pointcut;
import org.springframework.stereotype.Component;

@Aspect
@Component("Aspect")
public class FiveAdviceAspect {

    @Pointcut("execution(* bigjun.bjtu.fiveAdvices.*.*(..))")
    public void DoSomething() {
    }

    @Before("DoSomething()")
    public void before(JoinPoint joinpoint)
    {
        System.out.print("这是前置通知 : ");
        for (int i = 0; i < joinpoint.getArgs().length; i++) {
            System.out.print(joinpoint.getArgs()[i]+" ");
        }
        System.out.println(joinpoint.getSignature().getName());
    }

    @After("DoSomething()")
    public void after(JoinPoint joinpoint)
    {
        System.out.print("这是后置通知 : ");
        for (int i = 0; i < joinpoint.getArgs().length; i++) {
            System.out.print(joinpoint.getArgs()[i]+" ");
        }
        System.out.println(joinpoint.getSignature().getName());
    }

    @AfterReturning(pointcut="DoSomething()",returning="result")
    public void afterReturning(JoinPoint jointpoint ,String result)
    {
        System.out.print("这是返回通知  : "+"result= "+result+" ");
        for (int i = 0; i < jointpoint.getArgs().length; i++) {
            System.out.print(jointpoint.getArgs()[i]+" ");
        }
        System.out.println(jointpoint.getSignature().getName());
    }

    @AfterThrowing(pointcut="DoSomething()",throwing="e")
    public void exception(Exception e)
    {
        System.out.println("这是异常通知 : "+e);
    }

    @Around("DoSomething()")
    public Object doBasicProfiling(ProceedingJoinPoint pjp) throws Throwable
    {
        //可以在环绕通知之下进行权限判断
        System.out.print("这是环绕通知 : ");
        for (int i = 0; i < pjp.getArgs().length; i++) {
            System.out.print(pjp.getArgs()[i]+" ");
        }
        System.out.println(pjp.getSignature().getName());
        System.out.println("proceed()方法执行前");
        Object result=pjp.proceed();
        System.out.println("proceed()方法执行后");
        return result;

    }
}
- 开启组件扫描和AspectJ自动代理的XML配置文件:
 1 <?xml version="1.0" encoding="UTF-8"?>
 2 <beans xmlns="http://www.springframework.org/schema/beans"
 3     xmlns:xsi="http://www.w3.org/2001/XMLSchema-instance"
 4     xmlns:aop="http://www.springframework.org/schema/aop"
 5     xmlns:context="http://www.springframework.org/schema/context"
 6     xsi:schemaLocation="
 7        http://www.springframework.org/schema/beans
 8        http://www.springframework.org/schema/beans/spring-beans-3.0.xsd
 9        http://www.springframework.org/schema/aop
10        http://www.springframework.org/schema/aop/spring-aop-3.0.xsd
11        http://www.springframework.org/schema/context
12        http://www.springframework.org/schema/context/spring-context-3.0.xsd">
13
14     <bean class="org.springframework.context.annotation.CommonAnnotationBeanPostProcessor" />
15
16     <context:annotation-config />
17
18     <!--扫描包 -->
19     <context:component-scan base-package="bigjun.bjtu.fiveAdvices" annotation-config="true"/>
20     <!-- ASPECTJ注解 -->
21     <aop:aspectj-autoproxy  proxy-target-class="true" />
22
23 </beans>
- 测试类:
 1 package bigjun.bjtu.fiveAdvices;
 2
 3 import org.springframework.context.ApplicationContext;
 4 import org.springframework.context.support.ClassPathXmlApplicationContext;
 5
 6 public class FiveAdvicesTest {
 7
 8     public static void main(String[] args) {
 9         @SuppressWarnings("resource")
10         ApplicationContext cfg = new ClassPathXmlApplicationContext("FiveAdvices.xml");
11
12         AdviceType aType = cfg.getBean("adviceType", AdviceType.class);
13
14         System.out.println("我要运行方法1!");
15         aType.Method1("来自方法1的QiaoJiang");
16
17         System.out.println();
18
19         System.out.println("我要运行方法2!");
20         aType.Method2("来自方法2的LianJiang", "No.2");
21
22     }
23 }
- 输出结果:
我要运行方法1!
这是环绕通知 : 来自方法1的QiaoJiang Method1
proceed()方法执行前
这是前置通知 : 来自方法1的QiaoJiang Method1
方法1的输出
proceed()方法执行后
这是后置通知 : 来自方法1的QiaoJiang Method1
这是返回通知  : result= 方法1的返回值 来自方法1的QiaoJiang Method1

我要运行方法2!
这是环绕通知 : 来自方法2的LianJiang No.2 Method2
proceed()方法执行前
这是前置通知 : 来自方法2的LianJiang No.2 Method2
方法2的输出
proceed()方法执行后
这是后置通知 : 来自方法2的LianJiang No.2 Method2
从输出结果可以看出,前置,后置,返回,异常都一目了然,然而需要重点分析一下环绕通知。
    @Around("DoSomething()")
    public Object doBasicProfiling(ProceedingJoinPoint pjp) throws Throwable
    {
        //可以在环绕通知之下进行权限判断
        System.out.print("这是环绕通知 : ");
        for (int i = 0; i < pjp.getArgs().length; i++) {
            System.out.print(pjp.getArgs()[i]+" ");
        }
        System.out.println(pjp.getSignature().getName());
        System.out.println("proceed()方法执行前");
        Object result=pjp.proceed();
        System.out.println("proceed()方法执行后");
        return result;
    }
环绕通知是最为强大的通知类型,它能够让你所编写的逻辑将被通知的目标方法完全包装起来。实际上就像在一个通知方法中同时编写好多通知。示例中需要注意的是,环绕通知的返回值就是目标方法的返回值。
写一个伪代码就很好理解了:
    @Around("DoSomething()")
    public void aroundAdviceTest(ProceedingJoinPoint jp) {
        try {
            前置通知代码块
            jp.proceed();
            返回通知代码块
            后置通知代码块
        } catch (Throwable e) {
            异常通知代码块
        }
    }
环绕通知的通知方法必须接受ProceedingJoinPoint作为参数,这个对象是必须要有的,因为米要在通知中通过它来调用被通知的方法。通知方法中可以做任何的事情,当要将控制权交给被通知的方法时,需要调用ProceedingJoinPoint的proceed()方法。如果不调用这个方法的话,会阻塞对被通知方法的访问。
八、AOP的概念和使用原因
现实中有一些内容并不是面向对象(OOP)可以解决的,必须数据库事务,它对于企业级的Java EE应用而言是十分重要的,又如在电商网站购物需要经过交易系统、财务系统,对于交易系统存在一个交易记录的对象,而财务系统则存在账户的信息对象。从这个角度而言,需要对交易记录和账户操作形成一个统一的事务管理。交易和账户的事务,要么全部成功,要么全部失败。
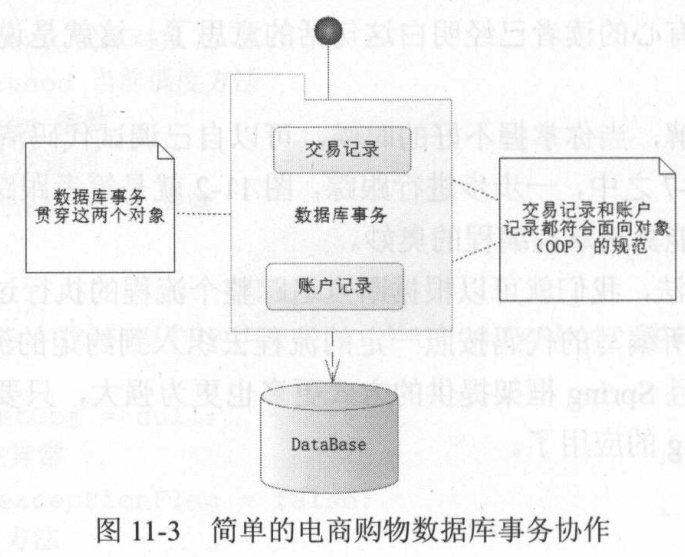
交易记录和账户记录都是对象,这两个对象需要在同一个事务中控制,这就不是面向对象可以解决的问题,而需要用到面向切面的编程,这里的切面环境就是数据库事务。
AOP编程有着重要的意义,首先它可以拦截一些方法,然后把各个对象组织成一个整体,比如网站的交易记录需要记录日志,如果约定好了动态的流程,就可以在交易前后、交易正常完成后或者交易异常发生时,通过这些约定记录相关的日志了。
在JDBC的代码中,需要考虑try...catch...finally语句和数据库资源的关闭问题,而且这些代码会存在大量重复。
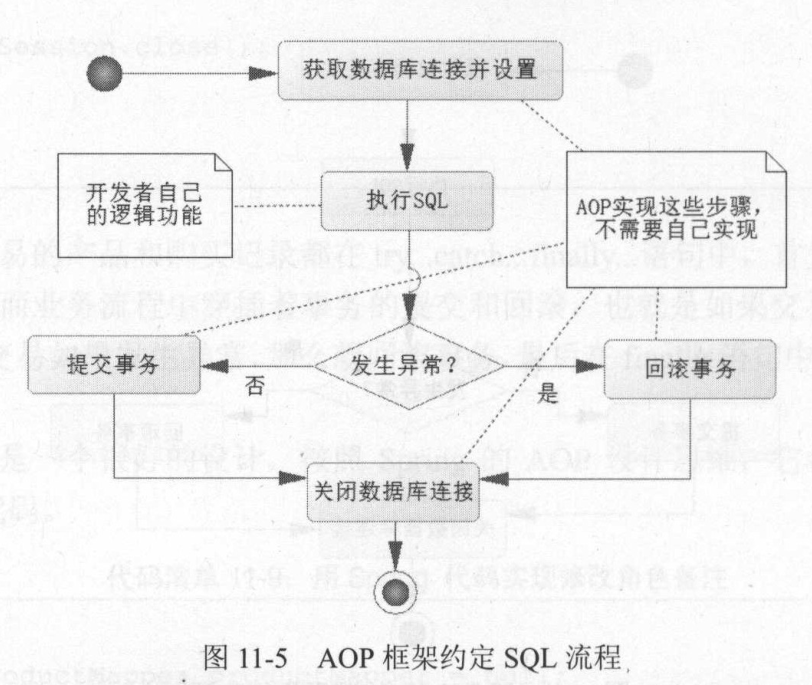
AOP是通过动态代理技术,来管控各个对象操作的切面环境,管理包括日志、数据库事务等操作,让我们拥有可以在反射原有对象方法之前正常返回、异常返回事后插入自己的逻辑代码的能力,有时候甚至取代原始方法。在一些常用的流程中,比如数据库事务,AOP会提供默认的实现逻辑,也会提供一些简单的配置,程序员就可以比较方便地修改默认的实现,达到符合真实应用的效果,这样就就可以大大降低开发的工作量,提高代码的可读性和可维护性,将开发集中在业务逻辑上。
九、多个切面
多个切面的情况下,执行顺序是无序的,可以使用@Order(1)、@Order(2)、@Order(3)为其添加执行顺序.
@Aspect
@Order(1)
public class Aspect1 {
    ...
}
@Aspect
@Order(2)
public class Aspect2 {
    ...
}
@Aspect
@Order(3)
public class Aspect3 {
    ...
}
示例程序源代码已上传至GitHub:https://github.com/BigJunOba/SpringAOP