一、Spring MVC概述
1.Spring MVC 的架构
对于持久层而言,随着软件的发展,迁移数据库的可能性很小,所以在大部分情况下都用不到Hibernate的HQL来满足迁移数据库的要求。与此同时,性能对互联网更为重要,不可优化SQL、不够灵活成了Hibernate的最大缺点,于是MyBatis就兴起了。无论是Hibernate还是MyBatis都没处理好数据库事务的编程,同时随着各种NoSQL的强势崛起,使得Java Web应用不仅能够在数据库获取数据,也可以从NoSQL中获取数据。
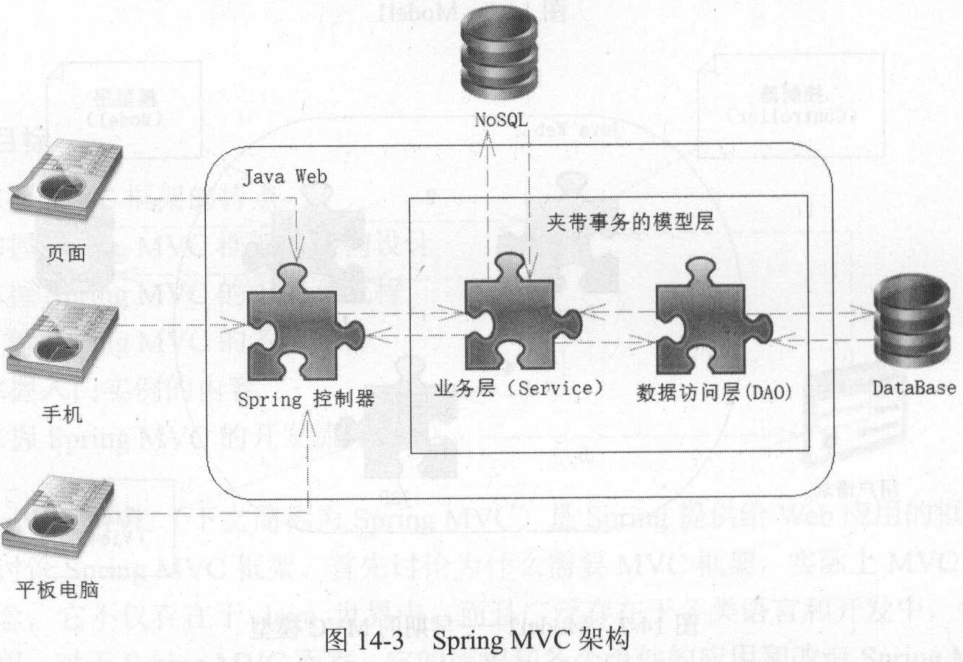
在上面的Spring MVC 架构中,传统的模型层被拆分成业务层(Service)和数据访问层(DAO)。在Service下可以通过 Spring 的声明式事务操作数据库访问层,而在业务层上还允许我们访问NoSQL,这样就能满足现今异军独起的NoSQL的使用了,它的使用将大大提高互联网系统的性能。对于 Spring MVC 而言,其最大的特点是结构松散,比如,可以在 Spring MVC 中使用各种视图,包括JSON、JSP、XML、PDF等,所以它能够满足手机端、页面端和平板电脑端的各类请求,这就是它如此流程的原因。
2.Spring MVC 组件与流程
Spring MVC 是一种基于Servlet的技术,它提供了核心控制器DispatchServlet和相关的组件,并制定了松散的结构,以适合各种灵活的需要。
3.Spring MVC 简单实例
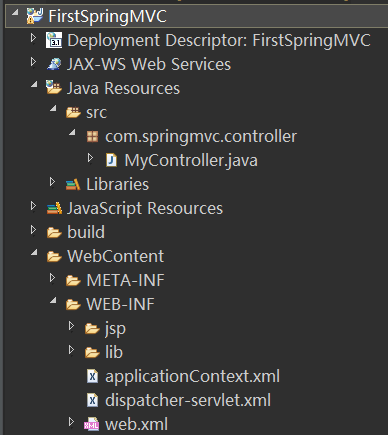
(1)Spring MVC 的配置文件web.xml
<?xml version="1.0" encoding="UTF-8"?>
<web-app version="3.1"
    xmlns="http://xmlns.jcp.org/xml/ns/javaee"
    xmlns:xsi="http://www.w3.org/2001/XMLSchema-instance"
    xsi:schemaLocation="http://xmlns.jcp.org/xml/ns/javaee
                        http://xmlns.jcp.org/xml/ns/javaee/web-app_3_1.xsd">

    <!-- 配置Spring IoC配置文件路径 -->
    <context-param>
        <param-name>contextConfigLocation</param-name>
        <param-value>/WEB-INF/applicationContext.xml</param-value>
    </context-param>

    <!-- 配置ContextLoaderListener用以初始化Spring IoC容器 -->
    <listener>
        <listener-class>org.springframework.web.context.ContextLoaderListener</listener-class>
    </listener>

    <!-- 配置DispatcherServlet -->
    <servlet>
        <!-- 注意:Spring MVC框架会根据servlet-name配置,找到/WEB-INF/dispatcher-servlet.xml作为配置文件载入Web工程中 -->
        <servlet-name>dispatcher</servlet-name>
        <servlet-class>org.springframework.web.servlet.DispatcherServlet</servlet-class>
        <!-- 使得Dispatcher在服务器启动的时候就初始化 -->
        <load-on-startup>2</load-on-startup>
    </servlet>

    <!-- Servlet拦截配置 -->
    <servlet-mapping>
        <servlet-name>dispatcher</servlet-name>
        <url-pattern>*.do</url-pattern>
    </servlet-mapping>

</web-app>
- 系统变量contextConfigLocation的配置,其作用是高速 Spring MVC 其 Spring IoC 的配置文件在哪里,这样 Spring 就会加载/WEB-INF/applicationContext.xml配置文件
- ContextLoaderListener实现了ServletContextListener接口,而ServletContextListener作用是可以在整个Web工程前后加入自定义代码。
- DispatcherServlet的配置,首先定义名字为dispatcher,然后会根据名字去寻找/WEB-INF/dispatcher-servlet.xml作为配置文件,然后设置在服务器启动时就初始化。
- 配置<servlet-mapping>用来拦截以后缀".do"结束的请求,这样所有以后缀“.do”结尾的请求都会被它拦截。
(2)Spring IoC配置文件applicationContext.xml
由于不需要加载任何的Java Bean,因此,这里的配置为空。
<?xml version='1.0' encoding='UTF-8' ?>
<beans xmlns="http://www.springframework.org/schema/beans"
    xmlns:xsi="http://www.w3.org/2001/XMLSchema-instance"
    xmlns:p="http://www.springframework.org/schema/p"
    xmlns:tx="http://www.springframework.org/schema/tx"
    xmlns:context="http://www.springframework.org/schema/context"
    xmlns:mvc="http://www.springframework.org/schema/mvc"
    xsi:schemaLocation="http://www.springframework.org/schema/beans http://www.springframework.org/schema/beans/spring-beans-4.0.xsd
       http://www.springframework.org/schema/tx http://www.springframework.org/schema/tx/spring-tx-4.0.xsd
       http://www.springframework.org/schema/context http://www.springframework.org/schema/context/spring-context-4.0.xsd
       http://www.springframework.org/schema/mvc http://www.springframework.org/schema/mvc/spring-mvc-4.0.xsd">

</beans>
(3)DispatcherServlet的配置文件dispatcher-servlet.xml
- 首先启动注解扫描,这样就能使用Spring MVC 中的注解了
- 然后定义扫描装载的包,也就是在指定的包路径下扫描Java代码中的注解
- 定义视图解析器,即在/WEB-INF/jsp/下所有以".jsp"为结尾的文件都可以作为视图去响应用户请求。
<?xml version='1.0' encoding='UTF-8' ?>
<beans xmlns="http://www.springframework.org/schema/beans"
    xmlns:xsi="http://www.w3.org/2001/XMLSchema-instance"
    xmlns:p="http://www.springframework.org/schema/p"
    xmlns:tx="http://www.springframework.org/schema/tx"
    xmlns:context="http://www.springframework.org/schema/context"
    xmlns:mvc="http://www.springframework.org/schema/mvc"
    xsi:schemaLocation="http://www.springframework.org/schema/beans http://www.springframework.org/schema/beans/spring-beans-4.0.xsd
       http://www.springframework.org/schema/tx http://www.springframework.org/schema/tx/spring-tx-4.0.xsd
       http://www.springframework.org/schema/context http://www.springframework.org/schema/context/spring-context-4.0.xsd
       http://www.springframework.org/schema/mvc http://www.springframework.org/schema/mvc/spring-mvc-4.0.xsd">

    <!-- 使用注解驱动 -->
    <mvc:annotation-driven />

    <!-- 定义扫描装载的包 -->
    <context:component-scan base-package="com.*" />

    <!-- 定义视图解析器 -->
    <!-- 找到Web工程/WEB-INF/JSP文件夹,且文件结尾为jsp的文件作为映射 -->
    <bean id="viewResolver"
        class="org.springframework.web.servlet.view.InternalResourceViewResolver"
        p:prefix="/WEB-INF/jsp/" p:suffix=".jsp" />

</beans>
(4)自定义控制器Controller
由于前面的配置文件中开启了注解扫描,并且制定了在“com.*”包下,因此就可以扫描到MyController类。
其中,首先使用@Controller注解表示MyController类是一个控制器,
然后使用@RequestMapping注解制定了对应的请求的URL,Spring MVC 在初始化时就会将这些消息解析,存放起来,于是有了HandlerMapping
然后通过ModelAndView方法将视图名称定义为index,由于前面定义了后缀“.jsp”,于是就定位到/WEB-INF/jsp/index.jsp作为最后的用户相应。
即,用户输入的URL为/my/index.do才对应着用户响应文件/WEB-INF/jsp/index.jsp。
package com.springmvc.controller;

import org.springframework.stereotype.Controller;
import org.springframework.web.bind.annotation.RequestMapping;
import org.springframework.web.servlet.ModelAndView;

//注解@Controller表示它是一个控制器
@Controller("myController")
// 表明当请求的URI在/my下的时候才有该控制器响应
@RequestMapping("/my")
public class MyController {
    // 表明URI是/index的时候该方法才请求
    @RequestMapping("/index")
    public ModelAndView index() {
        // 模型和视图
        ModelAndView mv = new ModelAndView();
        // 视图逻辑名称为index
        mv.setViewName("index");
        // 返回模型和视图
        return mv;
    }
}
(5)用户响应文件index.jsp
<%@page contentType="text/html" pageEncoding="UTF-8"%>
<!DOCTYPE HTML PUBLIC "-//W3C//DTD HTML 4.01 Transitional//EN"
    "http://www.w3.org/TR/html4/loose.dtd">
<html>
    <head>
        <meta http-equiv="Content-Type" content="text/html; charset=UTF-8">
        <title>Welcome to Spring Web MVC project</title>
    </head>
    <body>
        <h1>Hello, Spring MVC</h1>
    </body>
</html>
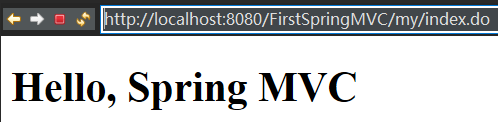
(6)启动Tomcat,然后在浏览器中输入http://localhost:8080/FirstSpringMVC/my/index.do就可以返回/WEB-INF/jsp/index.jsp了
(7)分析执行流程
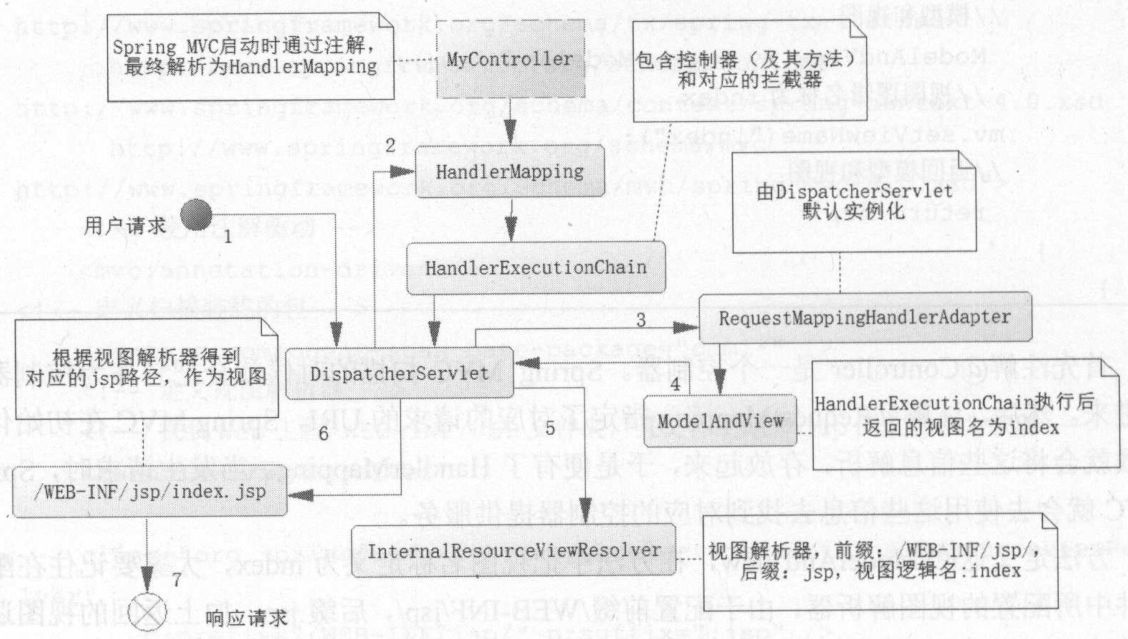
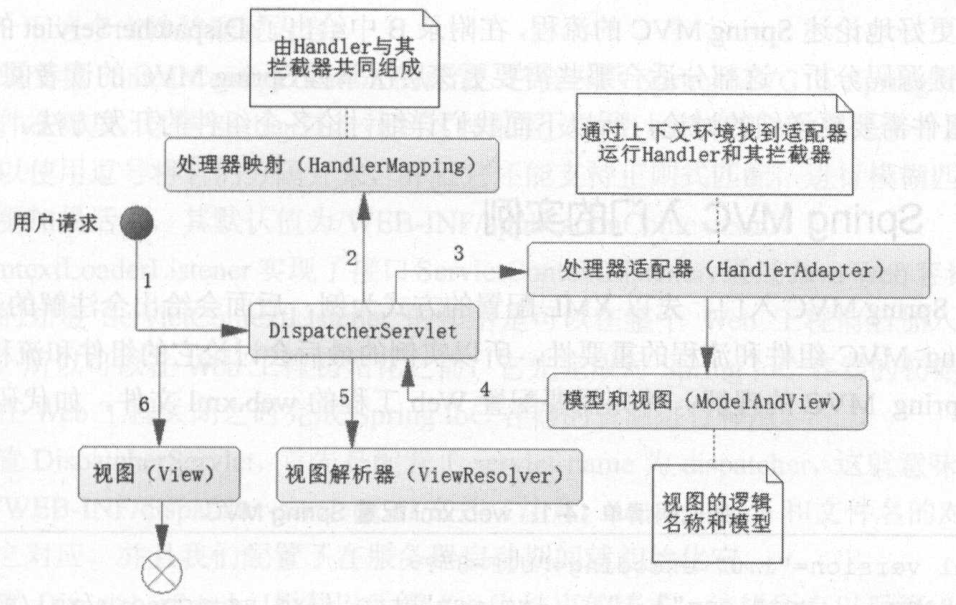
0.Spring MVC启动时,就会解析MyController的注解,然后生成对应的URL和请求的映射关系(/my/index.do→/WEB-INF/jsp/index.jsp),并注册成对应的方法到HandlerMapping
1.用户发起请求,即在浏览器中输入:http://localhost:8080/FirstSpringMVC/my/index.do
2.然后根据URL找到对应的HandlerMapping,然后组织成为一个执行链HandlerExecutionChain
3.通过请求类型找到RequestMappingHandlerAdapter的实例,通过它去执行HandlerExecutionChain中的内容
4.然后在MyController方法中将方法返回结果,即index返回给DispatcherServlet
5.由于在定义视图解析器的时候,InternalResourceViewResolver配置成p:prefix="/WEB-INF/jsp/" p:suffix=".jsp" />
6.根据视图解析器和视图名,确定视图文件的为/WEB-INF/jsp/index.jsp
7.将视图文件返回给用户,响应最终的请求。
二、Spring MVC + Spring + MyBatis 开发流程
1.动态Web项目总体配置文件 web.xml,和上面的实例没有区别
<?xml version="1.0" encoding="UTF-8"?>
<web-app version="3.1"
    xmlns="http://xmlns.jcp.org/xml/ns/javaee"
    xmlns:xsi="http://www.w3.org/2001/XMLSchema-instance"
    xsi:schemaLocation="http://xmlns.jcp.org/xml/ns/javaee http://xmlns.jcp.org/xml/ns/javaee/web-app_3_1.xsd">

    <!-- 配置Spring IoC配置文件路径 -->
    <context-param>
        <param-name>contextConfigLocation</param-name>
        <param-value>/WEB-INF/applicationContext.xml</param-value>
    </context-param>

    <!-- 配置ContextLoaderListener用以初始化Spring IoC容器 -->
    <listener>
        <listener-class>org.springframework.web.context.ContextLoaderListener</listener-class>
    </listener>

    <!-- 配置DispatcherServlet -->
    <servlet>
        <!-- 注意:Spring MVC框架会根据servlet-name配置,找到/WEB-INF/dispatcher-servlet.xml作为配置文件载入Web工程中 -->
        <servlet-name>dispatcher</servlet-name>
        <servlet-class>org.springframework.web.servlet.DispatcherServlet</servlet-class>
        <!-- 使得Dispatcher在服务器启动的时候就初始化 -->
        <load-on-startup>2</load-on-startup>
    </servlet>

    <!-- Servlet拦截配置 -->
    <servlet-mapping>
        <servlet-name>dispatcher</servlet-name>
        <url-pattern>*.do</url-pattern>
    </servlet-mapping>
</web-app>
2.配置Spring + MyBatis
(1)Spring IoC配置文件applicationContext.xml
包括:开启注解驱动,dataSource + transactionManager + MapperScannerConfigurer = MyBatis环境配置
<?xml version='1.0' encoding='UTF-8' ?>
<beans xmlns="http://www.springframework.org/schema/beans"
    xmlns:xsi="http://www.w3.org/2001/XMLSchema-instance"
    xmlns:p="http://www.springframework.org/schema/p"
    xmlns:tx="http://www.springframework.org/schema/tx"
    xmlns:context="http://www.springframework.org/schema/context"
    xmlns:mvc="http://www.springframework.org/schema/mvc"
    xsi:schemaLocation="http://www.springframework.org/schema/beans http://www.springframework.org/schema/beans/spring-beans-4.0.xsd
       http://www.springframework.org/schema/tx http://www.springframework.org/schema/tx/spring-tx-4.0.xsd
       http://www.springframework.org/schema/context http://www.springframework.org/schema/context/spring-context-4.0.xsd
       http://www.springframework.org/schema/mvc http://www.springframework.org/schema/mvc/spring-mvc-4.0.xsd">

    <!-- 使用注解驱动 -->
    <context:annotation-config />

    <!-- 数据库连接池 -->
    <bean id="dataSource"
        class="org.apache.commons.dbcp.BasicDataSource">
        <property name="driverClassName" value="com.mysql.jdbc.Driver" />
        <property name="url" value="jdbc:mysql://localhost:3306/chapter6?useSSL=false" />
        <property name="username" value="root" />
        <property name="password" value="bjtungirc" />
        <property name="maxActive" value="255" />
        <property name="maxIdle" value="5" />
        <property name="maxWait" value="10000" />
    </bean>

    <!-- 集成mybatis -->
    <bean id="SqlSessionFactory"
        class="org.mybatis.spring.SqlSessionFactoryBean">
        <property name="dataSource" ref="dataSource" />
        <property name="configLocation"
            value="classpath:/mybatis/mybatis-config.xml" />
    </bean>

    <!-- 配置数据源事务管理器 -->
    <bean id="transactionManager"
        class="org.springframework.jdbc.datasource.DataSourceTransactionManager">
        <property name="dataSource" ref="dataSource" />
    </bean>

    <!-- 采用自动扫描方式创建mapper bean -->
    <bean class="org.mybatis.spring.mapper.MapperScannerConfigurer">
        <property name="basePackage" value="com.ssm.chapter14" />
        <property name="SqlSessionFactory" ref="SqlSessionFactory" />
        <property name="annotationClass"
            value="org.springframework.stereotype.Repository" />
    </bean>
</beans>
(2)与之对应的/mybatis/mybatis-config.xml,即MyBatis配置文件:
<?xml version="1.0" encoding="UTF-8"?>
<!DOCTYPE configuration PUBLIC "-//mybatis.org//DTD Config 3.0//EN" "http://mybatis.org/dtd/mybatis-3-config.dtd">
<configuration>

    <!-- 指定映射器路径 -->
    <mappers>
        <mapper resource="com/ssm/chapter14/mapper/RoleMapper.xml" />
    </mappers>

</configuration>
(3)与之对应的,MyBatis映射器配置文件:
<?xml version="1.0" encoding="UTF-8" ?>
<!DOCTYPE mapper
  PUBLIC "-//mybatis.org//DTD Mapper 3.0//EN"
  "http://mybatis.org/dtd/mybatis-3-mapper.dtd">
<mapper namespace="com.ssm.chapter14.dao.RoleDao">
    <select id="getRole" parameterType="long"
        resultType="com.ssm.chapter14.pojo.Role">
        select id, role_name as roleName, note from t_role where id
        = #{id}
    </select>
</mapper>
(4)与之对应的,映射器接口Java类:
package com.ssm.chapter14.dao;

import org.springframework.stereotype.Repository;

import com.ssm.chapter14.pojo.Role;

@Repository
public interface RoleDao {

    public Role getRole(Long id);
}
(5)与之对应的还有(可能顺序不太对,应该最先定义POJO类,whatever),简单POJO类:Role类:
package com.ssm.chapter14.pojo;

public class Role {
    private Long id;
    private String roleName;
    private String note;

  /*getter and setter*/
}
(6)然后是业务类:
首先是业务接口类:RoleService
package com.ssm.chapter14.service;

import com.ssm.chapter14.pojo.Role;

public interface RoleService {

    public Role getRole(Long id);
}
(7)然后是业务实现类:RoleServiceImpl类,其中在getRole方法上还定义了事务@Transactional
package com.ssm.chapter14.service.impl;

@Service
public class RoleServiceImpl implements RoleService {

    @Autowired
    private RoleDao roleDao = null;

    @Override
    @Transactional(isolation = Isolation.READ_COMMITTED, propagation = Propagation.REQUIRED)
    public Role getRole(Long id) {
        return roleDao.getRole(id);
    }

}
至此,MyBatis + Spring 基本配置完成。
3.Spring MVC 的核心组件 DispatcherServlet的配置文件dispatcher-servlet.xml
同上,没有任何变化,包括开启注解驱动,定义扫描包得以扫描控制器类,以及定义映射文件前缀和后缀
<?xml version='1.0' encoding='UTF-8' ?>
<beans xmlns="http://www.springframework.org/schema/beans"
    xmlns:xsi="http://www.w3.org/2001/XMLSchema-instance"
    xmlns:p="http://www.springframework.org/schema/p"
    xmlns:tx="http://www.springframework.org/schema/tx"
    xmlns:context="http://www.springframework.org/schema/context"
    xmlns:mvc="http://www.springframework.org/schema/mvc"
    xsi:schemaLocation="http://www.springframework.org/schema/beans http://www.springframework.org/schema/beans/spring-beans-4.0.xsd
       http://www.springframework.org/schema/tx http://www.springframework.org/schema/tx/spring-tx-4.0.xsd
       http://www.springframework.org/schema/context http://www.springframework.org/schema/context/spring-context-4.0.xsd
       http://www.springframework.org/schema/mvc http://www.springframework.org/schema/mvc/spring-mvc-4.0.xsd">
    <!-- 使用注解驱动 -->
    <mvc:annotation-driven />
    <!-- 定义扫描装载的包 -->
    <context:component-scan base-package="com.*" />
    <!-- 定义视图解析器 -->
    <!-- 找到Web工程/WEB-INF/JSP文件夹,且文件结尾为jsp的文件作为映射 -->
    <bean id="viewResolver"
        class="org.springframework.web.servlet.view.InternalResourceViewResolver"
        p:prefix="/WEB-INF/jsp/" p:suffix=".jsp" />
    <!-- 如果有配置数据库事务,需要开启注解事务的,需要开启这段代码 -->
    <tx:annotation-driven
        transaction-manager="transactionManager" />
</beans>
4.自定义控制器Controller:RoleController类
@Controller声明RoleController类是一个控制器,@RequestMapping("/role")定义了必须以URL开头的请求,然后包括两个ModelAndView返回类型的方法。
分析第一个方法:
- @RequestMapping(value = "/getRole", method = RequestMethod.GET):HTTP请求枚举取值范围为GET、HEAD、POST、PUT、PATCH、DELETE、OPTIONS、TRACE,常用的请求是GET和POST请求,这里的配置的意思是只响应GET请求,如果没有配置method项,则所有的请求都会响应。
- public ModelAndView getRole(@RequestParam("id") Long id) {...}:在Spring MVC 中接收参数的方法很多,可以使用Servlet容器给予的API,但是这样会是控制器依赖于Servlet容器,不利于扩展和测试。为了给予更好的灵活性,Spring MVC 可以使用@RequestParam来从HTTP请求中获取到参数,这里的意思是,从HTTP请求中获取到参数的id,且类型为Long。
- mv.setViewName("roleDetails");:设置对应的映射文件的名称,结合之前的InternalResourceViewResolver配置,得知视图文件名称为/WEB-INF/jsp/roleDetails.jsp
- mv.addObject("role", role);:把查询到的数据role添加给数据模型和视图以便将来使用,这里是由于roleDetails.jsp中需要通过引用来获取到role对象的各种参数。
第二个方法对比于第一个方法的不同,在于mv.setView(new MappingJackson2JsonView());。由于目前的前端技术中,普遍使用Ajax技术,因此往往需要后台返回JSON数据给前端使用,Spring MVC也可以轻松实现,这里只需要下载Jackson2的包,然后通过mv.setView(new MappingJackson2JsonView());将视图类型设置为JSON类型,就可以得到JSON数据提供给Ajax异步请求使用了。
由于MappingJackson2JsonView是一个非逻辑视图,因此并不需要视图解析器进行解析,它会直接把模型和视图中的数据模型直接通过JSON视图转换出来:
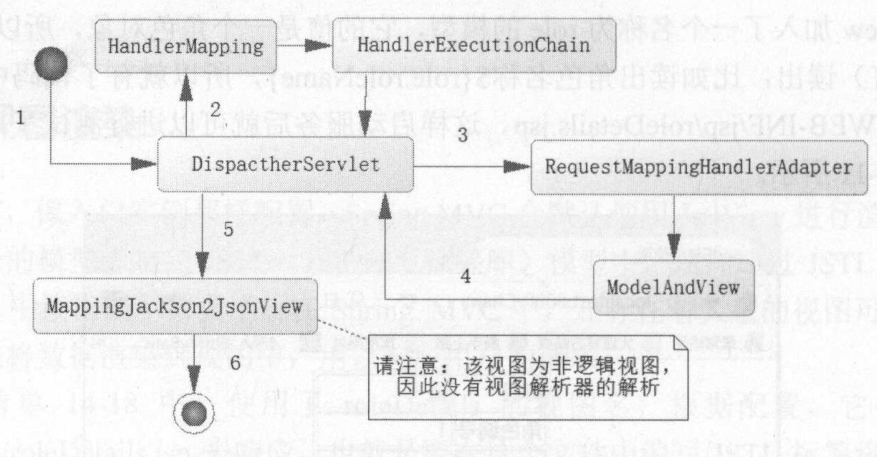
可以得到两个控制器方法的映射关系:
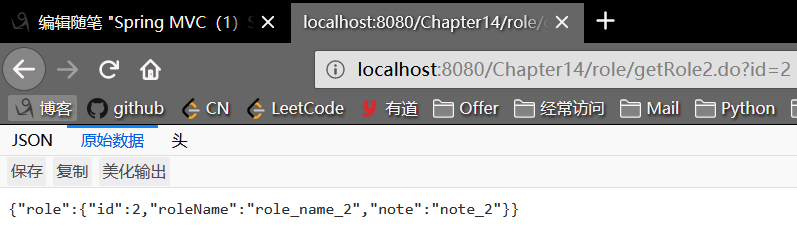
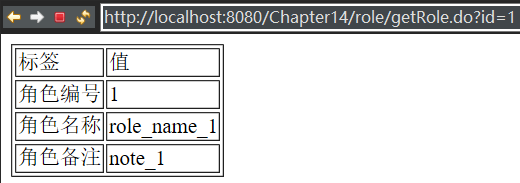
/role/getRole.do?id=1 → /WEB-INF/jsp/roleDetails.jsp
/role/getRole2.do?id = 1 → JSON类型的role数据
package com.ssm.chapter14.controller;

@Controller
@RequestMapping("/role")
public class RoleController {
    // 注入角色服务类
    @Autowired
    private RoleService roleService = null;

    @RequestMapping(value = "/getRole", method = RequestMethod.GET)
    public ModelAndView getRole(@RequestParam("id") Long id) {
        Role role = roleService.getRole(id);
        ModelAndView mv = new ModelAndView();
        mv.setViewName("roleDetails");
        // 给数据模型添加一个角色对象
        mv.addObject("role", role);
        return mv;
    }

    // 获取角色
    @RequestMapping(value = "/getRole2", method = RequestMethod.GET)
    public ModelAndView getRole2(@RequestParam("id") Long id) {
        Role role = roleService.getRole(id);
        ModelAndView mv = new ModelAndView();
        mv.addObject("role", role);
        // 指定视图类型
        mv.setView(new MappingJackson2JsonView());
        return mv;
    }
}
5.用户响应视图文件:roleDetails.jsp
第4步控制器中通过mv.addObject("role", role);方法将名称为role的模型传递给模型和视图即ModelAndView,它的值是一个角色对象。
然后通过<td><c:out value="${role.id}"></c:out></td>标签中的EL表达式,即<c:out value="${role.id}"></c:out>通过"${role.id}"读出角色对象role的各种参数属性。
<%@ page pageEncoding="utf-8"%>
<%@ taglib prefix="c" uri="http://java.sun.com/jsp/jstl/core"%>
<html>
<head>
<title>out标签的使用</title>
</head>
<body>
</body>
    <table border="1">
        <tr>
            <td>标签</td>
            <td>值</td>
        </tr>
        <tr>
            <td>角色编号</td>
            <td><c:out value="${role.id}"></c:out></td>
        </tr>
        <tr>
            <td>角色名称</td>
            <td><c:out value="${role.roleName}"></c:out></td>
        </tr>
        <tr>
            <td>角色备注</td>
            <td><c:out value="${role.note}"></c:out></td>
        </tr>
    </table>
</html>
6.测试结果
(1)测试public ModelAndView getRole(@RequestParam("id") Long id) 方法定义的控制器
(2)测试public ModelAndView getRole2(@RequestParam("id") Long id) 方法定义的控制器