SSM框架整合
整合思路
1.由于SpringMVC是Spring框架中的一个模块,所以SpringMVC与Spring之间不存在整合的问题,只要引入相应JAR包就可以直接使用。因此SSM框架的整合就只涉及Spring与Mybatis的整合,以及SpringMVC与Mybatis的整合。
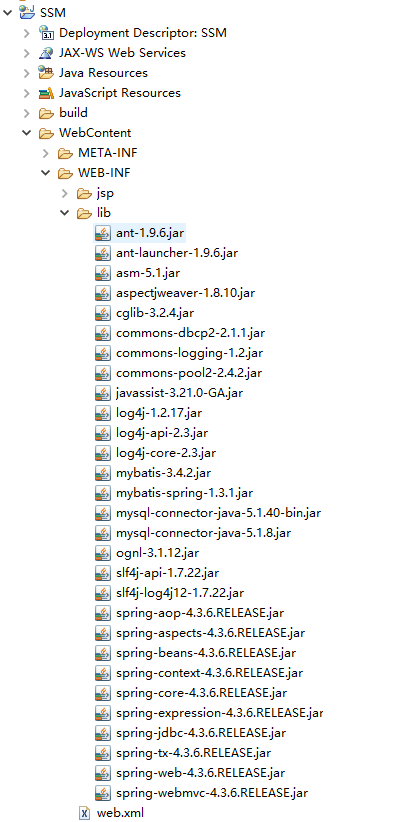
2.准备所需要的JAR包

3.编写配置文件
(1)在Eclipse中,创建一个名为SSM的Web项目,将整合所需要的JAR包添加到项目的lib目录中,并发布到类路径下。
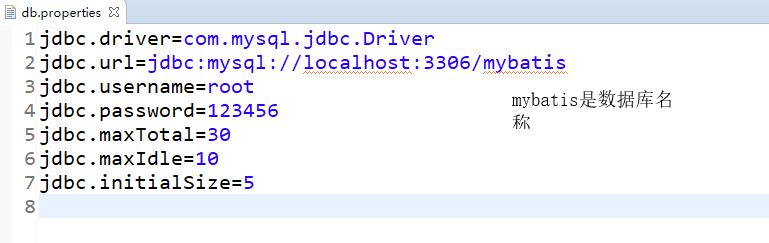
(2)在SSM项目下,创建一个名为config的源文件夹(SourceFolder),在该文件夹中分别创建数据库常用配置文件db.properties、Spring配置文件applicationContext.xml以及Mybatis的配置文件mybatis-config.xml
<?xml version="1.0" encoding="UTF-8"?>
<beans xmlns="http://www.springframework.org/schema/beans"
    xmlns:xsi="http://www.w3.org/2001/XMLSchema-instance"
    xmlns:aop="http://www.springframework.org/schema/aop"
    xmlns:tx="http://www.springframework.org/schema/tx"
    xmlns:context="http://www.springframework.org/schema/context"
    xsi:schemaLocation="http://www.springframework.org/schema/beans
    http://www.springframework.org/schema/beans/spring-beans-4.3.xsd
    http://www.springframework.org/schema/tx
    http://www.springframework.org/schema/tx/spring-tx-4.3.xsd
    http://www.springframework.org/schema/context
    http://www.springframework.org/schema/context/spring-context-4.3.xsd
    http://www.springframework.org/schema/aop
    http://www.springframework.org/schema/aop/spring-aop-4.3.xsd">
    <!-- 读取db.properties -->
    <context:property-placeholder location="classpath:db.properties"/>
    <!-- 配置数据源 -->
	<bean id="dataSource"
                           class="org.apache.commons.dbcp2.BasicDataSource">
		<!--数据库驱动 -->
		<property name="driverClassName" value="${jdbc.driver}" />
		<!--连接数据库的url -->
		<property name="url" value="${jdbc.url}" />
		<!--连接数据库的用户名 -->
		<property name="username" value="${jdbc.username}" />
		<!--连接数据库的密码 -->
		<property name="password" value="${jdbc.password}" />
		<!--最大连接数 -->
		<property name="maxTotal" value="${jdbc.maxTotal}" />
		<!--最大空闲连接  -->
		<property name="maxIdle" value="${jdbc.maxIdle}" />
		<!--初始化连接数  -->
		<property name="initialSize" value="${jdbc.initialSize}" />
	</bean>
     <!-- 事务管理器,依赖于数据源 -->
	<bean id="transactionManager" class=
     "org.springframework.jdbc.datasource.DataSourceTransactionManager">
		<property name="dataSource" ref="dataSource" />
	</bean>
    <!-- 开启事务注解 -->
	<tx:annotation-driven transaction-manager="transactionManager"/>
    <!-- 配置MyBatis工厂SqlSessionFactory -->
    <bean id="sqlSessionFactory"
                           class="org.mybatis.spring.SqlSessionFactoryBean">
         <!--注入数据源 -->
         <property name="dataSource" ref="dataSource" />
         <!--指定核MyBatis心配置文件位置 -->
  <property name="configLocation" value="classpath:mybatis-config.xml" />
    </bean>
    <!-- 配置mapper扫描器 -->
	<bean class="org.mybatis.spring.mapper.MapperScannerConfigurer">
		<property name="basePackage" value="com.itheima.dao"/>
	</bean>
    <!-- 扫描Service -->
    <context:component-scan base-package="com.itheima.service" />
</beans>
[applicationContext.xml ]<?xml version="1.0" encoding="UTF-8" ?>
<!DOCTYPE configuration PUBLIC "-//mybatis.org//DTD Config 3.0//EN"
"http://mybatis.org/dtd/mybatis-3-config.dtd">
<configuration>
<!-- 别名定义 -->
<typeAliases>
<package name="com.itheima.po" />
</typeAliases>
</configuration>
[mybatis-config.xml]
(3)在config文件夹中,创建Spring MVC的配置文件springmvc-config.xml。
<beans xmlns="http://www.springframework.org/schema/beans"
  xmlns:xsi="http://www.w3.org/2001/XMLSchema-instance"
  xmlns:mvc="http://www.springframework.org/schema/mvc"
  xmlns:context="http://www.springframework.org/schema/context"
  xmlns:tx="http://www.springframework.org/schema/tx"
  xsi:schemaLocation="http://www.springframework.org/schema/beans
  http://www.springframework.org/schema/beans/spring-beans-4.3.xsd
  http://www.springframework.org/schema/mvc
  http://www.springframework.org/schema/mvc/spring-mvc-4.3.xsd
  http://www.springframework.org/schema/context
  http://www.springframework.org/schema/context/spring-context-4.3.xsd">
	<!-- 配置包扫描器,扫描@Controller注解的类 -->
	<context:component-scan base-package="com.itheima.controller" />
	<!-- 加载注解驱动 -->
	<mvc:annotation-driven />
	<!-- 配置视图解析器 -->
	<bean class=
    "org.springframework.web.servlet.view.InternalResourceViewResolver">
		<property name="prefix" value="/WEB-INF/jsp/" />
		<property name="suffix" value=".jsp" />
	</bean>
</beans>
在springmvc-config.xml中主要配置了用于扫描@Controller 注解的包扫描器、注解驱动器以及视图解析器
(4)在web.xml中,配置Spring的文件监听器、编码过滤器以及Spring MVC的前端控制器
<?xml version="1.0" encoding="UTF-8"?>
<web-app xmlns:xsi="http://www.w3.org/2001/XMLSchema-instance"
  	xmlns="http://xmlns.jcp.org/xml/ns/javaee"
  	xsi:schemaLocation="http://xmlns.jcp.org/xml/ns/javaee
  	http://xmlns.jcp.org/xml/ns/javaee/web-app_3_1.xsd"
  	id="WebApp_ID" version="3.1">
  	<!-- 配置加载Spring文件的监听器-->
	<context-param>
		<param-name>contextConfigLocation</param-name>
		<param-value>classpath:applicationContext.xml</param-value>
	</context-param>
	<listener>
		<listener-class>
		     org.springframework.web.context.ContextLoaderListener
		</listener-class>
	</listener>
	<!-- 编码过滤器 -->
	<filter>
		<filter-name>encoding</filter-name>
		<filter-class>
		     org.springframework.web.filter.CharacterEncodingFilter
		</filter-class>
		<init-param>
			<param-name>encoding</param-name>
			<param-value>UTF-8</param-value>
		</init-param>
	</filter>
	<filter-mapping>
		<filter-name>encoding</filter-name>
		<url-pattern>*.action</url-pattern>
	</filter-mapping>
	<!-- 配置Spring MVC前端核心控制器 -->
	<servlet>
		<servlet-name>springmvc</servlet-name>
		<servlet-class>
		     org.springframework.web.servlet.DispatcherServlet
		</servlet-class>
		<init-param>
			<param-name>contextConfigLocation</param-name>
			<param-value>classpath:springmvc-config.xml</param-value>
		</init-param>
		<!-- 配置服务器启动后立即加载Spring MVC配置文件 -->
    	<load-on-startup>1</load-on-startup>
	</servlet>
	<servlet-mapping>
		<servlet-name>springmvc</servlet-name>
		<!--/:拦截所有请求(除了jsp)-->
		<url-pattern>/</url-pattern>
	</servlet-mapping>
</web-app>
4.整合应用测试
(1)在src目录下,创建一个com.black_yejing.po包,并在包中创建持久化类Customer。
/**
 * 客户持久化类
 */
public class Customer {
	private Integer id;       // 主键id
	private String username; // 客户名称
	private String jobs;      // 职业
	private String phone;     // 电话
	public Integer getId() {
		return id;
	}
	public void setId(Integer id) {
		this.id = id;
	}
	public String getUsername() {
		return username;
	}
	public void setUsername(String username) {
		this.username = username;
	}
	public String getJobs() {
		return jobs;
	}
	public void setJobs(String jobs) {
		this.jobs = jobs;
	}
	public String getPhone() {
		return phone;
	}
	public void setPhone(String phone) {
		this.phone = phone;
	}
}
上述文件编写了一个用于映射数据表t_customer的客户持久化类,在类中分别定义了id,username,jobs和phone属性,以及对应的getter/setter方法。
(2)在src目录下,创建一个com.black_yejing.dao包,并在包中创建接口文件CustomerDao以及对应的映射文件CustomerDao.xml。
/**
 * Customer接口文件
 */
public interface CustomerDao {
	/**
	 * 根据id查询客户信息
	 */
	public Customer findCustomerById(Integer id);
}
[CustomerDao.java]
上述代码可以看出,CustomerDao中定义了一个根据id查询客户信息的方法。
<?xml version="1.0" encoding="UTF-8"?>
<!DOCTYPE mapper PUBLIC "-//mybatis.org//DTD Mapper 3.0//EN"
    "http://mybatis.org/dtd/mybatis-3-mapper.dtd">
<mapper namespace="com.itheima.dao.CustomerDao">
	<!--根据id查询客户信息 -->
	<select id="findCustomerById" parameterType="Integer"
		                               resultType="Customer">
		select * from t_customer where id = #{id}
	</select>
</mapper>
上述代码根据接口文件的方法编写了对应的执行语句信息。
(3)在src目录下创建com.black_yejing.service包,然后在包中创建接口文件CustomerService,并在CustomerService中定义id查询客户的方法。
public interface CustomerService {
	public Customer findCustomerById(Integer id);
}
(4)在src目录下创建一个com.black_yejing.service.impl包,并在包中创建CustomerService接口的实现类CustomerServiceImpl
@Service
@Transactional
public class CustomerServiceImpl implements CustomerService {
	//注解注入CustomerDao
	@Autowired
	private CustomerDao customerDao;
	//查询客户
	public Customer findCustomerById(Integer id) {
		return this.customerDao.findCustomerById(id);
	}
}
在上述文件中使用了@Service注解来标识业务层的实现类,使用了@Transactional注解来标识类中所有方法都纳入Spring的事务管理,并使用@Autowired注解将CustomerDao接口对象注入到本类中,然后在本类的查询方法中调用了CustomerDao对象的查询客户方法。
(5)在src目录下,创建一个com.black_yejing.controller包,并在包中创建用于处理页面请求的控制器类CustomerController
@Controller
public class CustomerController {
	@Autowired
	private CustomerService customerService;
	/**
	 * 根据id查询客户详情
	 */
	@RequestMapping("/findCustomerById")
	public String findCustomerById(Integer id,Model model) {
		Customer customer = customerService.findCustomerById(id);
		model.addAttribute("customer", customer);
		//返回客户信息展示页面
		return "customer";
	}
}
在上述文件中使用了Spring的注解@Controller来标识控制器类,然后通过@Autowired注解将CustomerService接口对象注入到本类中,最后编写一个根据id查询客户详情的方法findCustomerById( ),该方法会将获取的客户详情返回到视图名为customer的jsp页面中。
(6)在WEB-INF目录下,创建一个jsp文件夹,在该文件夹下创建一个用于展示客户详情的页面文件customer.jsp
<%@ page language="java" contentType="text/html; charset=UTF-8"
	pageEncoding="UTF-8"%>
<!DOCTYPE html PUBLIC "-//W3C//DTD HTML 4.01 Transitional//EN"
    "http://www.w3.org/TR/html4/loose.dtd">
<html>
<head>
<meta http-equiv="Content-Type" content="text/html; charset=UTF-8">
<title>客户信息</title>
</head>
<body>
	<table border=1>
		<tr>
			<td>编号</td>
			<td>名称</td>
			<td>职业</td>
			<td>电话</td>
		</tr>
		<tr>
			<td>${customer.id}</td>
			<td>${customer.username}</td>
			<td>${customer.jobs}</td>
			<td>${customer.phone}</td>
		</tr>
	</table>
</body>
</html>
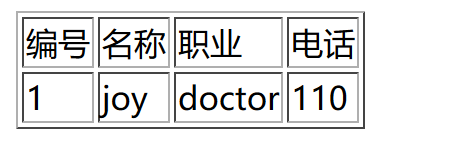
在上述文件中编写了一个用于展示客户信息的表格,表格会通过EL表达式来获取后台控制层返回的客户信息。
(7)将项目发布到Tomcat服务器并启动,在浏览器中访问地址http://localhost:8080/SSM/findCustomerById?id=1。显示效果如下图
总结:
SSM框架的整合是一个浩大的工程,在整合之前我们必须了解spring、spring MVC和mybatis框架的使用,然后才能着手SSM框架的整合,不然则为适得其反。
最后附上t_customer的sql语句
CREATE TABLE `t_customer` (
  `id` int(11) NOT NULL AUTO_INCREMENT,
  `username` varchar(50) DEFAULT NULL,
  `jobs` varchar(50) DEFAULT NULL,
  `phone` varchar(10) DEFAULT NULL,
  PRIMARY KEY (`id`)
) ENGINE=InnoDB AUTO_INCREMENT=3 DEFAULT CHARSET=utf8;