我的博客上有很多关于使用 Spring Boot 和 Spring Cloud 进行微服务的文章。本文的主要目的是简要总结这些框架提供的最重要的组件,这些组件可以帮助您创建微服务,并实际上向您解释什么是用于微服务架构的 Spring Cloud。本文涵盖的主题是:
- 在云原生开发中使用Spring Boot 2
- 使用 Spring Cloud Netflix Eureka为所有微服务提供服务发现
- 使用Spring Cloud Config 进行分布式配置
- API 网关模式在 Spring Cloud 中使用一个新项目:Spring Cloud Gateway
- 将日志与Spring Cloud Sleuth 相关联
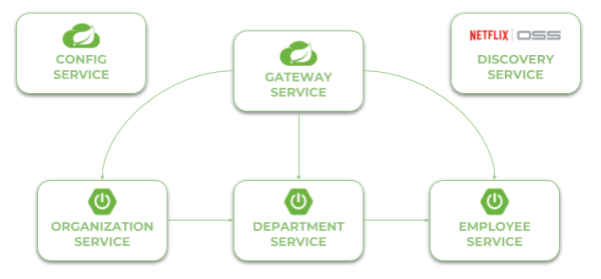
在我们继续源代码之前,让我们看一下下图。它说明了我们示例系统的架构。我们有三个独立的微服务,它们在服务发现中注册自己,从配置服务中获取属性并相互通信。整个系统隐藏在 API 网关之后。
本文使用Spring Cloud 版本是 Finchley.M9. 此版本spring-cloud-dependencies的依赖项声明如下。
|
1
2
3
4
5
6
7
8
9
10
11
|
<dependencyManagement> <dependencies> <dependency> <groupId>org.springframework.cloud</groupId> <artifactId>spring-cloud-dependencies</artifactId> <version>Finchley.M9</version> <type>pom</type> <scope>import</scope> </dependency> </dependencies></dependencyManagement> |
现在,让我们考虑使用 Spring Cloud 创建基于微服务的工作系统要采取的进一步步骤。我们将从配置服务器开始。
步骤 1. 使用 SPRING CLOUD CONFIG 构建配置服务器
要为应用程序启用 Spring Cloud Config 功能,首先要包含spring-cloud-config-server到您的项目依赖项中。
|
1
2
3
4
|
<dependency> <groupId>org.springframework.cloud</groupId> <artifactId>spring-cloud-config-server</artifactId></dependency> |
然后在应用程序启动期间启用运行嵌入式配置服务器使用 @EnableConfigServer注释。
|
1
2
3
4
5
6
7
8
9
|
@SpringBootApplication@EnableConfigServerpublic class ConfigApplication { public static void main(String[] args) { new SpringApplicationBuilder(ConfigApplication.class).run(args); }} |
默认情况下,Spring Cloud Config Server 将配置数据存储在 Git 存储库中。这在生产模式下是非常好的选择,但对于示例目的文件系统后端就足够了。配置服务器使用真的很容易,因为我们可以将所有属性放在类路径中。Spring Cloud Config 默认在以下位置搜索属性源:classpath:/, classpath:/config, file:./, file:./config.
我们将所有属性源放在src/main/resources/config. YAML 文件名将与服务名称相同。例如,用于发现服务的 YAML 文件将位于此处:src/main/resources/config/discovery-service.yml.
最后两件重要的事情。如果您想使用文件系统后端来启动配置服务器,可以通过--spring.profiles.active=native在应用程序启动时设置参数来实现。在示例中,我还通过在文件中设置属性将默认配置服务器端口 (8888) 更改为8061。server.portbootstrap.yml
步骤 2. 使用 SPRING CLOUD NETFLIX EUREKA 构建服务发现
现在,包括发现服务在内的所有其他应用程序都需要添加spring-cloud-starter-config依赖项才能启用配置客户端。我们还必须包含对spring-cloud-starter-netflix-eureka-server.
|
1
2
3
4
|
<dependency> <groupId>org.springframework.cloud</groupId> <artifactId>spring-cloud-starter-netflix-eureka-server</artifactId></dependency> |
然后,您应该通过@EnableEurekaServer在主类上设置注释来启用在应用程序启动期间运行嵌入式发现服务器。
|
1
2
3
4
5
6
7
8
9
|
@SpringBootApplication@EnableEurekaServerpublic class DiscoveryApplication { public static void main(String[] args) { new SpringApplicationBuilder(DiscoveryApplication.class).run(args); }} |
应用程序必须从配置服务器获取属性源。客户端所需的最低配置是应用程序名称和配置服务器的连接设置。
|
1
2
3
4
5
6
|
spring: application: name: discovery-service cloud: config: uri: http://localhost:8088 |
正如我已经提到的,配置文件discovery-service.yml应该放在config-service模块中。但是,需要对下面可见的配置说几句话。我们已将 Eureka 运行端口从默认值 (8761) 更改为8061。对于独立的 Eureka 实例,我们必须禁用注册和获取注册表。
|
1
2
3
4
5
6
7
8
9
10
11
|
server: port: 8061eureka: instance: hostname: localhost client: registerWithEureka: false fetchRegistry: false serviceUrl: defaultZone: http://${eureka.instance.hostname}:${server.port}/eureka/ |
现在,当您使用嵌入式 Eureka 服务器启动应用程序时,您应该会看到以下日志。

成功启动应用程序后,您可以访问地址http://localhost:8061/下的 Eureka Dashboard 。
步骤 3. 使用 SPRING BOOT 和 SPRING CLOUD 构建微服务
我们的微服务会在启动期间执行一些操作。它需要从 中获取配置config-service,在发现服务中注册自己,公开 HTTP API 并自动生成 API 文档。为了启用所有这些机制,我们需要在pom.xml. 要启用配置客户端,我们应该包括 starter spring-cloud-starter-config。在包含spring-cloud-starter-netflix-eureka-client和注释主类后, 将为微服务启用发现客户端 @EnableDiscoveryClient。要强制 Spring Boot 应用程序生成 API 文档,我们应该包含 springfox-swagger2依赖项并添加注释 @EnableSwagger2。
这是为我的示例微服务定义的完整依赖项列表。
|
1
2
3
4
5
6
7
8
9
10
11
12
13
14
15
16
17
|
<dependency> <groupId>org.springframework.cloud</groupId> <artifactId>spring-cloud-starter-netflix-eureka-client</artifactId></dependency><dependency> <groupId>org.springframework.cloud</groupId> <artifactId>spring-cloud-starter-config</artifactId></dependency><dependency> <groupId>org.springframework.boot</groupId> <artifactId>spring-boot-starter-web</artifactId></dependency><dependency> <groupId>io.springfox</groupId> <artifactId>springfox-swagger2</artifactId> <version>2.8.0</version></dependency> |
这是为微服务启用Discovery Client和Swagger2的主要应用程序类。
|
1
2
3
4
5
6
7
8
9
10
11
12
13
14
15
16
17
18
19
20
21
22
|
@SpringBootApplication@EnableDiscoveryClient@EnableSwagger2public class EmployeeApplication { public static void main(String[] args) { SpringApplication.run(EmployeeApplication.class, args); } @Bean public Docket swaggerApi() { return new Docket(DocumentationType.SWAGGER_2) .select() .apis(RequestHandlerSelectors.basePackage("pl.piomin.services.employee.controller")) .paths(PathSelectors.any()) .build() .apiInfo(new ApiInfoBuilder().version("1.0").title("Employee API").description("Documentation Employee API v1.0").build()); } ...} |
应用程序必须从远程服务器获取配置,因此我们应该只提供bootstrap.yml带有服务名称和服务器 URL 的文件。事实上,这是Config First Bootstrap方法的示例,当应用程序首先连接到配置服务器并从远程属性源获取发现服务器地址时。还有Discovery First Bootstrap,从发现服务器获取配置服务器地址。
|
1
2
3
4
5
6
|
spring: application: name: employee-service cloud: config: uri: http://localhost:8088 |
没有太多的配置设置。这是存储在远程服务器上的应用程序配置文件。它只存储 HTTP 运行端口和 Eureka URL。但是,我也将文件employee-service-instance2.yml放在远程配置服务器上。它为应用程序设置不同的 HTTP 端口,因此您可以根据远程属性轻松地在本地运行同一服务的两个实例。现在,您可以在应用程序启动期间传递参数后employee-service在端口9090上运行第二个实例spring.profiles.active=instance2。使用默认设置,您将在端口8090上启动微服务。
|
1
2
3
4
5
6
7
|
server: port: 9090eureka: client: serviceUrl: defaultZone: http://localhost:8061/eureka/ |
这是实现 REST 控制器类的代码。它提供了使用不同过滤器添加新员工和搜索员工的实现。
|
1
2
3
4
5
6
7
8
9
10
11
12
13
14
15
16
17
18
19
20
21
22
23
24
25
26
27
28
29
30
31
32
33
34
35
36
37
38
39
|
@RestControllerpublic class EmployeeController { private static final Logger LOGGER = LoggerFactory.getLogger(EmployeeController.class); @Autowired EmployeeRepository repository; @PostMapping public Employee add(@RequestBody Employee employee) { LOGGER.info("Employee add: {}", employee); return repository.add(employee); } @GetMapping("/{id}") public Employee findById(@PathVariable("id") Long id) { LOGGER.info("Employee find: id={}", id); return repository.findById(id); } @GetMapping public List findAll() { LOGGER.info("Employee find"); return repository.findAll(); } @GetMapping("/department/{departmentId}") public List findByDepartment(@PathVariable("departmentId") Long departmentId) { LOGGER.info("Employee find: departmentId={}", departmentId); return repository.findByDepartment(departmentId); } @GetMapping("/organization/{organizationId}") public List findByOrganization(@PathVariable("organizationId") Long organizationId) { LOGGER.info("Employee find: organizationId={}", organizationId); return repository.findByOrganization(organizationId); }} |
STEP 4. 微服务与SPRING CLOUD OPEN FEIGN的通信
我们的第一个微服务已经创建并启动。现在,我们将添加其他相互通信的微服务。下图说明了三个示例微服务之间的通信流:organization-service、department-service和employee-service。微服务organization-service收集部门的清单与(GET /organization/{organizationId}/with-employees)或不雇员(GET /organization/{organizationId})的department-service,和员工的列表,而无需将它们分成不同的部门直接从employee-service。微服务department-service能够分配给特定部门的员工收集名单。

另外,在上述两个所述的情况下 organization-service和department-service具有本地化其他微服务并与它们进行通信。这就是为什么我们需要为这些模块添加额外的依赖:spring-cloud-starter-openfeign。Spring Cloud Open Feign 是一个声明式 REST 客户端,它使用 Ribbon 客户端负载均衡器来与其他微服务通信。
|
1
2
3
4
|
<dependency> <groupId>org.springframework.cloud</groupId> <artifactId>spring-cloud-starter-openfeign</artifactId></dependency> |
Open Feign 的替代解决方案是 Spring RestTemplatewith @LoadBalanced. 然而,Feign 提供了更优雅的定义客户端的方式,所以我更喜欢它而不是RestTemplate. 在包含所需的依赖项之后,我们还应该使用@EnableFeignClients注释启用 Feign 客户端。
|
1
2
3
4
5
6
7
8
9
10
11
12
13
|
@SpringBootApplication@EnableDiscoveryClient@EnableFeignClients@EnableSwagger2public class OrganizationApplication { public static void main(String[] args) { SpringApplication.run(OrganizationApplication.class, args); } ...} |
现在,我们需要定义客户端的接口。因为organization-service与其他两个微服务通信,我们应该创建两个接口,每个微服务一个。每个客户端的界面都应该用@FeignClient. 注释中的一个字段是必需的 - name。此名称应与服务发现中注册的目标服务名称相同。下面是调用GET /organization/{organizationId}暴露的端点的客户端接口employee-service。
|
1
2
3
4
5
6
7
|
@FeignClient(name = "employee-service")public interface EmployeeClient { @GetMapping("/organization/{organizationId}") List findByOrganization(@PathVariable("organizationId") Long organizationId);} |
内部可用的第二个客户端接口organization-service从 调用两个端点department-service。第一个GET /organization/{organizationId}只返回组织与可用部门的列表,而第二个GET /organization/{organizationId}/with-employees返回相同的数据集,包括分配给每个部门的员工列表。
|
1
2
3
4
5
6
7
8
9
10
|
@FeignClient(name = "department-service")public interface DepartmentClient { @GetMapping("/organization/{organizationId}") public List findByOrganization(@PathVariable("organizationId") Long organizationId); @GetMapping("/organization/{organizationId}/with-employees") public List findByOrganizationWithEmployees(@PathVariable("organizationId") Long organizationId);} |
最后,我们必须将 Feign 客户端的 bean 注入 REST 控制器。现在,我们可以调用DepartmentClientand 中定义的方法EmployeeClient,这相当于调用 REST 端点。
|
1
2
3
4
5
6
7
8
9
10
11
12
13
14
15
16
17
18
19
20
21
22
23
24
25
26
27
28
29
30
31
32
33
34
35
36
37
38
39
40
41
42
43
44
45
|
@RestControllerpublic class OrganizationController { private static final Logger LOGGER = LoggerFactory.getLogger(OrganizationController.class); @Autowired OrganizationRepository repository; @Autowired DepartmentClient departmentClient; @Autowired EmployeeClient employeeClient; ... @GetMapping("/{id}") public Organization findById(@PathVariable("id") Long id) { LOGGER.info("Organization find: id={}", id); return repository.findById(id); } @GetMapping("/{id}/with-departments") public Organization findByIdWithDepartments(@PathVariable("id") Long id) { LOGGER.info("Organization find: id={}", id); Organization organization = repository.findById(id); organization.setDepartments(departmentClient.findByOrganization(organization.getId())); return organization; } @GetMapping("/{id}/with-departments-and-employees") public Organization findByIdWithDepartmentsAndEmployees(@PathVariable("id") Long id) { LOGGER.info("Organization find: id={}", id); Organization organization = repository.findById(id); organization.setDepartments(departmentClient.findByOrganizationWithEmployees(organization.getId())); return organization; } @GetMapping("/{id}/with-employees") public Organization findByIdWithEmployees(@PathVariable("id") Long id) { LOGGER.info("Organization find: id={}", id); Organization organization = repository.findById(id); organization.setEmployees(employeeClient.findByOrganization(organization.getId())); return organization; }} |
步骤 5. 使用 SPRING CLOUD GATEWAY 构建 API 网关
Spring Cloud Gateway 是相对较新的 Spring Cloud 项目。它建立在 Spring Framework 5、Project Reactor和Spring Boot 2.0之上。它需要Spring Boot 和 Spring Webflux 提供的Netty运行时。这是 Spring Cloud Netflix Zuul 的一个非常好的替代品,它是迄今为止唯一一个为微服务提供 API 网关的 Spring Cloud 项目。
API 网关在 module 内部实现gateway-service。首先,我们应该将 starter 包含spring-cloud-starter-gateway到项目依赖项中。
|
1
2
3
4
|
<dependency> <groupId>org.springframework.cloud</groupId> <artifactId>spring-cloud-starter-gateway</artifactId></dependency> |
我们还需要启用发现客户端,因为gateway-service它与 Eureka 集成以便能够执行到下游服务的路由。Gateway 还将公开我们的示例微服务公开的所有端点的 API 规范。这就是我们还在网关上启用 Swagger2 的原因。
|
1
2
3
4
5
6
7
8
9
10
|
@SpringBootApplication@EnableDiscoveryClient@EnableSwagger2public class GatewayApplication { public static void main(String[] args) { SpringApplication.run(GatewayApplication.class, args); }} |
Spring Cloud Gateway 提供了三个用于配置的基本组件:路由、谓词和过滤器。路由是网关的基本构建块。它包含目标 URI 和定义的谓词和过滤器列表。Predicate负责匹配来自传入 HTTP 请求的任何内容,例如标头或参数。过滤器可以在发送到下游服务之前和之后修改请求和响应。所有这些组件都可以使用配置属性进行设置。我们将使用为示例微服务定义的路由创建并放置在配置服务器文件 gateway-service.yml 上。
但首先,我们应该通过将属性设置spring.cloud.gateway.discovery.locator.enabled为 true 来启用与路由发现服务器的集成。然后我们可以继续定义路由规则。我们使用 Path Route Predicate Factory 来匹配传入的请求,并使用 RewritePath GatewayFilter Factory 来修改请求的路径以使其适应下游服务公开的格式。uri 参数指定在发现服务器中注册的目标服务的名称。我们来看看下面的路由定义。例如,为了organization-service在 path 下的网关上可用/organization/**,我们应该定义 predicate Path=/organization/**,然后/organization从路径中去除前缀,因为目标服务暴露在 path 下/**。Eureka基于uri值获取目标服务的地址lb://organization-service.
|
1
2
3
4
5
6
7
8
9
10
11
12
13
14
15
16
17
18
19
20
21
22
23
24
25
|
spring: cloud: gateway: discovery: locator: enabled: true routes: - id: employee-service uri: lb://employee-service predicates: - Path=/employee/** filters: - RewritePath=/employee/(?.*), /${path} - id: department-service uri: lb://department-service predicates: - Path=/department/** filters: - RewritePath=/department/(?.*), /${path} - id: organization-service uri: lb://organization-service predicates: - Path=/organization/** filters: - RewritePath=/organization/(?.*), /${path} |
步骤 6. 使用 SWAGGER2 在网关上启用 API 规范
每个带有注释的 Spring Boot 微服务都会@EnableSwagger2在 path 下公开 Swagger API 文档/v2/api-docs。但是,我们希望将该文档放在一个地方——API 网关上。为了实现它,我们需要SwaggerResourcesProvider在gateway-service模块内部提供 bean 实现 接口。该 bean 负责定义应由应用程序显示的 Swagger 资源的列表存储位置。这是SwaggerResourcesProvider基于 Spring Cloud Gateway 配置属性从服务发现中获取所需位置的实现。
不幸的是,SpringFox Swagger 仍然不提供对 Spring WebFlux 的支持。这意味着如果你将 SpringFox Swagger 依赖包含到项目应用程序将无法启动......我希望对 WebFlux 的支持很快可用,但现在我们必须使用 Spring Cloud Netflix Zuul 作为网关,如果我们想运行嵌入式Swagger2就可以了。
我创建了一个模块proxy-service,它是基于 Netflix Zuul 的替代 API 网关,gateway-service基于 Spring Cloud Gateway。这是一个带有 SwaggerResourcesProvider 实现的 bean 内部可用proxy-service。它使用ZuulPropertiesbean 将路由定义动态加载到 bean 中。
|
1
2
3
4
5
6
7
8
9
10
11
12
13
14
15
16
17
18
19
20
21
22
23
24
25
26
|
@Configurationpublic class ProxyApi { @Autowired ZuulProperties properties; @Primary @Bean public SwaggerResourcesProvider swaggerResourcesProvider() { return () -> { List resources = new ArrayList(); properties.getRoutes().values().stream() .forEach(route -> resources.add(createResource(route.getServiceId(), route.getId(), "2.0"))); return resources; }; } private SwaggerResource createResource(String name, String location, String version) { SwaggerResource swaggerResource = new SwaggerResource(); swaggerResource.setName(name); swaggerResource.setLocation("/" + location + "/v2/api-docs"); swaggerResource.setSwaggerVersion(version); return swaggerResource; }} |
这是我们的示例微服务系统的 Swagger UI,地址为http://localhost:8060/swagger-ui.html。

步骤 7. 运行应用程序
让我们看一下下图中可见的系统架构。我们将从这个organization-service角度来讨论它。启动后organization-service连接到config-service可用地址localhost:8088 (1)。基于远程配置设置,它能够在 Eureka (2) 中注册自己。当organization-service外部客户端通过地址localhost:8060下可用的网关(3)调用的端点时,请求被转发到基于服务发现(4)条目的实例。然后在 Eureka (5) 中查找地址,并调用其端点(6)。最后organization-serviceorganization-servicedepartment-servicedepartment-service从 调用端点employee-service。作为负载的两个可用实例之间平衡请求employee-service通过织带 (7) 。
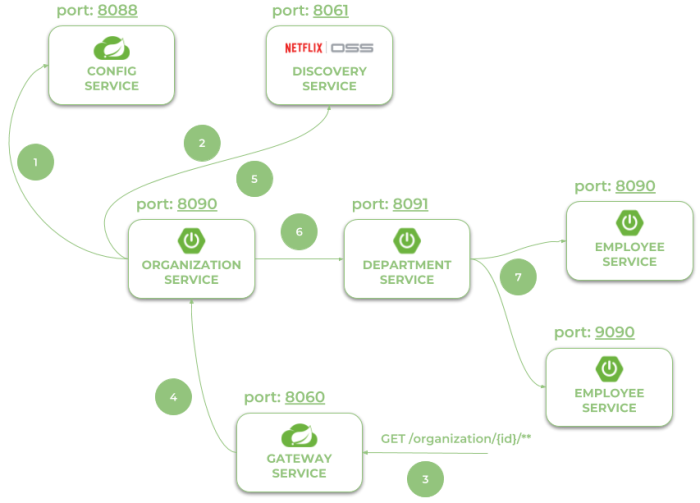
让我们看看地址http://localhost:8061下可用的 Eureka Dashboard 。有注册有微服务的四个实例:单个实例organization-service和department-service和的两个实例employee-service。

现在,让我们调用端点http://localhost:8060/organization/1/with-departments-and-employees。

步骤 8. 使用 SPRING CLOUD SLEUTH 关联独立微服务之间的日志
使用 Spring Cloud Sleuth 关联不同微服务之间的日志非常容易。实际上,您唯一需要做的就是将 starter 添加spring-cloud-starter-sleuth到每个微服务和网关的依赖项中。
|
1
2
3
4
|
<dependency> <groupId>org.springframework.cloud</groupId> <artifactId>spring-cloud-starter-sleuth</artifactId></dependency> |
为了澄清起见,我们将默认日志格式稍微更改为: %d{yyyy-MM-dd HH:mm:ss} ${LOG_LEVEL_PATTERN:-%5p} %m%n. 以下是我们的三个示例微服务生成的日志。[]Spring Cloud Stream 生成的大括号内有四个条目。对我们来说最重要的是第二个条目,它指示 on traceId,它在系统边缘的每个传入 HTTP 请求设置一次。

使用 Zuul、Ribbon、Feign、Eureka 和 Sleuth、Zipkin 创建简单spring cloud微服务用例-spring cloud 入门教程
微服务集成SPRING CLOUD SLEUTH、ELK 和 ZIPKIN 进行监控-spring cloud 入门教程
使用Hystrix 、Feign 和 Ribbon构建微服务-spring cloud 入门教程
使用 Spring Boot Admin 监控微服务-spring cloud 入门教程