目前Spring Cloud Gateway是仅次于 Spring Cloud Netflix 的第二大最受欢迎的 Spring Cloud 项目(就 GitHub 上的 Star 数而言)。它是作为 Spring Cloud 家族中 Zuul 代理的继任者而创建的。该项目为微服务架构提供了一个 API 网关,并建立在反应式Netty和 Project Reactor之上。它旨在提供一种简单但有效的方法来路由到 API 并解决诸如安全性、监控/指标和弹性等常见问题。
Spring Cloud Gateway 为您提供了许多功能和配置选项。今天我将专注于网关配置的一个但非常有趣的方面——速率限制。速率限制器可以定义为一种控制网络上发送或接收流量速率的方法。我们还可以定义几种类型的速率限制。Spring Cloud Gateway 目前提供了一个Request Rate Limiter,它负责将每个用户限制为每秒 N 个请求。与 Spring Cloud Gateway 一起
使用时RequestRateLimiter,我们可能会利用 Redis。Spring Cloud 实现使用令牌桶算法做限速。这个算法有一个集中的存储桶主机,你可以在每个请求上获取令牌,然后慢慢地将更多的令牌滴入桶中。如果桶为空,则拒绝请求。
1. 依赖
我们将在较高流量下针对 Spring Cloud Gateway 速率限制测试我们的示例应用程序。首先,我们需要包含一些依赖项。当然,Spring Cloud Gateway 启动器是必需的。为了使用 Redis 处理速率限制器,我们还需要向spring-boot-starter-data-redis-reactivestarter添加依赖项。其他依赖项用于测试目的。mockserver测试容器中提供的模块。它负责模拟目标服务。反过来,该库mockserver-client-java用于mockserver在测试期间与容器集成。最后一个库junit-benchmarks用于基准测试方法并同时运行测试。
<dependency>
   <groupId>org.springframework.cloud</groupId>
   <artifactId>spring-cloud-starter-gateway</artifactId>
</dependency>
<dependency>
   <groupId>org.springframework.boot</groupId>
   <artifactId>spring-boot-starter-data-redis-reactive</artifactId>
</dependency>
<dependency>
   <groupId>org.projectlombok</groupId>
   <artifactId>lombok</artifactId>
</dependency>
<dependency>
   <groupId>org.springframework.boot</groupId>
   <artifactId>spring-boot-starter-test</artifactId>
   <scope>test</scope>
</dependency>
<dependency>
   <groupId>org.testcontainers</groupId>
   <artifactId>mockserver</artifactId>
   <version>1.12.3</version>
   <scope>test</scope>
</dependency>
<dependency>
   <groupId>org.mock-server</groupId>
   <artifactId>mockserver-client-java</artifactId>
   <version>3.10.8</version>
   <scope>test</scope>
</dependency>
<dependency>
   <groupId>com.carrotsearch</groupId>
   <artifactId>junit-benchmarks</artifactId>
   <version>0.7.2</version>
   <scope>test</scope>
</dependency>
示例应用程序构建在 Spring Boot 之上2.2.1.RELEASE并使用 Spring Cloud Hoxton.RC2Release Train。
<parent>
   <groupId>org.springframework.boot</groupId>
   <artifactId>spring-boot-starter-parent</artifactId>
   <version>2.2.1.RELEASE</version>
</parent>

<properties>
   <project.build.sourceEncoding>UTF-8</project.build.sourceEncoding>
   <project.reporting.outputEncoding>UTF-8</project.reporting.outputEncoding>
   <java.version>11</java.version>
   <spring-cloud.version>Hoxton.RC2</spring-cloud.version>
</properties>

<dependencyManagement>
   <dependencies>
      <dependency>
         <groupId>org.springframework.cloud</groupId>
         <artifactId>spring-cloud-dependencies</artifactId>
         <version>${spring-cloud.version}</version>
         <type>pom</type>
         <scope>import</scope>
      </dependency>
   </dependencies>
</dependencyManagement>
2. 实施
请求速率限制是使用名为 的 Spring Cloud Gateway 组件实现的GatewayFilter。此过滤器的每个实例都在特定工厂中构建。Filter当然负责在发送下游请求之前或之后修改请求和响应。目前,有 30 个可用的内置网关过滤器工厂。
在GatewayFilter有一个可选的keyResolver参数和参数特定于速率限制器的实现(在这种情况下使用的Redis的实施方案)。参数keyResolver是一个实现KeyResolver接口的bean 。它允许您应用不同的策略来派生限制请求的密钥。参数keyResolver是一个实现了KeyResolver界面。它允许您应用不同的策略来派生限制请求的密钥。遵循 Spring Cloud Gateway 文档:
的默认实现
KeyResolver是从和 调用中PrincipalNameKeyResolver检索。默认情况下,如果 KeyResolver 没有找到密钥,请求将被拒绝。此行为可以通过(true 或 false) 和属性进行调整。PrincipalServerWebExchangePrincipal.getName()spring.cloud.gateway.filter.request-rate-limiter.deny-empty-keyspring.cloud.gateway.filter.request-rate-limiter.empty-key-status-code
由于,我们已经讨论了 Spring Cloud Gateway 速率限制的一些理论方面,我们可以继续实施。首先,让我们定义主类和非常简单的KeyResolverbean,它总是等于 1。
@SpringBootApplication
public class GatewayApplication {

   public static void main(String[] args) {
      SpringApplication.run(GatewayApplication.class, args);
   }

   @Bean
   KeyResolver userKeyResolver() {
      return exchange -> Mono.just("1");
   }
}
假设我们有以下配置和在端口上运行的目标应用程序,8091我们可以执行一些测试调用。您可以设置两个属性来自定义流程。该redis-rate-limiter.replenishRate决定每秒用户多少个请求被允许发送,没有任何下降的请求。这是令牌桶被填充的速率。第二个属性redis-rate-limiter.burstCapacity是允许用户在一秒钟内执行的最大请求数。这是令牌桶可以容纳的令牌数量。将此值设置为零将阻止所有请求。
server:
  port: ${PORT:8085}

spring:
  application:
    name: gateway-service
  redis:
    host: 192.168.99.100
    port: 6379
  cloud:
    gateway:
      routes:
      - id: account-service
        uri: http://localhost:8091
        predicates:
        - Path=/account/**
        filters:
        - RewritePath=/account/(?<path>.*), /${path}
      - name: RequestRateLimiter
          args:
            redis-rate-limiter.replenishRate: 10
            redis-rate-limiter.burstCapacity: 20
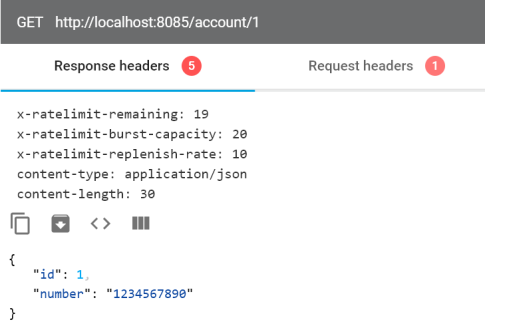
现在,如果您调用网关公开的端点,您会得到以下响应。它包括一些特定的标头,以x-ratelimit. Headerx-ratelimit-burst-capacity表示to burstCapacityvalue,x-ratelimit-replenish-rate表示to replenishRatevalue,最重要的是x-ratelimit-remaining,它显示了你下一秒可能发送的请求数。

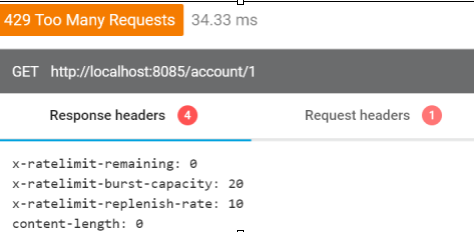
如果超过允许的请求数 Spring Cloud Gateway 会返回带有代码的响应HTTP 429 - Too Many Requests,并且不会处理传入的请求。

3. 测试 Spring Cloud Gateway 限速
我们有使用 Testcontainers 提供的两个 Docker 容器的 Spring Boot 测试: MockServer和Redis. 因为暴露的端口是动态生成的,所以我们需要@BeforeClass在运行测试之前在方法中设置网关属性。在 init 方法中,我们还用于MockServerClient在模拟服务器容器上定义模拟服务。我们的测试方法在六个线程中同时运行,并重复 600 次。
@SpringBootTest(webEnvironment = SpringBootTest.WebEnvironment.DEFINED_PORT)
@RunWith(SpringRunner.class)
public class GatewayRateLimiterTest {

    private static final Logger LOGGER = LoggerFactory.getLogger(GatewayRateLimiterTest.class);

    @Rule
    public TestRule benchmarkRun = new BenchmarkRule();

    @ClassRule
    public static MockServerContainer mockServer = new MockServerContainer();
    @ClassRule
    public static GenericContainer redis = new GenericContainer("redis:5.0.6").withExposedPorts(6379);

    @Autowired
    TestRestTemplate template;

    @BeforeClass
    public static void init() {
        System.setProperty("spring.cloud.gateway.routes[0].id", "account-service");
        System.setProperty("spring.cloud.gateway.routes[0].uri", "http://192.168.99.100:" + mockServer.getServerPort());
        System.setProperty("spring.cloud.gateway.routes[0].predicates[0]", "Path=/account/**");
        System.setProperty("spring.cloud.gateway.routes[0].filters[0]", "RewritePath=/account/(?<path>.*), /$\{path}");
        System.setProperty("spring.cloud.gateway.routes[0].filters[1].name", "RequestRateLimiter");
        System.setProperty("spring.cloud.gateway.routes[0].filters[1].args.redis-rate-limiter.replenishRate", "10");
        System.setProperty("spring.cloud.gateway.routes[0].filters[1].args.redis-rate-limiter.burstCapacity", "20");
        System.setProperty("spring.redis.host", "192.168.99.100");
        System.setProperty("spring.redis.port", "" + redis.getMappedPort(6379));
        new MockServerClient(mockServer.getContainerIpAddress(), mockServer.getServerPort())
                .when(HttpRequest.request()
                        .withPath("/1"))
                .respond(response()
                        .withBody("{"id":1,"number":"1234567890"}")
                        .withHeader("Content-Type", "application/json"));
    }

    @Test
    @BenchmarkOptions(warmupRounds = 0, concurrency = 6, benchmarkRounds = 600)
    public void testAccountService() {
        ResponseEntity<Account> r = template.exchange("/account/{id}", HttpMethod.GET, null, Account.class, 1);
        LOGGER.info("Received: status->{}, payload->{}, remaining->{}", r.getStatusCodeValue(), r.getBody(), r.getHeaders().get("X-RateLimit-Remaining"));
    }

}
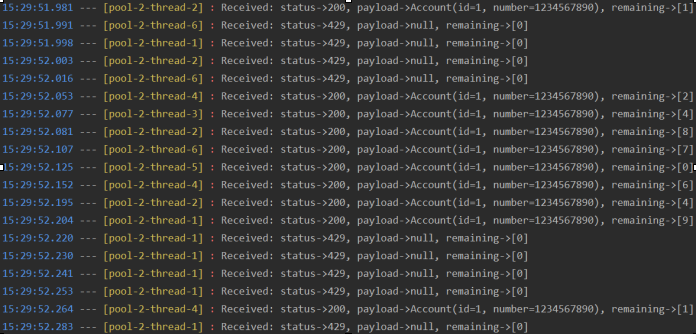
我们来看看测试结果。启动网关后,用户最多可以在一秒钟内发送 20 个请求。超过此值后,它开始返回HTTP 429。

丢弃一些传入请求后,网关在下一秒开始接受它们。但是这次它只允许处理 10 个请求,这等于replenishRate参数值。

使用 Zuul、Ribbon、Feign、Eureka 和 Sleuth、Zipkin 创建简单spring cloud微服务用例-spring cloud 入门教程
微服务集成SPRING CLOUD SLEUTH、ELK 和 ZIPKIN 进行监控-spring cloud 入门教程
使用Hystrix 、Feign 和 Ribbon构建微服务-spring cloud 入门教程
使用 Spring Boot Admin 监控微服务-spring cloud 入门教程