在刚开始学android的时候肯定会知道,android的主要的布局就是LinearLayout、RelativeLayout、FramLayout、AbsoluteLayout、以及TableLayout,这是谁都知道的。其他的一些UI就交给了众多的三方库。其实,随着android的发展壮大,开发者不用再辛苦的去找三方类库了,android已经拥有了很强大的功能。比如我们不再用pullToRefresh而是用SwipeRefreshLayout,不再用ViewPagerTabStrip而是用TabLayoutd等等。我们会发现越来越多的布局可以随心所欲的加入到主布局中了。
因为项目的需要,添加了新功能,侧滑菜单,以前我们自然会去网上找一大堆的资料,看一大堆demo,其实原生的android就已经有了这个功能。就是DrawLayout。
下面先看看效果图:

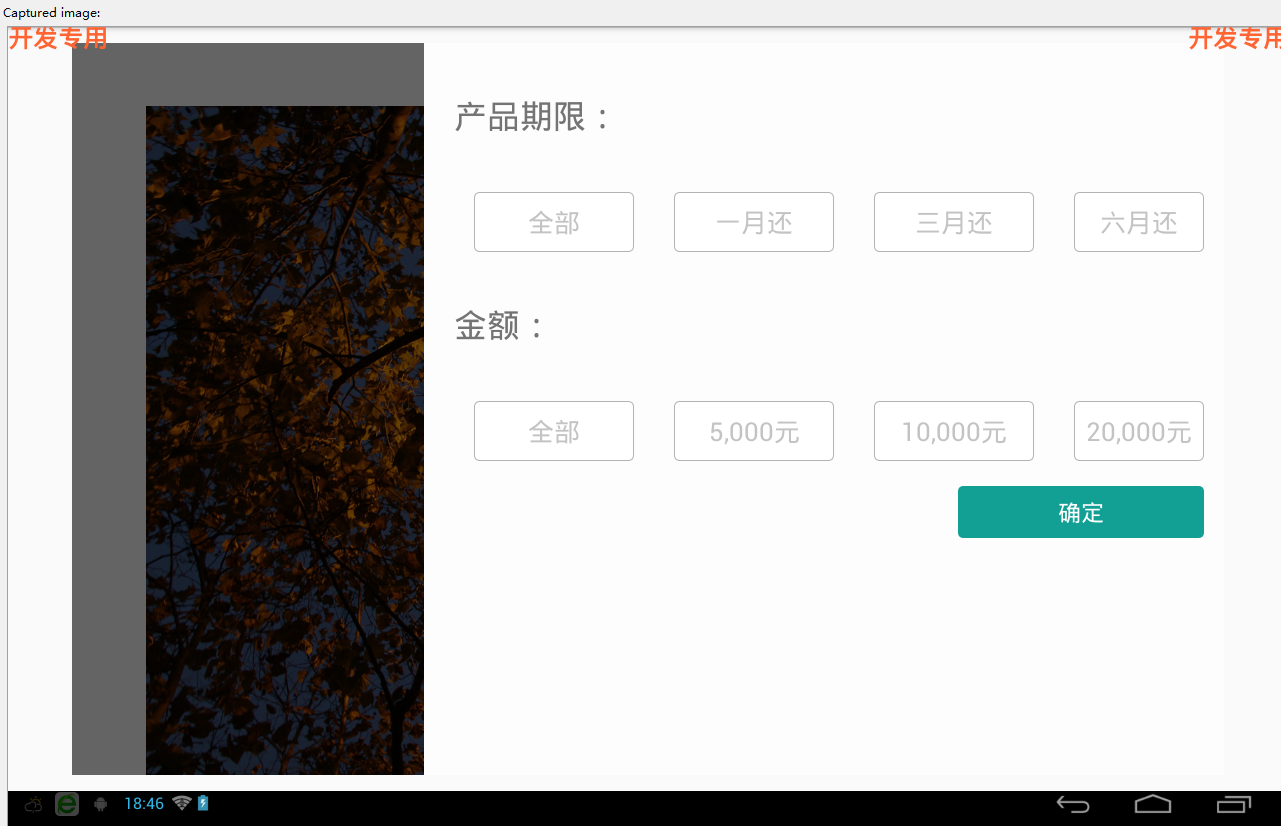

可以点击左侧的查询产品按钮将侧滑栏弹出来,然后在右侧进行相应的操作之后点击确定将右侧滑栏收回去。因为只是做的一个比较简单的demo所以在主界面只放了一张图。
下面上代码:
activity_mainactivity.xml:这个文件是来盛放下面的侧滑布局(content_main.xml)的
<?xml version="1.0" encoding="utf-8"?>
<LinearLayout xmlns:android="http://schemas.android.com/apk/res/android"
    xmlns:app="http://schemas.android.com/apk/res-auto"
    xmlns:tools="http://schemas.android.com/tools"
    android:layout_width="match_parent"
    android:layout_height="match_parent"
    android:fitsSystemWindows="true"
    tools:context=".MainActivity">
    <include layout="@layout/content_main" />
</LinearLayout>
content_main.xml 这个xml文件是整个主布局以及侧滑页的布局:
<RelativeLayout xmlns:android="http://schemas.android.com/apk/res/android"
    xmlns:tools="http://schemas.android.com/tools"
    android:layout_width="match_parent"
    android:layout_height="match_parent"
    android:paddingBottom="@dimen/activity_vertical_margin"
    android:paddingLeft="@dimen/activity_horizontal_margin"
    android:paddingRight="@dimen/activity_horizontal_margin"
    android:paddingTop="@dimen/activity_vertical_margin"
    tools:context=".DrawerActivity">

    <android.support.v4.widget.DrawerLayout
        android:id="@+id/drawer_layout"
        android:layout_width="match_parent"
        android:layout_height="match_parent">

        <!-- The main content view -->
        <LinearLayout
            android:id="@+id/content_frame"
            android:layout_width="match_parent"
            android:layout_height="match_parent"
            android:orientation="vertical"
            >

            <Button
                android:id="@+id/btn"
                android:layout_width="wrap_content"
                android:layout_height="wrap_content"
                android:text="查询产品"
                android:layout_gravity="right"/>
           <ImageView
                android:layout_marginTop="15dp"
                android:layout_width="match_parent"
                android:layout_height="wrap_content"
                android:src="@drawable/back"/>
            <TextView
                android:layout_marginTop="55dp"
                android:layout_width="match_parent"
                android:layout_height="wrap_content"
                android:text="showSomethingHere"
                />

            <Button
                android:layout_width="wrap_content"
                android:layout_height="wrap_content"
                android:text="somethingElse"
                android:layout_gravity="center_vertical"/>
        </LinearLayout>

        <!-- The navigation drawer -->
        <LinearLayout
            android:layout_width="800dp"
            android:layout_height="match_parent"
            android:layout_gravity="right"
            android:background="#FDFDFD"
            android:orientation="vertical">

            <TextView
                android:layout_width="wrap_content"
                android:layout_height="wrap_content"
                android:layout_marginLeft="30dp"
                android:layout_marginTop="50dp"
                android:text="产品期限:"
                android:textSize="25sp" />

            <include layout="@layout/layout_period"></include>

            <TextView
                android:layout_width="wrap_content"
                android:layout_height="wrap_content"
                android:layout_marginLeft="30dp"
                android:layout_marginTop="50dp"
                android:text="金额:"
                android:textSize="25sp" />

            <include layout="@layout/layout_amount"></include>
            <Button
                android:id="@+id/btn_check"
                style="@style/button_style"
                android:layout_width="wrap_content"
                android:layout_height="wrap_content"
                android:layout_gravity="right"
                android:layout_marginBottom="10dp"
                android:layout_marginRight="20dp"
                android:layout_marginTop="25dp"
                android:paddingBottom="10dp"
                android:paddingLeft="100dp"
                android:paddingRight="100dp"
                android:paddingTop="10dp"
                android:text="确定" />
        </LinearLayout>
    </android.support.v4.widget.DrawerLayout>

</RelativeLayout>
另外两个不怎么重要的布局就不贴上来了,还有一大堆的样式。。。我们注意到,这个布局要用到 android.support.v4包。
下面是主要的activity类:
package hao.zerosoft.com.testdrawlayout;

import android.app.Activity;
import android.os.Bundle;
import android.support.v4.widget.DrawerLayout;
import android.view.Gravity;
import android.view.View;
import android.widget.Button;

public class MainActivity extends Activity implements View.OnClickListener {

    private DrawerLayout mDrawerLayout = null;
    private Button btnCheck;
    @Override
    protected void onCreate(Bundle savedInstanceState)
    {
        super.onCreate(savedInstanceState);
        setContentView(R.layout.activity_main);

        mDrawerLayout = (DrawerLayout) findViewById(R.id.drawer_layout);
        btnCheck=(Button)findViewById(R.id.btn_check);
        Button button = (Button) findViewById(R.id.btn);
        button.setOnClickListener(this);
        btnCheck.setOnClickListener(this);

    }

    @Override
    public void onClick(View v) {
        switch (v.getId()){
            case R.id.btn://主页面的查询产品按钮
                mDrawerLayout.openDrawer(Gravity.RIGHT);
                break;
            case R.id.btn_check://确定按钮,可以将侧滑页面的一些操作写在这里。我们一般都是用消息回调的方式去执行
                mDrawerLayout.closeDrawer(Gravity.RIGHT);
                break;
            default:
                break;
        }
    }
}
项目的源码在我的文件夹里面可以去查看 ,由于图片文件比较大,不能上传,删除了一些文件。http://i.cnblogs.com/Files.aspx