控件Group Box默认的边框的颜色是白色的,在很多时候显得不那么突出。但默认的属性列表里面并没有提供相应的接口。所以只能借助重绘事件。
网上很多都说使用 OnPaint 事件,但是我在事件列表中没找到,应该是隐藏得太深了(需要用 override 关键字来重写)。我这里直接使用了 Paint 事件,也可以达到其效果。
感谢:http://blog.csdn.net/haoduo123456789001/article/details/51083223
    public partial class TestForm : Form
    {

        public TestForm()
        {
            InitializeComponent();

            this.groupBox1.Paint += groupBox_Paint;
            this.groupBox2.Paint += groupBox_Paint;
        }

        void groupBox_Paint(object sender, PaintEventArgs e)
        {
            GroupBox gBox = (GroupBox)sender;

            e.Graphics.Clear(gBox.BackColor);
            e.Graphics.DrawString(gBox.Text, gBox.Font, Brushes.Red, 10, 1);
            var vSize = e.Graphics.MeasureString(gBox.Text, gBox.Font);
            e.Graphics.DrawLine(Pens.Red, 1, vSize.Height / 2, 8, vSize.Height / 2);
            e.Graphics.DrawLine(Pens.Red, vSize.Width + 8, vSize.Height / 2, gBox.Width - 2, vSize.Height / 2);
            e.Graphics.DrawLine(Pens.Red, 1, vSize.Height / 2, 1, gBox.Height - 2);
            e.Graphics.DrawLine(Pens.Red, 1, gBox.Height - 2, gBox.Width - 2, gBox.Height - 2);
            e.Graphics.DrawLine(Pens.Red, gBox.Width - 2, vSize.Height / 2, gBox.Width - 2, gBox.Height - 2);
        }

        private void TestForm_Load(object sender, EventArgs e)
        {

        }
    }
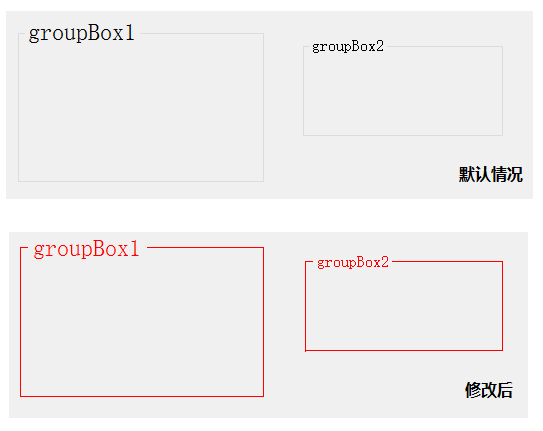
效果图:
|
|
方法二:
当然,如果你愿意,请看下面的利用 OnPaint 来实现的方法。
首先,需要创建一个自己的组件(类似于自定义控件):

添加后,切换至“代码视图”。
将继承关系,修改为:
    public partial class MyGroupBox : GroupBox  //Component
    {
        public MyGroupBox()
        {
            InitializeComponent();
        }

        public MyGroupBox(IContainer container)
        {
            container.Add(this);

            InitializeComponent();
        }
        // 重写
    }
然后重写 OnPaint() 方法:
        // 重写
        protected override void OnPaint(PaintEventArgs e)
        {
            var vSize = e.Graphics.MeasureString(this.Text, this.Font);

            e.Graphics.Clear(this.BackColor);
            e.Graphics.DrawString(this.Text, this.Font, new SolidBrush(this.ForeColor), 10, 1);

            e.Graphics.DrawLine(Pens.Black, 1, vSize.Height / 2, 8, vSize.Height / 2);
            e.Graphics.DrawLine(Pens.Black, vSize.Width + 8, vSize.Height / 2, this.Width - 2, vSize.Height / 2);
            e.Graphics.DrawLine(Pens.Black, 1, vSize.Height / 2, 1, this.Height - 2);
            e.Graphics.DrawLine(Pens.Black, 1, this.Height - 2, this.Width - 2, this.Height - 2);
            e.Graphics.DrawLine(Pens.Black, this.Width - 2, vSize.Height / 2, this.Width - 2, this.Height - 2);
        }
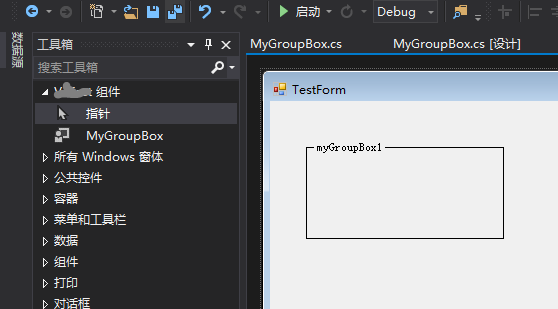
按 F6 生成一下,然后就可以在 工具栏里面 找到它,然后,你就不需要再用以前的 GroupBox 啦。一劳永逸
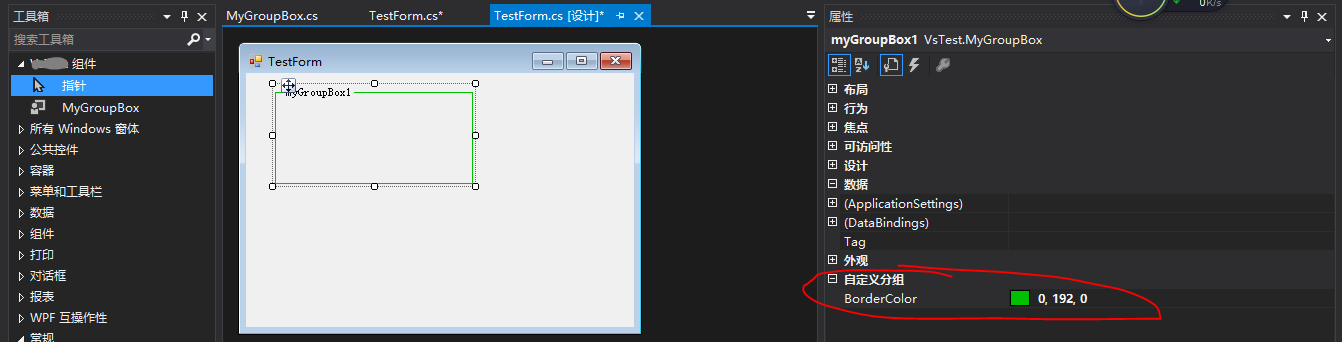
你甚至可以将 边框颜色 通过控件属性的方式自己把他公开出来。
    public partial class MyGroupBox : GroupBox//Component
    {
        private Color mBorderColor = Color.Black;

        [Browsable(true),Description("边框颜色"),Category("自定义分组")]
        public Color BorderColor
        {
            get { return mBorderColor; }
            set { mBorderColor = value; }
        }

        public MyGroupBox()
        {
            InitializeComponent();
        }

        public MyGroupBox(IContainer container)
        {
            container.Add(this);

            InitializeComponent();
        }

        // 重写
        protected override void OnPaint(PaintEventArgs e)
        {
            var vSize = e.Graphics.MeasureString(this.Text, this.Font);

            e.Graphics.Clear(this.BackColor);
            e.Graphics.DrawString(this.Text, this.Font, new SolidBrush(this.ForeColor), 10, 1);
            Pen vPen = new Pen(this.mBorderColor); // 用属性颜色来画边框颜色
            e.Graphics.DrawLine(vPen, 1, vSize.Height / 2, 8, vSize.Height / 2);
            e.Graphics.DrawLine(vPen, vSize.Width + 8, vSize.Height / 2, this.Width - 2, vSize.Height / 2);
            e.Graphics.DrawLine(vPen, 1, vSize.Height / 2, 1, this.Height - 2);
            e.Graphics.DrawLine(vPen, 1, this.Height - 2, this.Width - 2, this.Height - 2);
            e.Graphics.DrawLine(vPen, this.Width - 2, vSize.Height / 2, this.Width - 2, this.Height - 2);
        }
    }