1 - Import Packages
import numpy as np
from keras import layers
from keras.layers import Input, Dense, Activation, ZeroPadding2D, BatchNormalization, Flatten, Conv2D
from keras.layers import AveragePooling2D, MaxPooling2D, Dropout, GlobalMaxPooling2D, GlobalAveragePooling2D
from keras.models import Model
from keras.preprocessing import image
from keras.utils import layer_utils
from keras.utils.data_utils import get_file
from keras.applications.imagenet_utils import preprocess_input
import pydot
from IPython.display import SVG
from keras.utils.vis_utils import model_to_dot
from keras.utils import plot_model
from kt_utils import *

import keras.backend as K
K.set_image_data_format('channels_last')
import matplotlib.pyplot as plt
from matplotlib.pyplot import imshow

%matplotlib inline
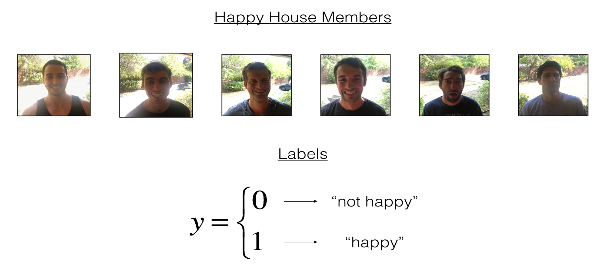
2 - The Happy House
2.1 - Dataset Description
2.2 - Normalize the dataset and learn about its shape
图像大小为(64, 64, 3),训练集有600张图像,测试集有150张图像。
X_train_orig, Y_train_orig, X_test_orig, Y_test_orig, classes = load_dataset()

# Normalize image vectors
X_train = X_train_orig/255.
X_test = X_test_orig/255.

# Reshape
Y_train = Y_train_orig.T
Y_test = Y_test_orig.T

print ("number of training examples = " + str(X_train.shape[0]))
print ("number of test examples = " + str(X_test.shape[0]))
print ("X_train shape: " + str(X_train.shape))
print ("Y_train shape: " + str(Y_train.shape))
print ("X_test shape: " + str(X_test.shape))
print ("Y_test shape: " + str(Y_test.shape))
Result:
number of training examples = 600
number of test examples = 150
X_train shape: (600, 64, 64, 3)
Y_train shape: (600, 1)
X_test shape: (150, 64, 64, 3)
Y_test shape: (150, 1)
3 - Building a model in Keras
这个作业比较开放,模型架构完全有自己决定。但建议使用作业提供的初始架构,然后再进行调整和改进。总之,我们可以修改模型的架构以及超参数。
使用Keras训练和测试模型,有如下步骤:
* 创建模型
* 编译模型:$model.compile(optimizer = "...", loss = "...", metrics = ["accuracy"])$
* 训练模型:$model.fit(x = ..., y = ..., epochs = ..., batch_size = ...)$
* 测试模型:$model.evaluate(x = ..., y = ...)$
综上,即是Create->Compile->Fit/Train->Evaluate/Test。
# GRADED FUNCTION: HappyModel

def HappyModel(input_shape):
    """
    Implementation of the HappyModel.

    Arguments:
    input_shape -- shape of the images of the dataset

    Returns:
    model -- a Model() instance in Keras
    """

    ### START CODE HERE ###
    # Feel free to use the suggested outline in the text above to get started, and run through the whole
    # exercise (including the later portions of this notebook) once. The come back also try out other
    # network architectures as well.
    X_input = Input(input_shape)

    # Zero-Padding: pads the border of X_input with zeroes
    X = ZeroPadding2D((3, 3))(X_input)

    # CONV -> BN -> RELU Block applied to X

    X = Conv2D(32, (7, 7), strides=(1, 1), name="conv0")(X)
    X = BatchNormalization(axis=3, name="bn0")(X)
    X = Activation("relu")(X)

    # MAXPOOL
    X = MaxPooling2D((2, 2), name="max_pool")(X)

    # FLATTEN X (means convert it to a vector) + FULLYCONNECTED
    X = Flatten()(X)
    X = Dense(1, activation="sigmoid", name="fc")(X)

    # Create model. This creates your Keras model instance, you'll use this instance to train/test the model.
    model = Model(inputs=X_input, outputs=X, name="HappyModel")
    ### END CODE HERE ###

    return model
3.1 - 创建模型
### START CODE HERE ### (1 line)
happyModel = HappyModel(X_train[0, :, :, :].shape)
### END CODE HERE ###
3.2 - 编译模型
### START CODE HERE ### (1 line)
happyModel.compile(optimizer="adam", loss="mse", metrics=["accuracy"])
### END CODE HERE ###
3.3 - 训练模型
我选择迭代10次,每一个批次有16个样本。
### START CODE HERE ### (1 line)
happyModel.fit(x=X_train, y=Y_train, epochs=40, batch_size=16)
### END CODE HERE ###
Result:
Epoch 1/10
600/600 [==============================] - 15s 25ms/step - loss: 1.5877 - acc: 0.6433
Epoch 2/10
600/600 [==============================] - 15s 25ms/step - loss: 0.3024 - acc: 0.8617
Epoch 3/10
600/600 [==============================] - 15s 25ms/step - loss: 0.1550 - acc: 0.9317
Epoch 4/10
600/600 [==============================] - 15s 25ms/step - loss: 0.1032 - acc: 0.9683
Epoch 5/10
600/600 [==============================] - 15s 26ms/step - loss: 0.1603 - acc: 0.9367
Epoch 6/10
600/600 [==============================] - 16s 26ms/step - loss: 0.0952 - acc: 0.9733
Epoch 7/10
600/600 [==============================] - 15s 26ms/step - loss: 0.0820 - acc: 0.9767
Epoch 8/10
600/600 [==============================] - 16s 26ms/step - loss: 0.0670 - acc: 0.9833
Epoch 9/10
600/600 [==============================] - 15s 26ms/step - loss: 0.0699 - acc: 0.9750
Epoch 10/10
600/600 [==============================] - 16s 27ms/step - loss: 0.1436 - acc: 0.9467
3.4 - 测试模型
### START CODE HERE ### (1 line)
preds = happyModel.evaluate(x=X_test, y=Y_test)
### END CODE HERE ###
print()
print ("Loss = " + str(preds[0]))
print ("Test Accuracy = " + str(preds[1]))
Result:
150/150 [==============================] - 2s 11ms/step

Loss = 4.14517145475
Test Accuracy = 0.559999998411
4 - Summary
happyModel.summary()
Result:
Layer (type)                 Output Shape              Param #
=================================================================
input_2 (InputLayer)         (None, 64, 64, 3)         0
_________________________________________________________________
zero_padding2d_1 (ZeroPaddin (None, 70, 70, 3)         0
_________________________________________________________________
conv0 (Conv2D)               (None, 64, 64, 32)        4736
_________________________________________________________________
bn0 (BatchNormalization)     (None, 64, 64, 32)        128
_________________________________________________________________
activation_1 (Activation)    (None, 64, 64, 32)        0
_________________________________________________________________
max_pool (MaxPooling2D)      (None, 32, 32, 32)        0
_________________________________________________________________
flatten_1 (Flatten)          (None, 32768)             0
_________________________________________________________________
fc (Dense)                   (None, 1)                 32769
=================================================================
Total params: 37,633
Trainable params: 37,569
Non-trainable params: 64
_________________________________________________________________
plot_model(happyModel, to_file='HappyModel.png')
SVG(model_to_dot(happyModel).create(prog='dot', format='svg'))
Result:
