由于颇受暗黑破坏神美工的影响,最近都在研究怎么制作场景地图之类的。
那么今日讲的模型高光虽然和地图无关,但是也涉及到一些美工的知识,尤其是shader。
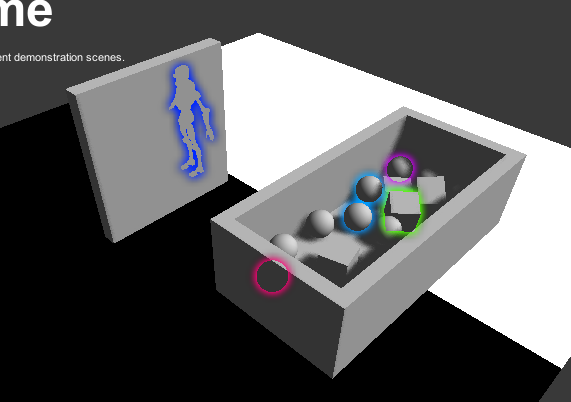
按照国际惯例,先贴一张图饱饱眼福。
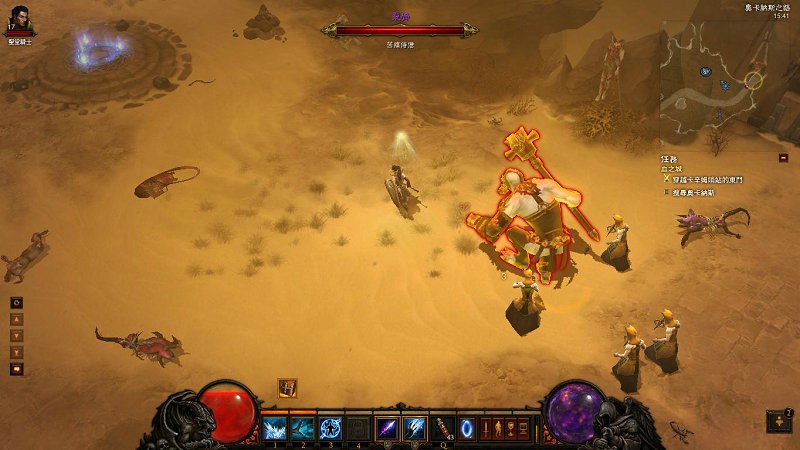
大家可以看到图上的怪物boss是高亮显示的,带有红色外边框,也就表示玩家用鼠标选择了这个怪物。这个高光选择在很多游戏中经常遇到,就比如LOL里面的,英雄、防御塔、野怪、眼都是高亮显示的,等等我找找图。
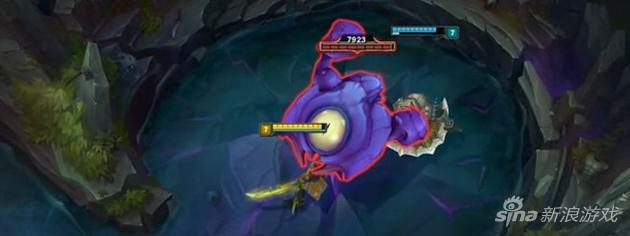
可以看到图中的守望先锋,被红色高亮显示的。
好,看完演示之后,那么我们就来看看,到底这个高光效果是如何在unity3d中实现的。
首先声明一点,因为我本身对图形学不够熟悉,所以我用了Asset Store上的一款插件,名叫:HighlightingSystem,专门搞高光的。
这款插件呢?我用了下,感觉还是蛮好用的,效果也不错,但是性能我没有测试过。反正感觉不会消耗太大性能。
首先,我们先导入这个插件,这款插件我会在博客最后插入下载地址,读者可以自行选择下载。
导入之后大概的文件目录是有两个文件夹:
1.HighlightingSystemDemo (主要存放demo演示的文件)
2.Plugins (主要存放插件核心代码和shaders)
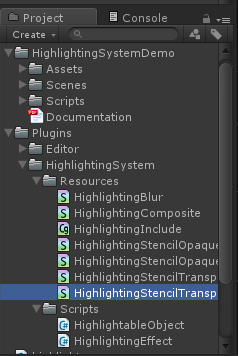
可能有些童鞋的插件版本和我的不一样,文件结构可能不同,但是大致应该是一样的,反正代码核心的不变。
ok,导入完成之后,我们来简单的制作一个小demo演示下是否可用。
1.new一个新的scene,取名为highlightingTest,然后为主摄像机添加HighlightingEffect.cs组件
2.为你的HighlightingEffect脚本配置参数
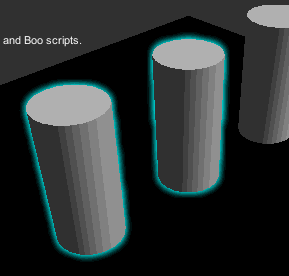
(1)Use Z-Buffer------>>如果你的项目中有用的遮挡高光,那么就勾上,否则就不要勾上。所谓遮挡高光就是当你的一个物体被别的物体遮挡住的时候,就显示高光。我贴张图。
 可以看到人物模型虽然被墙挡住了,但是我们依旧能看到他的活动轮廓。这个在暗黑中,虽然没有用到,因为暗黑是人物被墙上面的挡住的时候,就掩藏了墙,既遮挡物。
但是火炬之光2里面的人物被挡住之后,他就是用到遮挡高光,大家有兴趣可以下载玩玩。
(2)Preset----->>表示预设的参数,分别对应有default、strong、speed、quality,这四个选项对应着已经设置好的参数,大家可以根据自己的需要选择。
(3)Downsampling------>>设置高光贴图的采样比例,分别对应有none、half、quarter,none是精度最好(也就是高光最细),quarter最低。
(4)Iteration------->>发散边缘光迭代次数,也就是边缘光的发散大小的倍数,2是默认的,如果你想发散大小增大可以调大。
(5)Min Spread------->>最小发散边缘大小,也就是Spread*Iteration = 0的时候,边缘光大小不会小于这个数值。
(6)Spread------->>发散边缘光大小
(7)Intensity------->>边缘光强度大小,也就是alpha值,0接近透明。
3.配置参数好了之后,我们添加一个需要高光的物体,我们这里创建一个简单的cube,然后添加HighlightableObject.cs组件。(注意这样弄完之后点击启动是没有任何效果的,我们还需要调用他的api来显示高光)。
4.在调用API之前,我们先来学习下有哪些API?我们打开官方给我们的帮组文档
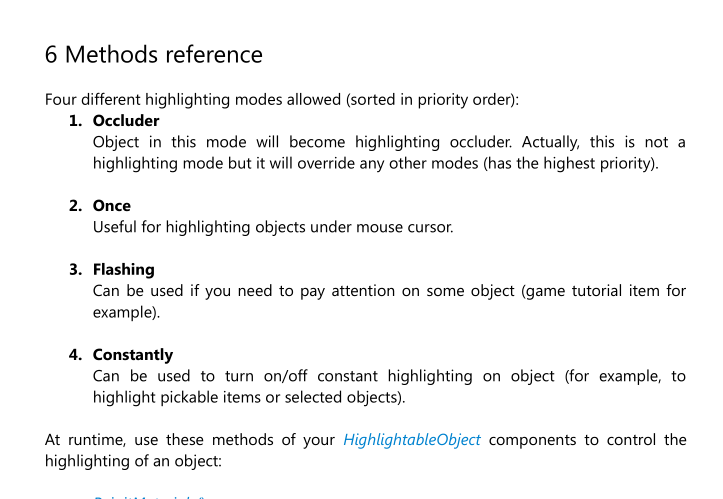
可以看到这里有4种不同的高光类型:
Occluder:遮挡高光。
Once:单次高光。也就是一帧只显示一次高光。这个常用来鼠标选择物体的时候让他每帧高亮显示。
Flashing:闪烁高光。
4.Constantly:持续高光。就是物体一直高亮。
这里我讲下分别这些类型的顺序,既覆盖顺序。先把源代码贴出来:
private void UpdateColors()
	{
		// Don't update colors if highlighting is disabled
		if (currentState == false)
		{
			return;
		}

		if (occluder)
		{
			SetColor(occluderColor);
			return;
		}

		if (once)
		{
			SetColor(onceColor);
			return;
		}

		if (flashing)
		{
			// Flashing frequency is not affected by Time.timeScale
			Color c = Color.Lerp(flashingColorMin, flashingColorMax, 0.5f * Mathf.Sin(Time.realtimeSinceStartup * flashingFreq * doublePI) + 0.5f);
			SetColor(c);
			return;
		}

		if (transitionActive)
		{
			Color c = new Color(constantColor.r, constantColor.g, constantColor.b, constantColor.a * transitionValue);
			SetColor(c);
			return;
		}
		else if (constantly)
		{
			SetColor(constantColor);
			return;
		}
	}
可以看到,优先级分别是occluder>once>flashing>constantly,既constantly的高亮颜色能被前面的覆盖。
了解完高光类型之后,我们看看API,再次翻出官方的帮助文档,注意这些API是在Highlightable.cs中的
• ReinitMaterials()
Object materials reinitialization. Call this method before or after your highlightable
object has changed (added and/or removed) child objects or changed any of its
materials and/or shaders (in case of game character has changed weapon
GameObject for example). Can be called multiple times per update - meshes
reinitialization will occur only once.
• OnParams(Color color)
Set color for one-frame highlighting mode.
• On()
Turn on highlighting for this frame.(打开这帧高亮,也就是我们自update调用该方法的时候,因为update是循环帧,所以每帧都会显示)对应once类型
• On(Color color)
Turn on highlighting for this frame with given color.
• FlashingParams(Color color1, Color color2, float freq)
Set flashing parameters – starting/ending colors and frequency.
• FlashingOn()
Turn on flashing.
Highlighting System 2.0 User Guide © 2012-2013 Deep Dream Games – Page 9 of 13
• FlashingOn(Color color1, Color color2)
Turn on flashing from given color1 to color2.
• FlashingOn(Color color1, Color color2, float freq)
Turn on flashing from given color1 to color2 and flashing frequency.
• FlashingOn(float f)
Turn on flashing with given frequency.闪烁频率
• FlashingOff()
Turn off flashing.
• FlashingSwitch()
Switch flashing mode.
• ConstantParams(Color color)
Set the constant highlighting color.
• ConstantOn()
Fade in constant highlighting.
• ConstantOn(Color color)
Fade in constant highlighting with given color.
• ConstantOff()
Fade out constant highlighting.
• ConstantSwitch()
Switch constant highlighting.
• ConstantOnImmediate()
Turn on constant highlighting immediately (without fading in).
• ConstantOnImmediate(Color color)
Turn on constant highlighting with given color immediately (without fading in).
• ConstantOffImmediate()
Turn off constant highlighting immediately (without fading out).
• ConstantSwitchImmediate()
Switch constant highlighting immediately (without fading in/out).
• OccluderOn()对应Occluder类型
红色的是特别重要的,也是最常用的API,分别打开4个类型的高亮显示开关API。
我们要想做鼠标移动到cube上就让他高亮显示的功能,创建highlight.cs脚本,然后
hightlight.cs:
using UnityEngine;
using System.Collections;
#region 模块信息
/*----------------------------------------------------------------
// 模块名:highlight
// 创建者:chen
// 修改者列表:
// 创建日期:2015/12/23
// 模块描述:鼠标移动到物体上,物体高亮显示
//----------------------------------------------------------------*/
#endregion
public class highlight : MonoBehaviour
{
    Ray ray;
    RaycastHit hit;
    void Update()
    {
        ray = Camera.main.ScreenPointToRay(Input.mousePosition);
        if (Physics.Raycast(ray, out hit, 100))
        {
            Transform transform = hit.collider.transform;
            if (transform != null)
            {
                HighlightableObject ob = transform.GetComponent<HighlightableObject>();
                if (ob != null)
                {
                    ob.On(Color.red);//物体once高亮类型打开,颜色为红色,注意是在update中,所以每帧执行,也就是每帧都高亮
                }
            }
        }
    }
}
然后我们吧脚本拖到主摄像机上,游戏运行。
发现已经完成这个效果,在游戏制作中,我们只需要将cube替换成模型即可。
插件下载地址:http://pan.baidu.com/s/1IGIRk