JDBC
前言
在JDBC-01当中,我们简单地学习了有关JDBC的一些基本操作,现在我们再一次进行深入的学习。
正文
事务
首先,我们来学习的是JDBC中事务的运用,那么让我们再次了解一下事务的概念。
事务的概念
事务指的是逻辑上的一组操作,组成这组操作各个逻辑单元要么全部成功,要么全部失败。
关于事务的API

commit()
![]()
rollback()
![]()
异常案例:
package com.charles.jdbc.high;

import org.junit.Test;

import java.sql.Connection;
import java.sql.PreparedStatement;
import java.sql.SQLException;

/**
 * 有关事务的案例
 * 转账案例
 * @author Charles
 */
public class Demo01 {
    @Test
    public void demo(){
        Connection conn = null;
        PreparedStatement pste = null;
        try {
            // 加载驱动 + 获取连接
            conn = org.charl.Demo.getConnection();
            // 编写SQL
            String sql = "update account set money = money + ? where name = ?";
            // 预编译
            pste = conn.prepareStatement(sql);
            // 转账过程
            pste.setInt(1,-1000);
            pste.setString(2,"aaa");
            pste.executeUpdate();
            pste.setInt(1,1000);
            pste.setString(2,"bbb");
            pste.executeUpdate();
            // 因为这个错误,导致异常的发生
            int i = 1 / 0;
        } catch (SQLException e){
            e.printStackTrace();
        } finally {
            // 资源释放
            org.charl.Demo.release(pste,conn);
        }


    }
}
修改后的案例
package com.charles.jdbc.high;

import org.junit.Test;

import java.sql.Connection;
import java.sql.PreparedStatement;
import java.sql.SQLException;

/**
 * 有关事务的案例
 * 转账案例
 * @author Charles
 */
public class Demo01 {
    @Test
    public void demo(){
        Connection conn = null;
        PreparedStatement pste = null;
        try {
            // 加载驱动 + 获取连接
            conn = org.charl.Demo.getConnection();
            // 开启事务
            conn.setAutoCommit(false);
            // 编写SQL
            String sql = "update account set money = money + ? where name = ?";
            // 预编译
            pste = conn.prepareStatement(sql);
            // 转账过程
            pste.setInt(1,-1000);
            pste.setString(2,"aaa");
            pste.executeUpdate();
            pste.setInt(1,1000);
            pste.setString(2,"bbb");
            pste.executeUpdate();
            // 因为这个错误,导致异常的发生
//            int i = 1 / 0;
            conn.commit();
        } catch (SQLException e){
            // 回滚事务
            try {
                conn.rollback();
            } catch (SQLException ex) {
                ex.printStackTrace();
            }
            e.printStackTrace();
        } finally {
            // 资源释放
            org.charl.Demo.release(pste,conn);
        }


    }
}
这样,数据就会进行回滚,保证了数据的安全性。
连接池
概念:连接池是创建和管理一个连接的缓冲池的技术,这些连接准备好被任何需要它们的线程使用。
好处(作用):
- 减少连接创建时间
- 简化的编程模式
- 受控的资源使用
- 提高连接的效率
连接池原理:
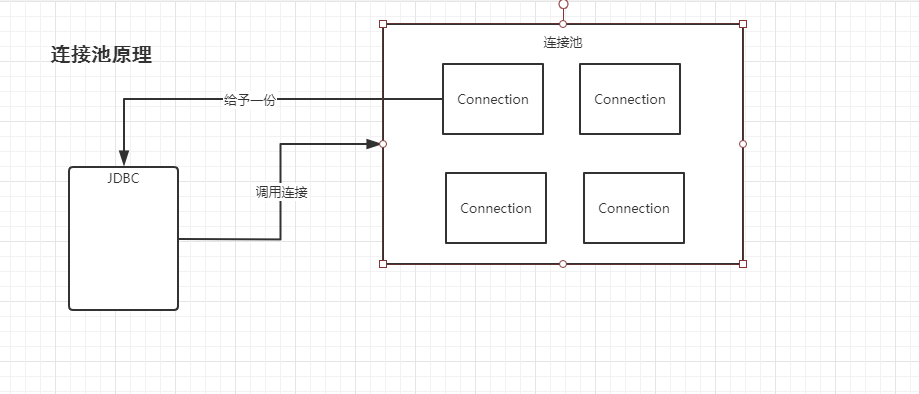
自定义连接池:
我们可以利用DataSource接口来实现一个自定义连接池
具体步骤:
-
-
重写一个getConnection方法
-
初始化多个连接在内存中
-
/**
 * 自定义连接池
 * @author Charles
 */
public class MyDataSource implements DataSource {
    // 在初始化的时候提供一些连接
    private List<Connection> connectionList = new ArrayList<Connection>();
    public MyDataSource(){
        // 初始化连接
        for (int i = 1; i <= 4; i++){
            // 向集合中存入连接
            connectionList.add(org.charl.Demo.getConnection());
        }
    }
    // 获得连接的方法
    @Override
    public Connection getConnection(String username, String password) throws SQLException {
        Connection conn = connectionList.remove(0);
        return conn;
    }

    // 归还连接的方法
    public void addBack(Connection conn){
        connectionList.add(conn);
    }
代码案例:
package jdbc.datasources;

import org.junit.Test;

import javax.management.relation.Relation;
import java.sql.Connection;
import java.sql.PreparedStatement;
import java.sql.ResultSet;
import java.sql.SQLException;

/**
 * 利用连接池的案例
 */
public class Demo01 {
    @Test
    public void demo(){
        Connection conn = null;
        PreparedStatement preparedStatement = null;
        ResultSet rs = null;
        MyDataSource md = null;

        try{
            // 利用自定义的连接池注册驱动 + 获得连接
            md = new MyDataSource();
            conn = md.getConnection();
            // 编写SQL语句
            String sql = "select * from account";
            preparedStatement = conn.prepareStatement(sql);
            rs = preparedStatement.executeQuery();
            // 遍历结果
            while (rs.next()){
                System.out.println(rs.getInt("id") + " " + rs.getString("name") + " "
                        + rs.getString("money"));
            }

        }catch (Exception e){
            e.printStackTrace();
        }finally {
            // 释放资源
            if (preparedStatement != null){
                try{
                    preparedStatement.close();
                } catch (SQLException e){
                    e.printStackTrace();
                }
                preparedStatement = null;
            }

            if (rs != null){
                try {
                    rs.close();
                }catch (SQLException e){
                    e.printStackTrace();
                }
                rs = null;
            }

            // 归还连接
            md.addBack(conn);

        }
    }
}
Druid 是阿里旗下的开源连接池产品,使用非常简单,可以与Spring 框架进行快速整合。
Maven导包
    <!-- https://mvnrepository.com/artifact/com.alibaba/druid -->
    <dependency>
      <groupId>com.alibaba</groupId>
      <artifactId>druid</artifactId>
      <version>1.1.21</version>
    </dependency>
基本代码实现
package com.charles.datasource.demo1;

import com.alibaba.druid.pool.DruidDataSource;
import org.junit.Test;

import java.sql.Connection;
import java.sql.PreparedStatement;
import java.sql.ResultSet;
import java.sql.SQLException;

public class DruidDemo1 {

    @Test
    public void demo01(){
        Connection connection = null;
        PreparedStatement preparedStatement = null;
        ResultSet resultSet = null;

        try {
            // 使用连接池
            DruidDataSource druidDataSource = new DruidDataSource();
            druidDataSource.setDriverClassName("com.mysql.jdbc.Driver");
            druidDataSource.setUrl("jdbc:mysql:///web_test3");
            druidDataSource.setUsername("root");
            druidDataSource.setPassword("1234");

// 获得连接
            connection = druidDataSource.getConnection();
            // 编写SQL
            String sql = "select * from user";
            // 预编译sql
            preparedStatement = connection.prepareStatement(sql);
            resultSet = preparedStatement.executeQuery();
            while (resultSet.next()){
                System.out.println(resultSet.getInt("id") + " " + resultSet.getString("username")
                        + " " + resultSet.getString("password"));
            }
        } catch (SQLException e) {
            e.printStackTrace();
        } finally {
            try {
                connection.close();
            } catch (SQLException e) {
                e.printStackTrace();
            }
            try {
                resultSet.close();
            } catch (SQLException e) {
                e.printStackTrace();
            }
            try {
                preparedStatement.close();
            } catch (SQLException e) {
                e.printStackTrace();
            }
        }


    }
}
当然也可以将这些数据库信息向外面引入,即创建一个db.properties
代码实现:
单元测试类
    @Test
    public void Demo02(){
        Connection connection = null;
        PreparedStatement preparedStatement = null;
        ResultSet resultSet = null;

        try {
            // 使用连接池
            Properties properties = new Properties();
            properties.load(new FileInputStream("src/main/resources/db.properties"));
            DataSource dataSource = DruidDataSourceFactory.createDataSource(properties);

            // 获得连接
            connection = dataSource.getConnection();
            // 编写SQL
            String sql = "select * from user";
            // 预编译sql
            preparedStatement = connection.prepareStatement(sql);
            resultSet = preparedStatement.executeQuery();
            while (resultSet.next()){
                System.out.println(resultSet.getInt("id") + " " + resultSet.getString("username")
                        + " " + resultSet.getString("password"));
            }
        } catch (SQLException | FileNotFoundException e) {
            e.printStackTrace();
        } catch (IOException e) {
            e.printStackTrace();
        } catch (Exception e) {
            e.printStackTrace();
        } finally {
            try {
                connection.close();
            } catch (SQLException e) {
                e.printStackTrace();
            }
            try {
                resultSet.close();
            } catch (SQLException e) {
                e.printStackTrace();
            }
            try {
                preparedStatement.close();
            } catch (SQLException e) {
                e.printStackTrace();
            }
        }
    }
db.properties
# 连接设置
driverClassName=com.mysql.jdbc.Driver
url=jdbc:mysql:///web_test3
username=root
password=1234

# 初始化连接
initialSize=10

# 最大连接数量
maxActive=50

# 最大空闲连接
maxIdle=20

# 最小空闲连接
minIdle=5

# 超时等待时间(以毫秒为单位)
maxWait=60000
C3P0连接池
C3P0是一个开源的JDBC连接池,它实现了数据源和JNDI绑定,支持JDBC3规范和JDBC2的标准扩展。
使用方法与Druid相类似
Maven导包
<!-- https://mvnrepository.com/artifact/com.mchange/c3p0 -->
<dependency>
    <groupId>com.mchange</groupId>
    <artifactId>c3p0</artifactId>
    <version>0.9.5.2</version>
</dependency>
基本代码实现
package com.charles.datasource.demo1;

import com.mchange.v2.c3p0.ComboPooledDataSource;
import org.junit.Test;

import java.beans.PropertyVetoException;
import java.sql.Connection;
import java.sql.PreparedStatement;
import java.sql.ResultSet;
import java.sql.SQLException;

public class C3p0 {

    @Test
    public void demo01() {
        Connection connection = null;
        PreparedStatement preparedStatement = null;
        ResultSet resultSet = null;

        try {
            // 使用连接池
            ComboPooledDataSource DataSource = new ComboPooledDataSource();
            DataSource.setDriverClass("com.mysql.jdbc.Driver");
            DataSource.setJdbcUrl("jdbc:mysql:///web_test3");
            DataSource.setUser("root");
            DataSource.setPassword("1234");

            // 获得连接
            connection = DataSource.getConnection();
            // 编写SQL
            String sql = "select * from user";
            // 预编译sql
            preparedStatement = connection.prepareStatement(sql);
            resultSet = preparedStatement.executeQuery();
            while (resultSet.next()) {
                System.out.println(resultSet.getInt("id") + " " + resultSet.getString("username")
                        + " " + resultSet.getString("password"));
            }
        } catch (SQLException e) {
            e.printStackTrace();
        } catch (PropertyVetoException e) {
            e.printStackTrace();
        } finally {
            try {
                connection.close();
            } catch (SQLException e) {
                e.printStackTrace();
            }
            try {
                resultSet.close();
            } catch (SQLException e) {
                e.printStackTrace();
            }
            try {
                preparedStatement.close();
            } catch (SQLException e) {
                e.printStackTrace();
            }
        }
    }
}
当然,C3P0连接池也可以通过外部配置文件引用
具体代码实现:
c3p0-config.xml配置文件
<?xml version="1.0" encoding="utf-8"?>
<c3p0-config>
    <default-config>
        <property name="driverClass">com.mysql.jdbc.Driver</property>
        <property name="jdbcUrl">jdbc:mysql:///web_test3</property>
        <property name="user">root</property>
        <property name="password">1234</property>

        <property name="initialPoolSize">5</property>
        <property name="maxPoolSize">20</property>
        <property name="minPoolSize">5</property>
    </default-config>

</c3p0-config>
单元测试类
    @Test
    public void Demo02(){
        Connection connection = null;
        PreparedStatement preparedStatement = null;
        ResultSet resultSet = null;

        try {
            // 使用连接池
            ComboPooledDataSource DataSource = new ComboPooledDataSource();
            DataSource.setDriverClass("com.mysql.jdbc.Driver");
            DataSource.setJdbcUrl("jdbc:mysql:///web_test3");
            DataSource.setUser("root");
            DataSource.setPassword("1234");

            // 获得连接
            connection = DataSource.getConnection();
            // 编写SQL
            String sql = "select * from user";
            // 预编译sql
            preparedStatement = connection.prepareStatement(sql);
            resultSet = preparedStatement.executeQuery();
            while (resultSet.next()) {
                System.out.println(resultSet.getInt("id") + " " + resultSet.getString("username")
                        + " " + resultSet.getString("password"));
            }
        } catch (SQLException e) {
            e.printStackTrace();
        } catch (PropertyVetoException e) {
            e.printStackTrace();
        } finally {
            try {
                connection.close();
            } catch (SQLException e) {
                e.printStackTrace();
            }
            try {
                resultSet.close();
            } catch (SQLException e) {
                e.printStackTrace();
            }
            try {
                preparedStatement.close();
            } catch (SQLException e) {
                e.printStackTrace();
            }
        }
    }
这里注意,只要将配置文件放在默认路径下,它就会自动查找,不需要手动导入。
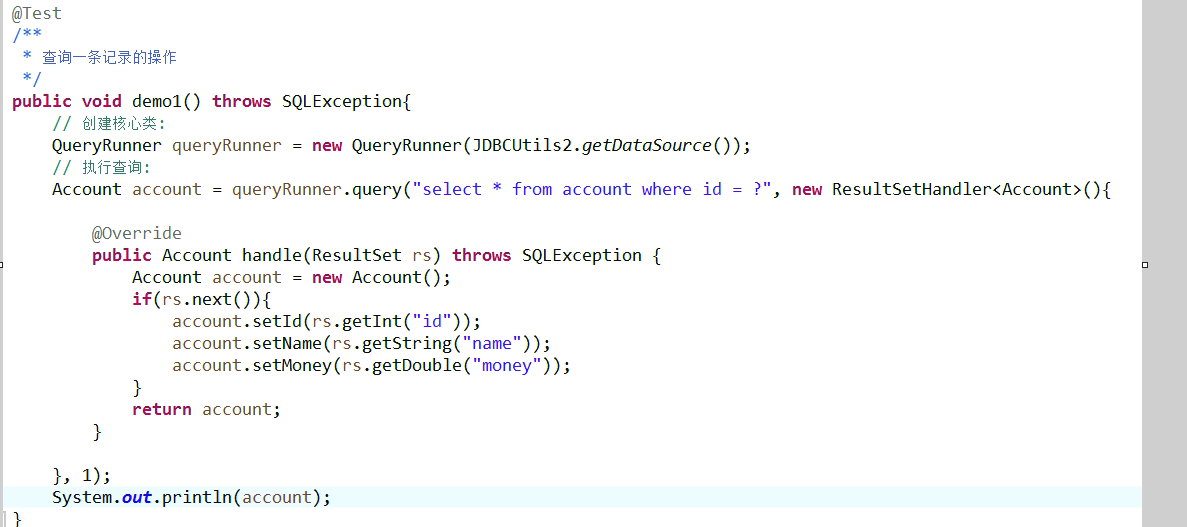
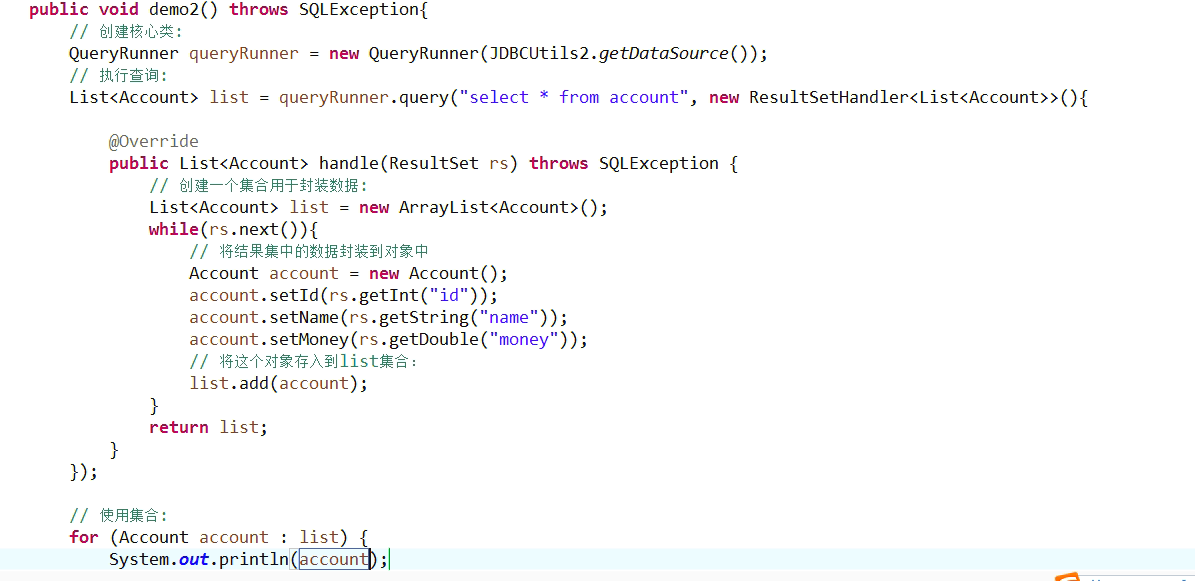
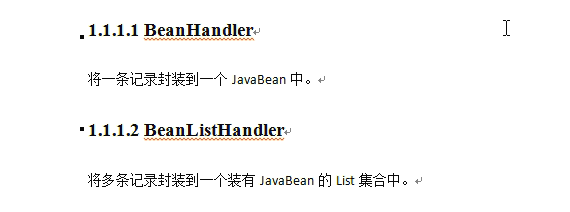
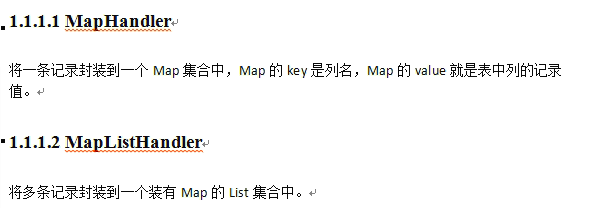
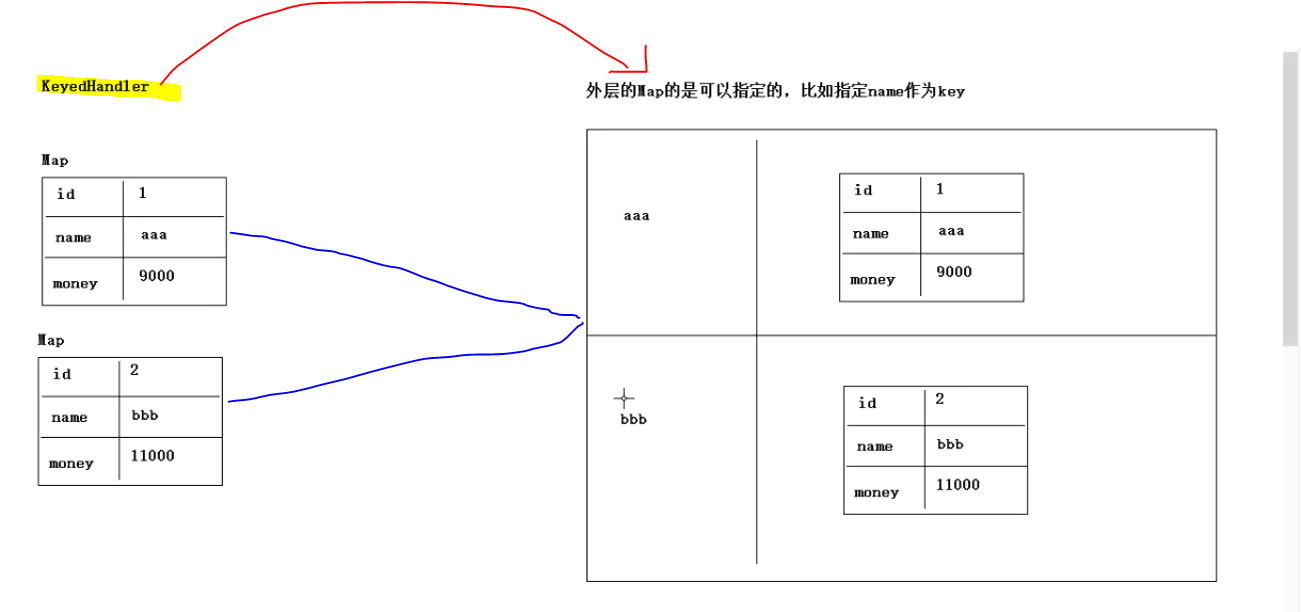
Commons DbUtils一个对JDBC进行简单封装的工具类库,它能够简化JDBC应用程序的开发,同时也不会影响程序的性能。
两个字:方便 -----> 一个字:懒
ArrayHandler 和 ArrayListHandler:

小结
以上便是JDBC的内容了,多练,练到烦了就会了。当然为了更偷懒,我们后期将会学到Mybatis,这个框架比JDBC更方便。
加油!
时间:2020-04-06 01:41:37


