解释一下这标题:apple个人开发者证书无线发布app的实现,也就是说不经过发布到app store,直接在ios设备上安装app,注:ios设备不需要越狱。
之所以有这篇文章的产生,可以看这里:
下面直接上图,介绍实现步骤:
1、设置签名
利用developer profile或者adhoc distribution profile签名app,注意,不能使用distribution profile方式签名,经过测试,是无法安装的。其中原因个人认为developer profile和adhoc distribution profile都可以指定设备,跟之前了解到的,个人开发者证书只能在100个设备中实现无线安装是一致的。
2、生成arichive
菜单:product->build for->arichiving,然后product->archive,完成后可以在organizer中看到生成的arichive。
3、生成ipa
选择刚刚生成的arichive,点击“Distribute...",弹出如下图界面,选择第二个:

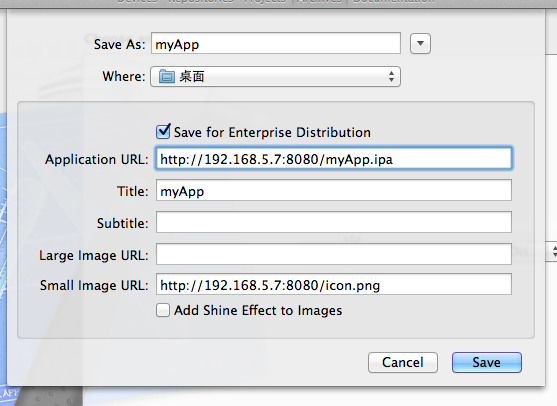
选择后点“next”,设置相关参数,如下图:

一定要勾选“save for enterprise distribution”,简单解释一下各个参数。
application url,是生成的ipa在服务器的位置;title是安装过程中出现的标题;subtitle暂时不清楚做何用处;large image url 和 smal image url是安装过程中出现的图标。
点击保存,将生成两个文件:myApp.ipa和myApp.plist。
4、服务器部署
将myApp.ipa和myApp.plist部署到服务器,同时在服务器生成一个html文件,目的是点击后打开一个链接,这样ios设备就会执行指令自动安装app了。
要打开的链接内容如下:
itms-services://?action=download-manifest&url=http://192.168.5.7:8080/stgApp.plist
5、附一个偷回来的html文件:
- <!DOCTYPE html>
- <html>
- <head>
- <meta http-equiv="Content-Type" content="text/html; charset=iso-8859-1">
- <meta name="viewport" content="width=device-width, initial-scale=1.0, maximum-scale=1.0, user-scalable=no" />
- <title>Install Geoloqi</title>
- <style type="text/css">
- body {
- background: url(bkg.png) repeat #c5ccd4;
- font-family: Helvetica, arial, sans-serif;
- }
- .congrats {
- font-size: 16pt;
- padding: 6px;
- text-align: center;
- }
- .step {
- background: white;
- border: 1px #ccc solid;
- border-radius: 14px;
- padding: 4px 10px;
- margin: 10px 0;
- }
- .instructions {
- font-size: 10pt;
- }
- .arrow {
- font-size: 15pt;
- }
- table {
- 100%;
- }
- </style>
- </head>
- <body>
- <div class="congrats">Congrats! You've been invited to the beta of Geoloqi.</div>
- <div class="step">
- <table><tr>
- <td class="instructions">Install the<br />FilmPicker App</td>
- <td width="24" class="arrow">→</td>
- <td width="72" class="imagelink">
- <a href="itms-services://?action=download-manifest&url=http://192.168.5.7:8080/stgApp.plist">
- <img src="icon.png" height="72" width="72" />
- </a>
- </td>
- </tr></table>
- </div>
- </body>
- </html>
以上步骤顺利经过测试。在摸索过程中参考了以下几篇文章,粘贴一下,以表示对作者迷途指导的感激之情。