介绍
之前讨论了WPF的基础架构,然后逐步开始学习布局面板,转换,介绍了不同的控件,容器,UI转换等。在这篇文章中,我将讨论每个创建XAML应用前的开发人员应该了解的关于XAML最重要的东西。
标记扩展是一种对XAML的扩展,你可以用来对基于XAML的程序应用自定义的规则。在你的设计中,你如果有任何的想对你的程序施加的自定义行为,你都可以使用标记扩展来实现。这里我们将讨论你可以怎样使用标记扩展对XAML生成自定义的行为。
XAML或者说可扩展应用程序标记语言实际上是一种定义了特殊架构的XML格式的语言。现在你可能经常想知道,标记到底能怎样扩展。XAML中到底有什么样的能力使其与XML大不相同。似的,它是因为有着大量的功能的XAML转换器把普通的XAML转换成了丰满的UI设计。
大家都知道XAML实际上是文本格式。它的标签和XML非常相似,每个属性的值都是字符串。尽管你想把一个对象赋给一个字符串,但是因为对象只能有一个字符串,所以你不能这样做。标记扩展将允许你处理这些情况。所以你可以说一个标记扩展实际上是一种把普通的XML扩展成为一个完成的可扩展的标记的方式——即是XAML。
由于XAML把任何东西都当成字符串,有事我们需要把这些字符串转换为有效的值。举个例子:当我们使用 Margin 的时候,我们需要声明 margin 元素的每个值。在这种情况下,转换非常的简单和直接,我们可以使用类型转换器而不是使用标记扩展。在我们讨论标记扩展前,首先我们来讨论一下类型转换器。
类型转换器
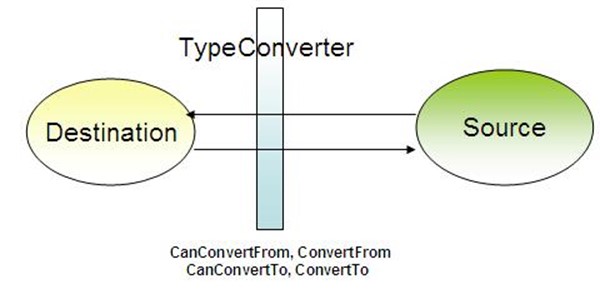
在上文中我已经说过了,XML的标记扩展不能对元素的数据施加限制。意思就是你在XAML中只能声明对象的属性为字符串数据。但是XAML提供了一个灵活的方式来创建类型转换器,这样就可以对数据施加限制了。甚至像 Single 和 Double这样的原语你都不能在XAML中描述。类型转换器扮演了一个重要的角色来把这种限制加到XAML转换器上。

XAML转换器在转换任何属性的值时需要两个信息:
- 值类型:这个决定了值将被转换为什么类型
- 真实值
好的,当转换器找到一个属性中的数据时,它首先确定数据的类型。如果类型是基本的,转换器将尝试直接转换。另一方面,如果是一个可枚举类型,转换器将尝试转换为一个特定的枚举值。如果上面的都不满足,转换器将尝试找到一个合适的类型转换器类并转换为一个合适的类型。XAML中已经定义了许多的类型转换器,比如 Margin=10,20,0,30 意思就是按照左,上,右,下定义的一个序列。因此系统定义了一个转换器把这种数据转换为 Thickness 对象。
自定义类型转换器
要创建一个自定义的类型转换器,我们需要使用 TypeConverterAttribute 装饰类型并且自定义一个用来把数据转换为实际类型的类。实际转换的类,需要继承自 TypeConverter 。
让我们使用一个例子来说得更明白:
一个转换地理位置的类型转换器:
像我上面说的那样,为了创建一个类型转换器,你需要创建一个一个应用了 TypeConverter 的类。在我的例子中,我创建了一个有两个属性 Latitude(纬度) 和 Longitude(经度) 的类,并且创建了一个地理位置的实现。让我们看一下以下的类:
[global::System.ComponentModel.TypeConverter(typeof(GeoPointConverter))]

public class GeoPointItem

{

public double Latitude { get; set; }

public double Longitude { get; set; }


public GeoPointItem()

{

}


public GeoPointItem(double lat, double lon)

{

this.Latitude = lat;

this.Longitude = lon;

}


public static GeoPointItemParse(string data)

{

if (string.IsNullOrEmpty(data)) return new GeoPointItem();


string[] items = data.Split(',');

if (items.Count() != 2)

throw new FormatException("GeoPoint should have both latitude

and longitude");


double lat, lon;

try

{

lat = Convert.ToDouble(items[0]);

}

catch (Exception ex) {

throw new FormatException("Latitude value cannot be converted", ex);

}


try

{

lon = Convert.ToDouble(items[1]);

}

catch (Exception ex) {

throw new FormatException("Longitude value cannot be converted", ex);

}


return new GeoPointItem(lat, lon);

}


public override string ToString()

{

return string.Format("{0},{1}", this.Latitude, this.Longitude);

}

}
在上面的代码中,你可以看到我创建了一个很普通的类,它定义了地球上的一个地理位置。这个类型有两个参数,经度和纬度,而且他们都是 Double 类型的。我已经重写了 ToString() 方法,在这个例子中获得对象的字符串值非常重要。 Parse 方法用来把一个字符串的值转换为 GeoPointItem 。
当实现了这些之后,第一件应该做的事是使用 TypeConverter 装饰这个类。这个属性使得使用了 GeoPointConverter 转换器的项可以很容易地转换作为属性的参数。这样当XAML转换器转换字符串的时候,它将会自动调用 GeoPointConverter 来转换回值。
当昨晚这些之后,我们需要来创建真正的转换器。看下面的代码:
public class GeoPointConverter : global::System.ComponentModel.TypeConverter
{
//如果源类型是字符串,返回 true
public override bool CanConvertFrom(
System.ComponentModel.ITypeDescriptorContext context, Type sourceType)
{
if (sourceType is string)
return true;
return base.CanConvertFrom(context, sourceType);
}
//如果目标类型是 GeopointItem ,返回 true
public override bool CanConvertTo(
System.ComponentModel.ITypeDescriptorContext context, Type destinationType)
{
if (destinationType is string)
return true;
return base.CanConvertTo(context, destinationType);
}
//把字符串转换为 GeopointItem
public override object ConvertFrom(
System.ComponentModel.ITypeDescriptorContext context,
System.Globalization.CultureInfo culture, object value)
{
if (value is string)
{
try
{
return GeoPointItem.Parse(value as string);
}
catch (Exception ex)
{
throw new Exception(string.Format(
"Cannot convert '{0}' ({1}) because {2}", value, value.GetType(), ex.Message), ex);
}
}
return base.ConvertFrom(context, culture, value);
}
//把 GeopointItem 转换为字符串
public override object ConvertTo(
System.ComponentModel.ITypeDescriptorContext context,
System.Globalization.CultureInfo culture, object value, Type destinationType)
{
if(destinationType == null)
throw new ArgumentNullException("destinationType");
GeoPointItem gpoint = value as GeoPointItem;
if(gpoint != null)
if (this.CanConvertTo(context, destinationType))
return gpoint.ToString();
return base.ConvertTo(context, culture, value, destinationType);
}
}
在上面的代码中,我们通过继承 TypeConverter 实现了转换类。实现接口 TypeConverter 我们需要重写一些方法让 XAML 转换器可以调用或者做合适的修改这样 XAML 转换器能在需要的时候得到合适的值。
- CanConvertFrom:当 XAML 转换器尝试将字符串转换为 GeoPointItem 的时候将尝试调用此方法。如果返回 true, 将调用 ConvertFrom 方法做真实的转换。
- CanConvertTo:当 XAML 转换器尝试将 GeoPointItem 变量转换为字符串的时候将尝试调用此方法。如果返回 true,将调用 ConvertTo 进行真实的转换。
- ConvertFrom:做真实的转换并且在成功转换后返回 GeoPointItem 。
- ConvertTo:做真实的转换并返回等效于传入的 GeoPointItem 的字符串。
在上面的代码中,你可以看到我实际上是使用了类型转换器类来把字符串转换为 GeoPointItem 的,反之也是这样。
到了该使用它的时候了。我创建了一个自定义的 UserControl 并且把有一个 GeoPoint 的属性放入。XAML看起来非常简单:
<Grid>
<Grid.RowDefinitions>
<RowDefinition/>
<RowDefinition/>
</Grid.RowDefinitions>
<Grid.ColumnDefinitions>
<ColumnDefinition/>
<ColumnDefinition/>
</Grid.ColumnDefinitions>
<TextBlock Text="Latitude" Grid.Row="0" Grid.Column="0"></TextBlock>
<TextBox x:Name="txtlat" MinWidth="40" Grid.Row="0" Grid.Column="1"
TextChanged="txtlat_TextChanged"/>
<TextBlock Text="Longitude" Grid.Row="1" Grid.Column="0"></TextBlock>
<TextBox x:Name="txtlon" MinWidth="40" Grid.Row="1" Grid.Column="1"
TextChanged="txtlon_TextChanged"/>
</Grid>
它有两个 TextBox 单独显示经度和纬度。如果这些值改变, GeoPointItem 的实际值也改变。
public partial class GeoPoint : UserControl
{
public static readonly DependencyProperty GeoPointValueProperty =
DependencyProperty.Register("GeoPointValue", typeof(GeoPointItem),
typeof(GeoPoint), new PropertyMetadata(new GeoPointItem(0.0, 0.0)));
public GeoPoint()
{
InitializeComponent();
}
public GeoPointItem GeoPointValue
{
get
{
return this.GetValue(GeoPointValueProperty) as GeoPointItem;
}
set
{
this.SetValue(GeoPointValueProperty, value);
}
}
private void txtlat_TextChanged(object sender, TextChangedEventArgs e)
{
GeoPointItem item = this.GeoPointValue;
item.Latitude = Convert.ToDouble(txtlat.Text);
this.GeoPointValue = item;
}
private void txtlon_TextChanged(object sender, TextChangedEventArgs e)
{
GeoPointItem item = this.GeoPointValue;
item.Longitude = Convert.ToDouble(txtlon.Text);
this.GeoPointValue = item;
}
private void UserControl_Loaded(object sender, RoutedEventArgs e)
{
GeoPointItem item = this.GeoPointValue;
this.txtlat.Text = item.Latitude.ToString();
this.txtlon.Text = item.Longitude.ToString();
}
}
这里当 UserControl 载入的时候,它首先加载 TextBox 中的值。 TextChanged 方法用来处理确保当 TextBox 的值改变时对象的值也改变。在 Window 中,我们需要创建一个 UserControl 的实例并且把下面的值传入:
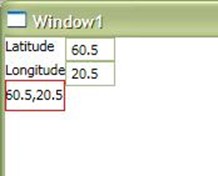
- <converter:GeoPoint x:Name="cGeoPoint" GeoPointValue="60.5,20.5" />
转换器指明了命名空间。因此你可以看到 TextBox 中的值正确显示。
标记扩展
现在你已经了解了类型转换器,让我们来解释一下标记扩展。标记扩展提供了在XAML属性中创建自定义对象的灵活性。每个标记扩展都包含在一对{}中。任何写在花括号中的内容都被认为是标记扩展。这样XAML转换器把在花括号中的任何内容不视为字符串,而是尝试通过花括号中声明的名字来找到对应的标记扩展。
例外
如果你想把包含花括号的字符串放入,你应该在开始的地方放置一个 {} ,这样使得它作为一个例外。你可以通过查看 怎样在XAML中对 {} 转义 了解更多。
使用标记扩展的例子:
- <TextBox Text={x:Null} />
可能这是一个最简单的例子,它实际上是一个返回 null 给 Text 字符串的标记扩展。

在 System.Windows.Markup 命名空间中已经有了很多的给 XAML 定义的标记扩展,这样在 XAML 中你可以做一些功能性的特性。让我们来讨论其中的一些:
NullExtension
这是最简单的标记扩展。当放入的时候,它实际上返回一个 null 。
- Content = "{x:Null}"
ArrayExtension
这个用来创建一系列项的数组列表。x:Array 返回根据声明的类型的一组对象。
- Values = {x:Array Type=sys:String}
StaticExtension
另一个简单的扩展,用来返回静态属性或者属性引用。
- Text="{x:Static Member=local:MyClass.StaticProperty}"
这样当你为 MyClass 定义了一个静态的属性 StaticProperty ,你可以通过这样来自动地把值赋给 Text 属性。
TypeExtension
类型扩展用来获取对象的类型。当一个控件的属性使用 Type 对象的时候,你可以使用它。
- TargetType="{x:Type Button}"
所以 TargetType 得到一个 Button 的类型对象。
StaticResourceExtension
资源是定义在 XAML 中的对象。 StaticResource 替代分配给对象的 key 并且替换引用的声明的资源元素。
<Grid.Resources>
<Color x:Key="rKeyBlack">Black</Color>
<SolidColorBrush Color="{StaticResource rKeyBlack}" x:Key="rKeyBlackBrush"/>
</Grid.Resources>
<TextBlock Background="{StaticResource ResourceKey=rKeyBlackBrush}"/>
如果编译的时候没有 key ,将产生静态资源错误。
DynamicResourceExtension
这个跟静态资源扩展相似,但是它推迟了赋值,成为运行时的引用。这样你可以定义一个 动态资源的 key 并且他将在当实际的对象创建的运行时才使用。
<TextBlock Background="{DynamicResource ResourceKey=rKeyBlackBrush}" />
现在, rKeyBlackBrush 如果没有在 Grid.Resources中声明也不会产生错误。你可以在窗口加载的时候,动态地添加。
什么是资源?
资源是创建被 XAML 转换器呈现的对象的对象。每一个 FrameworkElement 对象包含一个 ResourceDictionary 对象。你可以在资源字典中添加资源并且在作用域中重用。
资源是可以重用的组件,可以使用多次来产生输出。如果在你的应用中你需要一个使用超过一次的对象,并且你不希望它在作用域中被修改,资源是最好的选择。

<Grid.Resources>
<Color x:Key="rKeyRed">Red</Color>
<Color x:Key="rKeyCyan">Cyan</Color>
<LinearGradientBrush x:Key="rKeyforegroundGradient">
<GradientStop Color="{StaticResource rKeyRed}" Offset="0"></GradientStop>
<GradientStop Color="{StaticResource rKeyCyan}" Offset="1"></GradientStop>
</LinearGradientBrush>
</Grid.Resources>
<TextBlock Text="{Binding ElementName=cGeoPoint, Path=GeoPointValue}"
FontSize="30" Margin="50" Grid.Row="1" Grid.ColumnSpan="2"
Foreground="{StaticResource rKeyforegroundGradient}"/>
这里你可以看到我们定义了一个 LinearGradientBrush 并且用来作为 TextBlock 的前景色。如果需要的话这个对象可以使用任意多次。
每个 FrameworkElement 都包含了一个叫做 Resource 的属性,它有一个 ResourceDictionary 对象。你可以在这个集合中分配多个你在不同对象上需要用到的资源。在 XAML 中,资源使用 x:Key 属性来声明,稍候这个 key 可以通过 StaticResource 和 DynamicResource 用来引用 ResourceDictionary 中的资源。
动态资源和静态资源的区别
静态资源在程序载入期间在作用域内通过定义在资源字典中的key来找到。因此如果在编译的时候没有找到,编译器将报错。相对地,动态资源标记扩展延迟了资源的分配,在运行时动态地进行。所以知道对象被创建之前表达式都没有被计算。
注意:如果资源是派生自冻结的(不可变的),任何对对象的改变都可能会改变UI,而不考虑资源是静态的还是动态的。例如:画刷(Brush),动画(Animation)和几何对象都是冻结的。
选择静态资源还是动态资源
- 静态资源在运行的时候使用更少的CPU资源,所以更快。
- 因为静态资源是在程序载入的时候创建的。所以如果把所有资源都设置为静态资源将降低程序的载入进度。
- 如果资源在编译的时候是未知的,你可以使用动态资源。动态资源被用于用户交互改变它们的外观。
- 如果你希望你的资源是可拔插的,动态资源是最好的选择。你可以阅读下面的文章了解如何创建可拔插的资源:WPF中使用语言转换工具创建可拔插的风格和资源
绑定
绑定是可以用来绑定一个对象的最重要也是最复杂的标记扩展。当数据对象呗分配给对象的 DataContext 时它提供了绑定对象。
意思就是加入你有一个对象 Obj ,它有很多的属性比如 Name ,Age 等。你可以这样写:
Text = "{Binding Name}"
意思就是在运行的时候 DataContext 对象将自动地计算然后 Name 属性真是的值将显示到 Text 属性上。
绑定有非常多的灵活性,这样你可以在绑定对象上声明表达式,这也就使得它是标记扩展中的一个最复杂的。
<StackPanel Orientation="Vertical">
<TextBox x:Name="txtObj"></TextBox>
<TextBox x:Name="txtCustom" Text="{Binding FallbackValue=10,
ElementName=txtObj, Path=Text,StringFormat='Text Entered : {0:N2}'}, Mode=TwoWay">
</TextBox>
</StackPanel>
因为他们都绑定到属性的任何改动将自动改变另外一个 textbox 。有多种绑定的模式: OnteTime , OneWayToSource , OneWay 和 TwoWay 。StringFOrmat 创建了对字符串的格式化。我们可以在绑定中关联转换器,这样让我们可以根据传入的值返回合适的值。
你可以阅读如何为绑定创建转换器:怎样在绑定中处理转换
考虑到绑定,你必须确定绑定的对象实现了 INotifyPropertyChanged 接口。否则每一个绑定都将以像 OneTime 那样工作。
你可以阅读更多关于怎样实现 INotifyPropertyChanged 接口:对象和集合的改变通知
我们将在后面的文章中详细讨论绑定。
相对资源(RelativeSource)
相对资源是一种你在绑定中不得不使用的标记扩展。绑定有一个叫做 RelativeSource 的属性,在这里你可以声明一个相对资源标记扩展。这个标记扩展让你可以给元素相对位置的引用而不是使用值的绝对声明。当绝对引用不好用的时候相对资源非常的顺手。
相对资源有以下一些属性:
- AncestorType(祖先类型):它定义了找到属性的祖先元素的类型。如果你在 Grid 中定义了一个按钮,并且你想参照 Grid,你可以使用相对资源。
-
Mode(模式):决定了相对资源怎么被找到。这个枚举有以下一些值:
- Self(自己):意思就是绑定将在对象自己内部发生。所以你如果想让对象的前景色和背景色一样,相对资源的 Mode=Self 将非常方便。
- FindAncestor(找到祖先):找到元素的父元素。这样将在可视化树上找到所有的可视元素并且尝试找到 AncestorType 提供的类型的控件,它将一直找到祖先元素为止。
- TemplatedParent(模板父元素):模板父元素让你在模板被定义的对象中找到值。模板被定义在控件自己中,用来帮助完全重新定义数据和控件元素。模板父元素允许你直接找到模板对象。
- PreviousData(上一个数据):允许你在对象绑定到一个集合视图时追踪上一个数据元素。这样实际上相对资源就是之前的数据元素。
- AncestorLevel(祖先层数):一个数值的值用来确定相对资源在确定结果前应该搜索的层数。如果你把 AncestorLevel 声明为 1 ,它将只查找一层。
你可以在任何绑定中使用相对资源:
<Grid Name="grd">
<TextBox x:Name="txtCustom" Text="{Binding Name, RelativeSource={RelativeSource AncestorType={x:Type Grid}, Mode=FindAncestor,AncestorLevel=2}}" />
</Grid>
这样允许你找到 Grid 。实际上来说,在这个例子中你可以很容易地获得 Grid 的引用,所以没有给你一个什么时候该使用相对资源的直观感受。相对资源在如果 Grid 是一些不可达的元素时将非常有用,例如 TextBox 在 Grid 的 DataTemplate 中。
TemplateBinding(模板绑定)
模板绑定允许你在控件的模板中把模板父元素的值绑定进来。
<RadioButton Foreground="Red">
<RadioButton.Template>
<ControlTemplate>
<ToggleButton Content="{TemplateBinding Foreground}"/>
</ControlTemplate>
</RadioButton.Template>
</RadioButton>
在这个例子中, ToggleButton 的标题将显示为 #FFFF00000 ,和 RadiButton 的颜色等效。
MUltiBinding(多重绑定)
多重绑定允许你基于多个绑定来创建绑定。你可以通过创建一个实现了 IMultiValueConverter 接口的类来把多个绑定声明转换为一个输出。不同的转换器和 MultiValueConverter 之间的唯一区别就是普通的 IValueConverter只使用一个值作为参数而 MultiValueConverter 可以使用来自所有绑定元素的一个数组的值。我们将在这个系列的后面讨论更多关于多重绑定的内容。
<Button x:Name="NextImageButton" >
<Button.IsEnabled>
<MultiBinding Converter="{StaticResource SelectedItemIndexIsNotLastToBoolean}">
<Binding Mode="OneWay" ElementName="ImageListBox" Path="SelectedIndex" />
<Binding Mode="OneWay" ElementName="ImageListBox" Path="Items.Count" />
</MultiBinding>
</Button.IsEnabled>
<Image Source="Icons/navigate_right.png"/>
</Button>
自定义标记扩展
在最后一小节,我将创建我的自定义标记扩展并且使用它。为了简单我们使用反射来获取字段,方法和属性并且把他们绑定到一个 ListBox 中。为了创建一个自定义的标记扩展,你需要创建一个继承了 MarkupExtension 的类。这个类有一个你需要重写的抽象方法叫做 ProvideValue 用来让标记扩展工作。所以实际上 XAML 转换器将调用 ProvideValue 方法来得到标记扩展的输出。实现代码如下:
public class ReflectionExtension : global::System.Windows.Markup.MarkupExtension
{
public TypeCurrentType { get; set; }
public bool IncludeMethods { get; set; }
public bool IncludeFields { get; set; }
public bool IncludeEvents { get; set; }
public ReflectionExtension(Type currentType)
{
this.CurrentType = currentType;
}
public override object ProvideValue(IServiceProvider serviceProvider)
{
if (this.CurrentType == null)
throw new ArgumentException("Type argument is not specified");
ObservableCollection<string> collection = new ObservableCollection<string>();
foreach(PropertyInfo p in this.CurrentType.GetProperties())
collection.Add(string.Format("Property : {0}", p.Name));
if(this.IncludeMethods)
foreach(MethodInfo m in this.CurrentType.GetMethods())
collection.Add(string.Format("Method : {0} with {1}
argument(s)", m.Name, m.GetParameters().Count()));
if(this.IncludeFields)
foreach(FieldInfo f in this.CurrentType.GetFields())
collection.Add(string.Format("Field : {0}", f.Name));
if(this.IncludeEvents)
foreach(EventInfo e in this.CurrentType.GetEvents())
collection.Add(string.Format("Events : {0}", e.Name));
return collection;
}
}
你可以看到这个类的构造函数使用了一个 Type 类型的参数。现在在 XAML 中使用它就跟我们之前使用的其他的标记扩展一样:
<ListBox ItemsSource="{local:Reflection {x:Type Grid},IncludeMethods=true, IncludeFields=true, IncludeEvents=true}" MaxHeight="200" Grid.Row="3" Grid.ColumnSpan="2" />
所以这里构造函数从 {x:Type Grid} 中获得参数。任何标记扩展的第一个参数都会作为构造函数的参数。其他的属性使用逗号隔开来定义。
总结
这篇文章中我们处理了基础 XAML 应用的基本的标记扩展和类型转换器。我们把绑定标记扩展留到了后面,我们将在下一篇文章中讨论。
WPF Tutorial - TypeConverter & Markup Extension
XAML as an Extensible Markup Language has great flexibilities to create objects in XAML itself and do functions like automatic binding, Conversion of Data, etc. Markup Extension allows you to truly extend your markup upto a certain extent to elevate you to write less code and design your application
Introduction
In my previous article I have discussed about basic architecture of WPF, and then gradually started learning with Layout panels, Transformation, introduced different Controls, containers, UI Transformation etc. In this article I will discuss the most important part of XAML which every developer must learn before starting with any XAML applications.
Markup Extensions are extensions to XAML which you might use to assign custom rules on your XAML based Applications. Thus any custom behavior which you would like to impose on your application in your designer, you should always use Markup Extensions. Here we will discuss how you can use Markup Extensions to generate your custom behaviors to XAML.
XAML or Extensible Application Markup Language is actually an XML format which has special schema defined. Now you might always wonder, how extensible the Markup is. What type of capabilities that are there within XAML which widely differs the XAML with XML. Yes, it is because of XAML parser which has huge number of capabilities to make the normal XML to a very rich UI designs.
You all know XAML is actually a text format. The tags are very same as with any XML where the attributes takes everything as String. Even though you want to assign a object to a string, you cannot do so because the object can only take a string. Markup Extension allows you to handle these kind of situations.
As XAML takes everything as string, sometimes we need to convert those data into valid values. For instance, when we use Margin, we need to specify each values of margin element. In such situation where the conversion is very simple and straight forward, we can use Type Converters to do this job rather than going for Markup extensions. Lets discuss about Type Converters first before we move to Markup Extensions.
Type Converter
As I already told you, markup as an extension of XML cannot impose restriction over a data element. That means we can only specify string data for attributes of any object in XAML. But XAML provides a flexibility to create your Type converter which allows you to impose restriction on the data. Thus even primitives like Single or Double could not have restrictions while you describe in your XAML. Type Converters plays a vital role to put this restriction to XAML parser.
XAML parser while parsing any value of an attribute needs two pieces of information.
- Value Type : This determines the Type to which the string data should be converted to.
-
Actual Value
Well, when parser finds a data within an attribute, it first looks at the type. If the type is primitive, the parser tries a direct conversion. On the other hand, if it is an Enumerable, it tries to convert it to a particular value of an Enumerable. If neither of them satisfies the data, it finally tries to find appropriate Type Converters class, and converts it to an appropriate type. There are lots of typeconverters already defined in XAML, like Margin. Margin = 10,20,0,30 means margin :left,top,right,bottom is defined in sequence. Therefore system defines a typeconverter that converts this data into Thickness object.
Custom TypeConverter
To create a TypeConverter we need to decorate the Type with TypeConverterAttribute and define a custom class which converts the data into the actual type. And the actual converter class, a class which implements from TypeConverter.
Let us make it clear using an Example :
TypeConverter to convert a GeoPoint:
To create a TypeConverter as I have already told you, you need to create a class for which the TypeConverterto be applied. In my example, I have created a class which has two properties called Latitude and Longitudeand creates an implementation of a Geographic Point. Lets see how the class looks like :
[global::System.ComponentModel.TypeConverter(typeof(GeoPointConverter))]
public
class GeoPointItem
{
    public
    double Latitude
    {
        get;
        set;
    }
    public
    double Longitude
    {
        get;
        set;
    }
    public GeoPointItem()
    {
    }
    public GeoPointItem(double lat, double lon)
    {
        this.Latitude = lat;
        this.Longitude = lon;
    }
    public
    static GeoPointItem Parse(string data)
    {
        if (string.IsNullOrEmpty(data)) return
                new GeoPointItem();
        string[] items = data.Split(',');
        if (items.Count() != 2)
            throw
            new FormatException("GeoPoint should have both latitude
                                and longitude");
        double lat, lon;
        try
        {
            lat = Convert.ToDouble(items[0]);
        }
        catch (Exception ex)
        {
            throw
            new FormatException("Latitude value cannot be converted", ex);
        }
        try
        {
            lon = Convert.ToDouble(items[1]);
        }
        catch (Exception ex)
        {
            throw
            new FormatException("Longitude value cannot be converted", ex);
        }
        return
            new GeoPointItem(lat, lon);
    }
    public
    override
    string ToString()
    {
        return
            string.Format("{0},{1}", this.Latitude, this.Longitude);
    }
}
In the above code you can see that I have created a quite normal class, which defines a Geographic point on Earth. The type has two parameters, Latitude and Longitude and both of which are Double values. I have also overridden the ToString() method, which is actually very important in this situation to get the string resultant of the object. The Parse method is used to parse a string format to GeoPointItem.
After implementing this, the first thing that you need to do is to decorate the class with TypeConverterAttribute. This attribute makes sure that the item is Converted easily using the TypeConverterGeoPointConverter passed as argument to the attribute. Thus while XAML parser parses the string, it will call the GeoPointConverter automatically to convert back the value appropriately.
After we are done with this, we need to create the actual converter. Lets look into it :
public
class GeoPointConverter : global::System.ComponentModel.TypeConverter
{
    //should return true if sourcetype is string
    public
    override
    bool CanConvertFrom(
        System.ComponentModel.ITypeDescriptorContext context, Type sourceType)
    {
        if (sourceType is
                string)
            return
                true;
        return
            base.CanConvertFrom(context, sourceType);
    }
    //should return true when destinationtype if GeopointItem
    public
    override
    bool CanConvertTo(
        System.ComponentModel.ITypeDescriptorContext context, Type destinationType)
    {
        if (destinationType is
                string)
            return
                true;
        return
            base.CanConvertTo(context, destinationType);
    }
    //Actual convertion from string to GeoPointItem
    public
    override
    object ConvertFrom(
        System.ComponentModel.ITypeDescriptorContext context,
        System.Globalization.CultureInfo culture, object
        value)
    {
        if (value
                is
                string)
        {
            try
            {
                return GeoPointItem.Parse(value
                                          as
                                          string);
            }
            catch (Exception ex)
            {
                throw
                new Exception(string.Format(
                                  "Cannot convert '{0}' ({1}) because {2}", value, value.GetType(), ex.Message), ex);
            }
        }
        return
            base.ConvertFrom(context, culture, value);
    }
    //Actual convertion from GeoPointItem to string
    public
    override
    object ConvertTo(
        System.ComponentModel.ITypeDescriptorContext context,
        System.Globalization.CultureInfo culture, object
        value, Type destinationType)
    {
        if(destinationType == null)
            throw
            new ArgumentNullException("destinationType");
        GeoPointItem gpoint = value
                              as GeoPointItem;
        if(gpoint != null)
            if (this.CanConvertTo(context, destinationType))
                return gpoint.ToString();
        return
            base.ConvertTo(context, culture, value, destinationType);
    }
}
In the above code we have implemented the converter class by deriving it from TypeConverter. After implementing it from TypeConverter class we need to override few methods which XAML parser calls and make appropriate modifications so that the XAML parser gets the actual value whenever required.
- CanConvertFrom : This will be called when XAML parser tries to parse a string into a GeopointItemvalue. When it returns true, it calls ConvertFrom to do actual Conversion.
- CanConvertTo : This will be called when XAML parser tries to parse a GeoPointItem variable to a string equivalent.When it returns true, it calls ConvertTo to do actual Conversion.
- ConvertFrom :Does actual conversion and returns the GeoPointItem after successful conversion.
-
ConvertTo : Does actual conversion and returns the string equivalent of GeoPointItem passed in.
In the above example, you can see I have actually converter the string value to GeoPointItem and vice-versa using the TypeConverter class.

Now its time to use it. To do this I build a custom UserControl and put the property of that to have a GeoPoint. The XAML looks very simple :
<Grid>
                            <Grid.RowDefinitions>
                            <RowDefinition/>
                            <RowDefinition/>
                            </Grid.RowDefinitions>
                            <Grid.ColumnDefinitions>
                            <ColumnDefinition/>
                            <ColumnDefinition/>
                            </Grid.ColumnDefinitions>
                            <TextBlock Text="Latitude" Grid.Row="0" Grid.Column="0"></TextBlock>
                            <TextBox x:Name="txtlat" MinWidth="40" Grid.Row="0" Grid.Column="1"
              TextChanged="txtlat_TextChanged"/>
                            <TextBlock Text="Longitude" Grid.Row="1" Grid.Column="0"></TextBlock>
                            <TextBox x:Name="txtlon" MinWidth="40" Grid.Row="1" Grid.Column="1"
             TextChanged="txtlon_TextChanged"/>
                            </Grid>
It has 2 Textboxes which displays value of Latutude and Longitude individually. And when the value of these textboxes are modified, the actual value of the GeopointItem is modified.
public partial class GeoPoint : UserControl
{
    public
    static
    readonly DependencyProperty GeoPointValueProperty =
        DependencyProperty.Register("GeoPointValue", typeof(GeoPointItem),
                                    typeof(GeoPoint), new PropertyMetadata(new GeoPointItem(0.0, 0.0)));
    public GeoPoint()
    {
        InitializeComponent();
    }
    public GeoPointItem GeoPointValue
    {
        get
        {
            return
                this.GetValue(GeoPointValueProperty) as GeoPointItem;
        }
        set
        {
            this.SetValue(GeoPointValueProperty, value);
        }
    }
    private
    void txtlat_TextChanged(object sender, TextChangedEventArgs e)
    {
        GeoPointItem item = this.GeoPointValue;
        item.Latitude = Convert.ToDouble(txtlat.Text);
        this.GeoPointValue = item;
    }
    private
    void txtlon_TextChanged(object sender, TextChangedEventArgs e)
    {
        GeoPointItem item = this.GeoPointValue;
        item.Longitude = Convert.ToDouble(txtlon.Text);
        this.GeoPointValue = item;
    }
    private
    void UserControl_Loaded(object sender, RoutedEventArgs e)
    {
        GeoPointItem item = this.GeoPointValue;
        this.txtlat.Text = item.Latitude.ToString();
        this.txtlon.Text = item.Longitude.ToString();
    }
}
Here when the UserControl Loads, it first loads values passed in to the TextBoxes. The TextChangedoperation is handled to ensure the actual object is modified whenever the value of the textbox is modified.
From the window, we need to create an object of the UserControl and pass the value as under:
<converter:GeoPoint x:Name="cGeoPoint" GeoPointValue="60.5,20.5" />The converter points to the namespace. Hence you can see the value is shown correctly in the TextBoxes.
Markup Extension
Now as you know about TypeConverter, let us take MarkupExtension into account. Markup Extensions gives the flexibility to create custom objects into your XAML attributes. Every markup extension is enclosed within a {} braces. Thus anything written within the Curl braces will be taken as Markup Extension. Thus XAML parser treats anything within the curl braces not as literal string and rather it tries to find the actual MarkupExtension corresponding to the name specified within the Curl braces.
Exception
If you want to put braces within a string you need to put {} at the beginning to make it an exception. You can read "How to Escape {} in XAML" [^] for more information.
Example of Markup Extension :
<TextBox Text={x:Null} />Probably the simplest of all, it actually a MarkupExtension which returns Null to the Text string.
There are already few Markup Extensions defined with XAML defined within System.Windows.Markup namespace which helps every time to produce functional features within your XAML. Let us discuss few of them :
NullExtension
This is the most simple MarkupExtension we ever have. It actually returns Null when placed against a value.
Content = "{x:Null}"ArrayExtension
This is used to create an ArrayList of items. The x:Array actually returns an object of Array of type specified.
Values = {x:Array Type=sys:String}StaticExtension
Another simple Extension which returns Static field or Property references.
Text="{x:Static Member=local:MyClass.StaticProperty}"Thus when you define a static property StaticProperty for MyClass , you will automatically set the value to Text property using this.
TypeExtension
Type extension is used to get Types from objects. When the attribute of a control takes the Type object you can use it.
TargetType="{x:Type Button}"So TargetType receives a Type object of Button.
Reference
It is used to Refer an object declared somewhere in XAML by its name. It is introduced with .NET 4.0
Text="{x:Reference Name=Myobject}"StaticResourceExtension
Resources are objects that are defined within the XAML. StaticResource substitutes the key assigned to the object and replaces its reference to the Resource element declared.
<Grid.Resources>
<Color x:Key="rKeyBlack">Black</Color>
<SolidColorBrush Color="{StaticResource rKeyBlack}" x:Key="rKeyBlackBrush"/>
</Grid.Resources>
<TextBlock Background="{StaticResource ResourceKey=rKeyBlackBrush}"
                                            />
StaticResource errors out if the key is not there during compile time.
DynamicResourceExtension
This is same as StaticResource, but it defers the value to be a runtime reference. Thus you can declare any key for a DynamicResource and it should be present during runtime when the actual object is created.
<TextBlock Background="{DynamicResource ResourceKey=rKeyBlackBrush}" />Now the rKeyBlackBrush if not declared as Grid.Resources will not error out. You can add that during Runtime when Window Loads.
What are Resources ?
Resources are objects that are created the object is rendered by XAML parser. Every FrameworkElement object has a ResourceDictionary object placed within it. You can add Resources within this ResourceDictionaryand can reuse those component within the scope.
Resources are reusable component which one can use for several times to produce its output. So if you need an object that you want to reuse more than once in your application, and you don't want the object to be changed within the scope, Resources are then the best option for you.

<Grid.Resources>
                            <Color x:Key="rKeyRed">Red</Color>
                            <Color x:Key="rKeyCyan">Cyan</Color>
                            <LinearGradientBrush x:Key="rKeyforegroundGradient">
                            <GradientStop Color="{StaticResource rKeyRed}" Offset="0"></GradientStop>
                            <GradientStop Color="{StaticResource rKeyCyan}" Offset="1"></GradientStop>
                            </LinearGradientBrush>
                            </Grid.Resources>
<TextBlock Text="{Binding ElementName=cGeoPoint, Path=GeoPointValue}"
      FontSize="30" Margin="50" Grid.Row="1" Grid.ColumnSpan="2"
      Foreground="{StaticResource rKeyforegroundGradient}"
                                    />
So you can see we have defined a LinearGradientBrush and used as Foreground of the TextBlock. This object can be reused any time when required.
Every FrameworkElement has a property called Resource which takes an object of ResourceDictionary. You can assign various resources to this Collection which you would use in different object created within the scope of the object. In XAML, resources are declared using x:Key attribute, and later this key can be used to refer to the resource in ResourceDictionary using StaticResource or DynamicResource.
Difference between StaticResource and DynamicResource
StaticResource finds the key defined within the ResourceDictionary under its scope during the Loading of the application. Hence the Compiler will throw error during compilation if not found in resources. On the other hand, DynamicResource Markup Extension defers the resource assignment to the actual runtime of the application. So the expression remains unevaluated until the object being created.
Note : If the resource is derived from Freezable (immutable), any change to the object will change the UI regardless of whether it is a StaticResource or DynamicResource. Example : Brush, Animation, Geometry objects are Freezable.
Choice between StaticResource and DynamicResource
- StaticResource requires less CPU during runtime, so it is faster.
- StaticResource are created when the application loads. So making everything as StaticResource means slowing down the Application Load process.
- When the resources are unknown during compilation, you can use DynamicResource. DynamicResourceare used when user interaction changes the look and feel of an object.
-
DynamicResource is best when you want your resource to be pluggable. You can read how to create pluggable resources from : Pluggable Styles and Resources in WPF with Language Converter Tool [^]
Binding
Binding is the most important and complex Markup extension which might be used to bind one object. It provides Databound object when the data object is assigned to the DataContext of the object.
Thus say you have an object Obj which has several properties like Name, Age etc. Then you might write
Text = "{Binding Name}"which means the DataContext object will automatically be evaluated during runtime and the actual value of Name property of the object will be shown on the Text property.
Binding has lots of flexibilities, thus you can specify expressions on the databound objects and hence made it one of the most complex Markup extension.

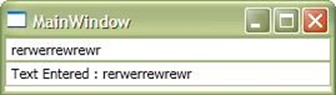
<StackPanel Orientation="Vertical">
                            <TextBox x:Name="txtObj"></TextBox>
                            <TextBox x:Name="txtCustom" Text="{Binding FallbackValue=10,
        ElementName=txtObj, Path=Text,StringFormat='Text Entered : {0:N2}'}, Mode=TwoWay">
                            </TextBox>
                            </StackPanel>
As both of them are bound any change to the property automatically reflects the changes to the other textbox. There are few modes of these binding, OneTime, OneWayToSource, OneWay and TwoWay. StringFormatcreates formatting of the string. We can have Converters associated with a binding to enable us to return appropriate value based on the value we feed in.
You can read how to create Converter for Binding from :
How to deal with Converter in Binding [^]
In case of binding, you must also make sure that the object which is bound to have implemented INotifyPropertyChanged. Otherwise every binding will work as OneTime.
You can read more on how you can implement Binding with INotifyPropertyChanged from : Change Notification for objects and Collection [^]
We will discuss Binding in greater detail in next article.
RelativeSource
RelativeSource is a MarkupExtension which you have to use within Binding. Binding has a property called RelativeSource, where you can specify a RelativeSource MarkupExtension. This Markup Extension allows you to give Relative reference to the element rather than absolutely specifying the value. RelativeSource comes handy when absolute Reference is unavailable.
RelativeSource has few properties which one can use :
- AncestorType : It defines the Type of the Ancestor element where the property to be found. So if you defined a button within a Grid, and you want to refer to that Grid, you might go for RelativeSource.
- Mode : Determines how the RelativeSource to be found. The enumeration has few values :
- Self : This means the Binding will take place within the object itself. So if you want the Background and Foreground of the same object, RelativeSource Mode =Self will come handy.
- FindAncestor : Finds elements parent to it. Thus it will look through all the visual element into the Visual tree and try to find the control for which the AncestorType is provided and it goes on until the object is found in the Ancestor elements to it.
- TemplatedParent : TemplatedParent allows you to find the value from the object for which the Template is defined. Templates are definition of the control itself which helps to redefine the Data and Control Elements altogether. TemplatedParent allows you to find the Templated object directly.
- PreviousData : This allows you to track the Previous Data element when the object is bound to a CollectionView. Thus this is actually RelativeSource to previous DataElement.
-
AncestorLevel : Numeric value that determines how many levels that the RelativeSource should search before determining the result. If you specify 1 as AncestorLevel, it will go through only one level.
You can use RelativeSource for any binding.
<Grid Name="grd">
                            <TextBox x:Name="txtCustom" Text="{Binding Name,
RelativeSource={RelativeSource AncestorType={x:Type Grid},
Mode=FindAncestor,AncestorLevel=2}}"
                                />
</Grid>
This allows you to find the Grid. Practically speaking, this example doesnt gives you a sense when to use RelativeSource as in this case you can easily get the actual reference to the Grid. RelativeSource comes very useful when the Grid is somewhat inaccessible from it, say the TextBox is within the DataTemplate of a Grid.
TemplateBinding
TemplateBinding allows you to bind the value of a property of an object within the Template of a control to the object TemplatedParent to it.
<RadioButton Foreground="Red">
                            <RadioButton.Template>
                            <ControlTemplate>
                            <ToggleButton Content="{TemplateBinding Foreground}"
                                                />
                            </ControlTemplate>
                            </RadioButton.Template>
                            </RadioButton>
In this case the ToggleButton Caption will be shown as #FFFF0000 which is the equivalent color for RadioButton.
MultiBinding
MultiBinding allows you to create Binding based on more than one Binding. You can create a class from IMultiValueConverter which will allow you to covert multipleBinding statements into one single output. The only difference between a normal converter and MultiValueConverter is a normal IValueConverter takes one value as argument whereas a MultiValueConverter takes an Array of values from all the Binding elements. We will discuss more on MultiBinding later in the series.
<Button x:Name="NextImageButton">
                            <Button.IsEnabled>
                            <MultiBinding Converter="{StaticResource SelectedItemIndexIsNotLastToBoolean}">
                            <Binding Mode="OneWay" ElementName="ImageListBox" Path="SelectedIndex"/>
                            <Binding Mode="OneWay" ElementName="ImageListBox" Path="Items.Count"/>
                            </MultiBinding>
                            </Button.IsEnabled>
                            <Image Source="Icons/navigate_right.png"/>
</Button>
Custom Markup Extension
In the final section, I will build my custom Markup Extension and use it. For simplicity we use Reflection to Get fields, Methods, and Properties and bind them into a ListBox. To create a custom Markup Extension, you need to create a class and inherit it from MarkupExtension. This class has an abstract method called ProvideValue which you need to override to make the MarkupExtension work. So actually the XAML parser calls this ProvideValue to get the output from MarkupExtension. So the actual implementation looks like :
public
class ReflectionExtension : global::System.Windows.Markup.MarkupExtension
{

    public Type CurrentType
    {
        get;
        set;
    }

    public
    bool IncludeMethods
    {
        get;
        set;
    }

    public
    bool IncludeFields
    {
        get;
        set;
    }

    public
    bool IncludeEvents
    {
        get;
        set;
    }


    public ReflectionExtension(Type currentType)
    {

        this.CurrentType = currentType;
    }


    public
    override
    object ProvideValue(IServiceProvider serviceProvider)
    {

        if (this.CurrentType == null)

            throw
            new ArgumentException("Type argument is not specified");


        ObservableCollection<string> collection = new ObservableCollection<string>();

        foreach(PropertyInfo p in
                this.CurrentType.GetProperties())
            collection.Add(string.Format("Property : {0}", p.Name));


        if(this.IncludeMethods)

            foreach(MethodInfo m in
                    this.CurrentType.GetMethods())
                collection.Add(string.Format("Method : {0} with {1}
                                             argument(s)", m.Name, m.GetParameters().Count()));

        if(this.IncludeFields)

            foreach(FieldInfo f in
                    this.CurrentType.GetFields())
                collection.Add(string.Format("Field : {0}", f.Name));

        if(this.IncludeEvents)

            foreach(EventInfo e in
                    this.CurrentType.GetEvents())
                collection.Add(string.Format("Events : {0}", e.Name));


        return collection;
    }


}
You can see the constructor for this class takes one argument of Type. Now to use it we refer it in XAML and use it in similar fashion as we do with other MarkupExtensions.
<ListBox ItemsSource="{local:Reflection {x:Type Grid},IncludeMethods=true, IncludeFields=true, IncludeEvents=true}"MaxHeight="200" Grid.Row="3" Grid.ColumnSpan="2" />So here the Constructor gets argument from {x:Type Grid}. The first argument for any MarkupExtension is treated as Constructor argument. The other properties are defined using comma separated strings.
Conclusion
So this article deals with the basics of Markup Extension and Type Converters of basic XAML applications. We have left the Binding markup extension behind, and we will discuss on it on our next topic. I hope this article comes helpful to all of you. Thanks for reading.