ChuanGoing 2019-11-24
asp.net core系列已经来到了第五篇,通过之前的基础介绍,我们了解了事件订阅/发布的eventbus整个流程,初探dapper ORM实现,并且简单的介绍了领域模型、领域仓储及服务实现,结合上一篇的日志、错误处理及事务和本篇将要介绍的权限,大致的可以形成一个简单的后端系统架构。当然这些都是零散的一些技术概念的介绍,后面如果有时间的话,我想详细的介绍下如何利用领域驱动来实现一个实际案例。
话不多讲,下面来看下本篇的学习曲线:
1.认识Identityserver4
2.Identityserver4实现认证与授权
3.自定义权限的实现
认识Identityserver4
关于Identityserver4(ids4)的概念介绍,请查看IdentityServer4 知多少-简书一文。我这里要说的是,asp.net core 下的ids4集成了认证与授权两大功能,使得我们非常方便的实现一个开放的认证与授权平台,比如公司内部多个系统的集成登录(单点登录)/第三方系统数据共享/统一的认证中心等。整个业务流程大致为:
1.用户首先的有用户中心的账号信息,因此需要注册一个账号
2.用户访问某个站点应用,需要去到用户中心认证
3.认证通过,用户得到其在用户中心注册的相应信息及其权限时限、范围、大小
4.认证不通过,即非法用户,提示用户注册
5.在第3步的前提下,若用户访问到另一个站点(采用同一认证平台),这时用户可以用之前认证通过后拿到的访问令牌访问此站点,若此令牌中包含此站点的相应权限即可之前登录。
Identityserver4实现认证与授权
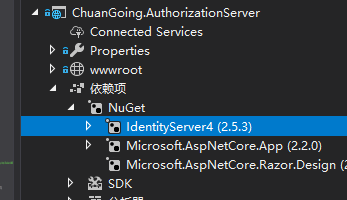
首先,新建一个asp.net core web 空项目,并且添加如下IdentityServer4 Nuget包
在ConfigureServices添加如下代码
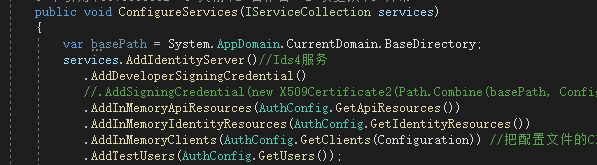
注册IdentityServer中间件,如下5个配置分别表示:
1.AddDeveloperSigningCredential:开发模式下的签名证书,开发环境启用即可
2.AddInMemoryApiResources:相关资源配置


public static IEnumerable<ApiResource> GetApiResources()
        {
            return new List<ApiResource>
            {
                new ApiResource("WebApi", "ChuanGoingWebApi"),
                new ApiResource("ProductApi", "ChuanGoingWebProduct")
            };
        }
这里配置了两个Api资源
3.AddInMemoryIdentityResources:OpenID Connect相关认证信息配置
 public static IEnumerable<IdentityResource> GetIdentityResources()
        {
            return new List<IdentityResource>
            {
                new IdentityResources.OpenId(),
                new IdentityResources.Profile()
            };
        }
4.AddInMemoryClients:客户端信息配置
 public static IEnumerable<Client> GetClients(IConfiguration Configuration)
        {
            var OnlineConfig = Configuration.GetSection("OnlineClient");
            var List = new List<Client>
            {
                new Client()
                {
                    ClientId = "ClientCredentials",
                    AllowedGrantTypes = GrantTypes.ClientCredentials,
                    ClientSecrets = { new Secret("ClientSecret".Sha256()) },
                    AllowedScopes =
                    {
                        IdentityServerConstants.StandardScopes.OpenId,
                        IdentityServerConstants.StandardScopes.Profile,
                        "WebApi",
                        "ProductApi"
                    },
                    AccessTokenLifetime = 10 * 60 * 1
                },

                new Client()
                {
                    ClientId = "ResourceOwnerPassword",
                    AllowedGrantTypes = GrantTypes.ResourceOwnerPassword,
                    ClientSecrets = { new Secret("ClientSecret".Sha256()) },
                    AllowedScopes =
                    {
                        IdentityServerConstants.StandardScopes.OpenId,
                        IdentityServerConstants.StandardScopes.Profile,
                        "WebApi",
                        "ProductApi"
                    },
                    AccessTokenLifetime = 10 * 60 * 1
                },
                  /*
                  隐式模式:https://localhost:6005/connect/authorize?client_id=Implicit&redirect_uri=http://localhost:5000/Home&response_type=token&scope=WebApi
                  */
                new Client()
                {
                    ClientId = "Implicit",
                    ClientName = "ImplicitClient",
                    AllowedGrantTypes = GrantTypes.Implicit,
                    ClientSecrets = { new Secret("ImplicitSecret".Sha256()) },
                    RedirectUris ={OnlineConfig.GetValue<string>("RedirectUris") },
                    PostLogoutRedirectUris = {OnlineConfig.GetValue<string>("LogoutRedirectUris") },
                    AllowedScopes =
                    {
                        IdentityServerConstants.StandardScopes.OpenId,
                        IdentityServerConstants.StandardScopes.Profile,
                        "WebApi",
                        "ProductApi"
                    },
                    AccessTokenLifetime = 10 * 60 * 1,
                    //允许将token通过浏览器传递
                     AllowAccessTokensViaBrowser=true
                },
                /*
                 * 授权码模式:https://localhost:6005/connect/authorize?client_id=GrantCode&redirect_uri=http://localhost:5000/Home&response_type=code&scope=WebApi
                 */
                new Client()
                {
                   //客户端Id
                    ClientId="GrantCode",
                    ClientName="GrantCodeClient",
                    //客户端密码
                    ClientSecrets={new Secret("CodeSecret".Sha256()) },
                    //客户端授权类型,Code:授权码模式
                    AllowedGrantTypes=GrantTypes.Code,
                    //允许登录后重定向的地址列表,可以有多个
                     RedirectUris ={OnlineConfig.GetValue<string>("RedirectUris") },
                    //允许访问的资源
                    AllowedScopes={
                        "WebApi",
                        "ProductApi"
                    }
                }
            };
            return List;
        }
分别对象Auth2.0的四种模式,本篇将用到的是ResourceOwnerPassword模式,其他几种可在篇尾github链接查看源码的实现
5.AddTestUsers:用户配置,可结合缓存/持久化
public static List<TestUser> GetUsers()
        {
            return new List<TestUser>
            {
                new TestUser
                {
                    SubjectId = Guid.NewGuid().ToString(),
                    Username = "admin",
                    Password = "123456"

                    //Claims = new List<Claim>
                    //{
                    //    new Claim("name", "admin"),
                    //    new Claim("website", "https://www.cnblogs.com/chuangoing")
                    //}
                },
                new TestUser
                {
                    SubjectId = Guid.NewGuid().ToString(),
                    Username = "chuangoing",
                    Password = "123456"

                    //Claims = new List<Claim>
                    //{
                    //    new Claim("name", "chuangoing"),
                    //    new Claim("website", "https://github.com/chuangoing")
                    //}
                }
            };
        }
定义两个测试用户,注意这里的SubjectId,用作用户中心注册的openid(认证唯一),后面将会用到
然后,Configure中添加app.UseIdentityServer();//启用ids4
至此,ids4 服务完成
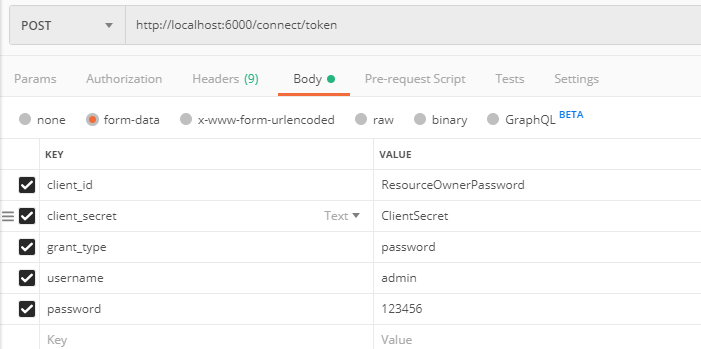
用postman测试下:
返回jwt accesstoken:
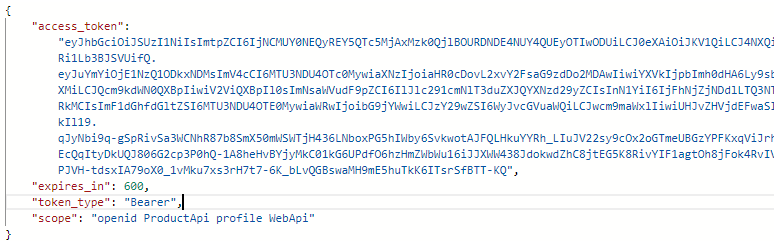
将token内容解码,如下:
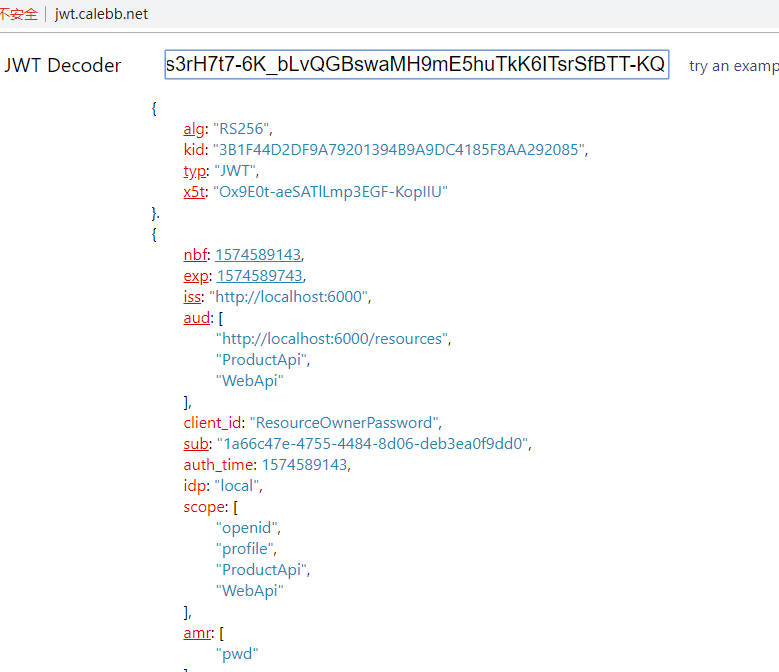
可以看到,里面包含我们配置的ProductApi/WebApi的权限
将token信息加入到http的header中:
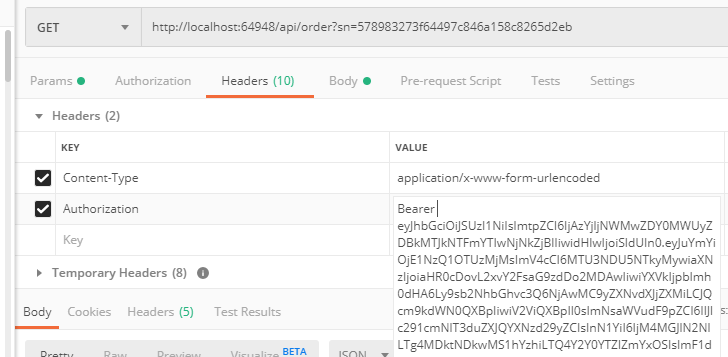
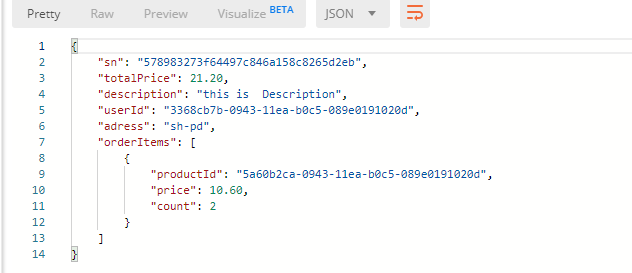
注意Bearer后面有个空格,访问order的获取订单信息:
自定义权限的实现
这里,我们将api中的action分别定义一个权限代码,用户拥有了此action访问权限(拥有此权限代码)即可访问,简单实现如下:
1.定义权限特性标识,api的action指定某个标识
public class PermissionAttribute : Attribute
    {
        /// <summary>
        /// 权限代码
        /// </summary>
        public string Code { get; }
        /// <summary>
        ///
        /// </summary>
        /// <param name="code">权限代码</param>
        public PermissionAttribute(string code)
        {
            Code = code;
        }
    }
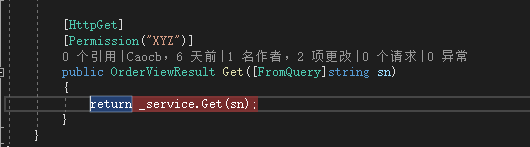
此处,get action定义了访问权限标识为"XYZ"
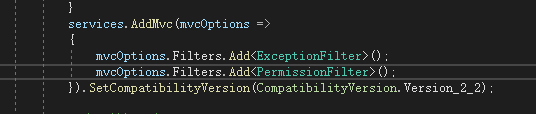
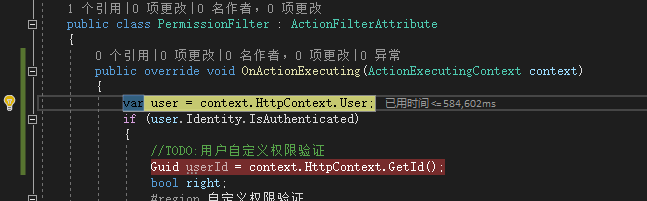
同样,我们这里需要用到一个权限过滤器,利用过滤器的Aop实现权限过滤业务处理:
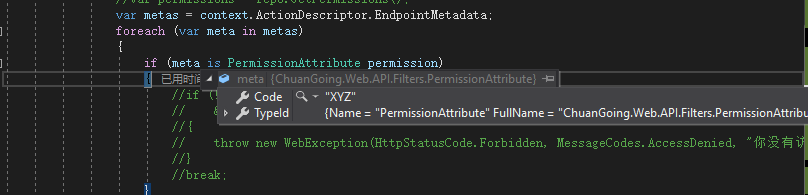
 public class PermissionFilter : ActionFilterAttribute
    {
        public override void OnActionExecuting(ActionExecutingContext context)
        {
            var user = context.HttpContext.User;
            if (user.Identity.IsAuthenticated)
            {
                //TODO:用户自定义权限验证
                Guid userId = context.HttpContext.GetId();
                bool right;
                #region 自定义权限验证
                //根据userId判断用户内部系统权限信息

                //var userPermissions = repo.GetUserPermissions(userId);
                //var permissions = repo.GetPermissions();
                var metas = context.ActionDescriptor.EndpointMetadata;
                foreach (var meta in metas)
                {
                    if (meta is PermissionAttribute permission)
                    {
                        //if (!permissions.Any(p => permission.Code.Any(c => c == p.Code))
                        //    && !userPermissions.Any(p => permission.Code.Any(c => c == p.Code)))
                        //{
                        //    throw new WebException(HttpStatusCode.Forbidden, MessageCodes.AccessDenied, "你没有访问该资源的权限");
                        //}
                        //break;
                    }
                }

                right = false;
                #endregion
                if (!right)
                {
                    context.Result = new ContentResult() { StatusCode = (int)HttpStatusCode.Forbidden, Content = "你没有访问该资源的权限" };
                }

            }
        }
同时,启用权限过滤器配置
部分代码略过,详细的请查看篇尾的源码链接
利用第二节的认证授权得到的token,我们用postman测试下:
过滤器切面成功工作

还记得第一节说的SubjectId么?这里利用这个openid,去内部系统去匹配相关用户信息,相关业务就不深入了,有兴趣的朋友可以下载示例完善下
至此,整个权限认证、授权、自定义权限介绍完。
WebApi详细代码在Github的https://github.com/ChuanGoing/Start.git 的Domain分支可以找到,AuthServer详细代码在https://github.com/ChuanGoing/Demo/tree/master/ChuanGoing.AuthorizationServer中。