1.mongodb4.0.4在windows7 64b x86安装好之后,在mongodb目录下(或者其他目录)
创建db目录(数据库的数据存储目录),
log目录,./log/mongo.log文件(日志文件),
./mongod.cfg文件(mongodb有一种启动方式需要这个配置文件作为启动参数):
systemLog:
    destination: file
    path: d:mongodatalogmongo.log
storage:
    dbPath: d:mongodatadb
还有一些参数没有配置,如“security: authorization: enabled”,表示需要通过用户密码验证后进入mongo.exe(mongo客户端),这里省略表示可以随意访问mongodb
2.mongo的服务端启动方式:
在bin目录可以通过mongod --help查看mongod的命令参数
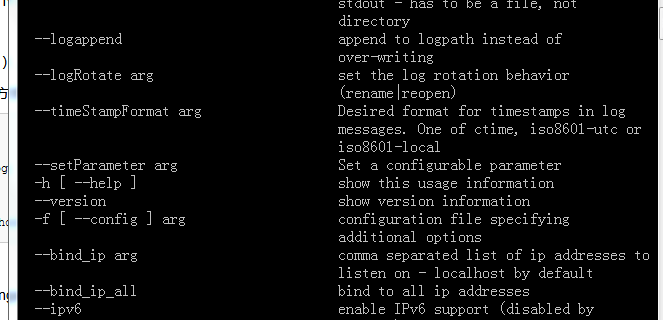
--bind_ip 127.0.0.1 默认为127.0.0.1
--port 27017 默认为27017, web 访问端口,默认加1000
--logpath "D:..." 指定日志输出路径,默认为控制台,windows中写入服务时必须指定,linux中启动时也必须指定
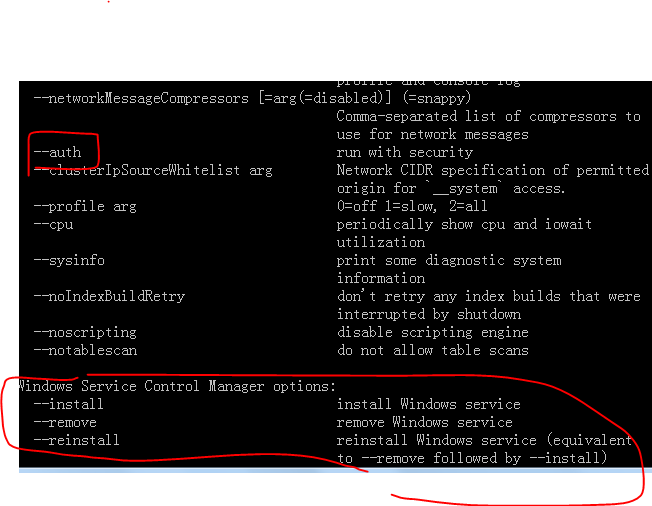
--auth 以启用用户认证方式启动数据库
--rest 可以打开api
--config ./server.conf 指定配置文件的位置(必须写成绝对路径)
启动/关闭方式1:注册安装服务+conf文件+net start xxx
(1)注册服务,开启通信
>mongod --logpath "d:mongodatalogmongodb.log" --logappend -dbpath "d:mongodatadb" --conf "d:mongodbmongd.conf" --serviceName "MongoDB01" --install
>net start MongoDB01
服务名称"MongoDB01"是自己定义的
此时服务器在后台成功注册并且启动网络通信模块,可以通过mongo.exe命令连接服务端(without authentication),或java的driver连接mongo (without authentication)
(2)关闭通信,移除服务
>net stop MongoDB01
>mongod --remove --serviceName "MongoDB01"
此时无法连接mongodb
启动/关闭方式2:前台临时启动(cmd关闭或ctrl+c即可关闭服务)
>mongod --logpath "d:mongodatalogmongodb.log" --logappend -dbpath "d:mongodatadb" --conf "d:mongodbmongd.conf" --serviceName "MongoDB01"
【mongodb 服务器关闭】
>use admin
>db.shutdownServer(
3.添加用户名密码权限注册(如果之前有install的服务,需要将之前注册服务启动的服务remove掉):
注意db.addUser()方法已经deprecated,无法继续使用
As per MongoDB BOL Enable Auth With access control enabled, ensure you have a user with userAdmin or userAdminAnyDatabase role in the admin database. This user can administrate user and roles such as: create users, grant or revoke roles from users, and create or modify customs roles.
You can create users either before or after enabling access control. If you enable access control before creating any user, MongoDB provides a localhost exception which allows you to create a user administrator in the admin database. Once created, you must authenticate as the user administrator to create additional users as needed.
Procedure
Here is the following procedure through which you can Enable Auth. First adds a user administrator to a MongoDB instance running without access control and then enables access control.
mongod --port 27017 --dbpath /data/db1

C:Program FilesMongoDBServer3.6bin>mongod --auth --port 27017 --dbpath /data/db1
2018-01-02T00:04:21.038-0700 I CONTROL  [initandlisten] MongoDB starting : pid=8048 port=27017 dbpath=/data/db1 64-bit host=ACSD140013
2018-01-02T00:04:21.038-0700 I CONTROL  [initandlisten] targetMinOS: Windows 7/Windows Server 2008 R2
2018-01-02T00:04:21.039-0700 I CONTROL  [initandlisten] db version v3.6.0
2018-01-02T00:04:21.039-0700 I CONTROL  [initandlisten] git version: a57d8e71e6998a2d0afde7edc11bd23e5661c915
2018-01-02T00:04:21.039-0700 I CONTROL  [initandlisten] OpenSSL version: OpenSSL 1.0.1u-fips  22 Sep 2016
2018-01-02T00:04:21.039-0700 I CONTROL  [initandlisten] allocator: tcmalloc
2018-01-02T00:04:21.039-0700 I CONTROL  [initandlisten] modules: none
2018-01-02T00:04:21.039-0700 I CONTROL  [initandlisten] build environment:
2018-01-02T00:04:21.039-0700 I CONTROL  [initandlisten]     distmod: 2008plus-ssl
2018-01-02T00:04:21.040-0700 I CONTROL  [initandlisten]     distarch: x86_64
2018-01-02T00:04:21.040-0700 I CONTROL  [initandlisten]     target_arch: x86_64
2018-01-02T00:04:21.040-0700 I CONTROL  [initandlisten] options: { net: { port: 27017 }, security: { authorization: "enabled" }, storage: { dbPath: "/data/db1" } }
2018-01-02T00:04:21.044-0700 I -        [initandlisten] Detected data files in /data/db1 created by the 'wiredTiger' storage engine, so setting the active storage engine to 'wiredTiger'.
2018-01-02T00:04:21.044-0700 I STORAGE  [initandlisten] wiredtiger_open config: create,cache_size=1508M,session_max=20000,eviction=(threads_min=4,threads_max=4),config_base=false,statistics=(fast),log=(enabled=true,archive=true,path=journal,compressor=snappy),file_manager=(close_idle_time=100000),statistics_log=(wait=0),verbose=(recovery_progress),
2018-01-02T00:04:21.557-0700 I STORAGE  [initandlisten] WiredTiger message [1514876661:556397][8048:140720576475904], txn-recover: Main recovery loop: starting at 1/35584
2018-01-02T00:04:21.677-0700 I STORAGE  [initandlisten] WiredTiger message [1514876661:676479][8048:140720576475904], txn-recover: Recovering log 1 through 2
2018-01-02T00:04:21.792-0700 I STORAGE  [initandlisten] WiredTiger message [1514876661:792524][8048:140720576475904], txn-recover: Recovering log 2 through 2
2018-01-02T00:04:23.008-0700 I CONTROL  [initandlisten]
2018-01-02T00:04:23.008-0700 I CONTROL  [initandlisten] ** WARNING: This server is bound to localhost.
2018-01-02T00:04:23.009-0700 I CONTROL  [initandlisten] **          Remote systems will be unable to connect to this server.
2018-01-02T00:04:23.010-0700 I CONTROL  [initandlisten] **          Start the server with --bind_ip <address> to specify which IP
2018-01-02T00:04:23.010-0700 I CONTROL  [initandlisten] **          addresses it should serve responses from, or with --bind_ip_all to
2018-01-02T00:04:23.010-0700 I CONTROL  [initandlisten] **          bind to all interfaces. If this behavior is desired, start the
2018-01-02T00:04:23.010-0700 I CONTROL  [initandlisten] **          server with --bind_ip 127.0.0.1 to disable this warning.
2018-01-02T00:04:23.011-0700 I CONTROL  [initandlisten]
2018-01-02T00:04:23.011-0700 I CONTROL  [initandlisten]
2018-01-02T00:04:23.011-0700 I CONTROL  [initandlisten] ** WARNING: The file system cache of this machine is configured to be greater than 40% of the total memory. This can lead to increased memory pressure and poor performance.
2018-01-02T00:04:23.011-0700 I CONTROL  [initandlisten] See http://dochub.mongodb.org/core/wt-windows-system-file-cache
2018-01-02T00:04:23.012-0700 I CONTROL  [initandlisten]
2018-01-02T10:04:23.320+0300 I FTDC     [initandlisten] Initializing full-time diagnostic data capture with directory '/data/db1/diagnostic.data'
2018-01-02T10:04:23.322+0300 I NETWORK  [initandlisten] waiting for connections on port 27017
2018-01-02T10:05:09.214+0300 I NETWORK  [listener] connection accepted from 127.0.0.1:64482 #1 (1 connection now open)
Connect to the instance
For example, connect a mongo shell to the instance.
mongo --port 27017Specify additional command line options as appropriate to connect the mongo shell to your deployment, such as --host.
Create the user administrator
For example here in the admin database, add a user with the userAdminAnyDatabase role. For example, the following creates the user myUserAdmin in the admin database:
> use admin
switched to db admin
> use admin
switched to db admin
> db.createUser(
...   {
...     user: "mongoadmin",
...     pwd: "mongoadmin",
...     roles: [ { role: "userAdminAnyDatabase", db: "admin" } ]
...   }
... )
Successfully added user: {
        "user" : "mongoadmin",
        "roles" : [
                {
                        "role" : "userAdminAnyDatabase",
                        "db" : "admin"
                }
        ]
}
NOTE: The database where you create the user (in this example, admin) is the user’s authentication database. Although the user would authenticate to this database, the user can have roles in other databases; i.e. the user’s authentication database does not limit the user’s privileges.
Disconnect the mongo shell.
Re-start the MongoDB instance with access control
Re-start the mongod instance with the --auth command line option or, if using a configuration file, the security.authorization setting.
mongod --auth --port 27017 --dbpath /data/db1Clients that connect to this instance must now authenticate themselves as a MongoDB user. Clients can only perform actions as determined by their assigned roles.
Connect and authenticate as the user administrator
Using the mongo shell, you can:
-
Connect with authentication by passing in user credentials, or
-
Connect first withouth authentication, and then issue the db.auth() method to authenticate.
To authenticate during connection Start a mongo shell with the -u <username>, -p <password>, and the --authenticationDatabase <database> command line options:
C:Program FilesMongoDBServer3.6bin>mongo --port 27017 -u "mongoadmin" -p "mongoadmin" --authenticationDatabase "admin"
MongoDB shell version v3.6.0
connecting to: mongodb://127.0.0.1:27017/
MongoDB server version: 3.6.0
Welcome to the MongoDB shell.
For interactive help, type "help".
For more comprehensive documentation, see
        http://docs.mongodb.org/
Questions? Try the support group
        http://groups.google.com/group/mongodb-user
2018-01-02T10:05:09.248+0300 I STORAGE  [main] In File::open(), CreateFileW for 'H:\.mongorc.js' failed with Access is denied.
To authenticate after connecting
Connect the mongo shell to the mongod:
mongo --port 27017Switch to the authentication database (in this case, admin), and use db.auth(, ) method to authenticate:
> use admin
switched to db admin
> db.auth("mongoadmin","mongoadmin")
1
>

开启权限验证
在配置文件中添加.

security:
    authorization: enabled
参考:https://blog.csdn.net/u013066244/article/details/53874216
https://www.cnblogs.com/zhoujinyi/p/4610050.html