一.urllib的结构
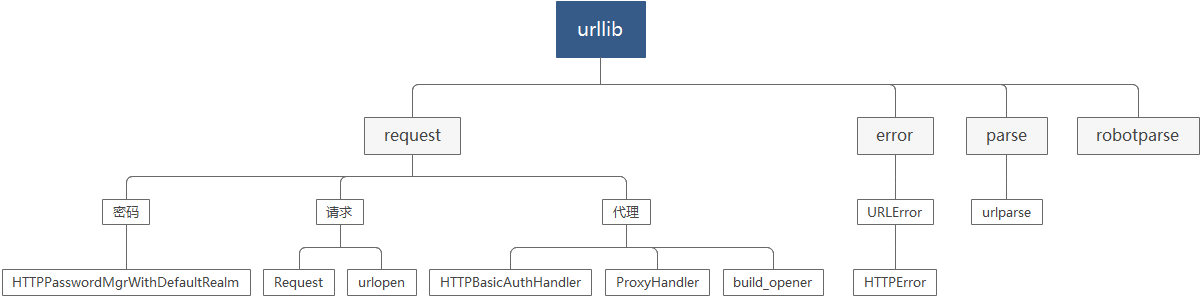
二.Python的urllib.request
1.request的基本使用
#导入urllib request库
import urllib.request

#爬取的网站地址
url = "https://www.baidu.com"

#请求打开网址
response = urllib.request.urlopen(url)

#网页读取,编码utf-8形式
html = response.read().decode("utf-8")

#输出
print(html)
2.request获取头部信息
"""
请求头信息
"""

#导入模块
import urllib.request as requests

#请求地址
url = "https://www.baidu.com"

#请求网页
response = requests.urlopen(url)

#如果状态为200
if response.status == 200:
    #输出请求类型
    print(type(response))

    #获取请求头所有
    print(response.getheaders())

    #请求单个头信息
    print(response.getheader('Server'))
3.request提交数据
"""
提交数据data

"""

#导入模块
import urllib.request as requests
#导入解析模块
import urllib.parse as parses


#请求地址
url = "http://httpbin.org/post"

#提交数据
data = bytes(parses.urlencode({'word':'hello'}),encoding='utf-8')

#Post方式提交
response = requests.urlopen(url,data=data)

#输出提交结果
print(response.read())
4.请求时间设定
"""
时间超时timeout

"""
#导入套接字
import socket

#导入请求模块
import urllib.request as requests

#错误模块
import urllib.error

#请求网址
url = "https://www.baidu.com"

try:
    response = requests.urlopen(url,timeout=0.1)  #请求时间比较短

except urllib.error.URLError as e:  #错误属于URLError

    if isinstance(e.reason,socket.timeout): #错误原因属于socket超时

        print("时间超时!")
5.urllib.request.Request请求(可以添加请求头)
"""
Request请求

"""

#请求模块导入
import urllib.request as requests

#请求连接
url = "https://www.baidu.com"

#请求,Request可以添加请求头
request = requests.Request(url)

#请求urlopen
response = requests.urlopen(request)

#请求网页
html = response.read().decode('utf-8')

#打印
print(html)
6.Request添加参数(请求头)
"""
Request请求中的参数配置

"""

#导入解析模块和请求模块
from urllib import request,parse

#请求连接
url = "http://httpbin.org/post"

#请求头
headers={
     "user-agent": "Mozilla/5.0 (Windows NT 10.0; Win64; x64) AppleWebKit/537.36 (KHTML,
like Gecko) Chrome/80.0.3987.122 Safari/537.36"

    }
#字典
dict ={'name':'fireshald'}

#数据
data = bytes(parse.urlencode(dict),encoding='utf-8')

#请求及请求信息
req = request.Request(url,data=data,headers=headers,method='POST')
#添加请求头
##req.add_header(headers)

#请求结果
response = request.urlopen(req)

#结果
html = response.read().decode('utf-8')

#输出结果
print(html)
7.验证输入(用户名与密码)


"""
验证用户名和密码

"""
#导入模块
from urllib.request import HTTPPasswordMgrWithDefaultRealm,
                           HTTPBasicAuthHandler,
                           build_opener

#导入错误模块URLError
from urllib.error import URLError

#用户名和密码
username = 'username'
password = 'password'

#请求地址
url = ''


#创建密码账户管理对象
p = HTTPPasswordMgrWithDefaultRealm()

#对管理添加密码和账户及对应的网址
p.add_password(None,url,username,password)

#处理与远程主机的身份验证
auth_handler = HTTPBasicAuthHandler(p)


#返回一个OpenerDirector实例,该实例按照给定的顺序链接处理程序
#创建接口
opener = build_opener(auth_handler)

try:
    result = opener.open(url)
    html = result.read().decode('utf-8')
    print(html)

except URLError as e:
    print(e.reason)
View Code8.代理的使用
"""
代理的使用
"""
#导入错误模块
from urllib.error import URLError

#导入请求代理模块
from urllib.request import ProxyHandler,build_opener

#代理信息
proxy_handler = ProxyHandler({
      'http':'http://127.0.0.1:8888',
      'https':'https://127.0.0.1:8888'

    })
#创建代理
opener = build_opener(proxy_handler)

#请求网址
url = "http://www.baidu.com/get"

try:
    response = opener.open(url)  #使用代理打开网址

    print(response.read().decode('utf-8')) #返回结果

except URLError as e:

    print(e.reason)  #错误结果
View Code
9.Cookie

"""
Cookie的使用
"""
#cookie和请求模块
import http.cookiejar,urllib.request

#CookieJar 相当于cookie池
cookie = http.cookiejar.CookieJar()

#一个用于处理 HTTP Cookies 的类
handler = urllib.request.HTTPCookieProcessor(cookie)

#创建cookie对应的连接
opener = urllib.request.build_opener(handler)

#请求网址
url = "http://www.baidu.com"

#
response = opener.open(url)

#请求后cookie池填充
for item in cookie:

    print(item.name +"="+item.value)
View Code
10.cookie保存本地
"""
Cookie的使用
MozillaCookieJar()与LWPCookieJar()的存储机制

"""
#cookie和请求模块
import http.cookiejar,urllib.request

#文件名称
filename = "cookie.txt"

#MozillaCookieJar()
##cookie = http.cookiejar.MozillaCookieJar(filename)
#LWPCookieJar()
cookie = http.cookiejar.LWPCookieJar(filename)

handler = urllib.request.HTTPCookieProcessor(cookie)


opener = urllib.request.build_opener(handler)

#请求网址
url = "http://www.baidu.com"

response = opener.open(url)

cookie.save(ignore_discard=True,ignore_expires=True)
View Code
11.cookie的加载
"""
Cookie的使用
MozillaCookieJar()与LWPCookieJar()的加载Cookie

"""
#cookie和请求模块
import http.cookiejar,urllib.request

#cookie的创建
cookie = http.cookiejar.LWPCookieJar()

#cookie载入
cookie.load('cookie.txt',ignore_discard=True,ignore_expires=True)

#cookie处理程序
handler = urllib.request.HTTPCookieProcessor(cookie)

#创建打开方式
opener = urllib.request.build_opener(handler)

#请求网址
url = "http://www.baidu.com"

#打开网站
response = opener.open(url)

#请求数据
html = response.read().decode('utf-8')

#打印数据
print(html[:500])
View Code
三.urllib处理异常
1.URLError