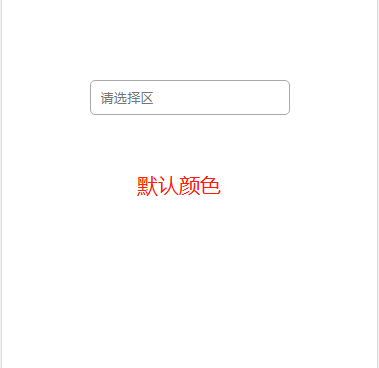
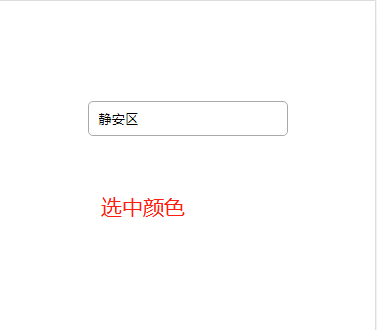
1、select默认选中项颜色为灰色,选择后变为黑色
<!DOCTYPE html>
<html lang="en">
<head>
    <meta charset="UTF-8" />
    <meta name="viewport" content="width=device-width,initial-scale=1,user-scalable=0">
    <title>select 元素</title>
    <style type="text/css">
        .box {
             100%;
            height: 100%;
            text-align: center;
            margin-top: 100px;
        }
        /* select 的默认下拉箭头 */
        /* --ie清除--*/
        select::-ms-expand{ display: none; }
        /* --火狐、谷歌清除--*/
        select{
             appearance:none;
            -moz-appearance:none;
            -webkit-appearance:none;
        }
        select{
             200px;
            height: 35px;
            padding: 5px 10px;
            border-radius: 5px;
            outline: none; //取消黄色的边框
        }
        option {
            outline: none;
        }
    </style>
</head>
<body>
    <div class="box">
        <select>
            <option selected="selected">请选择区</option>
            <option>静安区</option>
            <option>浦东新区</option>
            <option>闵行区</option>
            <option>松江区</option>
        </select>
    </div>

    <script src="./jquery.min.js"></script>
    <script>
        var selected = "#757575"; //默认颜色
        var choose = "#000"; //选中的颜色
        $(function () {
            $("select").css("color", selected);
            $("option").css("color", choose);
            $("select").change(function () {
                var selItem = $(this).val();
                if (selItem == $(this).find('option:first').val()) {
                    $(this).css("color", selected);
                } else {
                    $(this).css("color", choose);
                }
            });
        })
    </script>
</body>
</html>
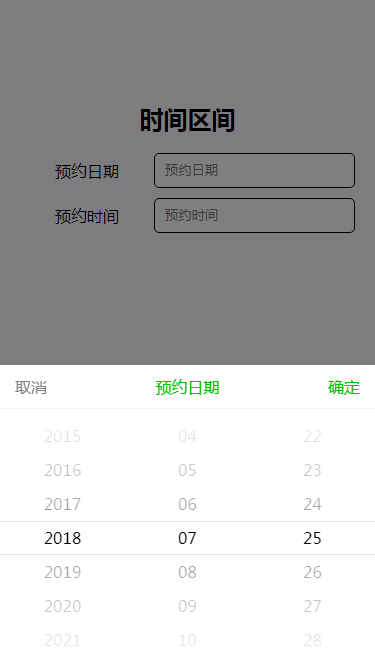
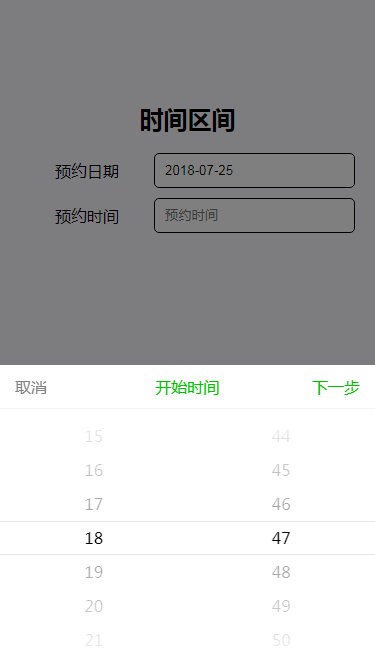
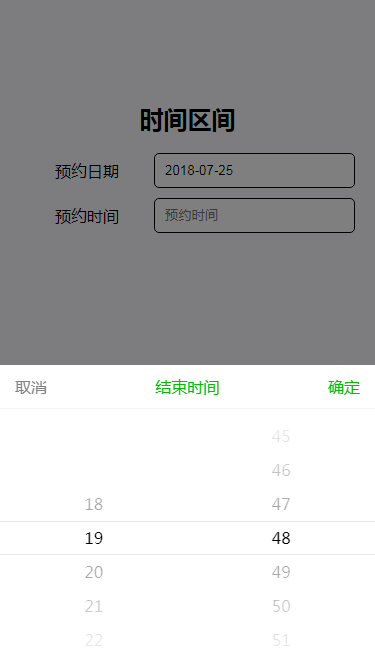
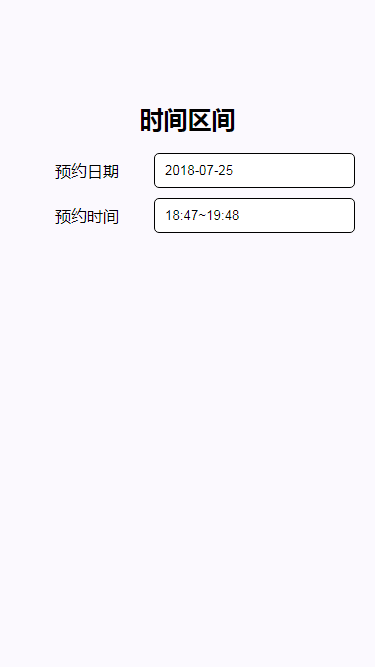
2、vux 时间区间
-
预约日期
-
预约时间(开始时间)
-
预约时间(结束时间)
-
最终效果
-
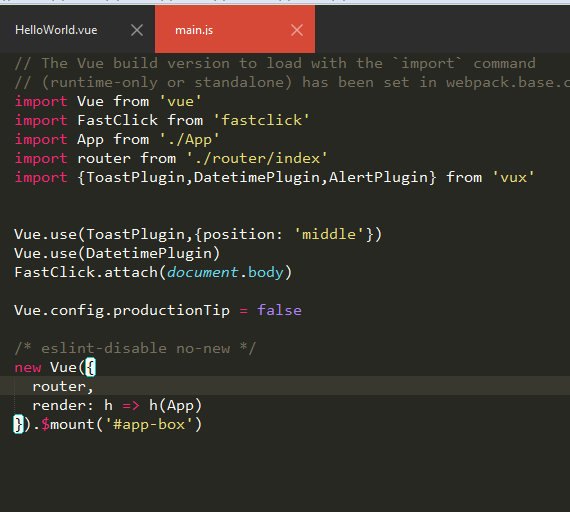
main.js里设置
  <template>
    <div class="hello">
        <h2>时间区间</h2>
        <form class="form-box">
          <div class="from-group">
            <span>预约日期</span>
            <input readonly placeholder="预约日期" v-model.trim="date" @click="getTime('YYYY-MM-DD','date')">
          </div>
          <div class="from-group">
            <span>预约时间</span>
            <input readonly v-model.trim="time" placeholder="预约时间" @click="setTime" >
           <!--  <popup-picker :data="list"  v-model.trim="time" @on-change="onChange" placeholder="预约时间" @click="setTime" ></popup-picker> -->
          </div>
        </form>
    </div>
  </template>

  <script>
  import Vue from 'vue'
  import { Toast,PopupPicker, Datetime } from 'vux'

  export default {
    components: {
      Toast,
      PopupPicker,
      Datetime
    },
    data:function() {
      return {
        date: '',
        time: '',
      }
    },
    mounted:function() {
    },
   methods: {
      //预约日期
      getTime:function(format,key) {
        var that = this;
        that.$vux.datetime.show({
          clearText: '预约日期',
          cancelText: '取消',
          confirmText: '确定',
          format: format,
          // value: '',
          onConfirm (val) {
            that[key] = val;
          }
        })
      },
      setTime:function() {
        var that = this;
        that.$vux.datetime.show({
          clearText: '开始时间',
          cancelText: '取消',
          confirmText: '下一步',
          format: 'HH:mm',
          value: '',
          onConfirm (val1) {
            setTimeout(function(){
              that.$vux.datetime.show({
                clearText: '结束时间',
                cancelText: '取消',
                confirmText: '确定',
                minHour: val1.split(':')[0],
                format: 'HH:mm',
                value: val1,
                onConfirm (val2) {
                  if(getSeconds(val1)>= getSeconds(val2)){
                    that.$vux.toast.show({
                      type: 'text',
                      text: '开始时间大于结束时间'
                    })
                  }else{
                    that.time = val1 + '~' + val2;
                  }
                }
              })
            },550)
          }
        })
        function getSeconds(time) {
          var hour = time.split(":")[0];
          var min = time.split(":")[1];
          return hour*60+min;
        }
      }

    }
  }
  </script>

  <style lang="less">
    // 基础样式
    body {
      font-family: "微软雅黑";
      -webkit-tap-highlight-color: rgba(0,0,0,0); //清除IOS长按灰色蒙版
    }
    input {
      -webkit-appearance: none; //去除系统默认的样式
      outline:none;
    }
    .hello {
       100%;
      height: 100%;
      margin-top: 100px;
      padding: 0 20px;
      box-sizing: border-box;
      text-align: center;
      h2 {
        margin-bottom: 15px;
      }
        .form-box {
           100%;
          .from-group {
            display: flex;
            justify-content: center;
            align-items: center; //垂直水平居中
             100%;
            margin-bottom: 10px;
            span {
               40%;
              font-size: 16px;
            }
            input {
               60%;
              height: 35px;
              padding: 5px 10px;
              box-sizing: border-box;
              border: 1px solid #000;
              border-radius: 5px;
              background: #fff;
            }
          }
        }
    }
  </style>
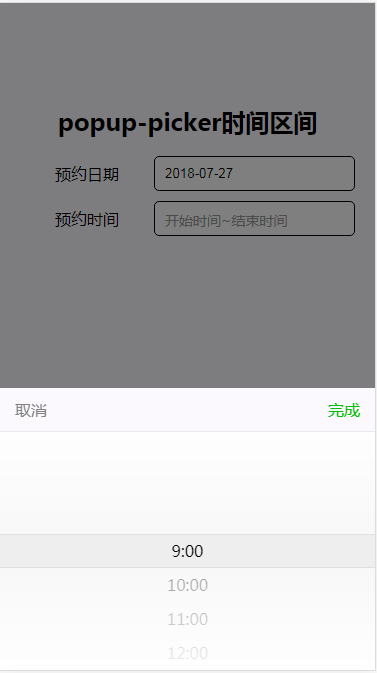
3、popup-picker时间区间
	<template>
	    <div class="hello">
	        <h2>popup-picker时间区间</h2>
	        <form class="form-box">
	            <div class="from-group">
	                <span>预约日期</span>
	                <input type="text" readonly placeholder="请选择预约日期" v-model="appoint_date" @click="getTime('YYYY-MM-DD','appoint_date')" />
	            </div>
	            <div class="from-group">
	              <span>预约时间</span>
	                <input v-if="!timePickerState" type="text"  readonly placeholder="开始时间~结束时间" v-model="appoint_time" @click="showPicker"/>
	                <popup-picker v-if="timePickerState"  placeholder="开始时间~结束时间" v-model="appoint_time" :data="list" @on-change="timeChange"></popup-picker>
	            </div>
	        </form>
	    </div>
	</template>
	<script>
	import Vue from 'vue'
	import { Toast,PopupPicker, Datetime } from 'vux'

	export default {
	   components: {
	    Toast,
	    PopupPicker,
	    Datetime
	  },
	  data:function() {
	    return {
	      appoint_date: '',//预约日期
	      appoint_time: [], //预约时间
	      list: null,
	      timePickerState: false
	    }
	  },
	  mounted:function() {
	    this.getTimeList();
	  },
	 methods: {
	    showPicker:function(){
	        if (this.appoint_date == '') {
	            this.$vux.toast.show({
	                type: 'text',
	                text: '请选择预约日期'
	            })
	        }else if(!this.timePickerState){
	            this.$vux.toast.show({
	                type: 'text',
	                text: '今天预约时间已截止,请选择其他预约日期!'
	            })
	        }
	    },
	    timeChange:function(data) {
	        this.appoint_time = data;
	    },
	    //预约日期
	    getTime:function(format,key) {
	      var that = this;
	      var now = new Date();
	      that.$vux.datetime.show({
	        clearText: '预约日期',
	        cancelText: '取消',
	        confirmText: '确定',
	        format: format,
	        startDate: now.getFullYear()+'-'+n(now.getMonth()+1)+'-'+n(now.getDate()),
	        value: that[key],
	        onConfirm (val) {
	          that[key] = val;
	          that.getTimeList(val);
	          that.appoint_time = [];
	        }
	      })
	      function n(a) {
	        return a>10?a:'0'+a;
	      }
	    },
	    getTimeList:function(time) {
	        //new Date().toLocaleDateString();//获取当前日期(“年/月/日”)
	        var start = 9,end = 18,gap = 1,i = start,arr = [],todayZero = new Date(new Date(new Date().toLocaleDateString()).getTime()),hour = 24;
	        var now = new Date();
	        if(time){
	            var date = new Date(time.replace(/-/g,"/")+" 00:00");
	            var tmp = date.getTime() - todayZero.getTime();
	            if(tmp >= 0){
	                if(tmp < 100){
	                    hour = now.getHours();
	                }else{
	                    hour = 0;
	                }
	            }
	        }
	        while(i<end){
	            if(i>hour){
	                arr.push(i+":00");
	            }
	            i+=gap;
	        }
	        this.timePickerState = (arr.length > 0);
	        this.list = [arr];
	    }
	  }
	}
	</script>
	<style lang="less">
	// 基础样式
	  body {
	    font-family: "微软雅黑";
	    -webkit-tap-highlight-color: rgba(0,0,0,0); //清除IOS长按灰色蒙版
	  }
	  input {
	    -webkit-appearance: none; //去除系统默认的样式
	    outline:none;
	  }
	  .hello {
	     100%;
	    height: 100%;
	    margin-top: 100px;
	    padding: 0 20px;
	    box-sizing: border-box;
	    text-align: center;
	    h2 {
	      margin-bottom: 15px;
	    }
	      .form-box {
	         100%;
	        .from-group {
	          display: flex;
	          justify-content: center;
	          align-items: center; //垂直水平居中
	           100%;
	          margin-bottom: 10px;
	          span {
	             40%;
	            font-size: 16px;
	          }
	          input ,.vux-cell-box{
	             60%;
	            height: 35px;
	            padding: 5px 10px;
	            box-sizing: border-box;
	            border: 1px solid #000;
	            border-radius: 5px;
	            background: #fff;
	            &:before {
	              border- 0px !important;
	            }
	            .vux-popup-picker-select {
	              text-align: left !important;
	              span {
	                 100% !important;
	                font-size: 14px;
	              }
	            }

	          }
	        }

	      }

	  }
	</style>
4、new Date()时间的获取和转换
- new Date() 获取系统当前时间
- new Date().getYear();//获取当前年份
- new Date().getFullYear();///获取当前完整年分(4位)
- new Date().getMonth();//获取当前月份(0-11,0代表1月)
- new Date().getDate();//获取当前日(1-31日)
- new Date().getDay();//获取当前星期(0~6,0代表星期天)
- new Date().getHours();//获取当前小时(0~23)
- new Date().getMinutes();//获取当前分钟数(0~59)
- new Date().getSeconds();//获取当前秒数(0~59)
- new Date().getMilliseconds();//获取当前毫秒数(0-999)
- new Date().toLocaleDateString();//获取当前日期(“年/月/日”)
- new Date().toLocaleTimeString();//获取当前时间("hh:mm:ss")
- new Date().toLocaleString();//获取日期与时间('年/月/日 上午/下午hh:mm:ss')
1.js获取当前时间戳
方法1
- var timestamp = Date.parse(new Date())
- 结果:1532588303000
方法2
- var timestamp = (new Date()).valueof()
- 结果:1532588373746
方法3
- var timestamp = new Date().getTime()
- 结果:1532588438293
- 方法1获取的时间戳是吧毫秒改成000显示
- 方法2和方法3是获取当前毫秒的时间戳
2.js获取当前时间及时间戳相互转换
1.获取当前时间的时间戳
- Date.parse(new Date())
- 结果:1532601195000
2.获取当前时间
- new Date()
- 结果:Thu Jul 26 2018 18:33:15 GMT+0800 (中国标准时间)
3.将时间戳转成时间
- new Date(1532601389597)
- 结果:Thu Jul 26 2018 18:36:29 GMT+0800 (中国标准时间)
4.将时间转换成时间戳
- Date.parse(new Date("2018-07-26 18:28:38"))
- 结果:1532600918000
3.js刷新当前页面
- reload() 方法;
- replace() 方法;
- 页面自动刷新
方法1:reload()方法
-
reload() 该方法强迫浏览器刷新当前页面
-
reload() 方法类似于你浏览器上的刷新页面按钮
location.reload();
方法2:replace()方法
- replace()方法可用于一个新文档取代当前文档
- 该方法通过指定URL替换当前缓存在历史里(客户端)的项目,因此当使用replace方法之后,你不能通过'前进'和'houtui'来访问已经被替换的URL
- 语法:location.replcae(URL)
- 返回并刷新页面
- location.replcae(document.referrer);
- document.referrer //前一个页面的url
- 不要用history.go(-1),或history.back();来返回并刷新页面,这两种方法不会刷新页面
JavaScript刷新页面的几种方法:
- 1.history.go(0)
- 2.location.reload()
- 3.location=location
- 4.location.assign(location)
- 5.document.execCommand('Refresh')
- 6.window.navigate(location)
- 7.location.replace(location)
- 8.document.URL=location.href
3.自动刷新页面的方法:
-
1.页面自动刷新:把如下代码加入区域中
-
其中20值每20秒刷新一次页面
-
2.页面自动跳转:把如下代码加入区域中
-
其中20值隔20秒后跳转到http://www.jb51.net页面
-
3.页面自动刷新js版
<script language="JavaScript"> function myrefresh(){ window.location.reload(); } setTimeout('myrefresh()',1000); //指定1秒刷新一次 </script> -
4.js刷新框架的脚本语句
-
//刷新包含改框架的页面用
<script language=JavaScript> parent.location.reload(); </script> -
//子窗口刷新父窗口
<script language=JavaScript> self.opener.location.reload(); </script> (或<a href="javascript:opener.location.reload()'>刷新</a>) -
刷新另一个框架的页面用
<script language=JavaScript> parent.另一个FrameID.location.reload(); </script> -
如果想关闭窗口时刷新或想开窗时刷新,在中调用以下语句即可
  <body onload='opener.location.reload()'>//开窗时刷新
  <body onUnload='opener.location.reload()'>//关闭时刷新
  <script language='javascript'>
  	window.opener.document.location.reload()
  </script>
4.H5中a标签的电话和邮件功能
电话
<a href="tel:15236541258">15236541258</a>
短信
<a href="sms:10086">发送</a>
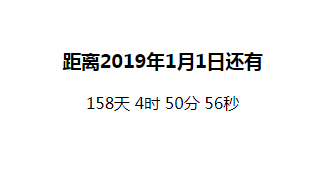
5、简单易用的js倒计时
<!DOCTYPE html>
<html lang="en">
<head>
    <meta charset="UTF-8" />
    <meta name="viewport" content="width=device-width,initial-scale=1,user-scalable=0">
    <title>简单易用的js倒计时</title>
    <style type="text/css">
        .time {
            text-align: center;
            margin-top: 100px;
        }
    </style>
</head>
<body>
    <div class="time">
        <h3>距离2019年1月1日还有</h3>
        <span id='t_d'>天</span>
        <span id='t_h'>时</span>
        <span id='t_m'>分</span>
        <span id='t_s'>秒</span>
    </div>
    <script>
        function getTime() {
            var EndTime = new Date('2019/01/01 00:00:00');
            var NowTime = new Date();
            var differ = EndTime.getTime()-NowTime.getTime(); //相差多少天
            var d = 0;
            var h = 0;
            var m = 0;
            var s = 0;
            if(differ>=0){
                d = Math.floor(differ/1000/60/60/24);
                h = Math.floor(differ/1000/60/60%24);
                m = Math.floor(differ/1000/60%60);
                s = Math.floor(differ/1000%60);
            }
            document.getElementById('t_d').innerHTML = d + '天';
            document.getElementById('t_h').innerHTML = h + '时';
            document.getElementById('t_m').innerHTML = m + '分';
            document.getElementById('t_s').innerHTML = s + '秒';
        }
        setInterval(getTime,0);
    </script>
</body>
</html>
vue.js中获取剩余的天数、小时、分钟、秒数-------methods方法里写
` return `剩余时间:${d}天${h}小时${m}分${s}秒`;`
1.css样式
-
p:first-letter; 首字放大
-
p:first-line; 改变第一行样式
-
text-indent: 2em; 首行缩进2字符
-
移动端添加图片
img{ object-fit: cover; object-position: center; 100%; height: auto; } -
文字自动换行
  {
  	word-wrap: break-word;
  	word-break:break-all;
  }
2.溢出文本显示省略号
-
单行文本省略
text-overflow:ellipsis; white-space:nowrap; overflow:hidden; -
多行文本省略
display: -webkit-box; text-overflow: ellipsis; -webkit-box-orient: vertical; -webkit-line-clamp: 2; overflow: hidden; -
-webkit-line-clamp: 3 只显示三行
-
-webkit-line-clamp用来限制在一个块元素显示的文本的行数。 为了实现该效果,它需要组合其他的WebKit属性。
如结合如下属性: -
display: -webkit-box; 必须结合的属性 ,将对象作为弹性伸缩盒子模型显示 。
-
-webkit-box-orient 必须结合的属性 ,设置或检索伸缩盒对象的子元素的排列方式 。//-webkit-box-orient: vertical;
-
WebKit是CSS扩展属性,该方法适用于WebKit浏览器及移动端;
3.Flex 布局(为"弹性布局",用来为盒状模型提供最大的灵活性。)
1.
display: flex;
justify-content: space-around;
align-items: center;
2.垂直水平居中
display: flex;
justify-content:center;
align-items:center;
3.排列可单行可多行
display:flex;
flex-flow: row wrap;
4.Vue中this.$router
1. params 传参
- 注意: this.$router.push方法中path不能喝params一起使用,否则params将无效。需要用name来指定页面
跳转页
this.$router.push({name: '路由名字',params:{参数名:参数值,参数名:参数值}})- this.$router.push({name: 'dispatch', params: {paicheNo: obj.paicheNo}})
接收页
this.$router.params.参数名- this.$route.params.paicheNo
2. query传参
跳转页
this.$router.push({path: '/transport/dispatch', query: {paicheNo: obj.paicheNo}})
接受页
- 取数据:this.$route.query.paicheNo
this.$route.query.paicheNo
5、布局
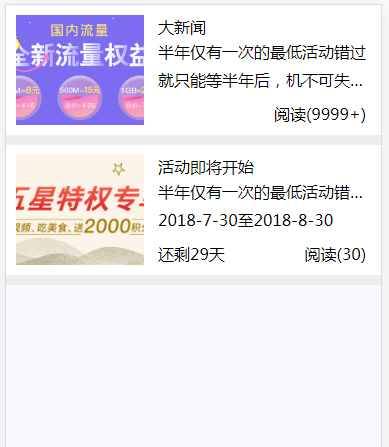
<template>
    <div class="paduan">
        <div class="row flex-spb" v-for="(item,index) in items" :class="{'news':checkItem(item)}">
            <img :src="item.imgUrl">
            <div class="row-left">
                <p class="ellip">{{item.title}}</p>
                <div class="row-main">
                    {{item.content}}
                </div>
                <p class="day">{{item.start_time}}至{{item.end_time}}</p>
                <div class="row-bottom">
                    <span class="surplus">还剩{{day(item)}}天</span>
                    <span class="read">阅读({{item.reader}})</span>
                </div>
            </div>
        </div>
    </div>
</template>
<script>
import Vue from 'vue'
export default {
    data:function() {
        return {
            items: [
                {
                    imgUrl: './static/banner1.png',
                    title: '大新闻',
                    content: '半年仅有一次的最低活动错过就只能等半年后,机不可失失不再来。',
                    start_time: '',
                    end_time: '',
                    reader: 10000
                },
                 {
                    imgUrl: './static/banner2.jpg',
                    title: '活动即将开始',
                    content: '半年仅有一次的最低活动错过就只能等半年后',
                    start_time: '2018-7-30',
                    end_time: '2018-8-30',
                    reader: 30
                }
            ]
        }
    },
    mounted:function() {
    },
    methods: {
        day:function(data){
          var EndTime= new Date(data.end_time);
          var NowTime = new Date();
          var t =EndTime.getTime() - NowTime.getTime();
          console.log(d)
          var d=0;
          if(t>=0){
            d=Math.floor(t/1000/60/60/24);
          }
          return `${d}`;
      },
        checkItem:function(data) {
            if (data.reader > 9999) {
                return data.reader = '9999+'
            }
            if (data.start_time && data.end_time) {
                return true;
            }else {
                return false;
            }

        }
    }
}
</script>
<style lang='less'>
    img {
         100%;
        height: auto;
        object-fit: cover;
        object-position: center;
    }
    .flex-spb {
        display: flex;
        flex-wrap: wrap;
        justify-content: space-between;
        box-sizing: border-box;
    }
    .ellip {
        text-overflow:ellipsis;
        white-space:nowrap;
        overflow:hidden;
    }

    .paduan {
        height: 100%;
        background: #eee;
        .row {
             100%;
            line-height: 100%;
            padding: 10px;
            background: #fff;
            margin-bottom: 10px;
            img {
                min- 110px;
                 36%;
                height: 110px;
            }
            .row-left {
                position: relative;
                display: inline-block;
                 60%;
                p {
                    line-height: 23px;
                    font-size: 16px;
                    &.day {
                        display: none;
                        height: 23px;
                    }
                }
                .row-main {
                     100%;
                    line-height: 28px;
                    overflow: hidden;
                    text-overflow: ellipsis;
                    display: -webkit-box;
                    -webkit-line-clamp: 2;
                    -webkit-box-orient: vertical;
                }
                .row-bottom {
                    position: absolute;
                    left: 0;
                    bottom: 0;
                     100%;
                    span {
                        line-height: 23px;
                    }
                    .surplus {
                        display: none;
                         45%;
                    }
                    .read {
                         50%;
                        float: right;
                        text-align: right;
                        margin-right: 5px;
                    }

                }

            }
            &.news {
                .row-left {
                    .row-main {
                        display: inline-block;
                        height: auto;
                        text-overflow:ellipsis;
                        white-space:nowrap;
                        overflow:hidden;
                    }
                    .day {
                        display: block;
                    }
                    .row-bottom {
                        .surplus {
                            display: inline-block;
                             45%;
                        }
                    }
                }

            }
        }

    }
</style>
1.图片img与容器下边界之间有空隙怎么办?这里介绍3中简单的解决方法。
第一,给图片img标签display:block。
img{
	display:block
}
第二,定义容器里的字体大小为0。
div {
  font-size:0
}
第三,定义图片img标签vertical-align:bottom,vertical-align:middle,vertical-align:top
img{
	vertical-align:bottom
 }