真的!讲得太清楚了!https://blog.csdn.net/MingHuang2017/article/details/79571529
真的是解惑了
本文所说的“核心线程”、“非核心线程”是一个虚拟的概念,是为了方便描述而虚拟出来的概念,在代码中并没有哪个线程被标记为“核心线程”或“非核心线程”,所有线程都是一样的,只是当线程池中的线程多于指定的核心线程数量时,会将多出来的线程销毁掉,池中只保留指定个数的线程。那些被销毁的线程是随机的,可能是第一个创建的线程,也可能是最后一个创建的线程,或其它时候创建的线程。一开始我以为会有一些线程被标记为“核心线程”,而其它的则是“非核心线程”,在销毁多余线程的时候只销毁那些“非核心线程”,而“核心线程”不被销毁。这种理解是错误的。
在ThreadPollExcutor类中,有一个字段 private final AtomicInteger ctl = new AtomicInteger(ctlOf(RUNNING, 0)); 是对线程池的运行状态和线程池中有效线程的数量进行控制的, 它包含两部分信息: 线程池的运行状态 (runState) 和线程池内有效线程的数量 (workerCount),还有几个对ctl进行计算的方法:
// 获取运行状态
private static int runStateOf(int c)     { return c & ~CAPACITY; }

// 获取活动线程数
private static int workerCountOf(int c)  { return c & CAPACITY; }
以上两个方法在源码中经常用到,结合我们的目标,对运行状态的一些判断及处理可以不用去管,而对当前活动线程数要加以关注等等。
下面将遵循这些原则来分析源码。
解惑
当我们要向线程池添加一个任务时是调用ThreadPollExcutor对象的execute(Runnable command)方法来完成的,所以先来看看ThreadPollExcutor类中的execute(Runnable command)方法的源码:
public void execute(Runnable command) {
    if (command == null)
        throw new NullPointerException();

    int c = ctl.get();
    if (workerCountOf(c) < corePoolSize) {
        if (addWorker(command, true))
            return;
        c = ctl.get();
    }
    if (isRunning(c) && workQueue.offer(command)) {
        int recheck = ctl.get();
        if (! isRunning(recheck) && remove(command))
            reject(command);
        else if (workerCountOf(recheck) == 0)
            addWorker(null, false);
    }
    else if (!addWorker(command, false))
        reject(command);
}
按照我们在分析方法中提到的一些原则,去掉一些相关性不强的代码,看看核心代码是怎样的。
// 为分析而简化后的代码
public void execute(Runnable command) {

    int c = ctl.get();
    if (workerCountOf(c) < corePoolSize) {
        // 如果当前活动线程数小于corePoolSize,则新建一个线程放入线程池中,并把任务添加到该线程中
        if (addWorker(command, true))
        return;
        c = ctl.get();
    }

    // 如果当前活动线程数大于等于corePoolSize,则尝试将任务放入缓存队列
    if (workQueue.offer(command)) {
        int recheck = ctl.get();
        if (workerCountOf(recheck) == 0)
        addWorker(null, false);
    }else {
        // 缓存已满,新建一个线程放入线程池,并把任务添加到该线程中(此时新建的线程相当于非核心线程)
        addWorker(command, false)
    }
}
这样一看,逻辑应该清晰很多了。
如果 当前活动线程数 < 指定的核心线程数,则创建并启动一个线程来执行新提交的任务(此时新建的线程相当于核心线程);
如果 当前活动线程数 >= 指定的核心线程数,且缓存队列未满,则将任务添加到缓存队列中;
如果 当前活动线程数 >= 指定的核心线程数,且缓存队列已满,则创建并启动一个线程来执行新提交的任务(此时新建的线程相当于非核心线程);
接下来看 addWorker(Runnable firstTask, boolean core)方法
private boolean addWorker(Runnable firstTask, boolean core) {
    retry:
    for (;;) {
        int c = ctl.get();
        int rs = runStateOf(c);

        // Check if queue empty only if necessary.
        if (rs >= SHUTDOWN &&
        ! (rs == SHUTDOWN &&
        firstTask == null &&
        ! workQueue.isEmpty()))
        return false;

        for (;;) {
            int wc = workerCountOf(c);
            if (wc >= CAPACITY ||
            wc >= (core ? corePoolSize : maximumPoolSize))
            return false;
            if (compareAndIncrementWorkerCount(c))
            break retry;
            c = ctl.get(); // Re-read ctl
            if (runStateOf(c) != rs)
            continue retry;
            // else CAS failed due to workerCount change; retry inner loop
        }
    }

    boolean workerStarted = false;
    boolean workerAdded = false;
    Worker w = null;
    try {
        w = new Worker(firstTask);
        final Thread t = w.thread;
        if (t != null) {
            final ReentrantLock mainLock = this.mainLock;
            mainLock.lock();
            try {
                // Recheck while holding lock.
                // Back out on ThreadFactory failure or if
                // shut down before lock acquired.
                int rs = runStateOf(ctl.get());

                if (rs < SHUTDOWN ||
                (rs == SHUTDOWN && firstTask == null)) {
                    if (t.isAlive()) // precheck that t is startable
                    throw new IllegalThreadStateException();
                    workers.add(w);
                    int s = workers.size();
                    if (s > largestPoolSize)
                    largestPoolSize = s;
                    workerAdded = true;
                }
            } finally {
                mainLock.unlock();
            }
            if (workerAdded) {
                t.start();
                workerStarted = true;
            }
        }
    } finally {
        if (! workerStarted)
            addWorkerFailed(w);
    }
    return workerStarted;
}
同样,我们也来简化一下:
// 为分析而简化后的代码
private boolean addWorker(Runnable firstTask, boolean core) {

    int wc = workerCountOf(c);
    if (wc >= (core ? corePoolSize : maximumPoolSize))
    // 如果当前活动线程数 >= 指定的核心线程数,不创建核心线程
    // 如果当前活动线程数 >= 指定的最大线程数,不创建非核心线程
    return false;

    boolean workerStarted = false;
    boolean workerAdded = false;
    Worker w = null;
    try {
        // 新建一个Worker,将要执行的任务作为参数传进去
        w = new Worker(firstTask);
        final Thread t = w.thread;
        if (t != null) {
            workers.add(w);
            workerAdded = true;
            if (workerAdded) {
                // 启动刚刚新建的那个worker持有的线程,等下要看看这个线程做了啥
                t.start();
                workerStarted = true;
            }
        }
    } finally {
        if (! workerStarted)
            addWorkerFailed(w);
    }
    return workerStarted;
}
看到这里,我们大概能猜测到,addWorker方法的功能就是新建一个线程并启动这个线程,要执行的任务应该就是在这个线程中执行。为了证实我们的这种猜测需要再来看看Worker这个类。
private final class Worker
extends AbstractQueuedSynchronizer
implements Runnable{
    // ....
}

Worker(Runnable firstTask) {
    setState(-1); // inhibit interrupts until runWorker
    this.firstTask = firstTask;
    this.thread = getThreadFactory().newThread(this);
}
从上面的Worker类的声明可以看到,它实现了Runnable接口,以及从它的构造方法中可以知道待执行的任务赋值给了它的变量firstTask,并以它自己为参数新建了一个线程赋值给它的变量thread,那么运行这个线程的时候其实就是执行Worker的run()方法,来看一下这个方法:
public void run() {
    runWorker(this);
}

final void runWorker(Worker w) {
    Thread wt = Thread.currentThread();
    Runnable task = w.firstTask;
    w.firstTask = null;
    w.unlock(); // allow interrupts
    boolean completedAbruptly = true;
    try {
        while (task != null || (task = getTask()) != null) {
            w.lock();
            // If pool is stopping, ensure thread is interrupted;
            // if not, ensure thread is not interrupted. This
            // requires a recheck in second case to deal with
            // shutdownNow race while clearing interrupt
            if ((runStateAtLeast(ctl.get(), STOP) ||
            (Thread.interrupted() &&
            runStateAtLeast(ctl.get(), STOP))) &&
            !wt.isInterrupted())
                wt.interrupt();
            try {
                beforeExecute(wt, task);
                Throwable thrown = null;
                try {
                    task.run();
                } catch (RuntimeException x) {
                    thrown = x; throw x;
                } catch (Error x) {
                    thrown = x; throw x;
                } catch (Throwable x) {
                    thrown = x; throw new Error(x);
                } finally {
                    afterExecute(task, thrown);
                }
            } finally {
                task = null;
                w.completedTasks++;
                w.unlock();
            }
        }
        completedAbruptly = false;
    } finally {
        processWorkerExit(w, completedAbruptly);
    }
}
在run()方法中只调了一下 runWorker(this) 方法,再来简化一下这个 runWorker() 方法
// 为分析而简化后的代码
final void runWorker(Worker w) {
    Runnable task = w.firstTask;
    w.firstTask = null;
    while (task != null || (task = getTask()) != null) {
        try {
            task.run();
        } finally {
            task = null;
        }
    }
}
很明显,runWorker()方法里面执行了我们新建Worker对象时传进去的待执行的任务,到这里为止貌似这个worker的run()方法就执行完了,既然执行完了那么这个线程也就没用了,只有等待虚拟机销毁了。那么回顾一下我们的目标:Java线程池中的核心线程是如何被重复利用的?好像并没有重复利用啊,新建一个线程,执行一个任务,然后就结束了,销毁了。没什么特别的啊,难道有什么地方漏掉了,被忽略了?再仔细看一下runWorker()方法的代码,有一个while循环,当执行完firstTask后task==null了,那么就会执行判断条件 (task = getTask()) != null,我们假设这个条件成立的话,那么这个线程就不止只执行一个任务了,可以执行多个任务了,也就实现了重复利用了。答案呼之欲出了,接着看getTask()方法
private Runnable getTask() {
    lean timedOut = false; // Did the last poll() time out?
    for (;;) {
        int c = ctl.get();
        int rs = runStateOf(c);

        // Check if queue empty only if necessary.
        if (rs >= SHUTDOWN && (rs >= STOP || workQueue.isEmpty())) {
            decrementWorkerCount();
            return null;
        }

        int wc = workerCountOf(c);

        // Are workers subject to culling?
        boolean timed = allowCoreThreadTimeOut || wc > corePoolSize;

        if ((wc > maximumPoolSize || (timed && timedOut))
            && (wc > 1 || workQueue.isEmpty())) {
            if (compareAndDecrementWorkerCount(c))
                return null;
            continue;
        }

        try {
            Runnable r = timed ?
            workQueue.poll(keepAliveTime, TimeUnit.NANOSECONDS) :
            workQueue.take();
            if (r != null)
            return r;
            timedOut = true;
            } catch (InterruptedException retry) {
                timedOut = false;
            }
    }
}
老规矩,简化一下代码来看:
// 为分析而简化后的代码
private Runnable getTask() {
    boolean timedOut = false;
    for (;;) {
        int c = ctl.get();
        int wc = workerCountOf(c);

        // timed变量用于判断是否需要进行超时控制。
        // allowCoreThreadTimeOut默认是false,也就是核心线程不允许进行超时;
        // wc > corePoolSize,表示当前线程池中的线程数量大于核心线程数量;
        // 对于超过核心线程数量的这些线程,需要进行超时控制
        boolean timed = allowCoreThreadTimeOut || wc > corePoolSize;

        if (timed && timedOut) {
            // 如果需要进行超时控制,且上次从缓存队列中获取任务时发生了超时,那么尝试将workerCount减1,即当前活动线程数减1,
            // 如果减1成功,则返回null,这就意味着runWorker()方法中的while循环会被退出,其对应的线程就要销毁了,也就是线程池中少了一个线程了
            if (compareAndDecrementWorkerCount(c))
            return null;
            continue;
        }

        try {
            Runnable r = timed ?
            workQueue.poll(keepAliveTime, TimeUnit.NANOSECONDS) :
            workQueue.take();

            // 注意workQueue中的poll()方法与take()方法的区别
            //poll方式取任务的特点是从缓存队列中取任务,最长等待keepAliveTime的时长,取不到返回null
            //take方式取任务的特点是从缓存队列中取任务,若队列为空,则进入阻塞状态,直到能取出对象为止

            if (r != null)
            return r;
            timedOut = true;
            } catch (InterruptedException retry) {
                timedOut = false;
        }
    }
}
从以上代码可以看出,getTask()的作用是
如果当前活动线程数大于核心线程数,当去缓存队列中取任务的时候,如果缓存队列中没任务了,则等待keepAliveTime的时长,此时还没任务就返回null,这就意味着runWorker()方法中的while循环会被退出,其对应的线程就要销毁了,也就是线程池中少了一个线程了。因此只要线程池中的线程数大于核心线程数就会这样一个一个地销毁这些多余的线程。
如果当前活动线程数小于等于核心线程数,同样也是去缓存队列中取任务,但当缓存队列中没任务了,就会进入阻塞状态,直到能取出任务为止,因此这个线程是处于阻塞状态的,并不会因为缓存队列中没有任务了而被销毁。这样就保证了线程池有N个线程是活的,可以随时处理任务,从而达到重复利用的目的。
小结
通过以上的分析,应该算是比较清楚地解答了“线程池中的核心线程是如何被重复利用的”这个问题,同时也对线程池的实现机制有了更进一步的理解:
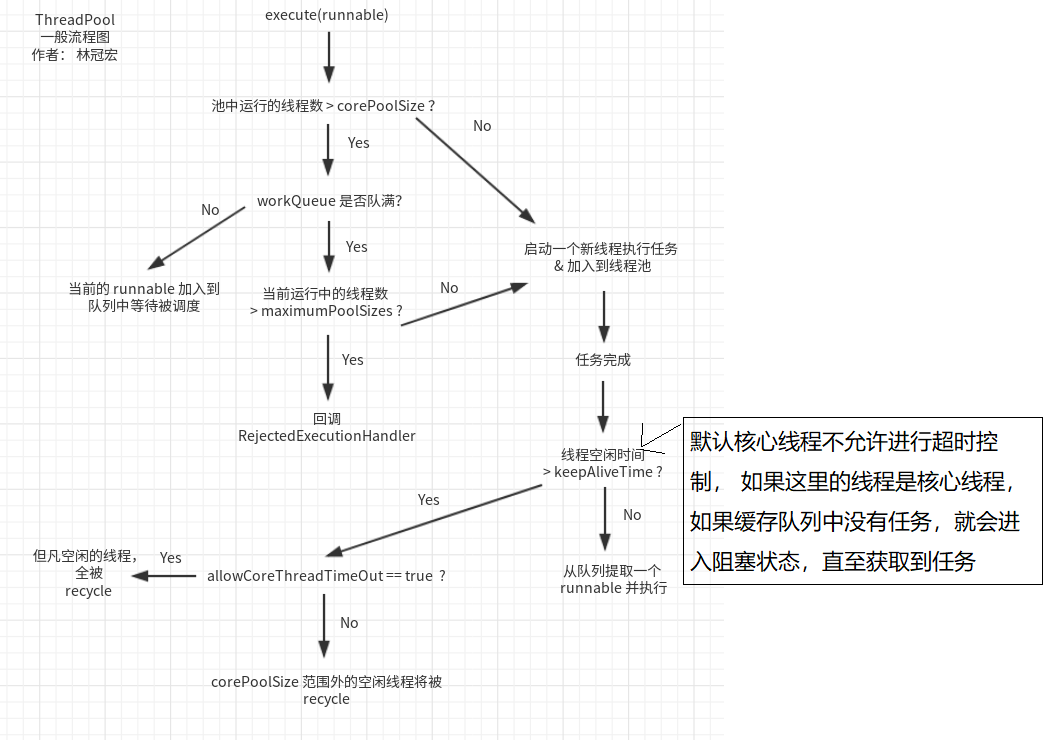
当有新任务来的时候,先看看当前的线程数有没有超过核心线程数,如果没超过就直接新建一个线程来执行新的任务,如果超过了就看看缓存队列有没有满,没满就将新任务放进缓存队列中,满了就新建一个线程来执行新的任务,如果线程池中的线程数已经达到了指定的最大线程数了,那就根据相应的策略拒绝任务。
当缓存队列中的任务都执行完了的时候,线程池中的线程数如果大于核心线程数,就销毁多出来的线程,直到线程池中的线程数等于核心线程数。此时这些线程就不会被销毁了,它们一直处于阻塞状态,等待新的任务到来
图片来源于: https://www.cnblogs.com/linguanh/p/8000063.html